The diversity of modern manufacturers and the presence of their own technical conditions have led to the fact that the same building material or product can differ in size. Differences in wall thickness make it impossible to actually standardize frame sizes for interior doors. The solution to this problem was the production of a door frame with a minimum acceptable width, guaranteeing strength, and an additional board that would cover the remaining thickness of the opening wall. What are door trims and how are they installed? We will tell you in our article.
What you need to know when choosing extras
The selection is made for a specific doorway, after all the necessary preliminary measurements. When machine operators are given technical specifications for the manufacture of doors, the additions immediately fit into the specification.
Types of additions
There are:
- Straight, with a flat end joint, when the end of the board is tightly joined by pressing it against the box and the trim with an adhesive layer.
- Telescopic. With a groove connection, where there is already a protrusion for this. It is also telescopically connected to the platband.
Size and materials
Separately, an extension with a flat end connection, that is, a straight one, is purchased. They are bought in large construction stores, which have a small production facility for fine-tuning products in terms of trimming something, sawing it off, etc. The length of flat trims is 2200 - 2300 mm for vertical strips and 1000 for upper horizontal ones, that is, they are produced with some length reserve. Telescopic extensions that have entered the trade are already strictly unified with specific models. Or the store has an agreement with a company that produces “frame + door leaf + trim” kits for the prompt production of a telescopic extension for this model. This is not difficult to do, keeping in mind the standard articles adopted by the manufacturer, and if the enterprise is within walking distance.
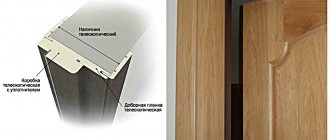
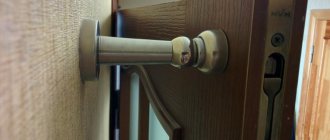
The standard (or often simply accepted by most manufacturers) width of straight additional strips is from 95 to 215 mm. Telescopic ones are somewhat narrower - from 95 to 165 mm. But since the telescopic extension is a functioning, full-fledged adjustment mechanism, by sliding the extension tenon in or out of the door groove, you can increase the thickness of the wall covered by it, as in Fig. "Adjustable telescopic extension."
The standard material for extensions is solid wood. Moreover, if the box is made from a specific type of wood (pine, birch, cedar, oak), then the accessory for it should be purchased (or it is already included in the kit) from the same type of wood.
Solid wood panels are the most environmentally friendly, beautiful and durable. Although they are also made from MDF, they are covered with the same material as the frame, trim or door. And this is veneer, eco-veneer or paper (polymer film) with a pattern that imitates wood.
What are the benefits of extras?
The first is aesthetics. Wood always looks attractive. Wallpaper, plastic, and the most beautiful plaster will look alien between the wood of the box and the trim.
The second is the possibility of quick installation. A professional can complete the installation of the extensions in an hour; an inexperienced person, working carefully and according to the instructions, will do it himself in 2-3 hours.
Third, it can be dismantled without damage and then reassembled. This may be necessary if you need to install hidden cables, wiring, or any communications in general.
Fourth, the opportunity to purchase additional accessories of any cost, from budget to luxury, made from valuable wood that matches the door covering material.
The need for extras.
- They are installed so as not to make a complex and load-bearing element in the form of a door frame the width of the doors. Considering the high cost of products made from natural wood, the box with extras will differ in price from the standard one by 2-3 times.
- The extensions hide all defects in the cut surfaces of the opening.
- They serve as decoration.
- Additionally, the rigidity of the “frame-platband-extension” system is increased.
Subtleties of choice
When choosing an extension, they are guided by the material of the remaining parts of the door system. In budget models, where the material for boxes and canvases is MDF or, less commonly, chipboard, the coating is made of eco-veneer, technological chips oriented in one direction, glued together under pressure with epoxy or polyester materials. Or even just from a special film painted to match the texture of wood.
If all the parts are covered with veneer, then the additional trims, purchased separately or included in the kit, will be veneered. In addition, the texture pattern and type of wood used matters.
Selection of planks to size
Straight extension strips are selected strictly according to the width of the wall masonry not covered by the frame in the opening. The telescopic sample may differ from the wall thickness by 30-40 mm or as much as the extension tenon extends from the groove of the box. However, at least 10 mm should still remain in the groove - for reliable rigidity of the assembly.
Kinds
Industrially produced decorative strips for door decoration are produced in the form of monolithic panels up to 3000 mm long. What types of additions there are for interior structures is described below.
Standard without edge
Such parts are slats with a width of 70 to 250 mm and are made of MDF, fiberboard, laminate or plywood. The side parts of the board do not have a covering and are in direct contact with the frame of the interior door and the platband. During installation, you must be careful and carefully check the gap, since if it is skewed, the raw edge of the finishing strip will be visible.
If necessary, the ends can be covered with film yourself. To do this, you will need to purchase material of a suitable shade and glue it to the edge.
Standard with edge
Products are available in the same width as without edges. The only difference is the factory-coated edge with film or natural veneer. Industrial coating ensures uniform and tight contact with the surface, which prevents MDF or chipboard from absorbing moisture. Therefore, closed edge panels are preferred for interior doors installed in bathrooms or kitchens.
Telescopic
For large wall thicknesses, a telescopic extension of the interior door is used, and this is also an ideal solution if the size cannot be determined accurately. The design is similar to a clapboard. On the edges of such products there are ridges and grooves, with the help of which individual strips are assembled into a monolithic structure, and also to obtain the required size. Assembly and installation of the telescopic extension is carried out without the use of any additional fasteners, and the width can also be adjusted.
Combined
Such products have an angular shape and act as an extension and platband for the opening. Like other types, these extensions can be made of MDF or plywood and covered with natural veneer or film.
Materials and sizes
Depends on the thickness of the wall and the weight of the door leaf. After all, the wider and more massive the door, the more durable the material of the additional strips should be - this is especially true for telescopic products that take on part of the weight of the structure.
As for specific sizes, in the absence of a unified standard, manufacturers have adopted the following unified values (Thickness x Width x Length):
- 10 x 50 x 2 350
- 10 x 100 x 2,350
- 10 x 150 x 2,350
The material from which the doors are made is selected either similar to the material of the doors (unification in appearance) or, conversely, according to the designer’s plan, differing in color and texture. It is not allowed (for purely aesthetic reasons) the combination of natural veneer or polished solid wood frames and doors coated with paper or polymer finishing. This combination looks “cheap”.
What are the accessories made of?
Material of manufacture
- Solid wood.
- MDF.
- Fiberboard.
- Chipboard.
Either covered with paper or laminate, or eco-veneer or natural veneer, but in appearance they will in any case repeat the external finish of the remaining elements of the door system.
Reasons for installing planks
Door extensions are needed in cases where the openings in the room are too wide.
To make it more clear, let's give an example. The width of the wall is 200 mm. 70 mm of them will be covered by the box and 130 mm will be covered with additional panels. We add 20-30 mm for the groove and get the required size of the strip (150-160 mm). An additional element is needed only if the platbands are planned on both sides: internal and external.
Decorating the doorway with extensions is a relatively new trend that is gaining popularity. When thinking about how to expand a door frame, it is better to use specially prepared strips. Since the existing platband will not hide the empty wall. The extensions are available in different widths and lengths, so they will completely cover the space between the slopes and the door leaf.
Rules for calculating the size of the addition
To determine the dimensions of the extensions, first, the linear dimensions of the doorway are determined by measurements, and this is done more than once and sequentially from the floor to the top point of the opening and between the verticals, focusing on the shortest measurement lengths. Then, after installation, there should be gaps in these places to fill with foam, 10-15 mm wide. And if we proceed from the old and most demanding GOSTs, then
- there should be a gap of 20 mm between the mounted box and the surface of the opening;
- there should be a technological gap of 3 mm between the door and the hatch around the perimeter;
- if the frame has no threshold, then the gap between the floor and the bottom of the door should be at least 8 mm.
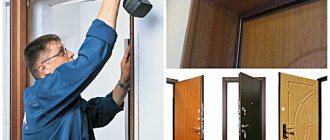
Do-it-yourself installation
Metal door trims differ from those for interior doors in width, weight and the way they fit to the wall. The fact is that additional thickness of standard thickness is unlikely to adequately cope with maintaining the load on the structure, so support battens are made for it on the wall of the opening. Its additional function, in addition to support, is also thermal insulation, which is important for an external door. After all, the cells between the sheathing can and should be filled with polyurethane foam.
If the extension is metal (only covered with decorative wood trim), then the sheathing is also made of metal (usually aluminum). A wooden sheathing is placed under the wooden paneling.
If the extension is not included in the package of the purchased metal door, then its width in the opening is determined by measuring the distance from the frame already fixed in the wall to the outer edge of the opening in it. In such a way that the ends of the additional planks are flush with the wall.
And the ideal material for a loot with a metal sheet would also be a metal profile. This way you will end up with a structure that is uniform in its strength.
In interior doors everything is simpler, all the parts are wooden or plastic, and they are much lighter.
Taking dimensions, making blanks
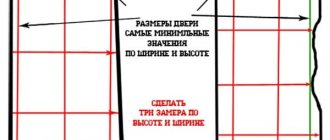
Using a building level you need to determine the horizontality of the upper part of the opening and the floor, and using a plumb line to determine the correctness of the vertical (the wall may be somewhat tilted into one or another part of the room, and the long vertical parts of the opening may also be skewed). When measuring an opening in a wall, they are guided by the narrowest part, taking into account all the irregularities in the linear dimensions of the edge of the opening. To determine this narrowest place, a straight, non-curved, wooden or metal strip is placed in the opening along a plumb line, the places in the opening where the wall touches this strip are marked, and then the opening is measured from these extreme marks.
Such measurements will give an idea of the external dimensions of the future already installed door frame.
We collect
- A tape measure and a corner. Or, using one corner, if there is a measuring scale on it, take measurements from the box to the end of the wall. If you work with only one tape measure, there may be distortions due to the fact that the measurement deviates from the horizontal, and then millimeters play a role! Measurements are taken at least 4 points vertically and 3 points horizontally.
- If the opening is deep and non-standard, it is calculated how wide the additional extension is needed for splicing. Or it is immediately purchased (or ordered) in the required width.
Connection to box
There are no problems with the compatibility of the telescopic extension and the box; everything is installed in the groove. By pushing or pulling the bar into the selected quarter, it is adjusted close to the platband and secured. We must remember that the upper horizontal bar rests on two vertical ones (and does not fit between them, hanging) so that the letter “P” is formed, as it were. And when marking the width, you need to consider whether there is a groove there and what size it is.
A short upper horizontal line is inserted into a quarter of the mounted box, and using a level and wedges, it is leveled strictly horizontally, and then it is fixed to the wall and the box with masking adhesive tape.
Then, also, only using a plumb line, spacers and wedges, the vertical extensions are correctly installed. The gaps between the wall masonry and the finishing that remain after installation are filled with foam.
Fastening the extension
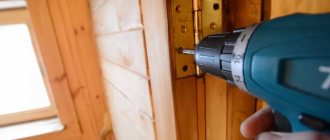
Direct grooveless extensions are placed on finishing nails, screws or foam. You just need to remember that when installing on nails, it is advisable to first drill holes for these nails with a diameter smaller than the nails themselves - otherwise there is a risk of splitting the wood. However, it is useful to have the same holes for self-tapping screws.
Sequence of operations:
- The planks are cut to size - since there is no need to add width due to the lack of grooves. The cutting areas are trimmed with a plane.
- An edge tape is glued to the finished ends and this tape is melted with a hot iron along the wrong side.
- The side planks are installed taking into account the movement of the horizontal plank and its support on the side ones (when working with straight extensions, it is installed last).
- Finishing nails are driven halfway into the ends on the hole side and the heads are bitten off diagonally with side cutters. Then they place the trim in the right places so that the edge tape is pressed against the box, and evenly tapping the trim along the end with a mallet or hammer, alternating with a wooden spacer, nail it with the already partially secured nails to the box. It is important that at this stage the addition lies without distortions.
- With self-tapping screws, the picture will be the same, only instead of hitting with a hammer, the self-tapping screws are screwed in. The heads of the screws or the places where the finishing nails are driven will then be hidden by the platband. To ensure that the heads of the screws do not interfere with the fastening of the casing, a countersunk depth is drilled under them using a larger drill to the length of the cone of the head (measured with a caliper or specified in the store).
- The horizontal part is laid last, checking the corners and horizontals and also fastened to nails
Foaming
When the extensions are sized, they are placed close to the box and leveled using a plumb line, level, wedges and spacers. Before foaming the cracks, the surface is treated with water. The easiest way to do this is with a spray bottle - at least for indoor plants. Then the adhesion of the foam will be perfect. Polyurethane foam is an ideal glue, so that after it hardens, the extension will sit firmly in the opening.
How to install extensions on an interior door
In this paragraph we will talk about ordinary planks - with straight ends. Sold in lengths of 2100-2300 mm. Three strips are needed for one door: One on the right and left, and a piece from the third will go to the upper part. If you install several doors at the same time and they are the same color, one strip will go to the two “tops”.
How to attach fittings to an interior door
The width and length of the planks are usually larger than necessary, so they will have to be trimmed. What instrument? With what you have. A jujube that cuts DMF, chipboard or wood is suitable. To decorate the corners, you may need a miter box (if you are going to join the box (and extensions) at 45°. It is also convenient to use in order not to “fill up” the cut and make it strictly perpendicular.
We take measurements and make blanks
Before installing the extensions on the interior door, you need to find out the exact dimensions of the expansion strips. To do this, install a door frame in the doorway and secure it. Draw an opening on the plan; it will be easier to write the dimensions. Next, take a tape measure and a level, measure the size of the extensions that you need.
- The width of the extension is determined as follows: insert the measuring tape of the tape measure into the groove until it stops. We apply a level to the wall and determine the required width at the intersection with the tape measure. We take measurements at six points: two on each side. If the wall has unequal thickness, we take the width of the extension according to the largest number.
We measure accurately - Length of additional strip. Again, take a tape measure and measure along the opening - from the floor (threshold, if anyone has one) to the beginning of the groove in the frame of the installed door. We measure on the right and left, because again there may be a difference. We measure the upper part from the beginning of the box to its end (not from the groove).
Now we cut out the sizes we need from standard planks. Make marks with a pencil - on light strips a simple pencil is clearly visible, on dark ones you can use a white one. We try on the cut strips in the opening; if necessary, we trim them a little.
We collect
Before placing the extensions on the interior door, they must be connected to each other. We lay out the cut out additional strips on the floor in the form of the letter “P”. If they have a processed edge, lay them out so that the edge is on one side. The planks will need to be connected to each other. If they are made from MDF or chipboard, you will need to pre-drill holes in the top rail.
Preparing for assembly
To do this, it is better to take a square (ideally a carpenter’s square, but an ordinary school one will do). We draw a line on the plank that marks the middle of the thickness of the plank. If the thickness of the additional board is 10 mm, the line runs at a distance of 5 mm from the edge. If the plank is 15 mm thick - at a distance of 7.5 mm. We put two points on this line and then drill holes. Diameter - 1 mm less than the diameter of the screws.
We complete the assembly of the door frame
Next, the holes must be transferred to long strips. To do this, we join them and align the edges. Using a drill, we transfer the marks to the end of the plank, then deepen it to the required length (along the length of the self-tapping screw). Having made the holes, we join the planks and tighten the fasteners. The extension to the interior door is half assembled. But don't rush to attach the second bar. You need to try on what has already been assembled “in place.”
Fitting and trimming
We put the assembled L-shaped part in place, driving the strips into the groove in the door frame. The upper jumper turned out to be larger (this is how we measured it). Take a pencil and put a mark where the groove begins. Try to be precise as this is important. You don't have to cut off the excess. We simply draw a line along the mark and make marks on it, then drill holes. After assembly, the letter “P” is obtained. We have assembled the extension for the interior door, now we need to install and secure it.
Installation in a door frame
Now the addition can be installed. Check the opening first. If the doors were placed on foam, it may block the groove. We cut off the excess so that the planks fit freely. Insert the U-shaped structure into the groove, tapping the end with your palm. We start from the top, then to the sides.
We put it in place, having first removed the excess polyurethane foam.
We take masking tape and use it to fix the planks to the walls. If in some places the extension on the interior door does not fit tightly to the frame (there is a gap), we remove this gap with the help of pads. You can use mounting wedges for this. If you don't have them, make them from foam plastic. You just need to set the bar level; dense foam plastic is enough for this purpose.
Fastening the additional box
You also need to level the extension to the interior door. You shouldn’t rely on your eye; use a level. Using a level and wedges, we remove all protrusions and blockages. During the process, we fix the aligned areas with masking tape. The distance between the tacks is 40-50 cm. One at the top and bottom (stepping back about 10 cm), and then at equal intervals.
How to attach the extensions: during the installation process
Next, using polyurethane foam with low expansion , we fill the space between the wall and the additional strip with it. Before use, read the instructions on the cylinder. It may be better to moisten the surfaces. In any case, the polyurethane foam must be laid in stages, otherwise it may bend the extension strips. Everything will have to be torn off, cleaned and foamed again.
So, first we apply foam deep into the gap. Not much, one strip. At the same time, we make strips across the entire width near the “tacks” (an example of applying foam to the door trim is in the photo above on the right). The foam in the area of the tacks will give the bar stability, the strip in the far part - near the joint - will press the extension to the groove, but will not bend the bar.
We leave the foam on the side strips to polymerize while we fill the gap from above. If it is as big as in the photo, there is no point in transferring a lot of foam. It’s easier to cut out a “bookmark” from foam plastic and place a wooden block of a suitable size. It is slightly smaller in size than the free space. There should be a gap of at least 1 cm on all sides. But too large gaps are not needed.
How to install extensions on an interior door: filling the top gap
Next we proceed like this:
- We place small pieces of polystyrene foam 1 cm or so thick under the embedded part.
- Using a snake, apply a layer of foam to the back wall (if there is one).
- We install a foundation block and fill the gaps around the perimeter with foam. Again, not too much so that the foam extension bar does not bend downwards.
- If necessary, install a “front” bar (bottom left in the photo above). If the width of the block is sufficient, we skip this step.
- We level the position of the additional strip using a building level and secure it with masking tape.
After the first layer of foam has hardened (the time is indicated on the can), we fill the remaining space. If the extension to the interior door has a significant width, it is possible (and better) to apply foam in two stages. But each time you need to wait for the polymerization time. After that, all that remains is to install the platbands.
Installation subtleties
| Before foaming and wetting with water, it is advisable to clean the stone or brickwork of the wall from dust, to the extent possible, blow it out with a rubber bulb or a bicycle pump, a compressor for inflating car tires - it’s up to you to decide. |
And another important point: when installing vertical planks, use spacers ALWAYS! In 2 places - approximately 60-65 cm from the floor and at the same distance from the top of the box - otherwise the foam filling the gaps will bend the extensions in the middle.
An element fixing the door frame such as liquid nails or foam is generally preferable, no matter what the door installation manuals say: not self-tapping screws, not finishing nails, but foam, which, unlike self-tapping screws and nails, has the most gentle effect on door elements .
Installing an extension to the box when it is thicker than the selected quarter
When installing any parts with your own hands, sometimes situations arise when it is not possible to purchase a thickness die that is correctly correlated with the selected quarter on the box.
In order for the extension to be attached to the opening with a minimum of cracks and to hold tightly, perforated aluminum tape is separated from the drywall hangers. When hung, it turns out to be two parts. Using small flea screws, these parts are screwed along the perimeter of the box with an indentation of ten centimeters from the corners, as in Fig. “Punched paper tape for attaching extensions.” The screws are screwed in, retreating 1.5-2 cm from the edge of the box, one per piece of tape, which will be enough. True, after installation in place, the edges of the tape will protrude a little. But with thin slats, due to elasticity, the plate will be pressed tightly and it will be hidden.
With a wider selection, the plates are first pressed onto the front part, and then returned to place by wrapping it. Now it is enough to insert the extension with the winding of its strips between the groove and the plate, and they will be clamped. You won’t notice any cracks even if you look closely at the surface. (Photo “We put extras thicker than a quarter”).
The final look is like this (photo of the same name)
How to determine the required thickness
The thickness of the additional board should not exceed the dimensions of the groove in the box. The average value ranges from 10-16 mm.
Factory strips are produced in standard sizes, depending on the parameters of the partition:
- if the wall width is up to 9 cm, then the thickness of the decorative insert is 1.5 cm;
- up to 16.5 cm - 1.5/2.5 cm;
- up to 26.5 cm - 2.5 cm.
The maximum thickness of finished panels is 3 cm. For non-standard openings, extensions are made to order.
For interior structures, planks of average thickness up to 1.4-1.5 cm are sufficient, and for entrance doors it is recommended to use extensions of 1.5-2.5 cm or more.
What to do with parts of inappropriate sizes
Each woodworking company has its own standards for the width of planks. For example, instead of 50 mm, the minimum width may be 60. Or 75. If the dimensions of the doorway do not fit into any standard produced by factories, there are three ways to solve the problem:
1. Purchase of two straight planks and joining them (splicing),
2. Buying a larger width strip and cutting it to the required size,
3. Purchase of a telescopic extension with adjustable width.
Tools and accessories necessary for work
The tools listed below are usually either already at home, or can be purchased, asked from friends, or rented.
- Plane. It may be necessary if there is a measurement error and a wall protrusion that interferes with the installation of the frame dimensions already calculated for the door leaf.
- Carpenter's pencil and construction knife with replaceable blades.
- Hammer.
- Roulette up to 3 m.
- Construction corner.
- A jigsaw or at least a sharpened hacksaw with a fine tooth. As a last resort, use a grinder with a special cutting wheel. If you have a hand-held circular saw with a sliding support ruler, all problems disappear altogether.
- Clamps.
- Plumb.
- Level.
You may also need a compact machine for manual milling - but an untrained person should not use it, it is very dangerous.
Telescopic platband and its structure
A telescopic platband is the same in appearance as a regular one, and can be a flat, corrugated wavy or slightly convex strip, which is installed frontally around the doorway and serves
- to hide installation marks;
- for the aesthetic final design of a door frame mounted in a doorway.
And it is telescopic because it fits into a groove with a protrusion. Due to its movement back and forth, there is an overlap of part of the box that needs to be covered for one reason or another. Or simply complement its look aesthetically.
Telescopic platbands with an additional strip are considered an expanded version of the simple one, as they allow you to increase the width of the tray up to 150 mm without creating a gap.
To file the platband at an angle of 45⁰, use a carpenter's miter box. This is the best option for sawing off according to a template, because no amount of measuring along the angle using a protractor will give an ideal cut for a reliable and imperceptible joint of the platband at an angle of 90⁰.
Purpose and functions
Photo:
Most often, the width of the door frame does not correspond to the thickness of the wall. To improve the unclosed part of the opening, previously the slopes were plastered, primed, and then painted or covered with wallpaper.
It was quite difficult to do such work with your own hands. But this task is well accomplished by adding a door frame, which is installed not only inside the house, but also in the entrance structures. You can install it yourself if you wish.
Door frame extensions perform various functions. With their help:
- unevenness is masked, slopes are sealed if the width of the box is less than the thickness of the walls;
- distortions that can occur when the door structure is installed incorrectly are eliminated;
- the canvas is strengthened.
DIY installation
First of all, they are guided by the rule: purchase structural parts of a size slightly larger than what is actually needed, since the doorway “walks” with an error of ±5-10 millimeters. This will allow you to make any necessary corrections in the future.
In a standard or non-permanent partition made according to specifications, the thickness of the walls rarely exceeds the overall dimensions of the products. But if this still occurs, then an additional set of appropriate dimensions is purchased. The L-shaped platband with its curved edge, perpendicular to the plank, then fits into the grooves of the boxes and extensions on both sides of the wall.
If the installation of the extension is carried out on an already installed frame, if the surface of the openings is even, problems usually do not arise. The best option for fastening parts in such cases is foaming. This will not only securely secure the entire structure, but also avoid damage to the wall and wooden parts of the doorway. In this case, the top of the extension is always installed first, then the vertical components are measured and shortened to the required size. Spacers are attached to the extension strips, the planks are first tapped to the wall, the gap between the wall and the planks is foamed, and after complete polymerization of the foam, the spacers are removed, the excess foam is cut off and the casing is attached to the extension tenon until it stops.
Post-installation elimination of gaps
Having installed the doors and mounted the extensions, they are faced with the need to seal the cracks. And they, even if very insignificant, will definitely be there. To remove them, all installation elements are aligned: the extension is fixed against the wall and frame with masking tape, and then wedges are driven into the gap between it and the wall, and this gap is finally foamed.
The time for complete polymerization of the foam is indicated on the cylinder, so only after waiting for it to expire, the platbands are finally installed along the entire perimeter of the opening on the sides of the wall. After installing the expansion, the step-by-step steps look like this:
- The height of the opening is measured, which consists of the length of the vertical trim plus the width of the casing.
- Using a miter box, the upper part of the casing is sawed off, maintaining the orientation of the cut in the desired direction (one casing is sawed off to the left with the long side, the second to the right). The top strip of the platband is sawn off obliquely with the short side in one direction.
- Holes are drilled and platbands are installed, fixing them on several nails driven in halfway with bitten off heads.
- The side trims are placed with their bottoms supported on the floor, then the top strip is attached. The structure is leveled and in order to prevent it from becoming loose, it must be immediately fixed with nails. There are six to eight side (vertical) trims, three to four on the top.
Immediately with the box
Sometimes the extension is installed on a box that has not yet been inserted into the opening. This method of installation has its advantages, since everything being mounted lies on a horizontal surface (preferably on a workbench or large table, but 4 stools of the same height in the corners of the assembled structure will do).
- The parts of the box, laid out in order, are stacked with the inner side facing the door facing up.
- Angles are leveled up to 90⁰. This can be done with a cord or thread, pulling them diagonally until they are equal to the millimeter. Then I fix this position of the box with a temporarily nailed bar.
- Along the perimeter, this entire structure is sheathed with plywood or plasterboard, with their protrusion upward outside the box, so that later the protruding parts of the extensions can be fixed along them. The result will be a structure that fits exactly into the future opening. The extensions are cut to size, and the top strip is glued first, the length of which will touch the limiters installed on the sides. The second to be planted on the glue are the side extensions.
- After the glue has dried, the retaining strips are removed.
- The entire assembled structure is placed in the doorway, fixed and leveled using a level, plumb line and wedges, and then secured with anchor bolts or long self-tapping screws.
If there is no quarter and the walls are slanted
If the quarter was not selected, you can do this:
- Having delved into the wood ½ of the thickness of the extension and taking a width of 10-12 mm, make the reverse quarter with a hand router. In case of a slight slope of the wall, a quarter can be made oblique in width; this will not affect the tightness of the elements.
- Or you can knock out a groove in the brick wall for the frame and insert a backing board there. This option may be preferable for those who find it easier to do rough and labor-intensive work instead of delicate work that requires saving energy.
In both cases, the extensions are installed by adjusting thin wedges, as is the case with straight slopes.
Slopes with slope
When the doorway widens upward or downward, the extensions are installed with the door already in place. This will prevent the door frame from moving away from its normal position. In this case, it is necessary to bring the inner edge of the extension into a wedge, and the extensions themselves in this case acquire a slightly trapezoidal shape. If this is not done, in the wide gap of the place where the doorway widens, after the mounting foam there remains a space where the plaster adheres to this foam. This means that cracks will inevitably form there, and a piece of the wall may become loose, crumble and begin to fall out in pieces.
Adviсe
Before foaming, it is recommended to clean the surface of the wall and the inside of the additional board from dust/dirt, if any, and then lightly moisten it. A damp, clean surface increases the adhesion of the polyurethane foam and the subsequent reliability of the foamed structure.
Advantages of installing extensions on interior doors using polyurethane foam:
- High strength and reliability of the design;
- Eliminating the possibility of damaging the material due to unsuccessful drilling or driving in nails;
- No cracks or chips on the door frame or frame during installation;
- Fewer actions during operation;
- Quick installation;
- Lower installation cost when involving specialists compared to other methods.
We hope that the tips on how to install extensions will be useful and you can easily install them on your interior door.
DIY door frame
Most often, making a door frame with your own hands is undertaken by those who have non-standard doorways, have well-seasoned and high-quality wood on hand, the area required for the work and at least the minimum of the tools listed in our material. Or those who managed to purchase a non-standard door leaf (usually imported), but will have to wait a long time for the necessary parts from a woodworking center located far from the site, and there is no guarantee that they will do everything correctly.
The fact is that non-standard products included in the door set cost one and a half, two, or even three times more than standard ones. In mass production, this is due to the need to reconfigure machines, develop a separate specification, that is, due to the fact that labor and means of production are turned off for a long period from the production process that generates profit due to the conveyor method. And to compensate for this, they raise the price of products many times over.
But it is not necessary to have such a labor-intensive part that requires a very expensive milling machine, such as the riser of a box with a quarter - you can make a composite box, as in the corresponding photo with the same name (photo).
Bars are cut from a board x50 mm, driven with a plane to size and self-tapping screws with preliminary drilling of holes of a smaller diameter, so as not to split the wood (especially at the ends); two bars of size are attracted to one another, forming a quarter.
You can even, if you have a not so expensive (or rented) hand router, make a groove for the future tenon of the extensions or for the sealing strip.
A box is prepared according to the size of the purchased canvas, which must meet the following standards:
- There should be a technological gap of 3 mm between the door leaf and it.
- There should be a gap of 20 mm between the edge of the opening and the top of the product. If everything sits on foam, there should be a gap of 20 mm along the vertical parts of the structure.
- The gap at the bottom, if the frame with a threshold or the bottom of the door should be from 5 to 15 mm - for dry rooms and up to 50 mm - when the room is wet.
Note:
| Boxes with a threshold are usually an attribute of purely entrance doors. Using thresholds on interior doors is impractical and sometimes prohibited by safety standards. |
How to take measurements
After final installation, a technological gap of 3 mm around the entire perimeter is required between the canvas and the box. Therefore, when installing the box, the internal distance should be 6 mm higher than the calculated one (3 on each side, and this also applies to the top of the door). And the outer distance, between the outer edge of the box and the wall, is 14 mm. If you decide to take the original bars of a different size (usually this is done if there is a heavy metal door, and the frame is made of wood), then compare the dimensions of the doorway itself with the future dimensions of the outer part of the box - sometimes it is expanded for such a case.
If the old frame has already been dismantled (and this is desirable), the doorway is measured in at least 5-6 places. It’s better to attach a straight plank to the wall and visually, with marker marks, immediately determine where the largest protrusions are located. In the future, either focus on them, or, if this operation is not too labor-intensive, bring them down to an acceptable level.
To ensure that the box is made correctly to size, you can measure both the size of the purchased canvas and the opening with the old box already dismantled.
Connection of the vertical and horizontal parts of the box
Can be done at an angle of 45⁰. But for this you need either a miter saw with the desired slope set on a scale, or a good miter box.
Important point!
| Make no mistake! The length of the vertical and horizontal elements of the box must be measured from the extreme points of the bevel and must take into account the thickness of the hacksaw blade or circular miter saw! Therefore, for example, in the length of a vertical box element of 2000 mm, it is necessary to add the thickness of the hacksaw blade (for example, 2 mm) before sawing off the bevel. Believe me: later, these 2 mm, if you don’t add them, may not be enough for you, and you, cursing, will push the door tightly into the frame every time, closing it. |
Or the connection is made at an angle of 90⁰. True, you still have to use a miter box for sawing. (photo “methods of connecting box beams”). This is the so-called “mortise method”, and it is better to do it if you already have carpentry skills.
If the size of the wooden blanks and their quality allow you to make a wide box, you can resort to this option in order to avoid adding extras.
Offer
It is better to entrust the installation of door trims to professionals with experience and a set of professional tools. Get help to ensure the door is installed quickly and correctly. The company’s employees will select the door frame, door leaf and components, assess the premises and take measurements for free
Our catalog presents a selection of interior doors made of quality materials, necessary components and accessories. Call and our consultants will answer all your questions. We guarantee long service life, excellent performance and safety of products purchased in our store.