From time immemorial, houses and various courtyard buildings were built from wood. This is primarily due to the fact that wood was the most accessible building material.
Nowadays the situation has changed. Nowadays, not everyone has the opportunity to build a house or bathhouse from round timber or timber. If such a chance does arise, then construction must be approached with all responsibility and a lot of nuances taken into account, paying attention to the smallest details.
For example, an important aspect is the installation of a door in a log house. At first glance, there is nothing complicated in carrying out such work, but this is not so.
Failure to follow the installation rules will lead to the fact that over time the door will no longer close well.
Types of doors for baths
Doors for baths must have the following characteristics:
- Should not be subject to deformation;
- Handles and other mechanisms should not heat up due to high temperatures in the steam room;
- Must have long-term moisture resistance;
- Must have an external opening mechanism.
The main stages of installing bath doors
Features of choosing a door
Arriving at a furniture store, a potential buyer will be amazed at the variety of models. Externally, the doors look perfect, but inside there may be serious flaws. We are talking about geometric parameters. Even a slight difference in the lengths of the sides of the leaf of 1-2 mm can seriously complicate the installation of the door. If your time and investment are valuable to you, do not be lazy to measure the canvas right in the store
The next stage is purchasing a door frame. Some of them form a single set with doors, but some are sold separately. It is much easier to install interior doors if you purchase a door leaf with a frame from one manufacturer, rather than making the latter yourself.
If it is impossible to buy a box for financial or other reasons, you can create it yourself by purchasing a special timber (boxed). A homemade box will consist of two vertical posts and one horizontal one on top (lintel). The purchased timber should not have knots, unevenness, or roughness. The thickness of the purchased timber is equal to the thickness of the door leaf, otherwise installation will be impossible.
Preparing the opening for installing doors
Very little time is allocated for this stage, since during the construction of the bathhouse all the necessary parameters have already been completed.
But if the door is installed in a log house, then you need to cut out the opening with a margin of at least 10 cm, since the structure will shrink.
To make the logs strong, you need to secure them with a wooden vertical beam. This can be done in two ways:
- At the end of the log, spikes are cut out, which are used to cover the beam.
- Make a hole in the opening into which the timber is inserted.
When to cut openings?
There are only three options:
Cut a blank frame, cut out openings after shrinkage;
Cut the frame taking them into account, carry out casing after shrinkage;
Cut the log house taking into account the openings and carry out the casing immediately.
Each method has its pros and cons.
Solid log house without windows and doors
One of the most controversial options, as it has a number of pros and cons that balance each other.
The log house is made in the form of a blind box. It will perfectly hold the geometry and shrink evenly along the entire height of the wall. When designing openings, you can achieve maximum accuracy, since they are cut out only after the object has settled on the foundation. Holes for future windows and doors are marked in place, for a specific structure.
The disadvantages include greater consumption of material, which leads to higher prices already at the stage of purchasing logs. The lack of standard window and door openings forces us to resolve the issue of organizing the ventilation of the facility. Without passages, air exchange in the interior of the log house becomes difficult. The log house simply will not dry, and fungus may form because of this.
The craftsmen who cut the log house will not be able to immediately install structures for filling the openings, which means that they will have to return to this work after a while and overpay the team for visiting the site.
A blind log house is an additional complication in the felling process. Once a certain height of the wall is reached, getting inside the object becomes problematic. It is necessary to organize technological passages or come up with additional auxiliary structures.
This method for log and inset structures would be the best case scenario. But for the customer and the builder it is extremely costly and difficult to implement. Maintenance of the log house during shrinkage turns into a separate quest.
Log house with openings, but without casing
One of the most common solutions due to the price-quality ratio.
Window and door openings are immediately included in the project and implemented at the time of cutting the log house. The log is calculated and purchased taking them into account, which reduces the cost.
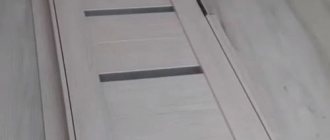
It is impossible to leave the opening completely without casing during shrinkage. Therefore, after designing the future locations of windows and doors, rough casing is done. A groove is cut into the vertical ends of the opening into which a guide block is inserted. The casing box is attached to this block.
Rough casing is necessary to maintain the geometry of the opening during shrinkage. The guide bar prevents and/or minimizes the horizontal movement of logs and does not interfere with the shrinkage of the log house, that is, the vertical movement of logs. During operation, the jamb prevents direct pressure from the logs on the window or door structure and is responsible for maintaining rigidity in the horizontal plane.
Even the installed rough frame does not always allow maintaining the ideal geometry of the opening, so during shrinkage these places are reinforced with installation logs. This procedure is almost mandatory for doorways and large windows.
In log buildings, where windows and doors are marked and decorated immediately, the issue of ventilation of the object during the period of shrinkage is automatically resolved; there is no need to spend additional money on organizing ventilation. The question of passers-by also disappears. Construction of a log house at the last stage, moving inside, as well as subsequent maintenance is not difficult.
It is more difficult to maintain the geometry of the opening - this is one of the main disadvantages of the method. During shrinkage, noticeable changes are possible, which will complicate installation and filling. There is another not so obvious problem. Such a log house is more defenseless and vulnerable to penetration by third parties. If the log house is located on a site without a fence, and there are no guards or residential buildings nearby, then almost anyone can get inside. Installing a protective mesh partially solves this problem.
Log house with openings and finishing casing
The method is alive due to its low cost and speed of execution. But in fact, it turns out to be Russian roulette. A finishing frame installed in a newly completed log house, followed by filling of the openings, often fails and needs to be redone. Moreover, it is necessary to redo not only the casing itself, but also the windows and doors.
The installed casing partially saves from changing the geometry of the openings, but cannot guarantee 100% success. As a result of shrinkage, the dimensions and shape may change, which is usually corrected during the installation stage. If windows and doors are inserted immediately, then during the process of shrinkage and geometry changes, they may also be damaged.
The advantages of this method include low cost, as well as speed of work. The client receives a full range of design and filling of openings immediately, using the same construction team.
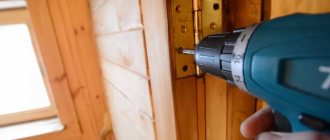
Install hinges
Installation of hinges is carried out as follows:
- The first loop will be below 20 cm from the top of the frame beam;
- The middle loop will be located 30 cm down from the first loop;
- The third loop is installed 20 cm up from the threshold.
Loops come in the following types:
- External. These hinges are fixed with self-tapping screws at the top and bottom.
- Screw-in. Designed for glass doors. The frame already has ready-made hinges.
- Mortise. For them, you need to make a recess in the frame in order to avoid the formation of a gap when the door is closed.
Leaving the log house open is important
What does this phrase mean? But here's the thing - after the construction is completed, the most intense moment of shrinkage begins, which will last at least a year. During this time, if the doors and windows are already installed, they will simply be crushed.
Moreover, wood is much stronger than metal and can bend even seemingly reliable structures. To prevent something irreparable from happening, you should carefully consider what is described below.
Before starting work, you should know in advance what size the entrance and swing structures will be. Usually, if the project is standard, then all measurements are put aside on drawings and diagrams and there is no need to bother. But if the log house is installed independently, then there is something to think about and decide quickly, since it is necessary that the cut opening fits together with the entire structure.
So, the installation stages:
Before the log house has to be left to shrink, it is recommended to make the necessary openings. How to saw through a door in a log house? Actually this is not the most difficult question.
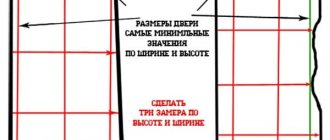
The required size is determined, and the diagonals must be taken into account, and the outline is drawn on the log house. You need to make sure that the bottom log is divided in half, and the top one too. Then 7 to 10 cm is added to these sides for shrinkage.
The thickness of the door frame ± 2-3 cm is added to the side ones. It is necessary to fill the edges of the future opening with boards to protect the short crowns from falling out. Thus, when the contours are ready, the desired size is selected with a saw.
If the log house assumes the presence of several entrances, one of which must be the front entrance, then the question of how to cut a door in the log house, when a greater distance is required, must be resolved more scrupulously. Board protection must be present on both sides - external and internal.
Also, after making the cut, it is recommended to place logs in the opening for a couple of weeks - during this time the log house will get used to the emptiness. Well, other aspects will no longer differ from an ordinary opening.
Moment of sawing
To avoid any difficulties with the question of how to cut a door in a log house, you must first determine the middle log of the opening and make slits on it. After that it is easy to knock it inside. Well, then working with a saw will no longer be difficult.
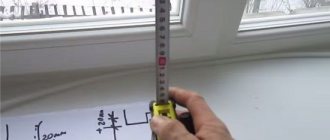
Let's move on. After the time allotted for shrinkage has passed, before installing the door, you need to measure the opening of the shrinking frame and determine the changes.
Methods for attaching a door to a wall
There are several options for wall mounting:
- The first option is to use foam for installation. We install the door frame with fixing pegs. Next we level the plane. We fill the resulting gap between the wall and the frame with polyurethane foam. To avoid deformation, set the spacers for about 10 o'clock. Once the foam has dried, the foam is trimmed, the spacers are removed, and the pegs are knocked out. The door will only be held in place by the foam.
- The second option is to use hangers. The hangers are screwed to the outside of the box using self-tapping screws. But first, it is placed on pegs and the evenness is measured using a level. Then we fill the resulting gaps with foam and install spacers overnight.
- The third option is using anchor bolts. They are inserted into holes that are drilled in the frame. But before fixing the frame with anchors, it is installed on pegs and leveled using a level. Next, fill the gaps with foam and install spacers.
Features of installing a door structure
If you need to install wooden doors, then installation of the frame is not required; its role will be played by the casing system. An exception may be the situation when wood lining is used as a finishing material. Then the box is placed on polyurethane foam.
After installation, the box is closed with platbands. In case of severe shrinkage, they can be replaced with new ones or simply reinstalled by adjusting the dimensions.
If you plan to install a metal door, then the casing is done a little differently. Its upper part does not need to be installed. Instead, you need to leave a gap that allows settlement to occur naturally.
The main advantage of a metal door is strength. Its box is able to withstand the pressure of wood during shrinkage without any consequences.
When cutting an opening, a number of recommendations should be taken into account:
- firstly, its height should be 150 millimeters greater than the door;
- secondly, the width of the opening should be 100–120 millimeters larger than the box (if its installation is necessary).
The above requirements are relevant and, if necessary, install a window. The casing must be carried out in any case, even if the opening cut in the log house is small.
When carrying out the work described above, the possibility of the formation of cold bridges should be taken into account. To avoid this, it is necessary to use thermal insulation materials, for example those with which the wall was insulated.
In other words, cracks and gaps formed during the installation process can be sealed with tow, polyurethane foam and other materials with similar functions.
It is preferable to use polyurethane foam, because it not only prevents drafts, but also gives strength to the structure. At the same time, it is much easier to use.
Installation of door frames
At the very last moment, the platbands are installed. After marking on the frame, the platbands are cut at the corners at 45 degrees. Then they are fixed with finishing nails or studs.
At this time, it is important to check if there is any obstacle to closing/opening the door.
Cutting and designing an opening in a log wall
- Before proceeding with this operation, it is necessary to temporarily secure even beams to the wall near the places where the opening was cut. This will prevent the wall logs from moving.
- Using a level or plumb line, draw the outlines of the opening in the wall. For our door they will be equal to the following values: width - 940 mm, height - 2090 mm. This takes into account the gaps between the door and casing frames (10 mm on both sides), and the fit of the casing posts into the tenon of the log wall. The lower level of the opening begins at half the diameter of the crown of the bathhouse frame, following the embedded crown.
- Using a chainsaw, we cut out the opening from top to bottom. Using an ax, we chop the upper and lower logs to the drawn horizontal lines.
- Next, using a chainsaw and a chisel, we cut out vertical spikes in the wall logs on each side of the opening with dimensions: width 60 mm, height 40 mm, symmetrically relative to the central axis. In the vertical posts of the casing, we select the appropriate longitudinal grooves and grooves for the upper spacer beams. We prepare a threshold with grooves for vertical tenons and quarters for planting vertical casing posts in them.
- We insert the threshold into the spikes, press it to the bottom plane of the opening and give it a horizontal position. Securely fasten with self-tapping screws.
- We place the vertical post at an angle at a quarter of the threshold and, using a hammer or an ax, drive it into the threshold and the tenons of the opening.
- We install the upper spacer bar into the grooves of the racks and hammer it into the grooves until it stops.
- We secure all connecting connections with self-tapping screws: in the corners, along the length, in the grooves, in the tenons, etc.
- So, the casing is ready, and the upper spacer beam has a gap between it and the cut opening. It is made specially and serves to compensate for the shrinkage of the bath. Now you can begin installing the door to enter the steam room.
Why do you need to make a pigtail?
This must be done to avoid the doors from skewing when using the bathhouse. In order to make a pigtail, you need to make holes for the screws.
- Two holes on the ceiling, the same number on the threshold and three holes on the sides.
- Next comes the timber. They also make holes for self-tapping screws and fit them to the walls and ceiling.
- A gap of 10 and 6 cm is required between the timber and the frame.
- After fixing the timber to the walls, the gaps are usually covered with tow, as it lasts for at least three years.
Leaving the log house open is important
What does this phrase mean? But here's the thing - after the construction is completed, the most intense moment of shrinkage begins, which will last at least a year. During this time, if the doors and windows are already installed, they will simply be crushed.
Moreover, wood is much stronger than metal and can bend even seemingly reliable structures. To prevent something irreparable from happening, you should carefully consider what is described below.
Before starting work, you should know in advance what size the entrance and swing structures will be. Usually, if the project is standard, then all measurements are put aside on drawings and diagrams and there is no need to bother. But if the log house is installed independently, then there is something to think about and decide quickly, since it is necessary that the cut opening fits together with the entire structure.
So, the installation stages:
Before the log house has to be left to shrink, it is recommended to make the necessary openings. How to saw through a door in a log house? Actually this is not the most difficult question.
The required size is determined, and the diagonals must be taken into account, and the outline is drawn on the log house. You need to make sure that the bottom log is divided in half, and the top one too. Then 7 to 10 cm is added to these sides for shrinkage.
The thickness of the door frame ± 2-3 cm is added to the side ones. It is necessary to fill the edges of the future opening with boards to protect the short crowns from falling out. Thus, when the contours are ready, the desired size is selected with a saw.
If the log house assumes the presence of several entrances, one of which must be the front entrance, then the question of how to cut a door in the log house, when a greater distance is required, must be resolved more scrupulously. Board protection must be present on both sides - external and internal.
Also, after making the cut, it is recommended to place logs in the opening for a couple of weeks - during this time the log house will get used to the emptiness. Well, other aspects will no longer differ from an ordinary opening.
Moment of sawing
To avoid any difficulties with the question of how to cut a door in a log house, you must first determine the middle log of the opening and make slits on it. After that it is easy to knock it inside. Well, then working with a saw will no longer be difficult.
Let's move on. After the time allotted for shrinkage has passed, before installing the door, you need to measure the opening of the shrinking frame and determine the changes.
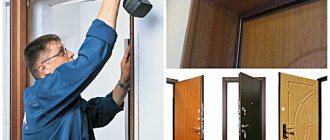
How to install a door in a log bathhouse
As a rule, the entrance to a bathhouse is a door made of metal or a door made of beams. In the bathhouse itself, an accordion door or compartment is installed. Sometimes they also install a book door.
Installation is carried out in several stages:
- First they make a joint. This is necessary for the door to last a long time.
- Then they place the box, observing all the necessary installation rules, using levels and plumb lines.
- Next, the canvas is mounted.
- Platbands are attached.
- Finally, the handles are fixed.
How to insert casing
The most common are three methods of casing assembly. The choice depends on the financial capabilities or the amount of time of the owner who is ready to install the door with his own hands.
Casing box with an end tenon - installation of the casing is carried out in a ready-made doorway on site; there is no need to fasten the structure in advance. The width of the board should be equal to the depth of the opening.
- It is understood that the construction of the opening was carried out with the expectation of using a tenon casing - its width should take into account the presence of a tenon. The latter is cut along both vertical slopes.
- A groove is made in the side casing posts that corresponds to the dimensions of the tenon.
- The tenon is covered with an inter-crown seal, then a side board is attached to it,
- a horizontal jumper is installed, and then a second side board. The crossbar serves as a spacer for the sidewalls. There is a gap of at least 5–7 cm between the top crossbar and the frame for the wall to shrink.
Casing on a embedded beam - involves installation on the so-called sliding beams. For the latter, bars with a cross section of 5*5 cm are used.
- A vertical groove is made in the slopes of the opening according to the dimensions of the board.
- The bars are installed. It is recommended to first place a heat-insulating material, for example, tow, in the groove.
- The assembled casing frame should be inserted between the sliding bars and attached to them using self-tapping screws.
- The horizontal crossbar, as in the previous case, should be located at a distance of 5–6 cm from the horizontal lintel of the opening. The photo shows a casing box.
Installation on bars - this method is used to save money. It differs from the above described in the absence of casing; the door is mounted directly on the sliding bars. A technical gap of 5–6 cm is maintained between the door frame and the lintel of the opening. The method is recommended for use for small buildings, for example, for baths or one-story log houses. For large buildings, it is recommended to use the first two.
How to frame a door
Installation is carried out in the usual way, but the fastenings are made not into the walls of the house, but into the boards of the casing.
- First, the door frame is installed without a leaf - or with it, if we are talking about metal entrance doors.
- Using a building level, the position of the vertical and horizontal posts is leveled. The position is adjusted using wooden wedges placed in the gap between the frame posts and the casing.
- When the verticality of the frame is achieved, the door frame is secured with anchors.
- Then you should hang the canvas. If necessary, the gaps between the casing and the frame are foamed.
The video explains in more detail how to insert a door into a log house.
Wooden door installation
Before installing the block in the bathhouse, you need to make a pigtail. It is needed so that the door can serve you for a long time. After the pigtail, we level the box.
- Before you fill the gap with foam, you first need to put the fabric on the hinges.
- Then install the trim and put on the handle.
- Next, spacers are placed and the gap is filled with foam.
- And to complete the process, you need to remove the spacers and trim the foam.
Main assembly steps
All operations for the production of pigtails are strictly regulated and are usually performed in the following order:
- preparation (marking and cutting) of the corresponding opening;
- its design to match the casing option you have chosen;
- installation of the casing itself;
- installation of a window or door block in it.
Stages of installation of the frame
When preparing the seat, it is necessary to clarify its dimensions, taking into account the distance to the floor level. For windows, in particular, it should be about 80–90 cm. After this, the opening is marked with the obligatory use of the simplest tools for checking - a plumb line and a level.
Depending on the manufacturing technology you choose, the work on designing the opening for the frame includes preparing a groove or ridge in it. The installation of the casing is also carried out taking into account the characteristics of the selected type of casing technology, that is, in compliance with all the rules and assembly procedures for this structure. At the final stage of the work, the window or door block is directly installed in the prepared casing.
Custom shaped window frame
Video
This video shows how to make a casing on a plastic window in a log house:
Watch this video on YouTube
Watch this video on YouTube
Glass door installation
When installing such a door in a bathhouse yourself, you must follow some rules:
- Avoid saving with cardboard;
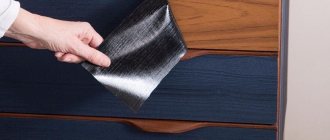
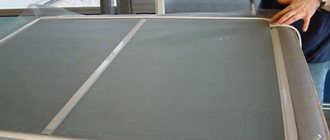
- Place tape around the perimeter of the glass to avoid chipping;
- Installation is carried out by 2 people.
Since glass is a fragile material, the question arises as to how this door will need to be installed in the bathhouse. Therefore, it will take more time and effort.
When installing a glass door, you should follow the step-by-step algorithm:
- First we install the frame;
- Next, we fix it with pegs and level it;
- We secure the box with screws;
- Then we hang the canvas and install the handle.
Installation recommendations
Before you begin the final stage of construction and make doors and windows for your own home, you should give it time to stand. By that time, the owners should have purchased the structures. At the beginning of shrinkage, you should be puzzled about how to cut a door in a log house. There is no point in delaying this - at the end of the term, omissions will become clear and will be corrected in a timely manner. The installation method is selected and installation is carried out. You should not work alone, and especially complex models should be left to professionals for installation. They will make the installation much better. And it’s not a matter of saving - inept actions will lead to even greater expenses.
By following simple rules, the builder will be able to ensure the safety of his own home. And then you see the move!
Boris Shirokov
Author of publications on 1Drevo.ru with topics: Glued logs | Living room interior | Home heating | Calibrated timber | Round house | Water heating | Home heating | House with attic | House made of timber | External insulation | Solid log house | Kitchen interior | Foundation insulation | Timber house | How to cover a log house | Brick cladding | Frame insulation | House made of laminated timber and others.
Was this publication useful to you?
Total score: 8Votes: 16
Overhaul of a log house - how to raise the log house onto the foundation
Internal and external finishing of log house corners - polishing and protection
We recommend! — Encyclopedia Wooden Houses — NEW
You can find out detailed and expanded information on the topic of the article from the book “Wooden Houses,” which reflects all stages of building a house, from laying the foundation to installing the roof. Book price = 77 rubles.
You may also be interested in other BOOKS on building houses from wood with your own hands.
We recommend other posts on this topic:
Window sizes in a wooden house: optimal size Installation of PVC window blocks - GOST for installation
How to insert a plastic window in a wooden house - do-it-yourself installation
What kind of protection is there for windows from sun rays?
Casing in a wooden house: technology for installing a frame in a log house
Technology for installing double-glazed windows in a wooden house
Installation of metal doors
Such doors are usually installed in brick baths. The gap between the block and the walls is left about 2 cm.
If the door is installed in a bathhouse made of a log house, then in such cases it is necessary to make a frame. Next, a block with a gap of 10 cm is attached to it. After that, the gaps are foamed and spacers are installed.
To install the door to the bathhouse yourself, you do not need to have special physical strength. The main thing in this matter is to do everything according to the instructions. Before installation, be sure to consult a specialist.
What tools will be needed for installation?
When deciding how to make a doorway and insert a door, first of all you need to decide on the tools necessary for this work. They must be at hand at all times. This will allow installation to be completed as quickly as possible. To carry out the work you will need:
- chainsaw or electric saw with a bar;
- hammer;
- perforator;
- circular saw or manual milling machine;
- chisel;
- construction measuring instruments: level (preferably laser), tape measure and square.
As a rule, searching for tools will not take much time, because all of them, one way or another, were used during the installation of the log house. Having prepared everything you need and understood how to install the door correctly, you can begin work.
Photo of installing doors in a bathhouse
How to install a plastic door
Installation of a plastic door is carried out according to the same scheme as similar structures made of any other material. Decide right away which door you need - interior or entrance. They have different designs and purposes. The material must be of high quality and certified.
The most rational option is to choose a door frame made of a metal frame. Experts recommend using a five-chamber profile. It is desirable that longitudinal or transverse stiffeners be present. It is recommended to take into account the following design features when choosing:
- When installing plastic doors with your own hands, it is advisable to use hinges that have a multi-layer structure.
- Degree of tightness.
- Availability of insulation.
- Quality of the glass unit - it is recommended to use armored or triplex.
- Quality lock and handle.
Before you begin installing a plastic door, read the instructions. If the installation quality is high, there will be no need to adjust the door. You can start using it immediately.
Preliminary preparation of wooden and conventional openings
When installing a plastic door in a wooden house, it is necessary to carefully treat all surfaces. First you need to completely clean the opening. Dismantling the old structure involves removing the fabric from the hinges. Then, using a crowbar and a grinder, you need to disassemble the box and completely dismantle it.
You need to get rid of the plaster, remove all dust with a brush, and apply primer to the slopes. If the structure is made according to your design, it will fully correspond to the size of the opening. After this, you need to install the fasteners yourself. The installation process is carried out in two ways:
- Using anchors. If you choose this option, you will need to drill holes.
- Using special brackets. They must be installed on the back of the box in a special groove.
If you decide to install using anchors, the appearance of the block will suffer. But this method is used in practice more often. If you decide to use brackets, then the appearance will not deteriorate, since all fastenings will be masked by slopes. Both methods are not difficult to implement.
Some important points
When installing plastic entrance or interior doors, you must adhere to the following recommendations:
Do not make a door threshold yourself - the best option would be to purchase a finished product. To secure the box on both sides, install wedges. It is not recommended to use nails, as they can deform the wall. After fixing, it is necessary to make holes for attaching the door frame. It is advisable that the holes are made at the production stage. You need to drill three holes on the left and right: in the center and along the edges at a distance of 20-30 cm. Two holes are made in the upper and lower crossbars at the same distance from the edges. Dowels must be installed in all holes. Screw the bolts into the dowels. You need to start from the side on which the hinges are installed. Screw in the bolts 2/3 of the way, then carefully check the position of the box relative to the vertical and horizontal with a level. Once the box is level, you can tighten all the bolts all the way. It is impossible to install a plastic door in a wooden house using anchors, so it is necessary to use other fasteners. The door frame must be in the opening and secured with nails or self-tapping screws. After putting the fabric on the hinges of the box, it should be pressed evenly to the base
A few hours after the foam has hardened, the wedges are removed and the doors are closed for a day.
Features of correct installation
Before inserting the plastic structure, it is necessary to measure the opening. Only in this case will you achieve a quality installation. In order for all the work to be done correctly, you need to know three parameters:
- The thickness of the opening.
- Height.
- Width.
Technology for cutting window and door openings
Openings for windows and doors can be cut in two different ways:
Whatever cutting technology you choose, you should mark the locations of windows and doors in advance so that it does not turn out that dowels and dowels are already installed in place of the windows or doors. Installation of dowels and dowels must be done on those walls where it is planned to cut down more than two windows. Otherwise, such a wall may sag under the weight of the roof.
Currently, cutting out window and door openings occurs as follows: they begin cutting down the log house, leaving openings that are somewhat smaller in size than required by the project. Then, in the middle of the opening, one continuous crown is passed through (as when constructing a blank wall). This is done every 3-4 crowns. These logs are cut only after the house has completely settled. It should be noted that window and door openings with this cutting method are usually made several centimeters narrower than necessary, which simplifies the process of final alignment of the openings.
Cutting out the openings is carried out using a chainsaw, while the upper and lower logs are cut only halfway, which simplifies the further implementation of the staking.
Framing is a process of casing openings, which prevents their deformation. Thanks to the socket, the crowns of the timber can move freely during vertical shrinkage, preventing the logs from being squeezed out.
Casing
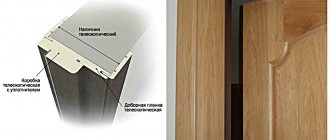
This is a door element that has a longitudinal tenon, which is inserted into the vertical side walls and, thus, further shrinkage can only affect it, without affecting the door in any way. The question of how to embed a door into a log house can be solved perfectly with the help of a casing.
It cannot be left without a gap of 5 cm with the log house. Self-tapping screws and nails are suitable as fasteners. The bottom one can also be cut for a tenon.
Next, the canvas is hung - the fittings should be included by then. Thus, the question is resolved - how to install a door in a log house using a casing.
Cutting methods
To cut a doorway with your own hands, you will need a tool, but you can choose it correctly after determining the method of work being carried out. The method depends on the wall material. It is not advisable to chisel and sledgehammer, as the integrity of the entire partition will be compromised. You can carefully cut the opening using diamond, laser, waterjet or oxygen cutting.
Diamond cutting
For concrete partitions, the method of diamond cutting of a doorway using a grinder or circular saw is used. The cutting element of the tool is a metal disk coated with diamond.
The diamond cutting method has many advantages:
Among the shortcomings
highlight the costs of purchasing expensive diamond blades. During work, the concrete wall is moistened with water, but fine dust still spreads into the room.
Laser cutting
Expensive equipment is used for laser cutting of openings. Previously, it was bulky and was used only in production. Modern laser cutting equipment is compact, but its high cost and specific purpose have made it popular only among specialized repair teams. The cutting of a concrete wall is made with a laser cutter due to the gas-discharge action.
Before starting work, the parameters of the wall
:
Additionally, the floor of the apartment building where cutting is planned is taken into account, as well as the admissibility of wetting the concrete structure with water.
Waterjet cutting
Cold cutting of an opening in a wall refers to the waterjet method. A special installation is used for work. It creates a strong stream of water at a speed of 1 thousand m/s. The liquid in the tank is mixed with abrasive particles with a diameter of about 0.4 mm. The prepared mixture is fed through a nozzle onto the reinforced concrete structure and destroys it at the point of contact. The cutting force depends on the pressure. At the maximum power of the equipment, a reinforcing frame made of steel rods is cut along with the concrete.
in a dream hear a knock on the door
The waterjet cutting method has the following advantages:
Disadvantage
is the formation of dirt, the high cost of consumables, and the large dimensions of the equipment. Waterjet cutting is used on construction sites that have not been put into operation.
Oxygen cutting
The oxygen cutting method is also called spear drilling. To cut out a doorway, a machine with a metal tube is used. Oxygen is supplied through the spear under high pressure. At the same time, the jet is heated inside the tube to a temperature of 1400°C using a gas burner. After the spear has ignited, the external heating source is turned off. When the temperature reaches 2000°C, the tube is leaned against the concrete surface and turned slightly. During cutting, you cannot move the spear away from the concrete, as it cools quickly.
The disadvantage of this method is considered to be a fire hazard, as well as the possibility of getting burned. During cutting, hot slag particles scatter throughout the room.
Work before shrinkage
What work can be performed immediately after installing the log house:
- Log sanding,
- Wall painting,
- Treatment of wood with protective compounds,
- Rough installation of floor and ceiling,
- Insulating the log house with tow or other materials (the first stage of insulation),
- Installation of partitions, partitions, interfloor stairs (again, it is important to know the difference in shrinkage if the work is carried out before shrinkage).
How to strengthen a lintel over an opening
Before starting the construction of the opening, it is necessary to install a lintel.
A part of the wall will rest on it, which will remain above the future opening, which will remain from:
The safety of the wall structure and the entire house depends on the rigidity of the lintel. When developing lintel drawings, it is necessary, in addition to previously obtained information, to take into account several more factors, which should be:
There are several ways to strengthen the lintel.
When making an opening in the wall, you can build a prefabricated reinforced concrete lintel, which will consist of two profile corner sections. For this:
How to make an opening in a load-bearing wall
It's easier to make a hole in a brick wall.
Reinforced concrete is more difficult to dismantle.
You will need:
Instructions for cutting the opening:
This method is used for internal load-bearing walls located in panel houses. In external load-bearing walls, cutting will need to be done several times on each side.
How does shrinkage occur?
The logs generally decrease in thickness, and the height of the walls of the house decreases. The degree of reduction depends on various factors:
- wood species;
- type of processing of lumber (round timber or rounded log dries out more than timber), cross-sectional dimensions and length;
- forest humidity level;
- construction season.
Dimensions change most intensively during the first 8-12 months - up to 90% of total shrinkage.
In the next 2 years - 5-8% and 2-5%, respectively. Winter-assembled log houses reach condition faster than summer-assembled log houses.