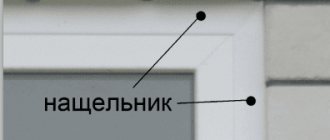
The final chord of installing a plastic window is such a decorated object as a strip, presented on the professional construction market in various types and forms. It’s not difficult to install a modern cover strip for plastic windows, or, as it is also called, a cover strip, on your own: it’s enough to get useful advice from experts when purchasing a decorative item that is relevant to you. When making this choice, it is worth taking into account: the type of flashing, the manufacturer and the installation features.
Purpose of window strips
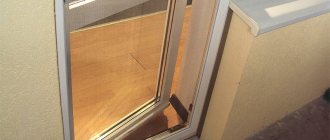
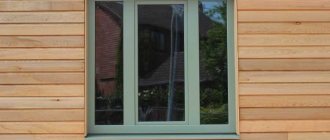
When it comes to arranging window openings, the first thing that comes to mind is plastic double-glazed windows.
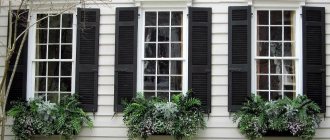
They not only look modern and beautiful, but are also the most functional solution for residential and commercial buildings that require increased heat and sound insulation. Window strips play an important role and free you from the need to spend money on putty and sealing joints. The use of a strip, or, as it is also called, a cover strip, greatly simplifies the task of final finishing of the space between the wall and the window frame. The joint is reliably protected from destruction as a result of exposure to sunlight, the thermal insulation qualities are increased, and the window opening will acquire an attractive appearance. Hinged strips are used both for external decoration and for frames installed indoors. With a large assortment, everyone will be able to choose a cover strip from the required material, texture, desired color and size.
Finishing doors in various ways
Finishing from wood material can be done for both wooden and metal doors. It is advisable to use raw materials based on natural wood, or use laminated panels. To achieve high insulating properties, it is recommended to use MDF boards.
MDF board has good insulating properties
If the dimensions do not match the slopes, they can be replaced with an analog laminate.
- We carefully seal the seams between the door body and the surface of the walls.
- We carefully remove the remaining foam, clean the surface and prime it.
- We determine the shape of the slopes: it can be either straight or with a slight slope. Next, we fix the panels using dowels.
- We attach the slopes with mounting glue or use self-tapping screws.
- We carefully seal the free spaces with silicone sealant.
When finishing the door, make sure to select the correct wooden planks. They should be the same thickness, and the dimensions on both sides should be identical to each other.
Installation of door slopes is carried out using self-tapping screws or mounting adhesive
Drywall is often used to install door slopes, since it allows you to significantly save on the purchase of materials for leveling walls. From it you can make slopes from the outside and inside the entrance opening, using the following technology:
First, the surface under the drywall is thoroughly cleaned of dirt and primed. We measure the prepared material and cut it into pieces of the required length
Please note that some of the parts are cut at an angle to allow the parts to be secured to an angled surface. We compare the cut sheets again with the dimensions of the doorway. We fasten the drywall with dowels or special mounting adhesive. We begin installation by installing the side part of the opening, after which we move to the top. Having securely fixed the sheets of drywall, we finish with putty using perforated corners.
Drywall can be used to finish door slopes
Door finishing can be done using a simple plastering method in the following sequence:
- Clean and prime the work surface. Let it dry well.
- To make the corners of the opening even, we attach a metal corner.
- Using a spatula, apply the plaster mixture over the entire surface of the slopes.
- After the plaster has completely dried, we clean the surface with construction sandpaper.
- Finally, we treat the working surface with paints and varnishes to impart external aesthetics.
Door slopes can also be made of plastic. The sequence of work is as follows:
- We measure the door slopes and cut the plastic panels to the required sizes. It is more convenient to use a jigsaw, which will ensure even cuts.
- We check the prepared panels again with the opening for dimensions.
- We install the slopes on the sides and fix them with self-tapping screws.
- We attach wooden slats along the edge of the wall, checking the evenness of the installation with a level.
- We install a plug along the bottom of the panels, insert it into the side slopes and the initial profile.
- Finally, we treat the seams with silicone sealant.
Slopes for windows made of high-quality and natural wood will not only perfectly decorate the room, but will be very practical to use. Errors made in the work will be hidden, and the appearance of the slopes will be noticeably more attractive. The door slopes will be similar, giving the house a noble appearance.
What are window coverings and why are they needed?
Strips are a cover strip that is fixed in various ways around the perimeter of the window opening. With their help, all joints with mounting foam are closed and, if necessary, the junction of the frame with the window sill and ebb is decorated and sealed. For the manufacture of these products the following are used:
- plastic;
- metal;
- tree.
Flashings are produced both in the form of tapes in rolls and straight profiles with different sections and rigidity. Thanks to this, it is possible to select the ideal protective element for any slopes and installation seams. After all, situations are different - sometimes it is enough to close a neat narrow gap, and sometimes you have to close very wide gaps.
Features of the decorative strip
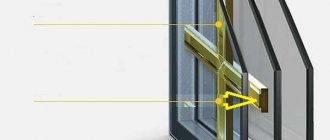
The final stage of installing a double-glazed window with a PVC profile is unthinkable without the use of finishing tape, which is fixed at the joints and covers the space between the profile block and the wall surface.
Many years of experience in the use of this material allows us to assert that flashings for plastic windows have the following significant advantages:
In the installation, the fender strip is not a mandatory element, but thanks to it, the loggia, balcony or window will acquire a truly respectable appearance. The lath is indispensable for sealing end cracks and joints of profile structural elements. In the procedure for installing decorative tape, a special self-adhesive composition is often used - liquid nails. It is also possible to use self-tapping screws or ordinary screws.
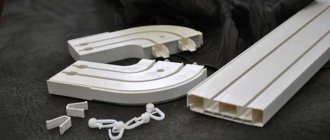
Types of products
Today there are many types of flashings on the market, which differ in the material they are made of. The most popular are products made of metal, wood and plastic. Each type is divided into subspecies, so before choosing something specific, you need to study the features of each.
Metal strips
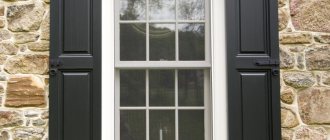
This type of flashing is often made from galvanized steel or aluminum. The planks can be coated with polymer paint and have a flexible edge. Metal structures look attractive, are strong and durable.
Galvanized slats are often used in the construction of garages, hangars and other buildings. To increase attractiveness, the surface can be covered with a layer of polyester. The thickness of the slats ranges from 0.5 to 1.3 mm.
Aluminum products have a number of undeniable advantages over galvanized ones. Such slats are resistant to various weather conditions, corrosion, and so on. In addition, the planks do not deform under the influence of temperature changes and can be treated with powder paints. The structures are made from aluminum sheets with a thickness of 1 to 2 mm.
Installation is carried out using self-tapping screws with a press washer. Slats with a flexible edge will help hide unevenness and protect the window structure from drafts. Experts recommend installing metal strips in brick or panel houses.
Wooden strips
Available in flat, angular and book-shaped. The planks can be painted, varnished or laminated. Pine wood is usually used to make such planks.
They are rarely used in modern apartments. More often in wooden houses or with interior decoration “like wood”. For installation, use liquid nails or ordinary wood screws.
Such products also have many advantages:
- attractive aesthetics;
- environmental cleanliness;
- significant tightness;
- good strength.
The only disadvantage of a wooden slat is its high cost.
Plastic flashings
Available in rigid and flexible types. Rigid strips are strips 3 and 6 meters long. The width of each strip is in the range of 20-100 mm. For fastening, use self-adhesive tape or self-tapping screws.
Flexible ones can be 20-70 mm wide. They can also be either plain white or laminated. The strips are wound into rolls of 30-50 m. For installation, use self-adhesive tape, self-tapping screws or liquid nails.
Like any product, plastic flashings have their undoubted advantages and disadvantages. First, about the advantages:
- Unpretentiousness to weather conditions. Whether it’s rain or snow, plastic doesn’t care;
- Durability. If the quality of the product is high and it is installed correctly, then you can forget about the slopes for a long time;
- Aesthetics. The slope looks perfectly smooth, and no irregularities are noticeable;
- Convenient for transportation and storage. It is much more convenient to carry a roll than long strips.
And now about the shortcomings. They are also available:
- temperature limitation during installation. That is, if the repair is carried out in winter, you will have to wait until warmer days with plastic flashings;
- quite often the installed product tries to “roll” into a roll again;
- The flexible plastic cover can be used only once. If the product was deformed and had to be removed, it is impossible to glue it back. Since its adhesive base completely loses its qualities. I have to get a new cover.
Self-adhesive
Such models have a special self-adhesive layer. Therefore, the self-adhesive PVC strip is the easiest to install. Such models may also have a silicone seal.
Self-installation or professional installation: what to choose
Many companies engaged in the manufacture and installation of turnkey windows perform turnkey installation work. This takes into account a full range of installation and finishing services, including specialists who offer to install slopes, window sills, flashings, and flashings.
Homeowners can carry out high-quality finishing themselves. This will help save your budget. The process does not take weeks or a lot of effort. The shutter strips are available in two mounting options.
The first is the presence of a self-adhesive composition. In this case, you need to tear off the protective film hiding the adhesive base. Afterwards, the gap is installed at the joint. The second is without a sticky layer. In this case, the rebates need to be secured using assembly glue, liquid nails or self-tapping screws (which cannot be done if small-width wooden rebates are used).
Criterias of choice
For the ideal combination of the flashing with the window, you should follow a number of points when choosing and purchasing. In this case, you can not only ensure an elegant appearance of the window group, but also effectively protect the seams from the effects of ultraviolet radiation and dampness.
- The trim strips should be selected to match the color of the window frame, the color of the façade or the interior decoration. In this case, the flashings will not discord with the surrounding colors, looking like eye-catching patches.
- The texture of the material should also match the window. For example, wooden flashings will look bad on white plastic windows. They are best used for finishing frames made of natural wood, or plastic, stylized to resemble the texture of wood. In the same way, white additional elements made of metal or PVC are not suitable for wooden frames.
- Before purchasing, you need to measure the width of the joining seam between the window and the wall opening. The width of the plank should completely cover the seam, extending onto the facade wall.
- When choosing, you should give preference to products from companies that have proven themselves in the market. The price of such flashings will be slightly higher, but all costs are compensated in the long term, thanks to their long service life.
Types and material of manufacture
However, flashings can be installed not only on external joints, but also on internal ones. For these purposes, various decorative versions of these additional elements are made, which allows them to fit organically into the interior of the room.
Cover strips can be made from various materials:
- Tree.
- Plastic.
- Metal.
For the production of metal flashings, aluminum alloys, galvanized sheet steel, and tin with an external polymer coating are most often used. Their thickness varies from 0.5 to 2 mm. Such modifications are durable in use and are not afraid of external aggressive influences - dampness, temperature changes, solar ultraviolet radiation. They are available in a variety of colors, which allows them to be successfully combined with the colors of the walls and window frames.
Wooden strips are made in the form of flat strips, corners or triangular in cross-section. Thickness - up to 3 mm. On the outside, they can be painted in various colors, varnished, or laminated with polymer compounds. Wooden shutters are used both outside and inside the window. Most often, they are made from pine wood, as it is a more accessible and inexpensive material.
However, on sale you can also find more exotic options, often intended for interior decoration - from wenge, mahogany, or from the more familiar beech, birch, and oak. They fit well into the wood-look interior decoration. At the same time, along with high aesthetic properties and environmental friendliness, they have a number of significant disadvantages:
- They are afraid of dampness.
- They may crack under the influence of temperature changes.
In this regard, wooden flashings are more suitable for interior design of window joints.
Plastic shutter strips are multifunctional decorative elements that can be used for both internal and external sealing of window joints. Polymer strips are available in two versions:
- Hard, in the form of planks 2-10 cm wide and up to 6 meters long.
Corner - strip without adhesive baseFlexible, in the form of a strip 2-7 cm wide, sold in rolls up to 50 meters long.
Among the advantages of polymer flashings are their budget cost, excellent color and texture compatibility with the plastic window frame, and resistance to dampness and frost. Disadvantages - the likelihood of peeling off the adhesive base in extreme heat under the influence of deformation forces and twisting of the tape. Planks made of polyvinyl chloride may acquire a yellowish tint under the influence of ultraviolet radiation, losing their decorative qualities.
In what cases should you use flashings?
These protective elements are recommended to be used even when the slopes are lined with putty and plasterboard structures. Almost always, due to thermal expansion and even slight shrinkage of buildings, cracks that widen over time appear in the places where they join the frames, and the putty gradually breaks off and crumbles. A metal, wooden or plastic flashing completely covers the expanding gap with a reserve, protects the mounting foam from external influences and prevents depressurization of the window structure.
The exception is situations when internal and external slope systems are used for finishing. These protective and decorative structures are equipped with a special starting strip, which serves as a cover plate. Find out more at OknaTrade about these excellent systems for decorating internal and external slopes.
Instructions for finishing with foam plastic with plastering
Before you begin installation work with polystyrene foam, you need to choose the right adhesive. The adhesive composition ST-85 Ceresit is considered optimal.
The work is performed in the following sequence:
- The adhesive composition is mixed until it becomes a homogeneous mass, but it should not flow down the instrument.
- Polystyrene foam is cut into sheets according to the size of the window opening.
- The glue is rubbed into the surface of the window opening and applied to the foam with a notched spatula.
- Initially the tide is set. A sheet of foam plastic is placed under it to reduce the noise from the sound of raindrops.
- The foam sheets are laid from bottom to top, close to the window frame. To avoid voids, the adhesive composition is not saved. Excess glue must be removed with a damp sponge.
- All cracks are sealed with foam.
- After drying, the surface of the foam is covered with a mesh, which is secured with putty.
- Profiles are installed at the corners of the window opening. Then plastering is carried out followed by high-quality leveling.
- The top layer of plaster on the external slopes is covered with facade paint, which is matched to the color of the building.
Same process in video:
Installation of strips
Metal flashings are installed at any temperature - their characteristics are not reduced by this. They are fastened with self-tapping screws. Installation starts from the bottom edge. The planks are connected to each other. Overlapping. Any waterproof sealant is applied to the joints of the strips.
The installation of wooden flashings has several features: in order to join two planks together, they should be sawed down using a miter box at an angle of 45 degrees. The planks are fastened using liquid nails or wood screws. At the joints of the planks, a special wood sealant is applied to protect the room from moisture.
Installation of plastic strips is carried out in the following order:
- dust and dirt are removed from the surface of the plastic window and degreased;
- the dimensions of the window opening and the width of the installation seam are measured;
- the stripping of the required length is cut from the roll;
- Gradually, the protective film is removed from the flashing, and the plank is pressed against the surface of the slope.
If an adhesive layer is not structurally provided on the back side of the plastic cover, then liquid nails are used. The glue is applied to the back side of the product, allowed to dry a little and pressed firmly against the slope.
The rigid PVC flashing is attached in the same way. White silicone sealant is applied to the joints between the strips.
Attaching the trim strips
When a plastic window is installed, a gap is formed around the perimeter of the profile in the place where it meets the wall. The opening is sealed with polyurethane foam - a weather-unresistant material that should be carefully closed. A good layer of plaster or vapor-permeable sealant with further painting of the surface solves the problem. But the most technologically justified and reliable method, as practice shows, is the installation of special cover strips.
It is possible to install the flashing efficiently without the help of professionals if you follow the following recommendations:
- inspect the window, slopes, measure the length of the openings and their width to determine the required footage to close all the seams;
- purchase material with the necessary quality and dimensional characteristics, make patterns of the appropriate size;
- gradually opening the protective layer, press down the length of the rail with ironing movements;
- When installing a strip without an adhesive base, apply the adhesive mixture with a brush and immediately press the strip to the surface.
Related article: Which company is better to order plastic windows
Competent installation requires compliance with certain conditions. All actions must be performed at a temperature not lower than -15. The surface to be finished is pre-protected and degreased.
It is not recommended to install the strip on the outside of the window profile yourself. The safest and best solution would be to contact specialists, especially when finishing should be done on the windows of the upper floors. The craftsmen of the WINDOWS ROSTA company will install the flashings quickly, efficiently, accurately and provide a guarantee for their work.
How to remove traces of shingles
Occasionally it happens that it is necessary to remove the strip to perform various repairs or replace the strip.
If you fastened the product with self-tapping screws, then no problems will arise: you just need to unscrew them and remove the bar.
The problem arises when you remove the plastic cover with the adhesive backing.
The fact is that almost the entire layer of glue remains on the slope and frame of the plastic window, onto which the flashing went. How can I remove this glue?
Do not miss! Handle for a plastic window with a lock - how to choose and install correctly
There are several ways to remove traces of glue. If the surface is smooth and there is little glue on it, then you can try using a regular school eraser.
This is important! You should know that removing traces of the strip with an eraser is a very labor-intensive procedure. And if you need to clean a large surface, this method will not work.
The next method is vegetable oil. The fact is that for gluing a plastic cover, glue based on acrylic is almost always used. Well, almost like tape. It is known that vegetable oil, when mixed with such glue, changes its properties. And the stickiness simply disappears.
If you need to remove traces of stripping from a large surface, then it must be treated with vegetable oil. After a couple of hours, the mass that used to be glue can be easily removed with a regular paper napkin.
This method cannot be used on those surfaces where it is planned to re-attach the false self-adhesive strip in the future. Glue just won't work. But if you attach the flashing with self-tapping screws, then there will be no problems.
If your plastic window frame is made of high-quality plastic, then you can try to remove traces of the flashing using white spirit or any other solvent. First, try in some inconspicuous place how the plastic of the frame will react to the solvent. After all, it is capable of dissolving low-quality plastic.
The installation of plastic windows is characterized by a gap along the perimeter of the window opening of the wall. As a rule, it is filled with polyurethane foam. This foam provides the necessary level of sealing at the joints, and also helps to retain heat inside the room, while at the same time perfectly insulating from noise and moisture from the outside.
The foam itself is a rather unstable building material, relative to the influence of weather. For this reason, there is a need to close it as quickly as possible. Usually, this is done with a layer of plaster, or a vapor-permeable type sealant, coupled with painting, this eliminates the above problem.
Note! The most reliable and technologically advanced method would be to install special flashings designed specifically for plastic windows.
Fastening of strips can be carried out both outside and inside the room. This will also serve as an interesting design solution, and will allow you to solve all problems regarding thermal insulation, and will also serve to protect the seams from destruction.
Removing traces
Sometimes there are situations when during the installation process the structure stands up crookedly. Of course, removing the rail, which was fixed with self-tapping screws, will not be difficult. However, in the case of fastening with liquid nails, after removing the strip, traces remain. You can remove them using a solvent, rubber band or vegetable oil. However, an eraser can only help if there is a thin layer of adhesive left, which is located only in places.
If there is a lot of glue, vegetable oil will help remove traces. It can change the characteristics of the glue, so after a few hours the residue can be easily removed. The only caveat: oil cannot be used if, after treatment, you plan to install a new rail with liquid nails. This is due to the fact that the latter will not adhere to an oiled surface.
If the window structures are made of high-quality plastic, the remaining adhesive mass can be removed using a solvent. But such decisions should not be made hastily. First, test the solvent resistance of the material in an inconspicuous area. Thus, white spirit is capable of corroding low-quality plastic to holes.
In the process of installing window structures, polyurethane foam is used. This material provides sealing, prevents cold from entering from the street, and prevents heat from leaking out from the room. Not everyone knows that this building material can deteriorate under the influence of weather conditions if it is not treated correctly. After the foam has completely hardened, experts recommend treating it with a vapor-permeable sealant, which then needs to be painted. Another option is to plaster the surface.
Modern flashings are used not only for sealing and thermal insulation, they are also an excellent way to decorate window structures. All cracks and irregularities can be sealed with their help, improving the appearance and soundproofing characteristics of the window. After studying all the important nuances, you can easily carry out the installation yourself.
Advantages and disadvantages of window coverings
Metal flashing for plastic windows, as well as wooden, aluminum, and plastic, is an optional, but important element of equipping a window opening. These elements have a lot of advantages.
Advantages:
- versatility, allowing such planks to be installed outdoors and indoors;
- aesthetics that decorate the interior and exterior;
- the ability to smooth out irregularities at seam joints;
- providing wind protection;
- resistance to ultraviolet rays, precipitation, changes in air temperature;
- duration of the operational period;
- wide size range;
- wealth of choice of colors and shapes;
- ease of installation and dismantling work;
- affordable price.
Provided the planks are properly secured, as well as proper care of these structures, they have virtually no disadvantages. Some owners noted that attaching plastic slats is not very convenient, especially for rolled slats. However, the problem will disappear by itself if you carry out the installation with an assistant.
The fact that the plastic panels are attached only the first time makes their installation somewhat difficult. However, with metal or wood slats, such problems never arise.
Advantages of metal flashings
Metal strips are made of aluminum and galvanized steel.
Metal window trim has the following qualities:
- reliable;
- durable;
- easy to install;
- allows you to cover all the unevenness on the slopes;
- reliably protects the room from cold air.
How to choose the right strip for windows
Window trims, provided they are chosen correctly, will ideally frame the window space, keep the seams protected, and increase the level of thermal insulation.
When choosing slats, metal or PVC for windows, you should take into account the preferred installation method, as well as the shade of the window frame.
Important! Before purchasing material, you should carry out the necessary calculations and measurements, clarify exactly how many components will be needed to frame it.
Experts recommend purchasing planks at specialized sales points, where only certified products will be presented. Having purchased such material, you will not have to worry that it will not last long or will have poor properties. In addition, cheap material will be difficult to attach neatly.
Therefore, before purchasing, you should study the offers and choose a certified product.
When choosing strips, you should keep in mind that glass units framed with a plastic frame will not be suitable for wood or metal strips. In addition, PVC planks do not look very good on wooden windows.
Features and rules for installing strips
Attaching pretend scarves is not difficult; it is not necessary to invite a qualified craftsman for this task. Before work, you should prepare the necessary tools:
- ruler, tape measure needed for measuring the block itself;
- miter box - a device for sawing different angles for joining planks;
- hacksaw for metal;
- painting knife;
- Bulgarian;
- scissors;
- screwdriver;
- liquid nail gun;
- sealant;
- clean cloth.
Specific tools can be selected by knowing what material the strips will be made of. For example, you will have to cut metal with a grinder, and plastic with a stationery knife.
After preparing the tool, you can start working. First of all, you should clean the surface of the frame. If there are traces of dust, dirt, or foreign substances on it, then the slats will be difficult to attach and are unlikely to last long. After wet cleaning of the frame, it is wiped with a degreasing compound.
Important! When there is excess polyurethane foam on the frame, after processing the gaps, they need to be trimmed evenly.
All other work depends on what material the strips are made of. Installation of plastic and metal differs significantly.
Installation of plastic flashings
Covers for plastic windows made from polyvinyl chloride fabric can be installed on frames made from any raw material, be it metal, wood or plastic.
Progress:
- Measure the length for the cut.
- Cut the ends of the cut at a 45 degree angle.
- When working with a flexible strip that has an adhesive base, you should remove the protective layer slowly, sequentially gluing the product to the selected surface.
- When the plank does not have an adhesive base, it is attached with liquid nails applied with a special gun.
Installation of metal flashings
The plastic cover is not too difficult to attach; the metal material is even more simple. Its installation is allowed even in winter.
The slats are secured with self-tapping screws. Holes are pre-drilled under them at intervals of 30 cm. To prevent the strip from peeling off prematurely or losing its aesthetic qualities, the metal should be overlapped. The joints, however, should be sealed using a sealant that has moisture-proof properties.
Installation of wooden strips
To mount wooden structures you will need a little more free time than to work with plastic or metal. For a smooth transition between the slats, each of them should be filed down and one edge should be adjusted to the other. It is allowed to fasten wood using liquid nails or self-tapping screws. It is preferable to use the latter; they are characterized by high reliability of fastening; if installed correctly, they will not compromise the integrity of the coating.
Sometimes it becomes necessary to remove old flashings and replace them with new ones. How to cope with this task?
- The strip attached to the screws is removed by unscrewing them.
- The slats that had a sticky layer are removed mechanically. To remove traces of glue, you can use an eraser, solvent, or soap solution.
Installation tools
The procedure for installing flashings on plastic windows is not as complicated as it might seem at first. Such manipulations can be done with your own hands, without the help of qualified specialists. To work you will need the following tools:
- a miter box for cutting slats (this tool is needed to join products in the corners);
- mounting gun for liquid nails (if the products will be fixed with self-tapping screws, a screwdriver will be required);
- clean rags;
- ruler or construction tape for taking measurements;
- cutting tools - scissors, grinder, hacksaw, painting knife (depending on the material from which the slats are made);
- sealant.
After preparing all the necessary tools, you can begin the installation procedure. First, you need to remove dust, dirt and moisture from the surface of the frame, and then degrease it well. Construction foam may protrude in some places; it must be cut off first. The subsequent operation algorithm depends on the material from which the rail is made.
The secret of proper installation of flashings for PVC windows, types of plates
Let's assume that the installation of the PVC window was successful and the finishing of the slopes is also pleasing with the result.
Everything would be great, but there is a gap on the outside. It’s small, but it needs to be eliminated without compromising the appearance of the window. The solution to the problem lies in the use of a strip - a plastic polyvinyl chloride strip for sticking on top of the frames. When faced with self-adhesive strips on sale and those without an adhesive strip, remember that the latter will look neater on the frame. But provided that the installation is professional. Self-adhesive strips are installed without the use of additional tools, which simplifies the task of fastening. However, if you examine the window closely, you will see a protruding edge on it.
Preliminary work
Have you ever encountered the installation of flashings before? Then keep in mind that the recommendations listed below are required to be followed if you want the result to please you for a long time.
You can glue strips only when it’s warm. If the temperature is below 5 degrees Celsius, the adhesive compositions freeze and lose their properties.
First, clean the frame, carefully removing dust, dirt and, if any, remnants of polyurethane foam. Can't do without wet washing? Then, after cleaning the surface, you need to wait until it becomes completely dry.
It is advisable to wear gloves to prevent your hands from getting glue stains. When working with a self-adhesive strip, do not peel off the protective film from the entire strip at once. Remove no more than 20 cm, glue, press, then repeat the steps, but with the next section of the strip. You will have to tinker with the plates that need to be coated with adhesive: sometimes there is little glue, sometimes there is a lot, sometimes something else.
Therefore, it is better to overpay a little for a self-adhesive strip, but then work calmly: remove the protective strip, close the gap, remove it and seal it, and so on.
Where else can it be used?
If you haven’t calculated the purchase of finishing material, you can use the remaining strips to seal the problem areas of the slopes, the places where the polyurethane foam is visible.
Instead of a conclusion
In order not to spend too much, buy plates only after measuring the length of the slope that needs to be finished. And regardless of the type of material of the chosen strip, it will help to securely close the outer seam.
What does the flashing protect the window joint from? From penetration of moisture, fungus, sunlight. All of these factors slowly but tirelessly affect the mounting foam that was used to fill the window opening before inserting the double-glazed window. Because of this, it will deform over time, which will lead to unpleasant things: decreased heat, water, and sound insulation. In addition, a strip to match the frame looks more aesthetically pleasing than a dark seam, which will increase in size over time due to the gradual accumulation of dust residues.
Preparatory work
Preparatory work includes purchasing materials, assembling a set of tools, and cleaning the surface on which the additional strip will be attached from all types of contaminants: dust, dirt, foam residues.
The installation gap is also checked for excess foam. If it protrudes beyond the plane of the frame, it is cut off with a construction knife.
Excess foam is cut off.
Plastic flashings
Errors when installing a plastic window happen even to professional craftsmen.
But if you discover a defect that is clearly cosmetic and not functional, do not despair. The impeccable appearance of the window and slopes can be easily restored by applying a strip. Gaps between the frame and the slopes are especially common when installing wooden frames. To ensure that the installed structure lasts a long time and does not irritate the eyes with small defects, hide them with a plastic cover. A little work and the window will immediately begin to look completely different.
The strip glued to the inside of the frame is more of a decorative element than a practical one. But on the outside of the frame it will not allow precipitation to seep under it, and will protect against temperature changes and wind.
The self-adhesive plastic strip is a strip that does not require the use of additional tools to install it on the frame. To prevent the adhesive strip from losing its properties, manufacturers cover it with anti-adhesion film. It must be removed immediately before gluing the strip to the frame. The elasticity of the edges of the strip ensures a good fit even to uneven surfaces and better sealing of the seam. Thanks to this, the polyurethane foam on which the window is mounted will retain its original qualities longer.
Self-adhesive strips are equally convenient for finishing external and internal joints between the frame and the window. Giving structures a well-groomed appearance, the strips also have a practical value: they extend the service life of the built-in double-glazed window.
After all, with the joints securely sealed, neither water, nor fungal spores, nor drying winds can seep under the frame.
This means that the mounting foam under the frame will support the window longer, just as it did in the first months of its operation.
Why is it worth installing a plastic flashing if you have plastic windows?
You have 6 reasons for this:
- the elastic edge will adhere even to uneven surfaces and allow you to achieve the desired sealing;
- the seam will become inaccessible to UV radiation, precipitation, unwanted temperature changes and drying wind;
- it is easy to install even for a beginner in construction work;
- the product is made of primary PVC, which eliminates the presence of impurities harmful to health;
- quality meets European standards.
It’s easy to select a strip of the desired width – strips with different dimensional parameters are available for sale. Why do self-adhesive plates captivate buyers? Easy installation, long service life, low temperature resistance. Just remember that the adhesive strip is more sensitive to low temperatures. Therefore, do not start finishing the exterior of the frame if the temperature outside is less than 5 degrees Celsius. If there is an urgent need to carry out such work in the cold season, it is necessary to ensure a flow of heat to the frame for the period while the strip is stuck to the frame. For example, use a hair dryer. The optimal ambient temperature at the time of installation of the strip with a self-adhesive strip is from 5 to 35 degrees Celsius. If the thermometer readings are between +5 and – 10, use a technical hair dryer. If it is even colder outside, then it is more advisable to postpone the installation to a warmer day.
Benefit
After installing the strip on the slope, you get:
- improved appearance of the slope;
- protection of the seam from ultraviolet radiation;
- a junction unattainable by precipitation, frost, wind;
- increased service life of the entire glass unit.
The easiest way to achieve the above is with a self-adhesive strip.
Installation of flashing on a PVC window
If a shortage of funds suddenly appears and there are only enough plates for installation on one half of the window, it is better to finish the outside.
Since it is there that the polyurethane foam on which the glass unit is inserted into the opening is placed is most strongly exposed to moisture, temperature, and wind. By protecting it from the listed factors, you automatically extend the life of the window. At the same time, it will look much more aesthetically pleasing.
When deciding to replace windows, check with the seller whether the installation service includes a sticker for the trim. If you want to decorate an existing window with stripes, then just take measurements and buy the appropriate number of plates. And even if the price for them is completely affordable - within 20-50 rubles per meter. But why do you need extra plastic if there is nowhere to sell it?
To prevent the finishing elements from turning yellow or deforming after some time, give preference to products manufactured by Roto, Salamander, Veka. After all, flashings are needed not only to protect the seams under the frames from the negative effects of precipitation and wind, but also to give the window an impeccable appearance. And what kind of impeccability can we talk about if a yellowish stripe is visible around the perimeter of the window? Then you will have to redo the installation again, tinker with removing the failed strip, clean the surface of glue and install a new strip.
Why do you need to close the joints between the frame and the slope? This provides additional thermal insulation and waterproofing, hides traces of polyurethane foam, and makes the window opening perfectly white. As a result, the time and money spent on work do not seem to be wasted, and every time you look at the window you feel only positive emotions.
Even a non-professional can achieve such a pleasant result, since there is nothing complicated in installing the strip.
Algorithm for finishing a window with a strip:
- inspection and measurement of the slope, frame around the entire perimeter of the window;
- purchasing flashings with a small margin;
- cutting plates into pieces of the required length;
- sticker (after removing the protective film, the plank must be pressed against the slope and frame along its entire length;
- if the plate does not have a sticky surface, then it needs to be coated with glue on the back side and quickly pressed to the place above the joint.
So that the work does not go down the drain:
- Carry out finishing at a temperature not lower than +5 degrees;
- Before finishing, the surface of the frame and slope must be cleaned of dust and degreased.
Kinds
Cover strips for plastic windows can be classified according to the following parameters:
- type of material;
- installation location;
- method of fastening;
- form.
Materials
Planks for protecting technological gaps can be wooden, plastic, or metal.
Tree. To make wooden trims, they take pine (the most common option), wenge, mahogany, alder, aspen, beech, oak and other lumber. Sizes and shapes may vary:
- thickness - from 3.0 to 30.0 mm;
- width - from 20 to 100 mm;
- length - from 1.0 to 3.0 m.
Wooden planks.
They find their application when installing window structures made of wood and decorating interiors to look like wood. Attached with glue or self-tapping screws.
- environmental friendliness;
- beautiful appearance;
- durability, but only with proper care;
- strength;
- vapor permeability;
- maintainability.
- high price;
- afraid of high humidity - mandatory waterproofing impregnation is required for outdoor installation;
- During sudden temperature fluctuations, small cracks may appear. But this is typical only for insufficiently dried planks.
Plastic. PVC strips for plastic windows are in high demand among the population. The reason is its merits.
- budget price is the main advantage of the material;
- availability - available in all construction stores and supermarkets;
- versatility - used for exterior and interior decoration of window openings;
- resistance to sunlight (does not fade), frost, heat, rain, snow;
- large selection of colors: white, brown, beige, etc.;
- various textures: wood, metal, brick, stone;
- compatibility with different interior design styles;
- durability.
- not the most reliable method of fastening, especially with self-adhesive strips. When heated, the glue loses its adhesive force, and the plastic tries to take the shape of the material twisted into a coil. As a result of the interaction of two negative factors, the protective strip lags behind;
- The “self-adhesive” must be attached correctly immediately. It will not be possible to correct the position (tear it off and stick it again) - the material is disposable;
- installation is possible only at positive temperatures - above +5oC;
- loss of decorative properties due to the appearance of yellowness on white polyvinyl chloride under the influence of the sun.
Produced in 2 versions: soft and hard. Flexible tapes are sold in rolls up to 50 m long and strip widths from 2 to 7 cm. The advantages of this product: convenient to transport, minimal waste during installation, simple installation. Some experts attach them to self-tapping screws, the heads of which are covered with beautiful caps.
Flexible strip.
The rigid strip is a sandwich panel with internal stiffeners. It has a width of up to 10 cm and a length of up to 6 m. They are fixed with glue, clips, latches and screws.
Sandwich panels made of plastic.
Metal. Metal extensions are made of aluminum, galvanized steel and tin coated with a polymer film. The planks are characterized by:
- strength;
- durability;
- environmental friendliness;
- beautiful appearance;
- resistance to negative natural phenomena: ultraviolet radiation, changes in temperature and humidity;
- large selection of colors and textures.
Galvanized strip.
The thickness of the planks ranges from 0.5 to 2 mm, width up to 10 cm, length up to 3 m. Best suited for brick and panel houses. Fastened with self-tapping screws and a press washer.
Installation location
Depending on the installation location, the extensions can be external or internal. The metal and plastic strips are universal - they can be installed anywhere. They can be made of wood only for internal ones. Outside it can be done after self-treatment with moisture-proof impregnations.
Mounting method
Flashings can be attached with glue, self-tapping screws, clips, or special latches. In this case, the adhesive can be applied in advance and protected with a special film (“self-adhesive” additional strips) and used during the installation process.
Latch fastening.
The glue allows you to tightly press the extension to the frame profile and the wall, which allows you to beautifully design the protection of the technological gap, as well as provide an additional barrier to drafts. Other fastening methods do not provide tightness. However, they successfully cope with the function of decoration and protection of polyurethane foam from the sun.
Form
Large selection of accessories and shapes. Manufacturers offer strips:
- flat;
- semicircular;
- corner;
- in the form of a book.
The specific choice depends on the taste of the owners, the mounting location and the design of the window opening.
Benefits of use
Despite all the obvious advantages of using flashings, it is worth mentioning them again:
- Easy to transport and store. They are made in special rolls or reels and fit into any vehicle.
- Has high resistance to external factors. Not afraid of radiation and do not deteriorate from exposure to moisture. Accessories can be installed both internally and externally.
- The material from which the strips are made does not scratch and is quite difficult to spoil. In this regard, the window opening will not lose its appearance.
- Installation does not require complex tools and requires little installation time.
- High durability and reliability.
Where else are they installed?
Despite the fact that flashings are created for windows, they are sometimes used for other purposes. Elements, especially self-adhesive ones, are used to seal seams both indoors and outdoors. Many designers use it to create a single design solution.
Sources
- https://stroypomochnik.ru/nashhelnik-dlya-plastikovyh-okon-01/
- https://www.oknatrade.ru/help/nashchelniki-dlya-okon-aktualnost-ispolzovaniya/
- https://7lestnic.com/okna/nashchelniki-na-okna-pvh.html
- https://otkroyokno.ru/%D0%BD%D0%B0%D1%89%D0%B5%D0%BB%D1%8C%D0%BD%D0%B8%D0%BA%D0%B8-% D0%BD%D0%B0-%D0%BF%D0%BB%D0%B0%D1%81%D1%82%D0%B8%D0%BA%D0%BE%D0%B2%D1%8B%D0 %B5-%D0%BE%D0%BA%D0%BD%D0%B0.html
- https://oknologiya.ru/naschelniki-na-okna-pvh/
- https://balkon4life.ru/osteklenie/furnitura/nashhelniki-dlya-okon/.html
- https://1prookna.ru/ustanovka/vidy-nashhelnikov-dlya-okon
- https://oknanagoda.com/okna/plastik/uteplenie/nashhelniki-dlya-plastikovykh-okon-prei.html
- https://dommdom.ru/nashhelniki-na-plastikovye-okna.html