Sealants for insulating balconies from moisture
Sealants are paste-like or viscous materials made on the basis of polymers that are used to seal various surfaces. There are several types of sealing compositions, differing in composition and conditions of use. Let's look at the most common sealants on the market today.
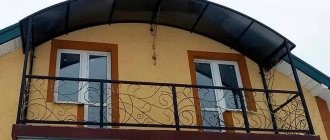
The result of poor-quality sealing of the balcony roof
Acrylic
Acrylic sealant, the main component of which is polyacrylate (the more common name is acrylic), is a non-allergenic, non-toxic material, used for internal waterproofing of premises. Such compositions are characterized by high adhesion to concrete, brick, plastics, including PVC, and form an elastic seam that retains this property after polymerization of the substance.
Acrylic is a polymer based on acrylic acid. In addition to sealants, structural plastic, paint, and synthetic fiber are made from it, which, due to its hypoallergenicity, is used to create textiles.
Despite the fact that some manufacturers indicate on the packaging the high moisture resistance of the material, acrylic sealant is rarely used for waterproofing an open balcony or external sealing of balconies and loggias. With constant contact with moisture, acrylic can lose its adhesive properties and peel off from the surface. Therefore, it is not recommended for use in rooms with high humidity.
Technical properties:
- Base: polyacrylate;
- Surface film formation (at 20 °C): 2 hours;
- Full cure (at 20 °C): 48 h;
- Application temperature: from +5 °C to +35 °C;
- Operating temperature: from -40 °C to +80 °C.
Subject to operating conditions, acrylic sealant well seals the joints between a brick wall and a concrete floor
Silicone
Sealants based on silicone rubber are durable, have high elasticity after polymerization, are not afraid of ultraviolet radiation, and can be used in a wide temperature range. High resistance to atmospheric conditions allows using silicone sealing compounds to seal and waterproof the balcony from the inside and outside.
You can work with silicone at different air temperatures, but keep in mind that in cold weather the polymerization process is slower.
Based on their composition, silicone sealants are divided into acidic and neutral. The former are cheaper and have a pronounced “vinegar” smell after application. They should be used carefully with metal products - the acidic environment can lead to metal corrosion. Neutral silicone is odorless and does not require ventilation of the room during interior work, but its price is higher than the acid version.
Technical properties:
- Base: silicone rubber;
- Surface film formation (at 20 °C): 20 min;
- Full cure (at 20 °C): 24 hours;
- Application temperature: from -30 °C to +60 °C;
- Operating temperature: from -60 °C to +200 °C.
Silicone has high adhesion to concrete, so it is suitable for sealing joints on balconies
Polyurethane
Polyurethane is used as a substitute for rubber and caoutchouc. It has high elasticity and withstands constant contact with moisture. Two-component polyurethane sealants are especially durable; after curing, they can demonstrate at least a 4-fold elongation when trying to break (in some brands, the elasticity reaches 1000%).
Two-component sealants are a composition of two components (working mass and hardener), which are mixed immediately before waterproofing the object.
Polyurethane has proven itself well in insulating internal and external seams, joints, and roof elements. However, when working, do not forget about the harmful aggressive substances in the material. Use protective equipment.
Technical properties:
- Base: polyurethane;
- Surface film formation (at 20 °C): 1 hour;
- Full cure (at 20 °C): 7 hours;
- Application temperature: from -10 °C to +35 °C;
- Operating temperature: from -60 °C to +80 °C.
The polyurethane composition maintains the tightness of the joint even with significant movement of the structure
Thiokols
In its external and structural characteristics, thiokol resembles rubber. An alternative name for the sealant is polysulfide rubber. In Europe, it has practically replaced silicone when sealing seams on balconies and other building structures. This is due to its high resistance to temperature and atmospheric factors, ultraviolet radiation, chemical reagents, including gasoline and solvents.
Many manufacturers of double-glazed windows use thiokol to seal the connection between glass and aluminum profiles.
The disadvantages of the material include a higher price compared to other sealants and difficulty of application. Such compositions have a two or three-component structure, requiring mixing in strictly prescribed proportions.
Technical properties:
- Base: thiokol;
- Surface film formation (at 20 °C): 2 hours;
- Full cure (at 20 °C): 48 h;
- Application temperature: from -15 °C to +40 °C;
- Operating temperature: from -60°C to +130°C.
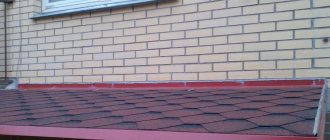
Sealing a balcony canopy using thiokol sealant
Bituminous
Bitumen sealing mastic is one of the most popular means for waterproofing external surfaces. The composition based on bitumen binder is absolutely neutral to external influences, which is why it is widely used in the construction industry. In addition, bitumen has excellent adhesion to any substrate, be it metal, concrete, plastic or wood.
Bituminous sealants do not require thorough surface preparation before application.
The disadvantage of bitumen-based mastics is their black color, which introduces certain restrictions for sealing, for example, window openings. However, hardened bitumen can be painted, so if necessary, the seam can be given the color of the surface being treated.
Technical properties:
- Base: bitumen;
- Surface film formation (at 20 °C): 30 min;
- Full cure (at 20 °C): 2-4 hours;
- Application temperature: from +5 °C to +30 °C;
- Operating temperature: from -50 °C to +150 °C.
When laying roofing felt waterproofing, all seams are treated with bitumen mastic
Butyl rubber
There is a whole line of sealing materials made from butyl rubber - seals, mounting tapes, cords, briquettes, mastics. Tape materials are especially popular, allowing you to quickly seal seams and cracks when waterproofing balconies and eliminating leaks.
During operation, tape butyl rubber sealants do not lose their elasticity and adhesive properties. Moreover, adhesion to the surface only increases over time.
Butyl rubber in the form of mastic is used in the same way as other viscous sealants. Butyl rubber compounds are absolutely not afraid of water, have a wide operating temperature range, and are suitable for indoor and outdoor use.
Technical properties:
- Base: butyl rubber;
- Surface film formation (at 20 °C): 1 hour;
- Full cure (at 20 °C): 24 hours;
- Application temperature: from -20 °C to +40 °C;
- Operating temperature: from -45°C to +80°C.
Sealing the external seams of the balcony with gray butyl rubber mastic
Materials for work
Waterproofing on the balcony is carried out using various types of materials.
- Liquid forms are intended for painting surfaces using a spray gun, roller or brush. Emulsions create a protective film and can have a penetrating effect of varying degrees of severity.
- Coatings and mastics are viscous compositions with a high concentration of waterproofing components.
- Rolled versions are made by impregnating the base with hydrophobic compounds. Adhesive bitumen-polymer compositions are applied to it from the inside, and a coating is used on the outside to prevent sticking of the contacting parts of the canvas.
Roll materials provide reliable waterproofing of balconies Source pol-spec.ru
- Film materials are durable and inexpensive, but are sensitive to ultraviolet radiation.
- Sheet forms are made from polymers and rolled metal.
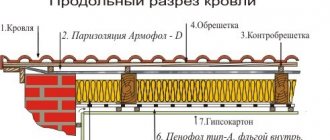
Waterproofing of roofs and balcony canopies
If the apartment is on the top floor, the balcony is exposed to precipitation at any time of the year. As a result of constant contact with moisture, an unprotected roof will sooner or later leak, so sealing the roof or balcony canopy in such cases is mandatory.
Selection and installation of roofing material
Standard designs for multi-storey buildings often do not provide anything other than a flat concrete floor for the roof of the top floor balcony. Although this design has a minimal slope, it is not able to cope with the rapid drainage of water during heavy rains or melting snow. This leads to the formation of puddles and moisture seeping into the room.
The best way to avoid this situation is to install a pitched roof with a sufficient angle of inclination. In this case, a frame is mounted directly on the concrete floor, on which hydrophobic roofing material is laid on top.
On balconies without an upper ceiling, the frame is attached to the wall, and the structure itself acts as a canopy, protecting the object from the sun, rain, and snow.
Stages of installation of a pitched canopy roof on a balcony
There are several types of roofing material, the choice of which is usually based on the personal preferences of the owners:
- Corrugated sheeting is a durable, affordable material, so it is often used if the repair budget is limited.
- Metal tiles are not inferior in performance properties to corrugated sheets, but have a more attractive appearance.
- Euroslate is a reliable, lightweight, aesthetically attractive coating with a sound-absorbing effect.
All of the listed materials are mounted with an overlap; the sheets are attached to the frame or sheathing with self-tapping screws and a rubber washer-gasket. This guarantees complete tightness of the roof covering.
Waterproofing of the junction of the canopy to the facade
Water cannot penetrate through a properly installed pitched roof, but moisture can find a way out at the junction of the canopy and the façade wall. Therefore, on the top floor balcony, waterproofing this area is mandatory.
Standard technology for sealing the junction:
- A recess 20-30 mm deep is made in the wall parallel to the roof.
- The upper end of the protective metal apron, treated with sealant, is inserted into the recess.
- The apron is attached to the wall with dowels, and to the roofing material with self-tapping screws with rubber gaskets. For additional compaction, foamed polyethylene is placed between the apron and the roof.
Scheme of sealing the junction of the canopy to the wall
Waterproofing a flat roof with roofing felt
If there is neither time nor money for arranging a pitched roof, you can waterproof the flat roof of the balcony with roofing felt. This is an old, proven method that is used to seal many construction projects.
Ruberoid is a rolled hydrophobic material, which is made by impregnating roofing cardboard with bitumen compounds.
The procedure for laying roofing felt:
- The surface of the concrete canopy is cleaned of debris, dust, and foreign objects.
- The roofing material is heated by a gas burner and gradually rolled out over the entire surface of the roof.
- The seams between sheets of roofing material, as well as the places where they adjoin the wall, are treated with bitumen or butyl rubber mastic.
Waterproofing a balcony with roofing felt requires special equipment and appropriate skills
Balcony ceiling decoration
To waterproof the balcony ceiling from the inside, penetrating compounds are usually used.
For balconies on the highest floors, the roof is additionally sealed.
Elimination of blowing and freezing of window openings
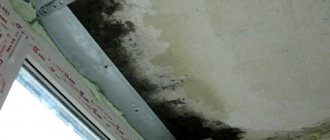
Insufficient sealing of window units on balconies often leads to the formation of mold and mildew on adjacent slopes and walls. This problem occurs when using old wooden windows or as a result of improper installation of metal-plastic structures.
Why is it blowing from the window?
Blowing through a window is a consequence of insufficient tightness between the frame and the wall or the sash to the frame. There may be several reasons:
- Incorrect window frame installation technology. Most companies selling plastic windows hire outsiders (often without relevant experience) for installation work. It is not surprising that when using window units, unpleasant consequences of “professional” installation appear.
- Wrong choice of sealant for sealing the seams between the frame and the wall. Some installers mistakenly believe that construction foam is a sealant and therefore does not require additional finishing. In fact, under the influence of sunlight and temperature changes, the foam begins to deform and peel off from the surface, breaking the tightness of the seam.
- Misaligned sashes. The sash pressure of a plastic window is an adjustable value. To do this, eccentrics are located around the perimeter of the window, the position of which determines the level of pressure - weak, medium or strong.
The presence of a foam seam alone is not a sufficient condition for sealing a window seam on a balcony
Rules for sealing window seams
You cannot do without polyurethane foam when installing plastic windows. In this case, in no case should you skimp on the foam seam, especially since excess remains of dried material can be easily cut off. After drying, the foam on the inside and outside should be covered with a moisture-resistant sealant, which will serve as a reliable barrier to ultraviolet radiation and water.
Before applying the sealing material, the seam must be cleaned of dust and degreased.
It is allowed to seal the balcony from the inside with putty, dry putty mixture, or paint. It is recommended to cover the outside of the foam seam exclusively with a sealant that is highly elastic and will not crack as a result of temperature exposure.
Sealing the junction of the window and the wall
When glazing a balcony, be sure to install ebb sills for high-quality drainage.
Roll waterproofing
After the base has been prepared, roll insulation based on roofing felt can be applied. If you do this, you will get a certain amount of reinsurance. The advantage is that you can wrap the insulation and cover the ends of the balcony with it.
Before applying waterproofing, install galvanized aprons on the ends of the balcony. They do not allow water to flow to the ends or enter from below. Roll insulators must hang at least 3 cm lower than the lower edge of the balcony slab.
You cannot immediately lay tiles on a flexible roll-type base. This coating requires special equipment: a burner and a gas cylinder. The amount of work is not large, and equipment rental is very expensive. Another drawback is that you will have to somehow attach such insulation to the wall. The top edge of the roofing felt sheet will begin to peel off over time. As a rule, a small galvanized apron and quick-installation dowels are suitable for this.
Sealing seams and cracks inside the balcony
Unlike external roof and window insulation, which requires climbing skills, internal balcony waterproofing can be done with your own hands. Structural seams and resulting cracks require mandatory sealing before further repairs. Delaying or neglecting this process will lead to the formation of “wet” spots and subsequent aggravation of the problem.
Types of balcony seams
More than 90% of the moisture entering the balcony passes through unprotected joints of the slabs, which in their normal state are not a serious obstacle to rain or melt water. Construction seams are divided into two types:
- fixed (cold) – formed between two stationary structures (slabs, walls, ceilings, etc.);
- moving (deformation) - made to prevent deformation of the object, which may arise as a result of soil movements and temperature fluctuations.
Open seams are the main reason for the spread of fungus and mold on the balcony
Methods for sealing seams
Each joint has individual characteristics (width, depth, geometry), and therefore requires an appropriate approach. Sealing seams and cracks on the balcony is carried out using several methods:
- Sealing with cement mortar. The simplest and cheapest, but not the most reliable option. The hardened mortar does not have even minimal elasticity, so if it is used to seal an expansion joint, there is a high probability of cracks appearing.
Sealing the seam with concrete
- Sealing the joint with an elastic band. One of the most common methods of sealing joints of concrete slabs. A sealing band made of foamed polyethylene or butyl rubber is pressed into the groove, after which the seam is sealed with a sealing compound.
Laying the harness and applying a layer of sealant
- Sealing of small seams and cracks. Small-width joints and structural defects are sealed using the injection method, in which the sealant is injected into the joint cavity with a construction syringe.
Isolation of small seams by injection
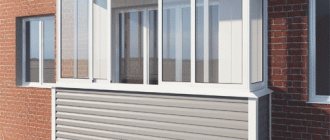
Is it possible to do without glazing?
In order to provide a balcony or loggia with a sufficient degree of waterproofing, it is necessary to install glazing. Moreover, in addition to installing double-glazed windows, it is important to pay attention to sealing seams and external cornices. But you shouldn’t completely neglect treating the floor when waterproofing an open balcony: otherwise the slab will be constantly exposed to direct exposure to rain, snow, fog, etc. This is especially true for waterproofing a balcony in a wooden house. If the balcony is open, when waterproofing the floor, you should create optimal conditions for drainage due to a slight slope from the wall to the outer wall of the balcony.
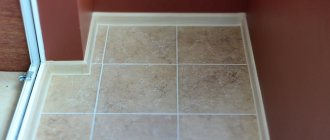
Waterproofing floors on balconies and loggias
The floor on the balcony of an apartment building also serves as a ceiling for the neighbors below, so it should be waterproofed to avoid unnecessary problems. Residents of the first floors should not relax either. Moisture from the basement will rise through an unprotected base onto the balcony, which will lead to increased humidity and damage to the flooring.
Floor waterproofing methods
There are several methods for sealing a balcony floor, which differ in the building materials used:
- Coating insulation is a multi-layer coating of an elastic sealing mixture, which is applied with a brush or roller.
- Cast insulation - a layer about 5 cm thick is made of mastic or a polymer composition, which are in a semi-liquid state when applied.
- Pasted insulation – gluing of hydrophobic material.
High-quality floor waterproofing extends the service life of the concrete base
Technology for sealing the base
Regardless of the material chosen, waterproofing of the balcony floor is carried out using the following technology:
- The base is cleaned of dust and dirt, defects are sealed with cement mortar.
- The prepared coating is treated with a primer if necessary.
- According to the instructions for using the material, a layer (or several layers) of waterproofing is applied to the surface.
- A screed is made from tile adhesive or concrete on top.
To ensure high adhesion of the screed to the waterproofing layer, the latter is sprinkled with quartz sand during the drying stage. Excess sand after the sealant has cured is removed with a vacuum cleaner.
Scheme for protecting the balcony base from moisture
Primer for ready-mix waterproofing
Each waterproofing requires its own type of primer. For waterproofing from a dry cement mixture diluted with water, different primers may be required (read the instructions carefully). Sometimes this is a deep penetration primer, and in other cases you can simply moisten the surface with plenty of water. This is important so that the waterproofing layers do not dry out.
Do not violate the instructions for using waterproofing, this will lead to disastrous consequences, as well as faster damage to the materials used. Strict compliance with the manufacturer's requirements will allow you to achieve maximum effect.
Acrylic or rubber bases - as a rule, require deep penetration primer to prevent the ingress of dust (both construction and street). Liquid waterproofing must be applied to a good tacky surface. Some manufacturers require that the surface be treated with a primer that is designed specifically for this type of waterproofing.
Bitumen bases – primer is strictly required! Very liquid soil of this composition is often sold in ready-made form in hardware stores. However, finding such a primer is quite difficult. In order to make it yourself, you can buy a minimum amount of bitumen waterproofing (mainly based on kerasin or its derivatives), dilute it with water in a ratio of 1:10 or 1:7. The result should be a liquid that penetrates well into all pores. The substance will visually resemble highly diluted coffee (light brown tint).
An additional advantage of such a primer is that kerosene will fill all the pores with bitumen particles dissolved in it. The prepared base dries quickly and bitumen waterproofing fits well on it. On such a base it will not stretch as on a cement surface.
It is necessary to note that sometimes there are bitumen-rubber mastics (also water-based). The instructions will indicate which primer needs to be used - deep penetration, water, or prepare it yourself.
Video instructions and tips
Detailed instructions from Sika, the manufacturer of the polyurethane waterproofing coating Sikafloor-400 N Elastic for reliable protection of the concrete base and floor covering from the destructive effects of moisture:
A step-by-step guide to installing a beautiful, durable floor on an open balcony, loggia or terrace in a private home:
What to do if the balcony is leaking from above? Eliminating leaks at a problematic facility:
Sealing balconies and loggias requires an integrated approach, in which absolutely all joints, abutments, and cracks are treated with appropriate materials. If you can do the internal work yourself, then for external waterproofing you will have to use the services of industrial climbers who have the necessary equipment and experience working at heights.
YOU MAY ALSO BE INTERESTED
Preparatory work - step-by-step instructions
Waterproofing a balcony is never done without prior preparation. Its essence is to ensure the most effective penetration of insulation. Since the treatment requires exposure of the concrete base, the extent of preparatory work may vary in composition. You may have to remove the old screed or wood flooring.
In advanced cases - with partially destroyed concrete structures, the repair composition Skrepa M500 is very appropriate. The mixture is used for the restoration and repair of concrete and belongs to the Penetron system of waterproofing materials.
Exposed reinforcement, if any, is cleaned and treated with an anti-corrosion compound. The cracks are opened for subsequent filling with screed or filling with plaster. Before leveling the surface, it is thoroughly cleaned of debris and dust, and then primed. The last stage is the actual alignment. It is recommended to make an expansion joint around the perimeter of the balcony - between the walls and the floor. It will prevent cracks from appearing. The seam (before pouring the screed) is filled with foamed polyethylene and then sealed with elastic sealant.
Installation of drainage systems
The waterproofing system may include drainage systems. Of course, this cannot be classified as preparatory work, but in many cases these are additional water protection measures. The simplest system is a ladder that is mounted at the bottom of the balcony floor.
External drain gutters are installed on small balconies - up to 4 meters long. The diameter of the pipes is 70-150 mm, and the width of the gutter is about 100 mm. Large balconies require the installation of several drains connected by drainpipes.
After installation or installation of a water drainage system, the joints must be carefully sealed with elastic sealant (polyurethane).
Application of polyurethane sealant
The material is mixed with water in the proportion that is usually indicated on the packaging, after which the solution is applied to the prepared moistened surface. All seams on the floor and connecting corners are taped and coated with a waterproofing compound. Having completely treated the entire surface of the floor with a thin layer of insulation, it is reinforced with a fiberglass mesh with a mesh diameter of 4 mm, pressing it into the insulating layer.
After waiting for the first layer to dry completely, apply the second layer using a spatula. The layer must be carefully leveled and smoothed.
Waterproofing is applied to the floor in several layers until the required thickness is achieved.
The height of the insulating layer should not be less than 20 mm if there is no room under the balcony, and not less than 4 mm otherwise.
It is recommended to carry out work in moderately hot weather, since rapid drying may cause cracks to form. Before completing the final floor covering, for example, tiles, the waterproofing layer must sit for 3–5 days.
Types of screeds
There are several types of ties that are suitable for leveling and protecting the balcony slab:
- Dry. Consists of an insulating layer of dry expanded clay mixture, extruded polystyrene foam or mineral wool boards and a hard covering of gypsum fiber sheets or special Knauf boards.
- Wet, poured over a reinforced concrete slab or a layer of insulation with reinforcement, from a cement-sand mortar of a creamy consistency.
- Semi-dry from cement, sand and fiberglass, with the addition of a minimal amount of water.
- Self-leveling from special polymer bulk mixtures, can be used in the case of a perfectly flat surface of a reinforced concrete base slab.
The choice of screed filling technology depends on the operating conditions: will it be an open balcony, a glazed unheated loggia or a warm heated room.
The weight of the leveling coating is also important.
Wet cement-sand screed has a lot of weight. It is not advisable to use it on dilapidated old balconies. It is better to install dry screed on heated loggias.
For balconies that do not require insulation, a thin self-leveling screed is suitable
TOP 3 best products according to customers
Light cement screed Knauf Ubo/Knauf Ubo 25 kg
438.00 rub.
Product code 206
Light cement screed Knauf Ubo/Knauf Ubo 25 kg Light cement screed Knauf Ubo/K…..
Floor screed Osnovit Startoline FC41 H 25 kg
180.00 rub.
Product code 217
Floor screed Osnovit Startoline FC41 H 25 kg Self-leveling floor Osnovit Startoline FC41 H presents with…..
High-strength floor screed Unis/Yunis Horizon 25 kg
216.00 rub.
Product code 12174
High-strength floor screed Unis/Yunis Horizon 25 kg Used on concrete, cement-sand…..
Manufacturing technology for balcony screeds
We start making the screed after preparing the slab and insulating it.
First of all, to make an even screed in the horizontal plane, mark the top of the screed. When installing a dry screed, mark the marks of the top of the insulating layer.
We make markings using a laser or water level.
First, we determine and transfer the zero level to the perimeter of the wall, at a height of 40-60 centimeters from the floor.
From this mark we find the highest point of the balcony slab and add to it the thickness of the layers of insulation and screed and make a mark for the top of the insulation and slab. We transfer the points to the perimeter of the wall.
Marking is necessary on large balconies and loggias.
Installation of dry screed
Dry screed is ideal for insulating and leveling glazed and heated logs.
We use expanded clay as an insulating layer.
On the surface of the slab we install beacons made of wooden or metal slats on slides of mortar and adjust them according to the level.
Figure 7. Installation of beacons.
We pour expanded clay between the guides, leveling and tamping using the rule.
After compacting the expanded clay layer, the beacons can be removed and the resulting cavities can be filled with expanded clay. To create a more durable layer, the insulation can be shed with cement laitance.
Figure 8. Insulation of the lodge with expanded clay.
We lay the gypsum fiber sheets on the insulation in two layers in a checkerboard pattern, with the seams and joints in the rows and layers offset by at least 30 centimeters. We fasten the layers together with PVA glue and self-tapping screws. After completing the work, seal the seams and recesses from the screws with putty.
Figure 9. Construction of a screed made of Knauf slabs.
The advantages of a dry screed on a log are that there are no wet and dirty processes, the base is immediately ready for laying the finishing coating, the screed does not load the floors and can be used even on dilapidated balconies. In addition, expanded clay is an excellent insulation and sound insulator.
TOP 3 best products according to customers
Plaster KNAUF DIAMANT / KNAUF DIAMANT BARK BEARD 2.5 mm (25 kg)
335.00 rub.
Product code 12699
Decorative cement plaster Knauf Diamant is used to create a granular, grooved surface.....
Decorative plaster Unis / Eunice “Bark beetle-Decor” 3.0 mm 25 kg
400.00 rub.
Product code 12669
Decorative plaster Unis / Eunice “Bark beetle-Decor” 3.0 mm 25 kg Decorative coarse.....
Wet floor screed
To prevent cracking of a wet screed, it must be pre-reinforced.
To reinforce the screed on the balcony, a metal or fiberglass mesh is suitable.
First lay the mesh on the prepared surface. To ensure that the mesh is in the body of the concrete, we install it on plastic clamps, wooden blocks or mortar slides.
On top of the laid mesh we install guide beacons on cement or gypsum mortar.
Figure 10. Installation of beacons on a reinforced base.
We prepare a cement-sand mortar using a ready-made mixture in bags, or taking cement and mortar in a ratio of 1:3. Pour the dry mixture into a container with water and stir using a construction mixer or drill with a special attachment.
Pour the creamy solution onto the prepared base, starting from the corner farthest from the door and level it using the rule.
Figure 11. Installation of wet cement-sand screed.
Important . Cover the finished screed with film until completely dry to prevent cracking.
The advantage of a wet screed is that it is durable, not afraid of moisture, and slightly reduces the height of the premises.
The main disadvantage is that the base is ready for installation of a decorative coating no earlier than after 28 days.
Cement-sand screed can be installed using a cable heated floor system.
The heating cable circuit is attached with clips to the reinforcing mesh and filled with solution.
Figure 12. Laying the cable circuit of the underfloor heating system..
Self-leveling screed
The main condition when installing self-leveling screeds is that the base must be smooth, clean, dry and free of oil stains.
Permissible deviations are no more than 10 millimeters.
Self-tapping screws and a cord stretched between them can be used as beacons.
Figure 13. Self-leveling screed device.
We prepare the screed solution strictly according to the instructions. For a thin layer we prepare a liquid solution, for a thick layer - a thicker one.
The optimal layer for applying the self-leveling mixture is 2-3 millimeters.
Important . Choose the optimal consistency of the solution, since if it is too thick it will not spread, and if it is too liquid it may separate.
Pour the solution in an even layer over the entire surface, starting from the wall opposite the exit.
Figure 14. Rolling the self-leveling screed with a needle roller.
Roll the poured screed with a needle roller over the entire surface to remove air bubbles.
After finishing the filling, we remove the beacons, and the resulting voids are filled with the solution spontaneously.
Let the self-leveling floor dry for at least a day.
Drying time depends on the thickness of the applied layer, temperature and humidity in the room.
Figure 15. Self-leveling screed on the balcony
This screed is suitable for unheated and uninsulated balconies with a flat base.
Electric heating mats or infrared plates are ideal for insulating floors under a self-leveling screed.
Figure 16. Installation of a self-leveling screed for a heated floor system.
The prepared solution is poured onto the laid heating elements and carefully distributed over the surface using a wide spatula.
Screeding on a balcony is not difficult even for a novice craftsman, following the technology, the sequence of work and using high-quality materials.
A reliable screed will become a reliable foundation for any floor covering and will protect the reinforced concrete slab of a balcony or loggia from premature wear.