The balcony slab is constantly exposed to destructive factors: sun, rain, wind. Because of this, its gradual destruction occurs. One way to protect a balcony slab is to pour a screed. In addition, a screed is needed to level the slab when insulating the balcony. The quality of the floor covering depends on its condition. Since the technology for filling the floor is simple, the work is most often done with your own hands. Initially, it will be useful to familiarize yourself with the existing methods of pouring screed.
Requirements for a balcony screed
There are some requirements for a balcony screed:
- light weight. The balcony slab has limited load-bearing capacity, so additional weight can destroy it;
- durability. Due to a poor-quality base, the floor covering quickly deteriorates. Carrying out frequent repairs in a limited balcony space is very problematic;
- leveling the surface of the balcony slab;
- strengthening the slab;
- additional thermal and sound insulation;
- affordable cost of the mixture for pouring the slab. The mixture should be inexpensive, but of high quality.
Which insulation is better
Most often, balconies are insulated with mineral wool, penoplex, penofol and polystyrene foam - lightweight and easy-to-use materials.
Mineral wool retains heat perfectly, does not allow street noise to pass through, does not burn or emit harmful fumes, and is not damaged by rodents.
Types of mineral wool
Comparison table of mineral wool and expanded polystyrene
A 4 cm thick layer of wool has the same thermal insulation properties as 60 cm thick brickwork. It is produced in rolls and slabs, is easy to install and lasts a long time. But at the same time, mineral wool is a very hygroscopic material, and after getting wet it completely loses its ability to retain heat. In addition, the porous structure promotes the development of microorganisms, which negatively affects the strength of the structure and the microclimate of the balcony. High-quality waterproofing of the floors and the insulation itself will help to avoid this.
Comparative characteristics of two basic types of mineral wool
Penoplex and foam plastic have similar properties. They are produced in slabs of various thicknesses and densities; installation does not require much effort, and such thermal insulation lasts for years. Due to the presence of fire retardants in the composition, these materials do not burn, which is also a big plus. The difference between penoplex and polystyrene foam is its denser structure, increased thermal insulation properties and chemical inertness, which is why it is much more expensive.
Characteristics of penoplex
Comparison of the characteristics of polystyrene foam and extruded polystyrene foam
Characteristics of foam plastic
Penofol is called foamed polyethylene, covered on one or both sides with aluminum foil. It is produced in rolls with a thickness of 3 to 10 mm, and is connected at the joints with aluminum tape. The material perfectly muffles sounds and does not allow moisture to pass through at all, but does not have the highest thermal insulation properties. For greater efficiency, it is laid together with other insulation, for example, polystyrene foam boards.
Technical characteristics of penofol
Prices for thermal insulation materials
Thermal insulation materials
Types of screeds
The final floor covering is laid on the poured screed. There are three filling methods:
- Wet
The solution is prepared from cement with sand or crushed stone, and then poured onto the prepared surface of the balcony slab. The drying process lasts about a month. To crystallize the solution, the surface is regularly moistened with water.
- Dry
The balcony slab is covered with a layer of expanded clay or other bulk material. Special materials are laid on top. This screed is quickly installed, but has the disadvantage of low resistance to moisture. This limits its use for unglazed balconies.
- Self-leveling
There are special mixtures diluted with water. Leveling the surface of the slab occurs due to the spreading of the liquid composition of the mixture. Such a mass has a limited action time, so installation is carried out at an accelerated pace. The mixture cannot be laid on a frozen balcony slab. After a week, you can apply the topcoat.
Self-leveling compounds are available in several types:
- cement mixtures with the addition of plasticizers. The composition is intended for rough finishing when there is a large difference in heights or there are large defects on the slab;
- mixtures with gypsum create the base before finishing installation. They are characterized by low resistance to moisture, so they are not recommended for use on unglazed balconies.
- finishing mixtures. A transparent or colored floor covering is created. These are epoxy and polyurethane compounds. Self-leveling 3D coatings are especially attractive.
The balcony slab does not withstand every screed. Due to its weight, wet, dry and self-leveling screed is suitable for the first floor balcony. Dry and self-leveling screeds do not have significant weight, so they are suitable for balconies on any floor.
Choosing material for the balcony
The choice of materials depends on the type of balcony:
- glazed and heated;
- glazed without heating;
- open.
If the balcony is well glazed, insulated and has radiator heating or heated floors, then residential materials are used for leveling and finishing.
An unheated closed balcony is not exposed to rain and snow. But due to sudden temperature changes, condensation may form. For this reason, moisture-resistant materials should be used in such rooms. For example, plywood, gypsum fiber sheets, moisture-resistant plasterboard, cement-bonded particle board, oriented strand board, screeds. For final finishing you can use tiles, linoleum, moisture-resistant laminate, carpet.
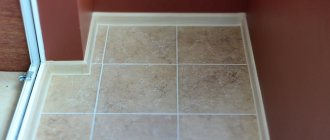
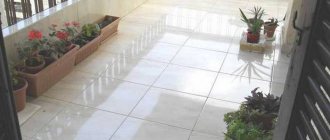
The difficulty is the open balcony. Its concrete floor is exposed to precipitation and frost. In this case, leveling the floor on the balcony can be done using screed, cement-bonded or oriented strand boards. The floor can be finished with porcelain stoneware, ceramic tiles, or terrace boards.
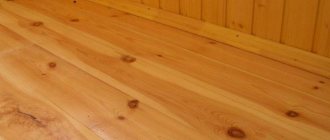
Do not forget that a balcony is a slab on three sides that does not have support. You should not overload it. This means that the floor structure should be as light as possible. Cement screed is not used in cases where the floor rises by 20 cm during leveling. It is better to choose floors on joists. They add minimal weight to the slab. When the floor is leveled no more than 3-5 cm, then a cement screed will be a good option.
Pouring wet screed
Most balconies are filled with wet screed. When choosing this option, you must take into account that a layer thicker than 5 centimeters can destroy the balcony slab. This type of filling has a drawback - it takes a long time to dry. For example, a layer 3 centimeters thick dries completely after three days at normal temperatures. In addition, pouring is carried out under certain conditions, since at low temperatures the solution loses strength.
It is not difficult to prepare the solution: cement, crushed stone and river sand are mixed with water until the concentration of thick sour cream is achieved.
The screed is poured in stages:
- Using a plumb line and level, the zero point of the fill is determined. It is marked along the perimeter of the balcony. The solution should not be poured above this point.
- Waterproofing of the balcony slab is being installed. Roofing felt or polyethylene film is used as an insulating material. The sheets are laid overlapping, and an overlap is made on the walls.
- On large balconies, fine-mesh metal mesh is used to strengthen the screed. It is laid on top of the waterproofing.
- To maintain the same screed level, beacons are placed at the zero point. As a rule, these are metal profiles laid on an alabaster or plaster solution for quick drying.
- The solution is poured in small portions from the wall opposite the door. During pouring, the screed layer is leveled with a building rule or a smooth board.
- After laying the mortar over the entire surface of the balcony, it is covered with a film that protects the screed from moisture evaporation and the mortar does not crack. If you do not use film, the screed will have to be constantly wetted.
- After about a week, the beacons are removed so that cracks do not appear at the points of contact. To make it easier to remove the beacons, they can be lubricated with machine oil before installation. The voids that appear from the removed profiles are sealed with cement mortar.
Self-leveling floor
After laying, ordinary concrete must be leveled according to the beacons as a rule. To reduce the labor intensity of work, manufacturers produce a wide range of ready-made mixtures - self-leveling floors and levelers. They contain superplasticizers, hyperplasticizers and other additives that increase the mobility and plasticity of the mixture several times.
After laying, such concrete, under the influence of gravitational forces, spontaneously spreads over the surface in an even layer. The user can only remove from it the excess air that got there when mixing the components with water with a special needle roller.
If the packaging of the self-leveling floor indicates a minimum layer thickness of less than 3 cm, it is prohibited to make a screed from this material in an unbound and floating manner. Such a thin crust can collapse under the floor covering when walking on it.
A self-leveling floor with a large layer thickness is an expensive proposition, so it is most often used in combination with a wet screed when it needs to be leveled with a thin layer.
Self-leveling monolithic flooring is suitable for open-type balconies and glazed enclosing structures. The permissible loads are indicated on the packaging, so it is better to install the frame of cabinets, the shelves of which will be filled with heavy objects, before installing the self-leveling floor.
Backfilling dry screed
Thanks to dry screed, owners of balconies in old houses are not deprived of the opportunity to equip the floor in a lightweight version. It will only take one day to make such a screed on your own.
Dry screed provides the following advantages:
- quick installation. The finishing coating is installed immediately;
- minimal load on the balcony slab;
- The thermal insulation of the slab increases.
There are also disadvantages:
- the balcony slab does not become stronger;
- requires the use of certain backfills, which are quite expensive.
Most often, non-flammable expanded clay materials with high thermal insulation qualities are used for backfilling: crushed stone, sand, gravel. If you use regular sand, freezing cannot be ruled out. In a hardware store you can choose ready-made dry backfill.
Laying is carried out in the following sequence:
- A waterproofing sheet is laid on the prepared balcony slab. Its ends are fixed to the walls with damper film.
- The zero level of the screed is determined, after which wooden logs treated with an antiseptic are installed across the balcony on anchor bolts, treated with an antiseptic to prevent rotting.
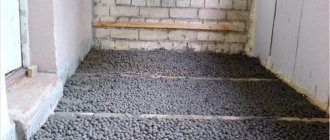
- Backfill is poured between the lags, leveled and compacted. For surface stability, material fractions must be of different sizes. This screed can withstand loads well with a thickness of at least 5 centimeters.
- Plywood or other waterproof material is laid on top of the backfill with glue. When installing, backfill is constantly added under the sheets so that there are no voids.
Useful video instructions:
The first stage is surface preparation
It is necessary to remove all unnecessary objects from the loggia, beat off the old screed, if necessary, down to the concrete slab. All cracks and holes must be very carefully sealed with cement to avoid the risk of leakage (especially if you plan to make a liquid screed on the balcony).
Then clean the surface again from construction dust and dirt, prime it so that the construction mixture will better adhere to the concrete.
The floor solution must be prepared immediately before work - the mixture dries out quite quickly. The dosage of water and instructions for using ready-made compositions are on the packaging; if you use ordinary cement and sand, then you need to mix them in a ratio of 1:3 (if you are sure of the excellent quality of the cement - 1:4). Water - enough to obtain the consistency of thick sour cream or dough.
Why is thermal insulation needed?
The thermal insulation function is very important on balconies and loggias. It helps get rid of dampness and constant formation of condensation, especially when there are temperature changes outside. Insulate the room; it can be used for personal purposes: organize a leisure area, make it a storage room or an additional mini-room.
Insulating the floor will allow building materials to retain their attractive appearance longer, so the regularity of repair work is eliminated.
Insulation with penofol and expanded polystyrene
With combined insulation, the procedure is slightly different:
- unwind a roll of penofol and cut a piece along the length of the balcony + 40 cm;
- lay the material on a clean and dry base, placing the edges on the walls of the balcony;
- the joints are sealed with aluminum tape;
Laying penofol - sawing timber along the width of the balcony;
- install the outermost logs at a distance of 5 cm from the walls;
Laying lag on penofol
Laying lag on penofol
The logs are laid on top of a layer of penofol - having retreated 50 cm from the first log, fasten the second one, and so on to the opposite wall;
- The location of the beams is checked with a level and screwed to the floor;
- the openings between the logs are filled with polystyrene foam boards to the thickness of the timber, the joints are foamed;
Laying polystyrene foam
Laying expanded polystyrene between the lag cells - cut off the penofol again and lay it on the insulation with the foil facing up, sealing the joints.
At this point the insulation process ends and the installation of the finished floor begins. If everything is done according to the rules, the balcony room will remain dry and warm even in severe frost. But the appearance of condensation will indicate an incorrectly selected insulation thickness or poorly executed waterproofing.
| Insulation | Thermal conductivity coefficient of insulation (W/m 0C) |
| Mineral (basalt) wool | 0,034-0,040 |
| Polyurethane foam slab | 0,022-0,026 |
| Sprayed polyurethane foam | 0,019-0,030 |
| Expanded polystyrene (foam) | 0,038-0,042 |
| Penofol | 0,047-0,050 |
Tips for installing Penoplex
- If installation of insulation in two layers is required, then the slabs are arranged in a checkerboard pattern;
- recommended screed thickness is at least 4 cm;
- if the screed is reinforced, then the distance from the insulation to the reinforced fabric should be at least 1-1.5 cm.
Using Penoplex, you will reduce heat loss in the room, a significant part of which occurs on the floor.
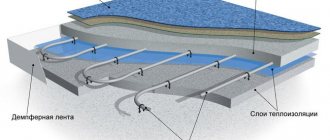
And with a “warm floor” system, the material will not allow the loss of precious heat, heating the ceiling to the neighbor below.
Installation of Penoplex is easy, and the result will please you for many years.
Source: floordigest.ru/ustroystvo-montazh/uteplenie/uteplenie-pola-penopleksom.html