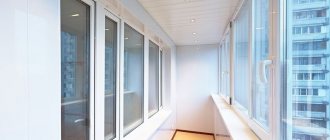
From the author: hello, dear readers, and again we are looking at the most common problems and repair errors. With the onset of cold weather, many of us are faced with the appearance of condensation and mold on plastic windows, ceilings and walls. There are many reasons for these problems, but today we are interested in how to get rid of condensation on the balcony and loggia once and for all.
Are there clear and understandable instructions on how to fix the problem? Yes, and in our article we will analyze the reasons for the appearance of condensation, and also offer several solution options, tested in practice by experienced craftsmen.
The main causes of condensation
How often do you hear complaints from friends that after expensive insulation or glazing of the balcony, condensation appears, and then mold appears on the windows, walls and ceiling. But, as it seems to us, we have provided for everything. What is recommended other than arming yourself with an antifungal agent, a rag, and periodically treating problem areas? We advise you to take our express course for a specialist in correcting errors in the insulation of loggias and balconies .
Thanks to the knowledge gained, you will save your friends and yourself from condensation, as well as mold fungus, which is dangerous to the human body.
Let us examine in detail the main causes of errors that can lead to condensation:
- violation of preparatory work for cleaning the rough base from contamination, treating damaged walls and ceilings, as well as eliminating cracks and crevices,
- use of low-quality building materials, such as:
- poorly dried slats and beams, which then become deformed due to temperature changes,
- defective or low quality fittings and window system design. Defects in fittings are one of the common problems with the appearance of condensation, usually the cause is associated with a loose fit of the rubber seal,
- illiterate choice of profiles and insulation, without taking into account the characteristics,
Advice: the standard choice for insulating balconies and loggias is mineral wool, polystyrene foam or polystyrene foam, but experienced craftsmen advise choosing the latter material, since it best matches the characteristics declared for the balcony and easily tolerates temperature changes.
- violation of balcony insulation and installation technology. When installing insulating structures, they often forget about treating the externally exposed parts of the balcony or loggia (ceiling, walls and floor), later condensation appears on them and moisture appears,
- excessive savings or the desire for maximum results when insulating. In the first case, you get a cold room with constant sharp changes in temperature, in the second - a closed, sealed space,
Advice: when selecting a material for sealing joints between insulation boards, give preference to polyurethane foam instead of gypsum putty. The gypsum layer not only conducts heat and moisture, but also creates a basis for the formation of condensation, and subsequently mold.
- ill-conceived or incorrect ventilation and heating systems,
- the flow of rain or snow from the upper floors,
- Air conditioner malfunction and condensate leak. Typically, such problems arise in the cold season: freezing of pipes, valves, malfunction of condensation pressure.
As you can see, there are not many reasons, but they all carry significant financial costs to varying degrees, and it will take time to correct.
How does condensation occur? Theoretically, this happens as follows: moist air in the form of steam penetrates through the insulation. When faced with a cold wall, it settles on the surface and condenses, turning into a liquid state. Over and over again, the insulation becomes saturated with moisture, resulting in:
- leaks appear in the form of “tears” along the wall,
- under conditions of minimal air exchange in problem areas, favorable conditions are created for the appearance of mold. The first signs of a problem will be the appearance of small black dots, then we will talk about corrosion and destruction of building materials, and fungi growing deeper into the material.
We do not set ourselves the goal of writing a “book of horrors”, we only want to convey that mold spores can destroy, at a minimum, your fresh renovation and, at a maximum, affect your health and lead to allergies and asthma. Let's draw conclusions!
Step-by-step troubleshooting instructions
Depending on the nature of the problem, the materials from which the frame of the window unit is made and the location of the condensation, the elimination of defects is carried out according to different technological maps .
On glass
The stages are as follows:
Wipe the translucent element to remove all greasy stains and dirt.- Applying toothpaste, aftershave cream, a solution of liquid soap, glycerin and turpentine.
Drawing a mesh of soap and then rubbing the applied substances over the entire plane of the window. - Application of chemical agents against condensation formation, according to the instructions for their use.
- Gluing energy-saving films onto the window with further heat treatment with a hairdryer.
Increasing the air exchange rate in the room
To do this you need to do:
- Installation of new fittings for tilt-and-turn window sashes.
- Installation of a supply valve in the areas of the rebate, with partial removal of the sealing tape.
- Installation of an additional hood indoors. A device for complete supply and exhaust ventilation with mechanical drive, according to the required air exchange rate.
- Installation of an air dryer.
- Installation of a split system or unit air conditioner.
- Adjustment of the locking pins of the window block from summer to demi-season or winter mode.
Additional measures
You can also take the following steps:
- Installation of an electric or water heating radiator of rated power. Installing a fan heater in a new heated puritanism.
- Replacing the window sill board with a narrow framing element.
- Carrying out insulation of slopes of window blocks.
- Rearrangement of translucent structures in the dew point formation zone.
- Installation of self-adhesive tapes around the perimeter of the installation seam.
- Additional insulation of the facade from the outside of the building, after preliminary calculation of the energy efficiency of the room and the heat transfer resistance of the enclosing structures.
- Electric glass heating device with the organization of a dedicated line for connecting the system to the power cable network.
Important. In case of radical intervention in the design of a translucent element, it is recommended to contact professionals, as they will complete all the work quickly, efficiently, use the best consumables and provide a long-term guarantee for the result.
External and internal insulation
In previous articles, we discussed the topic of insulation in detail, noting the pros and cons of different building materials, highlighting that each method of insulation and financial costs will depend on the technical characteristics of your balcony.
Source: balkonix.ru
Internal insulation
By insulating only the inside of the room, you are unlikely to get the full effect of the work done. The fact is that by placing only a layer of insulation on the inside, you will leave the outer walls exposed to rain, snow, hail and sudden temperature changes. Moisture, which is destructive for insulating materials, will penetrate through the layers and, as a result, accumulate under thermal insulation and appear in the form of condensation on the windows and internal surfaces of the balcony room.
Advice: consider internal insulation only in conjunction with external work!
What materials are most often used for interior work:
- Styrofoam,
- penoplex,
- foil penofol,
- mineral wool and vapor barrier.
Advice: experts advise installing a vapor barrier before and after the insulation; this is necessary to achieve maximum effect. An exception is made only for foil penofol, since one of the layers already contains a vapor barrier.
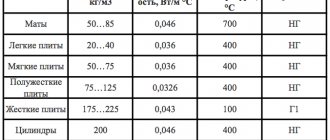
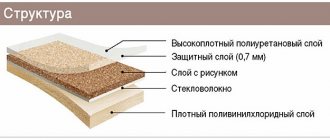
There is no ideal insulation scheme, but by looking at the illustration with detailed indicators, you will be able to assess the scope of internal and external work.
Source: balkonix.ru
As part of internal insulation, you can consider installing a heated floor system, which will eliminate the appearance of dampness and condensation, and you can also give preference to three- or four-chamber PVC windows. Windows with such characteristics will not only insulate the balcony, but will also prevent low temperatures from entering inside.
External insulation
On the outer surface of the loggia or balcony, foam plastic or one of the thermal insulation materials that meets the characteristics is most often fixed. All seams and joints must be sealed using construction foam. Be careful, the slightest cracks can lead to water leakage and destruction of the integrity of the structure. In addition, visors and drains are thought out, which will protect the insulation from the physical pressure of seasonal precipitation.
Important: external insulation is the most expensive and difficult work to complete, especially if you own an apartment in a high-rise building. Therefore, for outdoor work, it makes sense to turn to specialists who have the appropriate industrial mountaineering skills and special equipment.
Thermal insulation material, as in the case of interior work, can be hidden behind decorative trim. It will create another layer of insulation and protect against water getting inside the structure.
Where exactly can it appear on the insulated?
In the first season after insulating the cold circuit, the owner of the property may notice the formation of condensation on the following parts of his window structure:
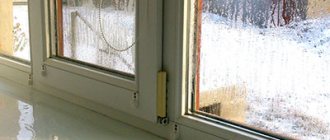
- The traditional place for fogging of most translucent structures is the inner plane of the glass unit. The material has a high density and homogeneous structure, which affects the increased thermal conductivity value.
- Material for filling the installation seam along the perimeter of the window unit at the points where it interfaces with the end of the opening in the outer wall.
- The bottom of the window structure is in the area where the window sill board is installed, especially if its width is more than 150 mm, or it is installed with poor-quality seam filling.
- The line where the tilt-and-turn sash joins the main profile of the window frame, in case of incorrect adjustment of the fittings.
- The slope plane is in the area of the piers or lintels, which indicates incorrect installation of the window frame - to the point where the dew point forms in the body of the enclosing structure.
- If there are aluminum windows, condensation can form along the entire plane of the profile, if there is no polymer thermal break in its design.
- Delamination of energy-efficient double-glazed windows, which causes moisture to enter the air chambers and, as a result, fog up.
Note. Regardless of the fact that these problems always have a logical explanation, the formation of condensation on an insulated balcony is not the norm. Such situations require prompt intervention and repair and restoration work.
Ventilation
The easiest way to get rid of condensation in a new or renovated room is to provide regular natural or forced ventilation. In the first case, the air will circulate independently, and in the second, with the help of a fan.
The downside of ventilation structures can be freezing in winter, as well as the ingress of dirt, dust or insects in summer and spring.
Source: homeli.ru
Grilles and diffusers
The easiest way to eliminate condensation on windows is to install a grill that will let fresh air through. Note that in winter there is a high probability of the hole freezing and heat escaping from the room.
An alternative to a grille can be a diffuser; thanks to its design and the ability to regulate the air supply, it does an excellent job of ventilation inside the loggia and balcony. You can choose one of two types: supply or exhaust. Some models have internal louvers that can control air direction.
Forced ventilation
This type of ventilation is not often used, but deserves attention. Supply ventilation is installed in the lower or upper part of the wall; an option consisting of two fans and a forced draft device is possible. What does the installation give us? The room is provided with natural air movement and there is no accumulation of condensation.
Source: homeli.ru
But there is a significant drawback: in winter, cold, damp air can penetrate through a running fan. To solve the problem, you can equip the fan with plastic doors or purchase a fan with an exhaust hood.
Window and wall valves
Another inexpensive and simple solution to improve ventilation is to install a special valve in the upper part of the window. Outwardly, it resembles a narrow box that is inserted into the gap between the window frame and the sash.
Source: balkonix.ru
The principle of operation of the valve is quite simple: fresh air first enters the box, and only then into the room. Although the throughput is small, the valve retains dust and helps normalize air circulation.
An external or wall valve works on the same principle, which ensures air exchange between the room and the street. Air saturated with moisture comes out and comes in relatively dry.
Source: balkonix.ru
Modern models cope better with high humidity and condensation in the room. Thanks to a well-thought-out ventilation system, you can make your stay on the loggia and balcony more comfortable.
Possible consequences
How this problem could turn out:
- In warm weather, water quickly evaporates, and in winter, condensation on the glass freezes and the windows become covered with ice. After which they quickly fail.
- Due to increased moisture and dampness, mold and mildew can form, and this will lead to big troubles.
After we have found out the reason for the appearance of condensation on the balcony, we will figure out how to get rid of it in more detail.
Dehumidifier
The next option is to install a humid air dehumidifier. Excess moisture is absorbed by the dehumidifier and recorded by a built-in sensor on the device. Modern models have built-in interesting options: timer and remote control. The new device definitely attracts attention with its innovations.
Source: o2vdom.ru
Important: the device is capable of not only recording the level of humidity in the room, but also processing, purifying air using an air filter, and drying from 10 to 100 liters of condensate per day.
How to make a hood on a balcony and loggia with your own hands
It is quite possible to construct a supply and exhaust system with your own hands. In fact, you just have to install two fans, one of which will work for air supply, and the second for air output. And in order to place them correctly, let’s remember the simplest law of physics: warm air moves up, cold air goes down. Therefore, the supply unit is mounted near the floor, and the outlet unit is mounted closer to the ceiling.
It is advisable to design the ventilation openings diagonally to each other - this way the system is guaranteed to cover the entire room and prevent the formation of condensation.
Compact multi-zone ventilator
To work you will need:
- 2 fans of equal power for air intake and exhaust. The best option is to choose models that are immediately equipped with plugs that block access to air when the device is not working. Otherwise, in winter you will have to close the ventilation hole with homemade partitions.
- Electricity supply.
- Fastening systems.
- Hammer.
- Sealant, plaster mixture, spatula.
To install the fan, draw a marking for the diameter of its shaft, turn on the hammer drill to jackhammer mode and make a through hole outward. Then you need to connect the device to pre-installed wiring, install it in the prepared passage and treat it with plaster around the perimeter, masking the joints. When the mixture dries, you can apply a sealant around the perimeter to prevent air from entering from microcracks.
On a small square loggia, you can get by with installing one supply and exhaust fan. If the room is long, it is better not to take risks and mount two devices.
Is it possible to solve?
The problem of window fogging can be solved, regardless of the cause of the problem. To prevent the formation of condensation, the following basic techniques can be applied :
Replacement of translucent elements with energy-efficient double-glazed windows.- Organization of air heating or ventilation on the balcony, which at the same time helps to expand the functionality of this room.
- Installation of energy-saving glass, or the use of modern methods of heating cold surfaces.
Each chosen method entails certain work, as well as the need to purchase consumables.
Important. Before deciding to carry out repair work, it is necessary to draw up a plan, taking into account all upcoming expenses.
When is it impossible without radical measures?
In some cases, simple repairs with minimal costs will not be possible , and the master decides to completely replace the window structures, or to carry out additional work in the space of the balcony or loggia:
- If there is single glazing on the balcony, installed in cold profiles with a minimum thickness.
- In the absence of hermetically sealed locks that ensure a tight fit of the frames in the vestibules.
- If there is heating on a balcony with inefficient windows.
- In case of freezing of the glazed contour from the outside, on a reinforced concrete floor slab without thermal liners.
In such situations, only dismantling window structures and replacing them with new, energy-saving frames with double-glazed windows can help.
Ways to get rid of excess moisture
- Use natural materials to decorate the balcony, allowing the surfaces to perform their microcirculation functions. Ventilate the room several times a day, exchanging air and removing excess moisture.
Schematic representation of condensation formation - Monitor the quality of the glazing on the balcony during work, choose suitable double-glazed windows and entrust the installation to trusted companies.
- A beautiful and simple way to combat moisture on windows is to use candles. Decorative candles placed on the windowsill burn slowly and balance the temperature.
- You can use a chemical method, it is expensive, but it will rid the windows of condensation. You just need to wipe the glass and apply a special protective agent to it.
- Install heating on balconies or loggias. If ventilation does not give the desired result, you can put a heater in the room. To save on electricity, you can install an electric convector with thermoregulation; it will remove excess moisture from the room.
These methods of dealing with condensation on balconies are quite effective, but still the most effective option would be high-quality insulation both outside and inside.
Preparatory work
As already noted, steam insulation should be done before insulating the balcony. Prepare the room, remove everything unnecessary, including garbage. Remove the door frame and balcony threshold. Fill cracks and crevices with foam. Eliminate any unevenness.
When the surface is ready, you can begin installing the vapor barrier layer. But before that, it’s worth dealing with the question that worries builders (especially beginners): which side should the vapor barrier material be laid on? Vapor barrier materials are produced double-sided
Which side to lay the insulation on is really important, and it also matters on which side the vapor barrier is done - external or internal:
Balcony vapor barrier diagram
- if external insulation of the facade is carried out, steam insulation is laid on the outside of the insulation;
- if the insulation is internal, the insulation should be laid as an inner layer over mineral wool or polystyrene foam;
- When insulating the ceiling, a film that retains steam is glued to the insulation.
If the balcony vapor barrier material has a fabric side, it should “look” outward, while the foil side should look inside the balcony (with internal insulation).
Polymer materials
Ordinary polystyrene foam with a density of 25 kg/m3, suitable for thermal insulation, has a thickness of at least 80 mm. This type of stove copes well with thermal protection. With extruded polystyrene foam the situation is somewhat different than with ordinary foam - its vapor permeability is 3-10 times less.
Therefore, a material 30 mm thick already protects well from excess moisture. To ensure thermal insulation, you need to increase the thickness to 50-60 mm. When calculating the thickness of the polymer material, climatic conditions and technical and thermal standards of the area where the work is carried out are taken into account. Therefore, the dimensions of the material may fluctuate up or down.
Stages of thermal insulation work
Before insulating the loggia inside, a number of preparatory works are carried out:
- glazing and sealing of all gaps between the frames and the wall, parapet;
- surface preparation;
- waterproofing.
Double-glazed windows with frames made of any material are chosen as glazing. They must be functional, have a ventilation mode and be light enough so as not to create additional load on the floor slab.
The walls, ceiling, and floor are first cleaned of debris and other contamination, and the integrity of the surface is checked. If cracks and gaps between tiles are detected, they are filled with sealant. Level if necessary.
An important approach to properly and better insulating a loggia is to create a layer of waterproofing. To do this, use one or more materials, since it is necessary to waterproof the parapet and all external walls, floor, ceiling, frames.
Waterproofing materials include:
- roofing felt;
- penofol;
- various types of coating and painting substances;
- penetrating waterproofing;
- foilisolone.
Rolled waterproofing is glued overlapping to the base, and the seams are sealed with sealant, sealed with special tape or soldered, as is the case with roofing felt. When covered with foil isolone, an additional layer of thermal insulation is obtained. The use of coating, painting, and penetrating insulation is justified in hard-to-reach areas and in cases where the room size is very small.
After determining which insulation is best for the loggia and carrying out preliminary work, they proceed directly to the insulation itself. There are two ways:
- a continuous layer of heat-insulating material is created and any options for steam penetration into the insulation are minimized;
- laying insulation and covering it with a vapor barrier.
Insulation methods
First.
In this case, materials with low vapor permeability are used: polystyrene foam, expanded polystyrene. Their thickness must be such as to create the required resistance to the passage of steam and at the same time be sufficient for the necessary thermal insulation. In the case of using tile insulation, the sequence of work is as follows:
- tile adhesive is diluted;
- glue is applied to the corners of the slab and in the center;
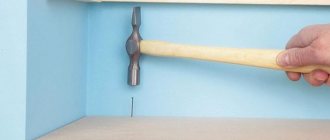
- the plate is applied to the surface and holes up to 6 cm deep are drilled through it with a hammer drill for dowels;
- final fastening is carried out through the drilled holes using dowel mushrooms; a minimum of 5 dowels are used;
- the next slab is also laid after checking the surface with the rule;
- the seams between the plates are sealed with assembly adhesive or taped;
- it is possible to lay a second layer of insulation, for example, penofol;
- after laying all the sheets, reinforcement is carried out with fiberglass mesh;
- putty for leveling the texture of the mesh.
Reinforcement is carried out in four stages:
- treat the slabs with coarse sandpaper;
- cover the slabs with glue up to 3 mm thick;
- press a fiberglass mesh with cells measuring 5x5 mm into the glue;
- Apply a second layer of glue over the mesh.
You can also use rolled thermal insulation materials; the installation technology will not change. In this case, pieces of insulation of the required size are cut off. After such insulation, the resulting surfaces are completely ready for painting, decorative plaster, pasting with liquid wallpaper or any other decorative material.
Second.
For this method there are no restrictions on the choice of insulation, since the technology provides for the creation of a vapor barrier between it and the decorative finish. Such insulation is carried out with the help of arranging wooden sheathing or without it, but then the sheathing for fastening drywall, lining, PVC boards is made on top of the vapor barrier.
The sheathing is made from wooden beams or metal fasteners and profiles. In the case of metal parts, insulation must be laid under them.
The height and width of the sheathing depends on the type of insulation:
- for mineral wool, the beams are selected to be smaller in width than its mats, so that laying is carried out spaced apart;
- it is advisable to lay several layers of cotton wool to cover the beams, then they will not become conductors of cold;
- for foam plastic, all parameters of sheets and beams must match.
After laying the insulation into the sheathing, a vapor barrier material is attached to it with an overlap. It can be ordinary polyethylene or a membrane. All joints of the vapor barrier are taped with tape. If the cladding with insulation was carried out without sheathing, then profiles for installing the finishing are attached on top of the vapor barrier.
https://youtube.com/watch?v=H1se6Fl6Nms
Mineral wool
There are several types of this insulating material. For a balcony, it is better to choose basalt mineral wool as the most environmentally friendly type with the best technical and operational characteristics.
The material has an impressive list of advantages:
- low thermal conductivity coefficient (only slightly higher than that of penoplex);
- hydrophobicity - basalt mineral wool does not absorb moisture, other varieties (glass wool and slag wool) get wet and change their characteristics;
- good air and vapor permeability - unlike foam plastic and penoplex, this insulation does not interfere with the natural movement of air, due to which a comfortable and healthy microclimate is formed on a closed balcony;
- fire resistance – the melting point of basalt mineral wool is about 1100 degrees; such thermal insulation can stop the spread of fire;
- good sound insulation - mineral wool has a chaotic structure, the air between the fibers effectively absorbs sound waves and significantly reduces the penetration of noise into the room;
- sufficient strength of the sheet allows the use of any finishing materials; some types of mineral wool are suitable for floor insulation;
- resistance to chemicals;
- environmental friendliness and hygiene - no harmful substances are released during use, no biological life in the form of fungi, mold, insects or rodents arises inside the thermal insulation.
Mineral wool also has its disadvantages:
- work must be carried out in protective clothing - when cutting sheets, dust is generated, which causes skin irritation;
- high cost of material.