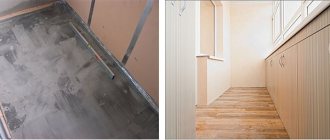
Insulating a balcony or loggia allows you to increase the area of your home and get additional space for work or leisure. But in order to feel comfortable on the balcony all year round, it is necessary to insulate it well. One of the important stages is the insulation of the balcony ceiling, since warm air moves from bottom to top. When planning insulation, special attention should be paid to the choice of insulation and compliance with the technology for performing the work.
Insulating a balcony or loggia allows you to increase the area of your home and get additional space for work or leisure. But in order to feel comfortable on the balcony all year round, it is necessary to insulate it well. One of the important stages is the insulation of the balcony ceiling, since warm air moves from bottom to top. When planning insulation, special attention should be paid to the choice of insulation and compliance with the technology for performing the work.
You should also check to see if the ceiling or roof is leaking. After all, if moisture accumulates between the ceiling and the insulation layer, dampness, mold and a musty smell will form in the room.
Why insulate the ceiling on the balcony
Heat leaves the room to a greater extent through the ceiling, as the heated air mass is directed towards it. If the walls, windows, and floors are insulated, then with a ventilated roof, the work done will be reduced to almost zero. Plus, cold bridges contribute to freezing of finishing materials and the formation of condensation inside the room.
On a canopy, if installed, with a ceiling without insulation, icicles always grow due to the active release of steam from the glazed balcony. Read more in the article “How to make a canopy on a balcony.”
Without thermal insulation work, complete interior decoration of the balcony is almost impossible. This is due to changes in temperature and humidity, which not all materials can withstand for a long time.
How to insulate a balcony to avoid moisture, mold and freezing.
Improper insulation of the balcony can cause the water vapor contained in the warm air to cool on the cold elements of the balcony and turn into water. This will lead to wet insulation, rotting of wooden elements and the formation of mold.
Mineral insulation in the form of cotton wool is especially sensitive to getting wet. Wet insulation freezes and its effectiveness decreases. In addition, if there is a large amount of moisture, it can even seep back into the room and thereby damage the interior decoration.
To avoid such problems, balcony insulation must be installed correctly, namely:
When installing insulation, the formation of cold bridges must be avoided. Cold bridges are blown areas of the structure or places where there is no insulation at all or its thickness is insufficient.
Cold bridges can also be any metal structural elements that pass through the entire thickness of the insulation. Such metal elements conduct cold from the street through themselves into the inside of the insulated room. Metal screws and dowels that secure the wooden sheathing are also cold bridges, but the area of their cap is so small that they can be neglected.
When insulating a loggia, some craftsmen use metal profiles for attaching drywall. They make lathing from such profiles. You can't do that. These metal structures are good cold bridges, as a result of which the structure may freeze and moisture condenses in such places.
All wooden structures must be coated with an antiseptic before installation. This simple operation will prevent mold from forming and wood rotting when it gets wet.
To ensure that water vapor in the warm air of the room does not penetrate into the insulation or into the joints between the insulation plates, it is necessary to glue the joints with metallized tape, and protect mineral insulation with a vapor barrier film or ordinary polyethylene.
If the decorative finishing of the balcony allows, for example, it is planned to install drywall after the insulation with further wallpapering or sheathing with plastic panels, then in this case it would be useful to cover the entire insulation with plastic film. Moreover, the joints of the film should be taped. This will create an airtight, vapor-tight barrier.
The graph below clearly shows how the dew point temperature (blue line) decreases at the installation site of the polyethylene film.
Thermal calculation schedule for balcony insulation.
Relative humidity graph for thermal calculation.
Before you start insulating a loggia or balcony, I recommend doing a thermal calculation. This calculation will help you make proper insulation and prevent the formation of moisture and mold on your balcony.
You can view the thermal calculation of balcony insulation presented above or make your own using this link.
Points to consider before insulation
If the balcony is not located on the top floor, then it is worth talking with the neighbors above. This is necessary to find out the condition of the floor in their premises. Often the gaps between walls and ceilings are end-to-end. The durability of the soldering result will be ensured only by continuous processing of the gap.
In any case, thermal insulation of the ceiling can be carried out on a prepared base.
Here is a list of required work:
- Dismantling. The decorative coating, old joint fillers, and weak areas must be removed.
Thorough thermal insulation
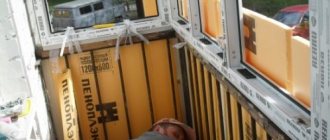
All other methods of insulating a balcony ceiling will be less simple and more expensive. To do this, you need to decide on the method of thermal insulation and the materials used. If you decide to use the latest advances in this area, then it is possible to use polyurethane foam spraying on the concrete surface.
This is a fairly progressive approach and the finishing of such a concrete coating will differ from other methods, but such insulation will give you both warmth and sound insulation. This material has higher fire-resistant properties than foam sheets. But only specialists can perform such work; this is not an option for insulating the ceiling yourself.
Materials for insulating the ceiling on the balcony
To insulate the ceiling, it is more convenient to use roll or slab-type materials. On trading platforms of this kind, products are represented by mineral wool, polystyrene foam and foamed polyethylene. Each option has subtypes, its own characteristics regarding technical indicators and installation rules.
Mineral wool
Mineral wool is represented by fibrous sheets, slabs made from glass, stone or waste from industrial enterprises for the extraction and processing of rocks.
The advantages of such thermal insulation include the following:
- budget;
- pliability regarding cutting, flexibility;
- ability to retain heat and absorb noise;
- resistance to temperature changes;
- ease.
But it is worth noting some disadvantages:
- protection from moisture and steam is required;
- It is necessary to work with a respirator, mask, gloves and completely cover the skin;
- laying is carried out in the grooves of the pre-assembled sheathing.
To insulate the insulation, the base of the ceiling is coated with a compound that does not allow water to pass through. It is recommended to create a ventilation gap between the tree and the hydrobarrier. A vapor-proof membrane is laid on top of the mineral wool.
Styrofoam
The production of polystyrene foam is based on two methods: foaming and extrusion. Depending on the technology, products have different technical characteristics. The most important difference is the density of the slabs.
In any case, the materials have the following advantages:
- rigidity and strength;
- a light weight;
- ability not to transmit heat;
- flexibility regarding cutting;
- moisture resistance.
Among the disadvantages, relative to other materials, the high price, thickness and shorter service life stand out. The latter depends on density. If mineral wool retains its properties for 25, 50 and 80 years, then polystyrene foam lasts up to 15 and about 30 years.
Read more in the article “Insulating a balcony with polystyrene foam.”
Penofol
Elastic foam plastic is protected on one side by a layer of aluminum foil. The fabric is often used as an intermediate moisture-resistant layer in order to reduce the thickness of the thermal insulation cake.
Among the advantages regarding the use of penofol for insulating the ceiling of a loggia or balcony, the following can be noted:
- resistance to temperature changes;
- the ability to retain heat and prevent the penetration of cold;
- low vapor permeability, can be used as waterproofing.
Like expanded polystyrene, foil foam plastic is unstable to organic solvents and products from oil refineries. Fixation is carried out, as a rule, by pressing the canvas to the ceiling using slats.
It is not recommended to damage the metal coating, since the declared insulation characteristics will be reduced in this case.
Table of technical indicators
The table shows the basic technical characteristics of various thermal insulation materials.
| Parameter | Glass wool | Slag | Stone wool | Styrofoam | Penoplex | Penofol |
| Thermal conductivity in W/m*K | 0,03-0,052 | 0,042-0,048 | 0,035-0,042 | 0,028-0,034 | 0,025-0,03 | 0,037-0,052 |
| Soundproofing | 0,8-0,92 | 0,75-0,82 | 0,75-0,095 | 0,45-0,65 | 0,52-0,75 | 0,4-0,55 |
| Water absorption | 1,7 | 1,9 | 0,095 | 4 | 0,4 | 0,7-0,35 |
| Temperatures in ℃ | -60-+500 | -50-+300 | -150-+600 | -50-+75 | -50-+80 | -60-+100 |
The strength and density of thermal insulation materials depends on the raw materials, binders, and production technology used. In addition to GOSTs, manufacturers comply with specifications. And this is reflected in standardized indicators. Therefore, weight and density must be determined separately for each product.
But we can note the distinctive flexibility of penofol, elasticity, causticity of mineral wool made of glass or slag, fragility of polystyrene foam, rigidity of basalt slabs and extruded polystyrene foam.
Expanded polystyrene ceiling tiles
This finishing material is no longer very popular today, but it is still used to decorate loggias. The undoubted advantages of polystyrene foam boards are low cost, minimal weight and ease of installation. This is a fairly high quality and aesthetic material. Expanded polystyrene exhibits excellent thermal insulation properties. In addition, PPS boards have the following advantages:
- moisture resistance;
- non-flammability;
- extremely small thickness;
- ease of cutting, adjusting to size, cleaning;
- Great variety of colors and patterned textures.
The polystyrene foam ceiling harmonizes perfectly with the plastic-lined walls.
Installation involves gluing the slabs and additionally securing them with dowels. The surface is allowed to dry, after which it is given a more presentable appearance by applying decorative plaster or textured paint.
Do-it-yourself insulation of the ceiling on the balcony
How to insulate the ceiling on a balcony? The process is carried out using technology corresponding to the specific material: with or without lathing, with glue or dowels. The main thing is to observe all the nuances regarding the preparation of the foundation. All the steps are simple enough to implement the event yourself.
Installation of mineral wool
The laying of sheets and slabs is carried out using lathing. To assemble it, a beam with a cross section of 50-60 mm is used. For fastening, self-tapping screws with dowels will be sufficient. The groove width is calculated according to the width of the mineral sheets. In this case, to compact the heat-insulating carpet, the distance should be reduced by 20-30 mm on each side.
Direct contact of wool with walls and windows should be excluded by means of a wooden frame. If the material used is of small thickness, then it is laid in 2 layers, overlapping the joint seams of the previous coating. The second sheathing is assembled perpendicular to the main one, and is attached to it with wood screws.
Insulating the ceiling on a balcony or loggia with stone and basalt insulating sheets can be done without lathing. To do this, you will need plastic dowels with a wide head and cement-based adhesive intended for installing mineral slabs. Double-layer insulation is also laid with an overlap.
Before finishing, the fiber insulation must be covered with a vapor-proof fabric. It is attached in two ways: using double-sided universal tape or construction staples and a stapler. Additionally, pressing with slats is carried out. If you have to make an overlap, it should be at least 15-20 mm, sealed with double-sided adhesive tape.
Installation of foam plastic and penoplex
It is enough to glue the polystyrene foam boards using a special solution and secure them with plastic dowels in the form of a fungus. If further finishing is meant with sheathing material, then it is easier to install the sheathing on the base and place insulation in the cells.
Read more in the article “How to insulate a balcony with penoplex.”
Regardless of the chosen method, polystyrene foam and penoplex move when temperature changes occur. Therefore, it is necessary to leave a technological gap of 15-25 mm along the entire perimeter of the slab. And to ensure the tightness of the insulating cover, the voids are filled with polyurethane foam with a low expansion coefficient, so as not to deform the insulation sheets.
Working with foil penofol
Insulation of the ceiling on a loggia or balcony with foil foam can be independent or auxiliary. The installation technology remains unchanged.
The metallized coating should be directed towards the finish. If the ceiling on the balcony or loggia was insulated with another material, then penofol is laid instead of a vapor barrier. Tightness is ensured by gluing the joints with special aluminum tape. This prevents the formation of overlaps.
An air cushion must be installed around the canvas to prevent condensation from accumulating.
The best option for attaching penofol to the ceiling is an adhesive solution. Manufacturers offer a choice of materials with an already applied composition, which significantly speeds up and simplifies installation work.
Another option, self-insulation with foil insulation, is excluded. Staples and a stapler are used for fixation, and a hanging sheathing is additionally installed to support the canvas.
Step-by-step installation
First you need to take the following tool:
- perforator;
- screwdriver;
- roulette;
- pencil;
- spirit level, level (80-100 cm long);
- hammer;
- tracer;
- drywall knife.
Marking
It is necessary to mark the level of the ceiling, that is, where it is planned for the plane to end. This is necessary so that when the ceiling is completely installed, it does not interfere with the window sash opening. Therefore, it is important that the ceiling does not reach at least 2 cm from the sash when open. If the facing material is wooden lining, it is 1.5 cm thick, which means the ceiling sheathing must be placed at a distance of 3.5 cm from the sash.
Since balcony frames are usually placed level, starting from the frame elements, you can get an exceptionally even horizontal line along the window. It needs to be moved to the opposite wall. A spirit level will help with this. Along the adjacent wall, the line from the window is transferred to the opposite wall. Marks are placed in the four corners with a pencil. These marks are connected with a tracer. You can't do this without a partner.
Installation of sheathing
After marking, you need to install a sheathing made of slats or timber. Focusing on the line along the perimeter of the balcony ceiling, a beam/rail is placed along its entire length, secured to the ceiling. Using a hammer drill, holes are drilled along the place where the beam will be in increments of 60 cm, a nylon dowel with a diameter of 8 mm is driven into the holes with a hammer, and then a self-tapping screw corresponding to the diameter of the dowel is screwed through the beam with a screwdriver. If, due to the unevenness of the slab laying, the beam deepens from the horizon mark, then in the place of the screwed-in screw, you need to place a wooden chip under the beam and secure it with a small nail so that over time it does not jump out from under the beam. The timber is placed against the wall using the same principle.
Wooden sheathing on the balcony ceiling
First, the beams are installed at the window and at the opposite wall, and the middle beam is aligned with those already installed. A spirit level will help ensure that all the bars are in the same horizon line. This will ensure the ceiling is even.
If you plan to cover the balcony with plasterboard, then the sheathing should be made from CD and UD metal profiles. Thanks to the markings, there is a line around the perimeter of the balcony. We nail the UD profile onto the brick (concrete) walls with a hammer drill, and screw it onto the plastic window frame with self-tapping screws. Flea beads and self-tapping screws 9.5 mm long will do. The CD profile is installed along the width of the balcony in increments of 40 cm. For rigidity, the CD profile is fixed with U-shaped hangers, which are attached to the ceiling with 6x40 dowels, and the profile itself is screwed with a flea screwdriver. A spirit level will help to control the uniform plane of the CD profile with UD attached to the walls.
Ceiling lathing with metal profiles
Laying insulation
After the sheathing is installed, you can lay insulation: polystyrene foam, penoplex or mineral wool. Having measured the width between the beams or profile with a tape measure, use a drywall knife to cut the required size from the insulation sheet. The size should be made 2-3 mm larger than the required size so that the cut pieces of foam foam fit very tightly into the space of the sheathing. This will allow it not to fall out when nailing the facing material (you can use glue to properly fix the insulation). It is advisable to fill any small cracks with foam.
We insulate the ceiling with penoplex, laying it between wooden sheathing
Important: If insulation is done with mineral wool on a metal frame, then you need to make sure that it also fills the space behind the profile. Metal tends to freeze, but the mineral wool surrounding it will not allow this.
Balcony roof insulation
Insulation of the ceiling is only possible if the canopy over the balcony is in good working order. Therefore, either repairs are made, strengthening of the old structure, or replacement with a new one. Next, you need to install a reliable frame for future work. As a rule, it is assembled from a hollow metal profile with a square section. The parts are connected using a welding machine.
A lathing made of wooden beams is installed on the frame. Waterproofing is laid on it to protect the under-roof elements of the balcony ceiling structure. Next, you can form the decorative flooring with corrugated sheets or metal tiles. Before insulation, all that remains is to fill all the voids with all-season polyurethane foam or a universal sealant with a long service life.
Finishing
Before proceeding with the last stage of insulating the balcony ceiling, you must wait until the polyurethane foam has dried. The excess is removed with a stationery knife, and the seams are carefully cleaned and, if possible, leveled.
Next, all aluminum hangers return to their normal position, and then aluminum profiles are fixed to them. Thanks to the profiles, you can attach any finishing material to the ceiling - from lining to metal slatted panels. But most often plasterboard sheets are attached to the ceiling, and they are usually laid in two layers.
Drywall can be covered with a layer of putty and any decorative coating: emulsion, whitewash, wallpaper, etc. An alternative to drywall is lining made from wooden boards. Although this material is denser than moisture-resistant drywall, it is nevertheless quite loose and capable of allowing steam to pass through.
But even if water vapor condenses on its surface, the lining is sufficiently resistant to moisture. In addition, using this material as a finish, you no longer have to worry about regularly updating the outer surface of the ceiling. You just need to wipe it with a damp cloth from time to time.
Options for organizing the roof on the top floor balcony
There are specific requirements for the roof over the balcony. It must withstand the load from wind, precipitation, and maintain its properties under changes in temperature and humidity. An important point is also the choice of roofing covering with high reflectivity. These can be materials with a silver or white coating.
Regarding the slope of the roof, the issue of eliminating avalanche snow is being considered. To do this, it is enough to maintain a slope of about 45 degrees (30 cm per linear meter) or attach a snow guard in front of the edge.
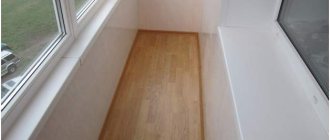
Preparing for work
Prepared ceiling surface of the balcony
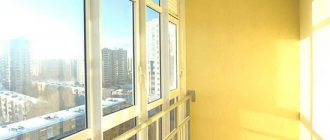
First of all, pay attention to the quality of the glazing of the room. In the absence of reliable double-glazed windows, work on installing thermal insulation will be in vain. It is necessary to ensure the optimal ratio of moisture and heat on the loggia, while maintaining high tightness. Before installing thermal insulation you will need:
- install glazing . If you want to install panoramic windows from floor to ceiling, then leave at least 10-15 cm at the top and bottom to lay the insulation;
- close the cracks with polyurethane foam . After the substance has dried, the protruding parts of the foam are cut off and the surface is leveled with putty or sand-cement mortar. Also, instead of foam, rubber-based sealants or bitumen-rubber compounds are used if the cracks are small;
- level the surface of the ceiling , treat with a solution of copper sulfate. The composition will destroy the fungus and prevent the appearance of new ones.
Additional materials: How to insulate the ceiling in a private house.
Recommendations from experts
The main aggressor for finishing materials on the balcony is water. Therefore, the installation of a hydraulic barrier cannot be neglected. Loggia owners often opt for universal protective equipment from the budget group. This is a wrong decision.
Durability can only be ensured by a product designed for use on concrete structures located outside the building. That is, the hydrobarrier must have a layer of more than 4 mm for external use. The service life should be at least 10-15 years.
As a rule, not only the ceiling is insulated. Therefore, a waterproofing coating must be additionally applied to the adjacent corners. It is better to leave a vapor-proof fabric or isolon with a small allowance in order to later avoid unnecessary hassle with organizing hermetic protection of insulation.
Balcony waterproofing
If the windows have not yet been installed, then it is worth calculating in advance the minimum height of the upper profile of the frame. To do this, sum up the thickness of the insulation, leveling solutions, ventilation gaps and decorative materials with or without lathing. Based on this, a beam will be installed to increase the mounting support for the glazing.
Wooden elements of frames, frames or sheathing must first be treated with an antiseptic composition and dried. Metal profile, fasteners are used with a galvanized coating or painted independently with anti-corrosion paints.
It is not worth taking products for working with drywall, since they are intended for work with small differences in temperature and humidity, that is, inside the building.
Wall decoration
We will consider the most popular materials used for wall decoration, the practical part, that is, we will not touch upon measurements and installation details. Not because we want to keep this knowledge secret from you, but because it will not be difficult for you.
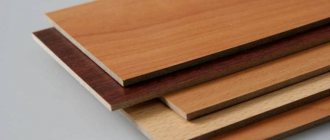
Tree
Perhaps wood is the most popular option for decorating the walls of balconies and loggias, known to us since Soviet times. The most commonly used is the so-called “wooden lining”. It has a rather “presentable” appearance and recreates the interior of country house buildings.
But the choice of wood from which the lining is made should be approached responsibly. For example, coniferous trees (pine, spruce) are not particularly durable.
In addition, there is the so-called “eurolining”, divided into classes “A”, “B” and “C”. Working with eurolining is somewhat easier than with “regular” lining, and, in turn, the class tells us about the immediate quality of the material.
In order for such a finish to last as long as possible, which is what you are undoubtedly interested in, it should be properly reinforced using self-tapping screws.
Of the significant advantages of this finishing material, we highlight the following:
- attractive appearance;
- ease of installation work;
- the ability to replace a damaged segment if necessary;
- a wide range of different types of wood.
"Vinyl lining"
“Siding” or “vinyl lining” is an equally common finishing material. This is a worthy alternative to lining made of wood. It is mounted according to the same principle as the previous version. The significant advantages of this finishing option are obvious. This:
- a wide range of colors and textures (including “wood”);
- ease of installation work;
- practicality and durability: the material does not tolerate fluctuations in temperature and humidity, which, by the way, cannot be said about natural wood;
- relatively low cost, availability.
GKL
Gypsum plasterboard sheets (GKL) are another widespread option for finishing balcony walls. In general, leveling walls with plasterboard sheets is generally accepted when renovating an entire apartment, and not just a balcony or loggia.
Yes, of course, if you do everything correctly, that is, build a strong wooden frame onto which the sheets will subsequently be attached using self-tapping screws, then putty the joints and places where these fasteners are screwed in, then perform a primer and, finally, finishing (for example , paint or wallpaper) - the result will please you, without a doubt.
In addition, drywall is also good because it does not limit you in design decisions: you can recreate literally anything you want. If you want to make decorative niches or recesses that serve as, say, bookshelves, no question. If you want to recreate decorative elements in the form of geometric shapes, no problem.
OSB
OSB is a rather non-standard way of finishing walls. Yes, the material is quite common - and this is no coincidence. OSB sheets are strong, durable, practical, easy to install and relatively inexpensive when compared to natural wood.
After installing OSB, it is not at all necessary to carry out other finishing measures: it is enough to simply cover the surface with a special varnish, but sometimes they can do without it. This will be an element of the Loft design style, which is popular among creative individuals. Therefore, if you are planning to create a study on the balcony, then this style will definitely suit you.
Open communications, some carelessness, “creative disorder” and various metal structures will be in harmony with OSB panels. The so-called Edison lamp can be used as a lighting device, which can be purchased at any construction hypermarket, in the “Lighting” department.
We thank you for making it through this long text. We hope that you found it clear, informative and useful. Now you know how to expand your living space and turn a balcony not just into a renovated balcony on which you can dry clothes, but into something more: a workshop, an office, a library - it all depends on your needs and creative imagination.
Marking
It is necessary to mark the level of the ceiling, that is, where it is planned for the plane to end. This is necessary so that when the ceiling is completely installed, it does not interfere with the window sash opening. Therefore, it is important that the ceiling does not reach at least 2 cm from the sash when open. If the facing material is wooden lining, it is 1.5 cm thick, which means the ceiling sheathing must be placed at a distance of 3.5 cm from the sash.
Since balcony frames are usually placed level, starting from the frame elements, you can get an exceptionally even horizontal line along the window. It needs to be moved to the opposite wall. A spirit level will help with this. Along the adjacent wall, the line from the window is transferred to the opposite wall. Marks are placed in the four corners with a pencil. These marks are connected with a tracer. You can't do this without a partner.