A sauna on a balcony or loggia is unusual, but so cool and interesting. I can even imagine the first reaction of guests when they see that you have your own sauna in your apartment!
A sauna on the balcony of an apartment may seem like too bold a decision, almost crazy. However, this is a very real idea if you approach the matter wisely.
Interior arrangement
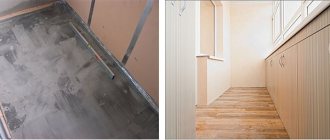
After insulating the balcony itself, we begin finishing the inside with flooring.
We do it around the perimeter of the balcony. In the steam room itself, it should be made 10-20 centimeters higher so that the cabin is always dry. The arrangement of the sauna must occur in the correct sequence:
- The first thing to do is lay the waterproofing material. Next, logs from beams are installed. About 5-8 centimeters in height in increments of 40-50 centimeters.
- Then insulation is laid between them and another waterproofing layer is laid.
- After this, the floorboards are nailed to the walls so as not to get burned while visiting the sauna. The ideal wood that will be suitable for a sauna is deciduous wood with a shrinkage of approximately 10%.
- We nail beams with a cross section of 5 cm2 onto the wall. The walls inside the cabin must be lined with plywood so that the insulation is completely adjacent to the inner surface and does not allow heat to pass through.
- A foil vapor barrier is carefully inserted into the openings between the beams. It must be laid with the reflective side facing out.
- The mineral wool should be cut so that it is 4-5 centimeters wider. This will ensure a more secure fit to the walls of the sauna.
- Next, we lay out the insulation in the space between the beams.
- Finally, aluminum foil is nailed onto the heat shield so that the reflective surface is on the inside. The joints are connected with specialized tape using metal. And lining is used as cladding.
Legitimacy of the idea
After enterprising citizens began installing mini-saunas in their apartments, representatives of the housing office and the fire inspectorate unanimously banned this installation. But according to regulatory documents, such installation can be carried out.
In fact, when installing a sauna, the balcony is not structurally rebuilt. Even if a partition is made, it will not be considered a major repair. Theoretically, there are no violations. Before installing a steam room at home, it is recommended that you familiarize yourself with the types of documentation:
- “Architectural and planning solutions for multi-apartment residential buildings” (SP 31 - 107 - 2004);
- “Residential multi-apartment buildings” (SNiP 31 – 01 – 2003).
It is recommended to contact the Management Company for registration to obtain a list of services from which you can obtain permission to install a mini-steam room. But if the neighbors don’t mind and security measures are followed, you don’t have to collect documentation.
Fire safety
In a steam room installed in an apartment building, only an electric stove is allowed. Its power should be up to 4.5 kW. In this case, there must be a ventilation system. It is prohibited to discharge steam into the ventilation shaft inside the house, since this load was not provided for during construction. The fire inspector will also require the installation of a special dry pipe that automatically supplies water in the event of a fire. The dry pipe must be connected to the fire alarm system.
Preparing the balcony
Before assembling the sauna chamber, preliminary preparation of the area of the balcony or loggia on which it will be placed is carried out - this will increase its service life and make the use of materials more efficient.
Primer and waterproofing of surfaces
Waterproofing
Concrete slabs of floors, walls and parapets, as well as brickwork, absorb and retain moisture well - this is a big problem when using mineral wool, which has high moisture-absorbing properties, as insulation. Therefore, all surfaces on which it is planned to lay insulation must be covered with waterproofing, which prevents the flow of moisture from the floor panels into the insulation material.
Since the steam from the sauna, penetrating into the concrete slabs, saturates them with moisture, there is a high probability that the ceilings and floors of the neighbors above and below in the area where the steam room is located will become wet. To avoid a possible conflict with neighbors, the slabs should be isolated from contact with steam - this function is performed by waterproofing.
There are several popular types of materials for waterproofing; roll insulators, bitumen mastics, various resins and deep-penetrating hydrophobic impregnations are widely used. In domestic conditions, it is more practical to use dry construction mixtures, which, after being diluted with water and applied to the surface, form a durable waterproof film that reliably protects the concrete structure from the penetration of water vapor. Waterproofing work is carried out in the following sequence:
- Clean concrete slabs from dirt and debris using brushes or a vacuum cleaner, knock down all protrusions, remove traces of old paints or other contaminants.
- Cover the concrete surface with a roller or brush with a special deep-penetrating primer, after the first layer has dried, cover all cracks and joints with sealing materials - polyurethane foam, putty, putty, cement-sand mixture.
- After sealing the cracks, joints and drying the materials, apply a second primer layer and wait until it dries completely.
- Dilute powder waterproofing in a plastic container in the required proportion with water, stir it with a mixer until it reaches the consistency of semi-liquid sour cream.
- Pour a small amount of solution onto the floor and spread it over the surface with a spatula 200 - 300 mm wide, some use a brush, but when applied with a spatula, the waterproofing shell is smoother, more uniform and dense. For application to vertical walls and ceilings, the mixture is made a little thicker, and the procedure is carried out in a similar way.
- If desired, the waterproofing can be reapplied - due to the small area of the sauna chamber, the material consumption will not be too great, and the reliability of the coating will increase significantly and is guaranteed to stop the penetration of steam into the concrete structure.
Where to begin
The very first thing is to prepare the balcony or loggia itself. It is necessary not only to do glazing and insulation, but also to carry out some other work. All this for the sake of their neighbors, because if they constantly hear suspicious noise coming from the neighboring balcony, then they may not like it, which means they need to carry out soundproofing. If you have insulated your balcony, then the thermal insulation material will already be able to muffle the noise, but it is still better to be on the safe side.
Also, the neighbors below may not like the water drips coming from your mini-sauna, so waterproofing must be done especially carefully. You shouldn’t save on this if you don’t want to quarrel with your neighbors. Once the balcony is finished, you need to prepare the necessary material and equipment. Here is a small list of what you will definitely need:
- wooden panels (they should be easy to assemble and disassemble, because you will transfer them to the balcony with your own hands);
- electric stove (it must be hot in the sauna, which means you can’t do without a heat source);
- a box with stones (no sauna is complete without them).
There are special requirements for wooden panels. The first thing you need is the type of wood. Spruce, pine, aspen or linden are suitable for a sauna. Also, all boards must be carefully prepared. The humidity in them should not be more than ten percent. The entire surface must be sanded. In addition, the boards must be coated with a special antifungal agent.
Then you can begin construction. You need to start from the floor. It's already insulated, so we need to start finishing it. The best floor for a sauna is wooden, so it is advisable to cover the surface under the structure with floorboards.
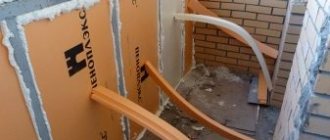
When it comes to the walls, you need to assemble a box from timber with your own hands. It should be installed close to the walls. The beam itself should be 50x50 mm in size. The outside of the box is lined with plywood; this must be done, since the walls in our houses do not have the correct geometry, and besides, this will help retain heat inside the structure.
Photo 3. Installation of the future steam room box
The next stage is insulating the box from the inside. This can be done using mineral wool. The layer of such insulation should be thick enough, because the rate of heating of the air inside the steam room will depend on this. The choice of mineral wool is determined by several parameters: firstly, such thermal insulation material is cheaper, and secondly, it is impossible to use polystyrene foam or other non-natural insulation in a steam room, they do not tolerate strong heat. Unnatural insulation will begin to melt and release toxic gases, as a result, instead of improving your health, you will get harm to your health due to harmful gases.
Photo 4. Insulating the box from the inside
Next, the entire internal area of the future sauna needs to be covered with aluminum foil. This must be done everywhere, otherwise the heat will easily evaporate even through a thick layer of insulation. This coating is able to retain up to ninety-eight percent of infrared heat. Secure the foil itself with aluminum tape.
Photo 5. Lining the body with foil from the inside
The next stage will be finishing the interior space with clapboard. This is not difficult to do with your own hands, you just need to be careful, because the lining will lie on a layer of foil, and it is very easy to tear it. The lining itself should be made of hardwood; you can use coniferous boards devoid of resin. The latter breed has a very bad effect on the body when heated.
Photo 6. Lining the sauna box with clapboard from the inside
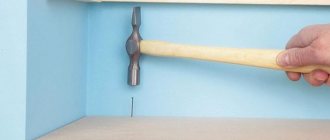
To avoid getting burned on heated nails while taking a steam bath, they need to be deepened into the lining, or better yet, all the heads should be covered with decorative panels, which will improve the appearance. After this, you can proceed to the shelf. This design must support the weight of two people, so it is advisable to make separate racks for the shelf. They are covered with boards five centimeters thick.
To ensure normal circulation of hot air in the sauna, the shelf itself must not be made solid. Leave a gap of one and a half centimeters between the boards. It is also advisable to round the edges of the boards, this will also be safe, you will not hit the sharp edges.
The material for the shelf is poplar, aspen or linden wood. But the best option is abashi. This African tree is ideal for saunas and contains no resin. Of course, such wood is quite expensive, but its quality is excellent.
Photo 7. Stages of constructing a shelf in a sauna
Decorating ideas
Depending on how you want to decorate the balcony yourself, step-by-step instructions may differ. Before you start carrying out any work, you need to decide on the following things:
- Purpose of the premises.
- Willingness to spend a certain amount on purchasing materials.
- Room style.
- Functionality.
The following materials are most often used for interior decoration of balconies:
- MDF is a relatively inexpensive panel that is easy to install. They will help to quickly close the walls and make them visually smooth, even if the balcony structure is curvature. The material is environmentally friendly and durable. Technical indicators are similar to solid wood, but MDF is much cheaper than the latter. The panels are made from pressed wood shavings. Carbide resins are used to firmly connect the chips; they do not emit formaldehyde, which is harmful to humans and can be found in chipboards.
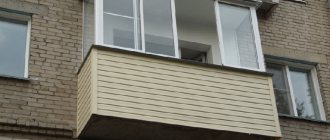
- Siding. The use of this material is permissible for both indoor and outdoor use. Installing it is quite simple, since the siding sheets are the same and have special fastenings. The material is not afraid of low and high temperatures, does not burn, does not crack, does not become moldy, does not rust or rot. Any inexperienced craftsman can install siding, that is, you can do it yourself. The service life of the material exceeds 25 years, no weather conditions can harm it.
- Plastic panels are a cheaper option than siding. They are light in weight, easy to install, and protect the structure well from drafts and moisture. If you require good sound insulation, plastic panels are a fairly good option as they can contain sound well. Plastic panels can be of any color, and a pattern can be applied to them. They well imitate wood, stone, marble, and other materials that are expensive and do not have the required qualities, while still meeting the aesthetic needs of the owner of the premises. Caring for plastic is quite simple: when it gets dirty, wash it with any detergent or just use a damp cloth. The material is not afraid of water and repels dirt.
- Plaster is an old and traditional option, but working with it is not very convenient for a beginner. You will need to create a sheathing from a special mesh; the walls must be smooth. Plaster cannot be applied to soft insulation. It is worth considering that it is applied in layers, and each layer takes about a day to dry: this is the longest option. Plaster is afraid of moisture; a positive quality is low cost. The plaster mixture can be painted after hardening; it is well suited for classic interiors. Another positive quality is the ability to retain heat well indoors.
Requirements for a bathhouse on a balcony or loggia
The most important thing to understand is that your sauna will be dry. There can be no talk of any splashing on the stones
After all, no matter how you waterproof, water will still seep in, which means your neighbors will have streaks on the ceiling and walls. Then the bathhouse will have to be dismantled.
If you want to do everything according to the rules, you will have to comply with fire safety requirements. And they are quite strict. The steam room on the balcony must meet the following requirements:
- she must pass a fire department test and receive the appropriate certificate;
- the apartment itself, and especially the room facing the balcony, must be equipped with fire safety equipment;
- You can only use an electric stove. However, its power should not exceed 4.5 kW. It is better to make a separate machine and wiring for it;
- the stove itself must be factory-made. It should also have an automatic shutdown when a certain temperature is reached;
- the cabin itself, or rather its perimeter, should be equipped with water sprayers. This is necessary to extinguish a fire if it occurs.
As you can see, you will have to work seriously, especially knowing our firefighters. But if you do not comply with these requirements, you may be subject to sanctions. Nobody needs a large fine, and it’s better to take care of your own safety.
Equipment
The walls or ceiling are ready. Now you need to additionally equip your bathhouse with everything you need. The first thing to do is install the shelves. It is made from wood. To ensure normal air circulation, make the shelves non-solid.
Photo 5. Do-it-yourself shelves in the bathhouse
You also need to build ventilation. To do this, place a ventilation hole with a valve next to the shelf so that it is convenient for you to adjust it. And build a hole near the place where the stove will be installed. As soon as you open the damper, fresh air will enter from below and exit through the hole near the shelf. This will make it easy to control the flow.
Photo 6. Ventilation hole in the bathhouse
Install the stove in the bathhouse. It is better to do the wiring for it with your own machine, from which an insulated wire will run all the way to the balcony. If you are not familiar with electricity and cannot do everything yourself, then it is better to turn to professionals. Electricity is no joke!
The walls near the stove must be equipped with sheets of non-combustible material. The same thing needs to be done with the floor. This way you will protect yourself from the possibility of a fire as a result of a short circuit or overheating of the stove. A lamp must also be installed inside the structure. It should be chosen carefully, since there will be high temperatures in the bathhouse, the lighting device must withstand all this. Don't forget about sealing.
Photo 7. Electric stove in the bathhouse
The door to the bathhouse should close tightly. You don't want heat to escape through the cracks, do you? But at the same time, it should not have latches, latch or other locking devices. You cannot close from the inside, and the door itself must open outward - these are safety requirements that are best observed, in case someone becomes ill in the steam room, but you cannot open the door.
Building a sauna on your balcony is not that difficult, you can easily do everything with your own hands, the main thing is to want to. Of course, it will only be a dry steam room, but still better than nothing
It is important to remember safety measures; you should only use a factory-made stove. If you handle everything, then you will have a place where you can relax after a hard day, and do it without leaving home
Choosing a stove for a Finnish sauna
• The stove must be electric. It is preferable to choose a ready-made sauna stove, as they are designed taking into account safety and power requirements. • The electric heater is selected taking into account the volume of the room. For 1 cubic meter, 1 kW of furnace power is required. • The design can be anything, there are floor and wall options. It is advisable to have a thermostat and remote control.
Advantages of a ready-made electric sauna stove: • can be installed anywhere, easy to assemble; • the room heats up in 1 hour; • no chimney required;
• ease of maintenance (sometimes you need to change stones); • no garbage in the sauna; • electrical safety; • fire resistance; • the case is safe in case of accidental touches; • it is impossible to get poisoned by carbon monoxide; it does not burn oxygen; • reliability; • lasts a long time; • small sizes; • Beautiful design.
Important! A DIY Finnish sauna requires preparation for use. It is heated to 60 degrees with the door open
Allow to cool and leave open until the next day. Then heat to 90 degrees and leave for a couple of hours. On the third day, heat up to 100 degrees, also leaving for two hours. You can use it on the fourth day. Those who made an infrared sauna on a loggia themselves say that it is not difficult, as long as the construction procedure is followed.
No space in the house? No problem!
A sauna in an apartment on the balcony is an excellent solution for small spaces. Having purchased an infrared apartment, users often have a question: “Where to place this device?” A well-thought-out installation of a sauna will not only allow it to be conveniently located, but also significantly save free space. A mini-sauna on the balcony requires installation in one of two ways. The first involves ordering a prefabricated fixture taking into account the minimum possible dimensions. According to the second, part of the balcony or loggia is separated independently and a small door is installed.
For small apartments, an infrared sauna on a loggia is the most acceptable solution, since its installation in one of the living rooms involves occupying free space, which can also be useful for other interior items. If you have a balcony or loggia, you can place a booth here too - it will not only be practical, but also convenient.
Where to start arranging a bathhouse
Preparing the balcony is the first thing you will have to do before installation work. It consists of the following:
- Complete glazing is installed. This will not only save the wooden sauna from exposure to precipitation, but will also significantly insulate the entire balcony. Some glazing elements need to be made opening for better ventilation.
- Carefully waterproof the floors. Before laying sheets of waterproofing materials, the subfloor of the balcony should be leveled and treated with penetrating waterproofing.
- They are connecting the power supply to the balcony. From inside the apartment, the input is equipped with a packet switch, and the cable itself is laid through the wall inside a metal pipe.
Video:
Then the location of the sauna cabin is determined. It should be located next to the main wall, where heat loss is minimal.
Correct placement of the sauna on the balcony.
Return to content
Installing the booth correctly
Experts note that a sauna on an apartment balcony should be installed in full accordance with the developed recommendations in order to avoid possible problems. Some of the main rules that should be followed are:
The infrared sauna on the balcony is a fairly convenient location. Because of this, many people prefer to install it here. Such a useful cabin is not only an attractive piece of furniture, but also contributes to the health of the human body. The infrared sauna on the balcony will become your favorite relaxation spot for the whole family.
Source
Beginning of work
The first thing to do before arranging a sauna is to prepare a balcony. For this purpose, continuous glazing is performed. In this case, the wooden elements will be protected from the effects of precipitation, and the level of thermal insulation of the room will increase significantly. Some of the insulation elements are made to open.
This is followed by waterproofing the balcony. First of all, you need to cover the floor. Before laying the waterproofing sheets, the base of the balcony is leveled and treated with penetrating waterproofing. Then the power supply is introduced. On the residential side, the input is equipped with a packet switch.
Floor
The best option for insulating a balcony is the use of polystyrene foam boards. This insulation practically does not conduct heat and has good waterproofing properties. Floor insulation is carried out in the following order:
- The logs are secured to the base using dowels. They are made from 30-40 mm timber. The height of the logs must be no less than the thickness of the insulation.
- In places of fastening, waterproofing is restored using liquid sealant.
- Thermal insulation boards are laid between the joists. They can be glued to a layer of waterproofing. However, they are often left loose.
- The seams between the insulation and the joists are sealed with sealant.
- A second layer of waterproofing is laid on top of the polystyrene foam.
- The final finishing – lining – is installed.
During work, you should adhere to safety rules. After such procedures, you can begin finishing the walls.
Waterproofing a balcony with your own hands is quite simple - it is important to select the necessary materials
Walls
To insulate the walls, the same material is used as for the floor - polystyrene foam. Penofol or foam glass are also often used. To secure the insulation to the walls, a special frame is made of beams. There should be a distance of 40-50 cm between the slats. Insulation is placed in each cell. Often pieces of material are not secured at all. When insulating a large area with mats, they are secured with special nails. The insulation layer consists of the following elements:
- insulation material
- diffusion film;
- clapboard finishing.
The top of the insulation is covered with a vapor barrier. This allows you to protect the material from moisture and condensation, as well as significantly increase the service life of thermal insulation and increase the safety of the balcony walls.
Often walls are insulated with polyethylene. The rolled material is thinner than mineral wool. In addition, it has a foil surface on one side. Aluminum protection reflects heat.
Penofol is laid with foil inside. The material is secured using wooden slats, which are nailed on the outside. After the insulation is laid, the walls are covered with clapboard. A photo of such a sauna on the balcony can be seen below.
Ceiling
Ceiling insulation is carried out in the same way as walls are insulated. However, in the case of insulated, the thickness of the insulation is less. Other aspects of the technology remain the same:
- first you need to fill the frame;
- then lay the insulation;
- fix the vapor barrier, perform finishing.
Such procedures will help to reliably protect the room from heat leakage. The work is done quickly and easily. The main thing is to follow the plan.
Ventilation
An important stage is the implementation of ventilation made in the outer wall. It will ensure the outflow of steam and eliminate foreign odors from the steam room. Ventilation is installed simultaneously with the construction of the ceiling. The outlet is equipped with a plug. It is made quite dense, which ensures heat retention in the room. For the plug, a piece of foam plastic cut to fit the dimensions of the hole is usually used.
Wiring
The electrical wiring stage is one of the most critical. Electricity is a source of increased danger, and moisture can cause a short circuit.
The lighting of the steam room must be closed. It is also necessary to reliably protect it from moisture. Thermal spotlights are often used to illuminate the sauna. They have a fairly high level of protection against moisture.
To protect the wiring from short circuits, the system is equipped with a special disconnect device (RCD). If you do the wiring yourself, you should follow the following sequence of actions:
- install a panel equipped with a 25 A circuit breaker;
- Use it to route wires to electrical points.
It is worth considering that only installation of lamps can be done inside the bathhouse. Switches and sockets must be installed outside. To protect the cable, corrugated pipe should be used. Its ends are carefully sealed.
Finishing sequence
Repair work on the balcony must be carried out in strict sequence, this is the only way the next step will not spoil the work already done. During the DIY repair process, you will have to go through the following steps:
- Arrangement of the frame, which will become the basis of both the external and internal cladding, as well as the window system.
- Glazing. It is preferable to use two-chamber aluminum or wooden systems: although plastic ones have a more affordable price, they will last less.
- Exterior finishing with moisture-resistant material: clapboard, siding, etc.
- Installation of galvanized metal sheets or plywood on the frame for protection from weather conditions.
- Attaching the waterproofing film, installing insulation, blowing the gap with special foam.
- Installation of additional sheathing from slats.
- Finishing of surfaces: ceiling, floor, walls.
Work related to the balcony should be carried out in the warm season - this will significantly facilitate and speed up the process
When taking on this process yourself, it is especially important to pay attention to choosing a period when cold or excessive dampness will not interfere with finishing
Preparing the balcony
Total glazing of an open balcony, if it is not already available, is the first necessary step. To equip a sauna, you need to choose strong frames with two-chamber or three-chamber double-glazed windows so that the “dressing room” is as insulated as possible. The steam room has blank walls: usually “skillful hands” at home either create a separate frame or build a sauna on one edge of the balcony.
A balcony that is too narrow may require expansion. This is done by removing the floor slab. Since even a wooden sauna will significantly increase the weight of the structure, in some cases external reinforcement with supports is vital.
Insulation
The main preparatory work is waterproofing and insulating surfaces - ceilings, walls and floors.
Floor preparation
Operation “Do it yourself sauna on the balcony” begins with insulating the floor. The most exemplary material for this is polystyrene foam. The work is carried out in the following sequence:
- Logs made of timber (30x40 mm) are attached to the base using dowels. Their height must match the thickness of the material.
- Expanded polystyrene sheets are laid between the wooden elements. They are glued to a layer of waterproofing, or they are dispensed with without this composition.
- The gaps between the insulation and the timber are filled with sealant, then a second layer of waterproofing is laid on the polystyrene foam.
- For finishing, the already mentioned lining is used.
Insulation of walls and ceilings
In this case, you can use foam glass, penofol, or also give this “position” to polystyrene foam.
Working with walls:
- First, a frame is made on which the insulation will be attached. The maximum step between adjacent planks is 500 mm.
- Thermal insulation material is placed in the space between the beams; the rolled material is nailed, but the slab material is not secured. A vapor barrier is fixed on top.
- The same lining is mounted on top.
A worthy competitor could be foiled polyethylene foam; the material is thin, therefore ideal for small, narrow balconies. They fasten it with the covering facing outwards, fill the slats on top, and then lay the lining on them.
The insulation of the ceiling is similar, but there is still a slight difference. In this case, only thin insulation is used. All other steps are unchanged:
- The frame is stuffed, and a heat insulator is placed in the space between the wooden planks.
- Then the vapor barrier is fixed, followed by finishing.
These preparatory works are usually carried out quickly and quite simply; they are not able to cause any difficulties for the master.
Communications: ventilated wiring
A do-it-yourself sauna on the balcony requires wiring of electrical communications; this operation is considered the most critical stage for a bathhouse; in this case, compliance with safety regulations is a necessity.
For lighting, closed devices are needed, completely protected from moisture: for example, class IP54. Spotlights with a high level of moisture resistance are optimal. The installation of an RCD in the electrical network is mandatory to prevent short circuits:
- install a panel with a machine (25 A);
- make wiring to electrical points;
- all cables are placed in corrugated pipes.
Ventilation is the second necessary system. Such work is carried out during the thermal insulation of the balcony and at the stage of finishing the mini-sauna. The ventilation hole is made in the outer wall, in its upper part. Its optimal diameter is 300 mm.
The walls of the ventilation duct often become a piece of metal corrugated pipe. All cracks are carefully sealed with sealant. A piece of foam plastic acts as a plug; the material is cut exactly to the size of the exhaust hole. A wooden circle is glued to it, to which the same handle can be nailed.
Types of steam rooms
There are several steam rooms that differ in their healing effect, operating principle, and internal design. Before choosing the type of steam room, you need to study the features of each type.
Infrared
Infrared steam rooms are cabins of different sizes with glass doors trimmed with wood. An IR radiation generator is located inside. The waves warm up the body of the steam.
Infrared steam rooms are safe for the body, since if you choose the right mode, it is impossible to overheat in them. Radiation is not harmful to health.
It is prohibited to use cosmetics in the booth, as they may cause burns on the skin.
Japanese
Baths are very different from Russian steam rooms and Finnish saunas:
- Visiting a Japanese steam room is a complex process consisting of several sequential procedures.
- Inside there are large barrels with warm water in which visitors warm themselves.
- Warming up should be combined with massage, covering the body with warm sawdust.
Before visiting a Japanese bath, you must undergo a medical examination.
Finnish
The sauna has dry air, minimal humidity, and high temperature.
To make a Finnish steam room in an apartment, you need to prepare a large room. Arranging a sauna with a shower in an apartment is accompanied by difficulties in connecting communications.
Turkish
Most people like hammams due to their mild microclimate. They are characterized by low temperature and high humidity. Steam constantly enters through special channels in the walls. Requirements for arranging a hammam:
- ceilings from three meters high;
- forced ventilation system;
- high-quality vapor barrier.
Hamams are suitable for cosmetic procedures.
Russian
Classic Russian steam rooms are preferred by most bath attendants. They are characterized by low temperature, high humidity, and abundant steam. It is impossible to make a real Russian steam room in an apartment, since it requires a stove that runs on solid fuel.
Electric
A popular option for steam rooms for apartments.
They are fireproof because they do not require the use of solid fuel. The room is heated using an electric stove, which increases energy costs.
Mini
For bathing procedures, a phyto-barrel is used - a container with benches installed inside. In terms of effect and design, the design is similar to ofuro. Before use, the barrel is connected to a regular outlet and filled with water.
Choosing a steam room
Factors to pay attention to when choosing a steam room for an apartment:
- available amount of free space;
- type of fuel used;
- possibility of establishing communications.
If desired, you can place a steam room on several square meters, for example, it is popular to arrange a sauna in an apartment on the balcony.
Necessary preliminary work on the loggia before installing the sauna
In order for the bathhouse on the balcony to function reliably, it is necessary to carefully prepare for its installation. The selected location for installation should be adjacent to the load-bearing wall of the house as much as possible to maximize heat retention in the future bathhouse.
You should consider that the balcony should be securely glazed. Double-glazed windows are chosen of high quality; they should not let cold air into the room
At the preparatory stage, it is also important to decide where the ventilation hole will be located.
Next, purchase the necessary building materials:
- mineral wool;
- Styrofoam;
- membrane providing waterproofing;
- wooden beams 5 cm thick;
- flooring boards;
- wood paneling;
- foil vapor barrier;
- corrugated pipe;
- metal sleeve;
- asbestos cardboard.
List of required materials
To build a steam room on a balcony, a wide variety of insulation materials, waterproofing materials and heat insulators are required. In order for the room to be airtight and retain heat well, the following materials are needed:
- Insulation materials.
- Vapor barrier film.
- Foil polyethylene foam.
- Foil vapor barrier.
- Fire-retardant composition.
- Pinotex impregnation.
- Antiseptic for impregnation of wood.
- Pine timber.
- Lining.
- Alder boards on the ceiling.
- Electrical system for a bath (for example: Ural-Mikmah-Term, Teplodar SteamSib).
- Specialized thermometer.
- Sealed, heat-protected bath lamp.
How to make a sauna on the balcony with your own hands
The main thing in this matter is not to separate the sauna and the balcony, the expert notes.
– After all, they work together, so they both will have to pay equal attention
We start making a sauna... by insulating the balcony with mineral wool
Let's start with insulating the balcony. The best material for this is mineral wool. It does not burn or melt like polystyrene foam with penoplex. After all, the sauna runs on electricity, one spark and you can’t put it out. In addition, insulation, for example penofol, is laid on both sides of the insulation. Moreover, on the inside it should lie with foil in the room, with the outside - with foil on the street.
Insulation serves several functions. Firstly, it protects the insulation from moisture. Secondly, it prevents steam from wetting the ceiling of neighbors below, and the floor of neighbors above. Thirdly, it makes it so that your neighbors can hear you less.
It is better to lay double insulation on the ceiling. After all, where does the steam rise? Of course, to the ceiling. The neighbors will start to get damp, and they will complain.
The sheathing for the steam room is sheathed with plywood
After insulation, build a frame for the cabin from 50x50 mm timber. Then line the sides and ceiling of the box with plywood. And don't forget about the hole for the door!
The sauna must be at least 80 cm long and wide, and 2.1 meters high. Moreover, these norms were invented for a reason, but for human convenience and safety. If you make the sauna narrow, a person will not be able to turn around; if it is low, it will be too hot.
The sauna cabin, like the balcony, is insulated with mineral wool
The sauna cabin is also insulated with mineral wool. Foil or other thermal insulation is laid on top of it to retain heat. After this, the walls and ceiling are covered with clapboard.
Next, you can make a shelf on which you will relax. You need boards with rounded edges; when laying, leave a gap of 0.5-1 cm between them for free air circulation. The backrest on the top shelf will make your stay in the sauna more enjoyable.
Afterwards the heater is installed. A ventilation grille is made on the ceiling or wall above the heater, and a ventilation valve is installed opposite. If you open the valve, the air flow will increase, and when it gets cool, you will close it.
The final part is wiring for lighting; a thermometer and a clock are hung in the corner. Welcome to the sauna!
If you are planning a sauna, it is also practical to cover the balcony with PVC panels. On the website we have provided detailed instructions with a list of tools and prices for materials. For other finishing options, see the article: Options for interior finishing and loggias.
If you don’t even have glazing on your balcony yet, where is the best place to order it in Moscow, read this material.
How to place plants on a balcony or loggia
In case of insufficient lighting, you need to make artificial
Everyone knows that different plants grow better in different conditions. There are heat-loving, moisture-loving, cold-resistant or shade-intolerant species. In order to choose exactly those plants that will suit your balcony, you first need to determine its location relative to the cardinal directions.
So, if the balcony is located:
- On the north side, it is dominated by uniform diffuse lighting. Here, the sun's rays will not warm up the room much, which means that if it is not possible to install special lamps for plants and additional heating, you will have to choose those plants that are resistant to low temperatures and unpretentious to the lack of bright light. This could be gardenia, begonia, maidenhair, ficus or climbing ivy.
- On the south side, plants will receive maximum natural light and warmth. In this case, you can safely give free rein to your imagination and organize a real piece of paradise with dwarf tangerine trees, light-loving palm trees, flowering cacti and various hanging flowers. But even in this case, you will have to carefully monitor the condition of the plants - the roots should not overheat, and a “greenhouse” effect should not be created on the balcony itself. Ventilation or installation of a split system will help. It is also necessary to hang curtains or blinds on the windows, and do not forget to maintain the necessary air humidity using a special device or a regular sprayer.
- On the east side, in the first half of the day there will be moderate lighting and temperature on the balcony. But in the afternoon the sun can get hot, especially in the summer. In this case, blinds are suitable to create shade, and an air conditioner or split system can maintain the optimal temperature. You can grow ficus, diffembachia, ginger, coffee tree and various hanging flowers on such a balcony.
- On the western side, the heat will remain around the clock. But on such a balcony you should also take care of shading. Fuchsia, monstera, ragwort, as well as some types of exotic plants such as coconut are suitable for growing.
In general, modern technologies make it possible to create the necessary conditions and microclimate in any well-insulated room. Installing a split system will help you avoid many mistakes and will greatly simplify caring for plants in the winter garden.
Now let’s figure out exactly how to place plants on a balcony or loggia:
- Dwarf trees, palms, large cacti or shrub flowers should be planted in large outdoor pots or flowerpots. In order to save space and comply with safety regulations, you should not place more than two or three heavy flowerpots on the balcony;
- Long hanging pots are suitable for the windowsill, in which you can plant hanging flowers, ornamental grass or various spices. You can also get confused with growing balcony garden crops like strawberries, tomatoes, etc.;
- Small plants can be placed in beautiful pots on a shelf or shelf. In addition, books, decorative elements, as well as utensils necessary for caring for plants can be placed here;
- Hanging and climbing plants look great in hanging pots - they can be placed both against the walls and under the ceiling.
How to make a steam room yourself
A very common and simplest method is to purchase a ready-made structure. Of course, it will cost between two and three thousand dollars, depending on the size and configuration. Manufacturers will provide you with it completely disassembled.
You can assemble it yourself or use the services of specialists. They can be hired directly when purchasing from manufacturers.
When choosing the size, make sure that the sauna is the width of your balcony; of course, in extreme cases it can be expanded. A DIY infrared sauna requires less insulation and insulation, so it can be installed more compactly.