Loggias and balconies of typical apartments usually have a small area, and therefore require reasonable use of every centimeter of space. Recently, loggias have often been turned into a recreation area. At the same time, things that are rarely used are put away in a box on the balcony. Usually it is designed in the form of a bench or a small sofa.
Inside the product there is free space for storing vegetables and storing canned goods. Sofas with spacious drawers are equally suitable for both large loggias and modest areas. This simple piece of furniture is easy to make yourself.
Manufacturing a universal version of furniture
The simplest model is a rectangular chest with a lid. To assemble a box for a balcony with your own hands, you will need bars for making a frame and sheet covering material: chipboard, plywood, OSB.
If there are no construction skills, then it is advisable to use old wooden boxes or used furniture for the frame. Chests of drawers, tables, bedside tables are suitable. In this case, you will only have to cover the frame with sheets of plywood, attach a lid and back, and decorate it with sofa cushions.
Required tools:
- drill;
- ruler, angle, pencil;
- tape measure, level;
- plane;
- fasteners;
- hammer;
- grinder;
- jigsaw
This list may vary depending on the type of finishing material, design, and additional elements. You may need paint, varnish, leatherette, fabric, or printed material.
How to make a box on the balcony with your own hands:
- Take measurements of the free space of the room. Determine the dimensions of the planned piece of furniture. It is important to combine ease of use and spaciousness of the design. It is advisable to make sketches with dimensions.
- Install the frame. You need to start from the floor. Lay and secure four timbers for the base of the structure. Then install the posts and build the upper part of the frame. Make a base for the lid from the bars.
- Cover the bottom of the box with boards. If the model is not insulated, then small gaps can be left between the boards to ventilate the interior space. This will protect supplies from excess moisture. For an insulated box, the bottom is made solid, and a sheet of foam plastic is placed underneath.
- Attach sheets of lining material to the walls of the box. Install one or more partitions to divide the space into compartments.
- Cover the base of the lid. The width of the product is usually no more than 70 and less than 40 cm, otherwise it will be uncomfortable to sit on. The optimal height of the box does not exceed 60 cm.
- Attach a piano hinge of the required size to the end side of the lid. Then put the top part on hinges or make a removable lid.
It is advisable to open the finished product with varnish or paint, and make a soft seat on the lid. It can be used as a couch or sofa. Fabrics or leatherettes for upholstery should be chosen to match the color scheme of the loggia.
Attention! If you decorate a balcony in a loft style, then sitting on a sofa made of hand-sewn pillows will look very impressive. This option is simpler and more functional. The pillows can be washed and used for other purposes.
Deciding on design and construction
First, we decide on the design of the sofa: stationary or sliding. The first one is easier to install and is perfect for beginners. The sliding design is expensive to manufacture, but very presentable. Using diagrams and recommendations, it is quite possible to make it yourself. If your dining table is wooden, then make the base and corner rails from a similar material. Original upholstery will create a unique, interesting item.
The cushioning material is selected from artificial leather or microfiber. Properly selected filling will give the seats maximum softness.
Drawings and diagrams
We begin work by creating a project. We analyze the shape of the end, the finished product, and parts with upholstery.
We use the following instructions:
- determine the location of the future corner;
- take measurements;
- We draw up a drawing and assembly diagram.
We take the following rules as a basis:
- The size of the width of the walls (the width of both walls is added minus 50 cm - this is the depth of the seat). Calculations will be needed to select the size of the connecting part.
- Choose the size of the back and seat.
- The lower part of the body is set at an angle for the best position of the legs. The front will be slightly larger than the back.
- The width of the main parts of the corner will be smaller due to the thickness of the material used.
- According to all the data, the size of all parts, the amount of material and fittings are calculated. A drawing is drawn for each individual element.
Decor options for a balcony bench
The easiest way is to simply cover the balcony bench with a layer of oil paint. You can decorate it with ornaments or drawings in the chosen style. For convenience, it is advisable to make the bench seat soft. This will bring comfort and coziness to the interior of the balcony.
Ways to design a box:
- place sofa cushions of a suitable size on the bench cover;
- make your own soft cover with elastic bands at the corners to fix it on the seat and remove it for washing;
- cover the seat with dermantine or soft fabric, use thick foam rubber as a filler;
- equip a comfortable support by attaching pillows to a metal rod, or make a backrest and cover it with the same material as the seat.
The upholstery of the back and seat made of fur, velsoft or velor looks very cozy and atmospheric. Wooden surfaces can be painted in a suitable shade or a thematic design can be applied using stencils.
Peculiarities
Modern layouts provide kitchens with a fairly large area, but even here the sofa will fit well into the interior. This can be a sofa with storage space for kitchen utensils or a full-fledged sofa with an extra bed. The assortment of furniture stores includes sofas for every taste and in different price categories.
But, despite this, it is not always possible to choose something that will harmoniously fit into the interior of the kitchen and suit you in terms of quality and price. A solution in this situation could be a homemade sofa. You can make with your own hands exactly what fits perfectly with the existing design.
This task seems difficult only at first glance. To make this type of furniture, no special equipment is required. By following the instructions, you can easily cope with this matter.
A homemade sofa for the kitchen will allow you to:
- save your budget;
- select quality materials;
- choose the best functionality that meets your needs.
Types of balcony sofas
Almost all factory soft corners and sofas are equipped with a recess for storing linen and other things. The range of furniture is quite wide. It is inappropriate to choose complex or elaborate models for the balcony. For a small area, products in a minimalist style are suitable.
A folding sofa on the loggia can be used not only as furniture for daytime relaxation, but also as a backup place for sleeping.
It is important that when unfolded it does not block the passage. If you equip additional heating in the room, you can use the sleeping place all year round.
Popular models:
- Daybed or ottoman. This category includes pieces of furniture without backrests and armrests. Their role is played by sofa cushions and pillows. If you place the model against the wall, you can sit with a cushion under your back or attach a pillow holder to the wall.
- Chair-bed. This product replaces a sofa and saves space. The model is suitable for relaxing, reading and sleeping.
- Sofa book with linen box. This option is optimal for sleeping, relaxing and storing things.
- Corner model. This is a convenient form of furniture for small rooms and non-standard loggias. The model can be semicircular or have two corners.
- Sofa chest of drawers. The furniture option has comfortable, spacious drawers. You can put clothes from other seasons, bed linen, and various useful little things in them. A good idea is to use dresser drawers as a place to store sewing supplies, knitting needles, skeins of yarn and other craft items.
- Bench with drawers. This model is equipped as an open shelf. The frame is made with one or more internal partitions dividing the space of the box. Additionally, drawers of suitable size are made, which are inserted into the compartments. They should be smaller than the niches themselves. In home goods, you can buy ready-made baskets or fabric boxes that are also suitable for these purposes.
- Bench with doors. The cabinet doors can be decorated with fittings in the general style. This box is convenient to use for storing preserved food.
When choosing a ready-made sofa for a loggia, it is important to remember that not all models have internal boxes or niches for household accessories. A simple model of a bench with a drawer for things is easy to make with your own hands.
Locker made of furniture board
When we arrived at the site, we saw the frame for the locker had already been completed. The customer installed it himself - the job stopped halfway. He asked us to do everything again. Then there would be holes left from the old nails. So People's Windows came up with another plan to convert the old locker into a new one.
We thought of a neat chest for storing camping equipment. Everything should fit here - my pot, grill for meat, skewers, folding table. That's what the customer wanted.
Also, make me a smooth lid. I want to sit, smoke and chat on the phone with friends. Yes, you need a place to put your laptop.
All the owner's wishes were fulfilled.
We made the top cover from solid wood 18 mm thick. This locker lid is smooth. It is convenient to move the fifth point. This chest is very similar to a shop in terms of functionality.
As a result, this furniture can accommodate one person of any weight and build.
We made and installed a folding table close to the seat.
The laptop will be located here. The table was set at a height for a specific person.
All the customer’s wishes were taken into account. He was pleased and undoubtedly spends more time on his favorite balcony.
Making a corner sofa
This option is convenient for very limited loggia space. It is easy to adjust to the size of the room. The downside is the impossibility of proper rest, since you cannot lie at full height on the sofa. But the corner is very good for tea drinking and gatherings. The production of the model begins with measuring the room and drawing up a drawing with the dimensions of the furniture. You can create a printed design or make a hand sketch. The sketch must reflect the correct dimensions and shape of the product.
Stages of assembling a corner sofa for a loggia:
- Make the frame of the product by rounding one of the sides. Between the extreme points of the sofa frame, strengthen several vertical ribs, attaching them to the base in the upper and lower parts.
- Having given the structure a curved appearance using vertical strips, cover the frame with chipboard, plywood or OSB. Secure the sheathing material using corners and self-tapping screws; the seams can be treated with glue.
- Make a cover frame and cover it with plywood.
- Wrap the seats on the balcony with a layer of thick foam rubber and cover them with wear-resistant material. Secure with a construction stapler or glue. After this, put the seat on the hinges. You can also use homemade sofa cushions.
Advice! Upholstery material should be cut taking into account allowances for folding the fabric.
Making a corner model differs little from assembling a regular straight sofa. The greatest difficulty is creating a smooth bend in the corner of the frame. In some cases, craftsmen try to give the material a certain shape by bending it by hand, but at the same time it gradually loses its rigidity and is pressed through.
Frame assembly
Before using glue to fix the ends of all structural elements, it is recommended to assemble it “dry”. It is necessary to ensure that all frame parts fit without gaps.
If everything fits perfectly, you can start assembling the frame using glue. For reinforcement, you can use 4x4 metal corners that are attached to the inside corners.
The bottom of the boxes can be made of plywood or a sheet of chipboard. The selected material only needs to be placed on the furniture corners attached to the frame below.
Thermobox for vegetables
Despite the opportunity to turn a loggia into a recreation area, winter garden or office, most owners of small standard apartments abandon these ideas in order to use the free space for storage for canning and root crops. In order to properly arrange a box on the balcony for fresh vegetables and fruits, it is necessary to take into account the conditions suitable for storing each crop.
There are several important nuances:
- Onions should be stored in a dry place, separate from other vegetables.
- Root vegetables retain their properties well in ventilated plastic containers at temperatures just above zero. Humidity can be quite high.
- Potatoes (except for the above conditions) need to be darkened so that solanine does not form in the tubers. The box with root vegetables must be closed, and each layer covered with hygroscopic fabric, otherwise the potatoes will quickly sprout. Optimal storage temperature: from +1 to +5 degrees.
- White cabbage should be laid out on an open surface, stalks up, and stored at a temperature of +1 to +2 degrees.
- Fruit crops are best stored in plastic or wooden containers or cardboard boxes. Containers must have slots for ventilation. To avoid rotting, each layer of fruit must be sprinkled with sawdust or covered with paper to absorb excess moisture.
Before arranging boxes on the balcony for long-term storage of fresh fruits, vegetables or canned goods, care must be taken to create optimal temperature conditions and a suitable microclimate. In regions with a warm climate, it is enough to glaze the balcony and cover the bottom of the boxes with foam plastic. If the weather conditions are harsh, then heating must be installed in the loggia.
The most affordable way to arrange a space for storing vegetables is to build a box for the balcony from chipboard, OSB or plywood (as described above). It is optimal to place it at the end of the loggia, then it will be enough to install the front wall as a single sheet, and the walls of the balcony will serve as the back and side surfaces.
Cover the top of the box with a lid. A layer of polystyrene foam or other insulation should be placed on the bottom of the box, and the inner surface of the walls should be lined with foil insulation. Some owners prefer to use storage units with split systems, automatic heaters with thermostats.
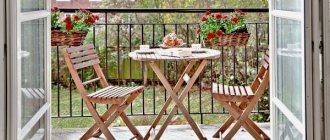
Green corner on the balcony
This option for decorating a loggia space is suitable for flora lovers who dream of a secluded corner for reading and relaxation. Green plants on the balcony will complete the overall interior of the apartment in eco style. To make your stay on the loggia enjoyable, you need to create a comfortable microclimate there and purchase comfortable furniture.
Important details:
- If the balcony is open, then it is necessary to make glazing. It is advisable to install multi-chamber double-glazed windows and carefully seal all seams and cracks.
- It is necessary to install heating and lighting in the room. You can use a heated floor system, buy a hanging heater or install an additional central heating radiator. The microclimate of the room must correspond to the selected plants.
- Buy compact and comfortable furniture for the loggia or make it yourself. The simplest option is benches with niches for storing canned food or fresh vegetables. If you plan to use them as stands for flowerpots, then it is better to make the drawers retractable. Arrange a soft seat for the balcony, covering it with fabric that is resistant to wear and fading.
Equipment for caring for plants does not have to be hidden inside the cabinet. Watering cans and spatulas can be beautifully arranged on shelves or a bookcase. This will turn household items into decorative elements. The design of the loggia will have a complete look if you use one color and design in the same style in the interior.
For example, a loggia in the Provence style looks original, decorated with flowerpots in lilac-blue tones and furniture using the decoupage technique.