Articles
All photos from the article
Often, in Soviet-era apartments, window units with a narrow sash are installed, which, according to the designers, is intended to serve as a window. However, it is not always convenient to open it, so many home craftsmen are forced by necessity to make a window themselves.
In addition, the need for its production may arise in the “blind” window sashes of old private houses.
Wooden window with a window
To help in this matter, next we will look at how to make a window in a wooden frame yourself.
Wooden windows: main options. Manufacturing process. Remaking window sashes
Often, in Soviet-era apartments, window units with a narrow sash are installed, which, according to the designers, is intended to serve as a window.
However, it is not always convenient to open it, so many home craftsmen are forced by necessity to make a window themselves. In addition, the need for its production may arise in the “blind” window sashes of old private houses.
Wooden window with a window
To help in this matter, next we will look at how to make a window in a wooden frame yourself.
General information
Is there a need for a window sash at all?
To answer this question for yourself, we recommend that you familiarize yourself with its advantages:
- When opened, there is a uniform movement of air masses in the room, but there are no drafts.
- Increases the strength of the window due to the presence of spacers.
- Possibility to adjust the opening range. For example, at night, when the body is most susceptible to drafts, you can open it slightly to ensure a moderate supply of fresh air.
From this we can conclude that wooden windows with a window for an apartment are indeed a useful element that increases the comfort of living in a home. Therefore, if your window does not have a window, it is advisable to equip it with this element.
Door with mortise window
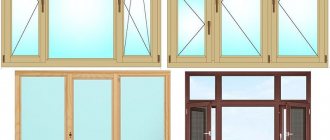
Types and features of frame designs
There are many types of structures. They can be standard or made to order, depending on the window opening. But there are several main varieties:
Types and sizes of window frames.
- Blind window frames that cannot be opened. To allow natural light to penetrate, they are located, for example, along a blank wall along which the staircase to the 2nd floor is built.
- Openable. The number of moving sashes can vary from 1 to 3 or more, if the size of the window opening allows and the width of the sashes is not too narrow.
- Lifting and sliding. These windows differ in the way they open and are most often located in rooms with a certain interior to maintain style.
- Bindings with installation of a window. Moreover, there can be several vents and usually their number is determined by the number of window sashes.
It is the use of such an additional element of the window frame, such as a window, that provides a number of advantages:
- Through an open window, cold air entering a warm room does not rush to the ceiling, unlike a plastic window with a tilt-and-turn mechanism. Thanks to this, air flows in the room and there are no drafts.
- The window leaf does not affect the general properties of the window frame, but increases the strength and reliability of the window structure due to the presence of a spacer;
- The window has a much higher range of regulation of opening for ventilation, which means there is more opportunity to influence the flow of cold air into the room. That is, by slightly opening the window throughout the day, you can provide fresh air to the room during the night, when the body is especially susceptible to drafts. In this case, the temperature inside the room will not undergo any significant changes.
Design options
Before proceeding directly to the manufacture of the window, first of all, let’s get acquainted with its possible designs:
| Construction type | Peculiarities |
| Mortise | In this case, a wooden window with a window is made in one sash. This kind of fastening is considered the most reliable. It should be noted that in this case it is necessary to adjust the structure as accurately as possible in order to avoid gaps. |
| Split | The window is made as a separate structure. It is attached to the window frame using external hinges. |
As a rule, when remodeling a window with your own hands, they give preference to a split design, since it is easier to implement.
Ending a Workflow
Installing a window using external glass.
Next, using a drill and a wood drill, drill out the middle part, thereby forming a groove with one rounded side. To make the connection tight, the tenon must be rounded. A tenon is made on the slab, and an eye is selected on the transom (the part that separates the sashes) and on one of the vertical posts of the frame. In this case, it is necessary to place the eyes symmetrically and according to the dimensions indicated in the drawing. For such an eye, you can use a drill and a drill bit, and fit the tenon to the resulting groove.
In addition, it is possible to make a through eye for attaching the slab. A window is made in the same way with a tenon fastening.
Once all the parts are ready, you can begin assembly. First, dry assembly is performed (without glue). If necessary, make adjustments and then glue them together. Additionally, to strengthen the fastening, you can screw the corners on the corners of the frame and the window. The window is hung on hinges. After this, you can begin impregnating and painting the window.
Manufacturing
Materials and tools
Before making a window in a wooden window, you need to prepare some materials and tools:
- Frame bars with a cross section of approximately 50x60 mm (selected individually);
- Calipers;
- Carpenter's chisel;
- Hammer;
- Roulette;
- Hacksaw;
- Electric planer;
- Roulette.
Note! In order for the product to last for a long time, the wooden blocks must be dried and of good quality - without knots or cracks. In addition, they must first be treated with an antiseptic agent to prevent wood rotting.
In the photo - timber 50x60 mm
Drawing
After preparing the tools and materials, you need to complete the drawing. To do this, first of all, you should measure the timber from which the sash is made in order to make a window from the same parts.
On the diagram it is necessary to indicate in millimeters all the dimensions of the window frame, sash and all other elements. Having a drawing will allow you to correctly cut the materials and avoid mistakes during the work process.
Remaking window sashes
First of all, it is necessary to redo both window sashes.
Instructions for doing this work look like this:
- The first step is to dismantle the glazing beads and pull out the glass.
- Next, you need to dismantle the top sash strip and shorten the uprights. If you cannot dismantle the top bar, you can cut out part of the racks in the middle.
The parts are connected using wood glue. If you have a router, you can make a connection using the tenon/groove principle. If it is not possible to cut grooves, you should strengthen the connection with metal corners or strips.
- Then you need to shorten the glass and glazing beads so that they can be inserted into the frame.
The second, outer sash is done in exactly the same way, the only thing you should take into account is that it must be smaller than the inner one so that it can open freely.
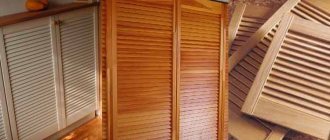
Advice! Ordinary curtains interfere with the use of the window. Therefore, you can purchase special roller blinds for wooden windows with a window or blinds.
Example - blinds on wooden windows with a window
Manufacturing
Now you can start making the window.
The work is performed in this order:
- First of all, it is necessary to make the frame of the future design, which, in fact, is an analogue of a window sash, but in a smaller version. At this stage you will need a router to make the grooves.
If there is no such tool, you should seek help from a carpentry workshop, where, according to the drawings, specialists will quickly process the timber. As a rule, the price for such work is low.
- Next, according to the drawing, cut the timber into planks and make cuts at 45 degrees.
- On the sections it is necessary to make spikes and eyes, with the help of which the frame parts will be connected to each other.
- Then you need to cut the glass to size and insert it into the frame. You can secure the glass with cutting beads from the frame.
- Next, the structure is attached to the window frame using hinges and fittings.
Example of a finished product
Advice! Before working on manufacturing, you should “get your teeth into”, for example, first making wooden windows with a window for a summer house.
The second sash is performed and installed in the same way. After this, you just need to paint the finished products or open them with varnish. This completes the manufacturing process.
It should be noted that wooden windows with a double-glazed window are made somewhat differently, since they have double sashes, however, the principle of operation still remains the same.
How to make a window
Now let's look at several options for making a window.
FIRST OPTION - when the narrow one is divided into two parts.
SECOND OPTION - when a window block is inserted into the wide frame.
First of all, I suggest you consider the parts from which the frame itself is made: 1-glass, 2-fittings, 3-tenon. Of course, everyone knows what glass is. Those who are not familiar with fittings should not take on the job and damage the frame. A window unit costs more than you will pay a craftsman. But we’ll talk about the ship separately.
SHIPKA - also known as “frame beam”. The frame frame is assembled from this part. We will work with this frame beam.
First, let's look at the first option for inserting a window. To be honest, I always recommend it to all customers.
Without dividing the removed double frame, we must cut it into two parts, into the future window and the future frame. First of all, we remove the fittings (except between the frame hinges) and remove the glass. Then we measure the length of the frame, divide it by 3. We measure the resulting number from the top of the frame and carefully saw it at a right angle.
Well let's begin. We take the frame beam of your frame as a sample (I warn you!) There are no identical frames, even though they were made at the same woodworking plant, and even on the same machine) which is shown in the first picture.
The second picture shows the timber from which the tenon will be made.
The red lines indicate the dimensions that must match the sample of our frame bar. I specifically do not write the parameters of the bar. I repeat once again, it is different on each frame (on average it is 4 x 5 cm).
The third picture shows a quarter removed for glass (it is advisable to do this operation on a machine. But if you don’t have a machine, then you can actually make a quarter with a simple chisel, although you need to have some skill).
In order for the spike to be almost ready, you need to remove the phase, as shown in the fourth picture. And - almost - because we will finish it on the frame.
On the other side of the tenon, make the same connection into a tenon.
Do-it-yourself wooden Euro-windows
The first association that arises when you mention Euro-windows is single-chamber or double-chamber PVC structures in white. These are the windows that are installed in most apartments and private houses, replacing outdated frame structures. An alternative to plastic windows, which are inferior to wooden ones in terms of environmental friendliness, but superior in terms of performance characteristics, is Euro-windows made of wood. Their parameters are impressive, their appearance is up to par, and they are environmentally friendly. Unlike a plastic one, a wooden window frame with a proud “euro” prefix can be made independently. Making wooden windows with your own hands is a common thing for many FORUMHOUSE users.
- Eurowindow - what it is and how it’s done
- DIY wooden windows
- Materials, tools, drawings, connection of elements
- Templates from the corner
- Chamfering, assembly, finishing
video instructions for manufacturing, installation, repairs, drawings, arched extensions, photos and prices
All photos from the article
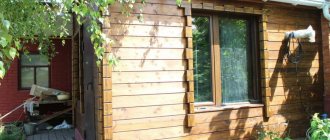
The plastic double-glazed windows that are popular today have many advantages, but it does not always make sense to install them. For example, if you need to glaze a wooden house in the country, then having at least a little experience working with wood, it will be much cheaper and more practical to make homemade frames or update existing ones. Below we will get acquainted with window manufacturing technology, and also consider how to update old wooden windows with your own hands.
Wooden double-hung window
Window production
To make a wooden window with your own hands from start to finish, you need to do the following:
- Drafting the project;
- Manufacturing and installation of the box;
- Manufacturing of window frames;
- Installation and glazing of the frame.
Below we will take a closer look at all these stages of work.
Example of a wooden window diagram
Drafting
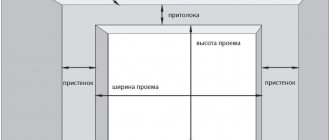
First of all, you need to complete drawings on how to make a wooden window with your own hands. To do this, you need to decide on the dimensions of the future product and its design. Accordingly, you should first measure the window opening.
To correctly draw up drawings of wooden windows with your own hands, you can familiarize yourself with existing projects and select the most optimal one. In this case, all that remains is to adjust the dimensions of the structure to the window openings of the building.
As a result, do-it-yourself drawings of wooden windows should show all the details of the product, as well as their dimensions, which must be indicated in millimeters. Having such a project will greatly simplify the work process, since all the nuances of the design will be before your eyes. Accordingly, the likelihood of making mistakes is reduced.
Below, as an example, we will consider how to make the simplest design - a blind wooden window with your own hands.
Window box diagram
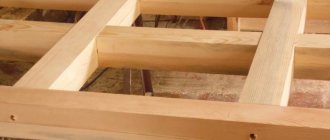
Making a box
Although the frame is the simplest element of a window, its manufacture must be approached very responsibly, since it is the one that takes on the entire load from the window. To make a box, you can use only well-dried boards, without any defects. Pine boards are an excellent option, as they are quite resistant to moisture.
Eurowindow - what is it and how is it done?
Perimeter fittings are a prefabricated harness made up of several parts mounted along the entire perimeter of the profile. It provides locking of the sash at several points, using one handle, which allows you to achieve the tightest possible fit and eliminates blowing. Thanks to this fittings, a window with an opening sash can operate in two modes – tilt and turn. In the rotary mode, the window opens only by turning; in the combined mode, the window sash opens and tilts.
The fundamental design difference between Euro windows and conventional windows is one frame, which can accommodate several double-glazed windows. The main technical characteristic of the “euro” is complete tightness, achieved through various seals. Thermal conductivity will depend on the number of air chambers, and on the type of glass in the double-glazed window, and on the correct installation of the window. Therefore, the material from which the profile is made does not play a significant role; the functionality of the structure and its characteristics are important.
DIY wooden windows
The process of manufacturing a wooden euro-window will require certain financial investments - the cost of wood, components, equipment. It is also easier to order double-glazed windows from professionals, although some craftsmen manage to assemble this unit themselves. But even taking into account the impressive cost of the finished product, which is an elite and therefore quite expensive product, the savings will be significant. If we are talking about building a new house or completely glazing an old one, the difference can be tens of thousands.
Materials, tools, drawings, connection of elements
Windows are constantly exposed to external influences and temperature differences between indoors and outdoors, which inevitably leads to changes in the geometry of the structure when it comes to wood. To minimize possible warping, frames and sashes are made not from solid timber, but from laminated veneer lumber. You can purchase a ready-made one if there are reliable suppliers, or you can glue it yourself. In the second case, a workpiece of at least three lamellas is assembled, so that the fibers are directed in opposite directions. If possible, choose radial sawn wood; tangential sawn wood “leads” more. For gluing, special, moisture-resistant compounds should be used.
The section of the beam is chosen based on the number of double-glazed windows - for a window with one chamber, a 6x4 cm beam is usually used. In production conditions, grooves are selected in the frame not only for the double-glazed window and external seals, but also for internal ones. One of the former manufacturers of wooden European windows shared his drawings, by simplifying which you can get high-quality structures that are almost as good as ready-made ones. In order to make a window with your own hands, the drawings are quite suitable.
Do-it-yourself wooden Euro-windows
The first association that arises when you mention Euro-windows is single-chamber or double-chamber PVC structures in white. These are the windows that are installed in most apartments and private houses, replacing outdated frame structures. An alternative to plastic windows, which are inferior to wooden ones in terms of environmental friendliness, but superior in terms of performance characteristics, is Euro-windows made of wood. Their parameters are impressive, their appearance is up to par, and they are environmentally friendly. Unlike a plastic one, a wooden window frame with a proud “euro” prefix can be made independently. Making wooden windows with your own hands is a common thing for many FORUMHOUSE users.
- Eurowindow - what it is and how it’s done
- DIY wooden windows
- Materials, tools, drawings, connection of elements
- Templates from the corner
- Chamfering, assembly, finishing
Repair of plastic windows
offers its clients professional services for maintenance, repair and modernization of modern metal-plastic windows and doors in Perm and the Perm region.
We will eliminate:
We will replace:
We will install:
We will produce:
Modernization of plastic windows
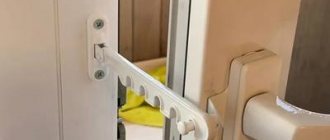
Do you need repair of metal-plastic windows or is the safety of children important to you and you want to put a child lock on the window? Cases of robbery from neighbors have become more frequent, and you are afraid that strangers may also invade your apartment? Then you need anti-burglary window fittings!
If the installed window no longer meets your requirements, or there is a need to improve its performance characteristics, do not rush to replace it. The design of the window allows you to install previously unnecessary elements on it, thereby saving money and time
Micro-ventilation mode RUB 1,200.
Setting the micro-ventilation mode will ensure a constant flow of fresh air, minimizing the risk of drafts.
The necessary additional elements are installed on the sash, or the fittings as a whole are changed
Children's locks 600 rub.
A modern window is much easier to open than an old wooden one, which leads to a significant risk for small children who, due to their curiosity, can open it and accidentally fall out. Child locks allow you to open the sash in ventilation mode, but will not allow you to open the window wide
Handle with key 800 rub.
A handle with a key allows you to limit the free opening of a window or balcony door. Installed for protection from children, as well as in places of free access in budgetary and commercial organizations
Anti-burglary fittings RUB 3,000.
Anti-burglary fittings are equipped with special locking elements that provide reliable protection against unauthorized access to the room through a window or door.
Recommended for installation in private houses and cottages, as well as on the first floors of houses
Installation of a sash in the blind part of a window from RUB 4,000.
If a blind window is installed and there is a need to ventilate the room, then a sash can be installed on such a window. You can also install windows and divide the window into several parts.
Eurowindow - what is it and how is it done?
Perimeter fittings are a prefabricated harness made up of several parts mounted along the entire perimeter of the profile. It provides locking of the sash at several points, using one handle, which allows you to achieve the tightest possible fit and eliminates blowing. Thanks to this fittings, a window with an opening sash can operate in two modes – tilt and turn. In the rotary mode, the window opens only by turning; in the combined mode, the window sash opens and tilts.
DIY wooden windows
The process of manufacturing a wooden euro-window will require certain financial investments - the cost of wood, components, equipment. It is also easier to order double-glazed windows from professionals, although some craftsmen manage to assemble this unit themselves. But even taking into account the impressive cost of the finished product, which is an elite and therefore quite expensive product, the savings will be significant. If we are talking about building a new house or completely glazing an old one, the difference can be tens of thousands.
Materials, tools, drawings, connection of elements
Windows are constantly exposed to external influences and temperature differences between indoors and outdoors, which inevitably leads to changes in the geometry of the structure when it comes to wood. To minimize possible warping, frames and sashes are made not from solid timber, but from laminated veneer lumber. You can purchase a ready-made one if there are reliable suppliers, or you can glue it yourself. In the second case, a workpiece of at least three lamellas is assembled, so that the fibers are directed in opposite directions. If possible, choose radial sawn wood; tangential sawn wood “leads” more. For gluing, special, moisture-resistant compounds should be used.
The section of the beam is chosen based on the number of double-glazed windows - for a window with one chamber, a 6x4 cm beam is usually used. In production conditions, grooves are selected in the frame not only for the double-glazed window and external seals, but also for internal ones. One of the former manufacturers of wooden European windows shared his drawings, by simplifying which you can get high-quality structures that are almost as good as ready-made ones. In order to make a window with your own hands, the drawings are quite suitable.
How to make a wooden window with your own hands
Anyone can make a wooden window with their own hands; you just need to know the necessary information about existing technologies and follow the instructions. Working with this material is very simple; in addition, you will need a minimal set of tools.
Contents [Hide]
Let's look at how to make a wooden window yourself from “A” to “Z”.
Rice. 1. Appearance of a homemade wooden window
What might be required for the job?
Making a wooden window yourself begins with purchasing wood and preparing tools. You will need:
To work with wood you will need: a hammer, a saw, a level, a chisel, a tape measure, a pencil.
- frame bars with a cross section of 50x60 mm;
- bars for windows with a section of 50x50 mm;
- carpenter's chisel;
- hammer;
- caliper for precise marking;
- tape measure (ruler), square;
- pencil (marker);
- an electric jigsaw with a set of spare files or a hacksaw;
- medium and fine sandpaper;
- construction knife with spare blades;
- electric plane.
In order for the manufactured window to serve for a long time without replacement or major repairs, the bars for its manufacture must be of excellent quality and dry.
They should not have chips, cracks or other defects that could cause damage to the wood during processing or sawing. Knots should be in a minimum quantity and be small in size, or better yet absent. Such source material will not only last a long time, but will also be easy to process.
Preparatory stage
Any construction work consists of a preparatory, main and final stage. When making a window, the preparatory stage includes the selection of carpentry tools and optimal raw materials. In addition, it is necessary to make a detailed drawing, which shows not only the general dimensions of the frame, but also the dimensions of all components.
Required Tools
To work you will need the following tools:
- hammer;
- drill;
- screwdriver;
- glass cutter;
- chisel;
- milling machine;
- grinding machine;
- saw.
The list is not exhaustive. If you want to save as much as possible, you will also need a circular saw. In this case, you can buy any wooden canvas and cut it into the required pieces yourself.
Necessary materials
Wooden window frames are mostly made from dry or laminated wood, but in some cases new plywood sheets can be used as a raw material.
Plywood is the cheapest and lowest quality option. Suitable for indoor windows only. Even well-treated with protective impregnations, plywood quickly picks up moisture and begins to crumble.
A solid wooden beam is a good and relatively inexpensive solution. The disadvantage is that such a board can move, which will lead to a change in geometry. In addition, you need to pay attention to ensure that there are no cracks or knots.
Laminated wood is an excellent choice for making a frame. Firstly, it is light in weight, but at the same time quite durable due to its multi-layer nature. Secondly, this type of wood is not susceptible to sedimentary influences and deformations.
It is recommended to use 5x5 cm timber for the frame.
In addition, you will need:
- wooden glazing beads;
- PVA glue;
- wood screws.
It is advisable to stock up on putty, stain or antibacterial impregnation in advance.
Making a box for a wooden window
The most popular tree for making window frames is oak, but its cost is quite high. Therefore, for the first experience in this matter, it is better to purchase cheaper materials, for example, pine.
It is worth remembering that the frame has a great “responsibility” - it bears the main load of the window, so when assembling it you need to carefully take care of the boards: they must be well cleaned and dried, and also not have scars, cracks, protruding knots, that is, be absolutely smooth. In other words, only first-class timber is suitable; other options should not even be considered.
You need to make a groove about 10-15 mm deep in the workpieces. The four sides of the box are connected to each other using wood glue. Next, holes are drilled in all corners with a drill, through which wooden fixing rods with a length of 3 cm are inserted. Chops are needed so that the connected blocks gain strength and are tightly fixed at an angle of 90 degrees.
Why is it better to worry about the window in advance?
Thanks to the window, you can conveniently ventilate the room without having the winter ventilation function. The advantage of using it is that when opening the window, it does not draw cold air across the floor, which often happens if the window is in the winter ventilation position. This way, you can ventilate without fear that you or the children playing on the floor will get blown out.
In addition, the window is convenient if children live in the house. They will not be able to reach it, open it or fall out, and they will not crush their fingers. If the window is on the ground floor and you have a cat, she will be able to enter the house without waiting for you to open the window.
Making a window frame for a wooden window
The next step: directly manufacturing the window frame itself. To do this, you will need a wooden beam with a cross-section of 60*40 mm or more, it depends on the size of the window. The thickness of the profile is determined by the number of glasses that will be inserted into the window. If the frame provides for the installation of one glass, two grooves are sufficient. In the case of a double-layer glass unit, another groove is added (to secure the second glass). There may be more glass in one window, so a spare groove must be provided for each.
To cut the profile, use a milling machine. It is recommended to fix glass with a thickness of about 4 mm.
The frame is assembled as follows:
All four corners of the boards should be divided obliquely into two equal parts - 90/2 = 45 degrees. When connecting boards, immobility is ensured using self-tapping screws. They need to be deepened as deeply as possible.
Preparation and insertion of glass
The dimensions of the glass must clearly coincide with the dimensions of the opening so that micro-cracks do not form that let in cold air from the street. Therefore, the measurement stage must be carried out scrupulously, with an accuracy of up to 0.5 mm. It is recommended to cut the glass with a diamond screw, after which the edges are thoroughly polished with sandpaper.
Rice. 3. Wall cut for glass insertion
When cutting glass, be sure to remember the safety rules:
- Wear protective gloves to avoid accidentally damaging your skin when working with glass.
- Along with gloves, do not neglect safety glasses: they protect your eyes from getting construction microparticles and glass chips into the mucous membrane.
- While working with glass, it is not recommended to breathe through the mouth or talk, as glass chips can settle on the mucous membrane of the throat. This is not fatally scary, but it brings great discomfort when you strain your voice and causes a painful cough.
When cutting glass, you should use a measuring device whose length exceeds the length of the glass, for example, a metal meter ruler. Having fixed the break point, the glass is lightly pressed with your hand until a cracking sound is heard. The finished glass sheet must be tried on after inserting it into the opening.
If the dimensions completely match, the glass is secured on top with glazing beads and secured with thin nails. If two or more additional glasses are inserted, a vertical beam with identical grooves is mounted in the middle of the frame.
Each half of the window is made separately from each other, and one of them must have a thinner frame. It is connected to the main one through hinged hinges, thus creating an opening sash. Using self-tapping screws, an auxiliary handle is attached to the frame, and a groove is made in the vertical beam for closing the sash.
Advantages and disadvantages
Advantages of windows with vents:
- Cool air entering the room at the top of the window, meeting the flow of warm air, manages to heat up.
- There is no need to empty the window sill.
- The presence of an additional impost strengthens the structure.
- You can install it anywhere. For example, for cats they make a hole at the bottom.
- Reduces the ventilated area , so you can leave it overnight, which is convenient for cold regions.
- The opening mechanism is very simple and convenient.
- The location of the opening in the upper part makes it impossible for children or a cat to reach it.
- When cooking in the kitchen , use it freely.
- Eliminates the possibility of drafts.
Minuses:
- The presence of an additional structure leads to its rise in price.
- Additional imposts reduce light transmission into the room.
- Mortise. The presence of a small door was initially included in the double-glazed window design. It is a separate sash with hinges and double-glazed windows. This is a very successful and reliable option, hence the inflated cost of products by a total of 30%. Just like the sash, the mortise opening has three modes: summer and winter ventilation, full opening.
- Split. Here the door cuts in when the glass unit is mounted in the opening. The sash is removed and the glass is cut to fit the door to the required size. The difficulty in such work is considered to be its adjustment and fastening so that it is perfect. The service life is significantly shortened compared to the first type of penetration.
- Sliding. The essence of this method is that during ventilation the internal sliding of the glass is used. They are located in special runners, due to which the glass moves a certain distance and returns to its original position. This option is considered the most modern, but there is a drawback in the vulnerability of the mechanism. It is not advisable to make such a design yourself; you should trust experienced specialists.
Final installation of a wooden window
When the window is completely ready, it must be carefully inserted into the opening and secured in the pre-prepared grooves. Its immobility is ensured by self-tapping screws driven through the frame into the wall. In order to do this efficiently, it is recommended to use a mounting gun, thanks to which the dowels with a sharp movement pierce the wall and lie deep in it.
If there are holes that allow cold air to pass through, use polyurethane foam. At the end of the work, the surface is thoroughly plastered. The final touch is the installation of the ebb and flow and fastening the window sill to the window.
A few tips when installing a wooden window sill:
- The boards that will make up the window sill must meet the same requirements: be thoroughly cleaned of knots, sawdust, and be absolutely smooth.
- An antiseptic should be applied to the wood; this will prevent the appearance of fungi and insects that like to live under natural materials.
- The length of the window sill should exceed the width of the window opening by several centimeters. On average, this excess is a difference of 100-200 mm.
- The protruding part of the window sill should not exceed 70 mm in length.
- It is advisable to cover the structure with felt, this will give more strength.
- To fix the window sill, you need to use headless nails. In the case of installing a wooden window sill and window in a wooden house, the nails are driven in half and boards are placed on them.
- Ideally, the window sill should be absolutely horizontal, but if you provide a slope, then it should not exceed 1-2 degrees.
Based on the foregoing, it is not difficult to come to the conclusion that the manufacture and installation of a wooden window is not anything complicated or incomprehensible. If you have free time and all the necessary tools, making such a masterpiece with your own hands is as easy as shelling pears. You can also create a real work of art from a homemade wooden window by decorating the sashes with hand painting or carving.
Advantages of windows with vents. Do they exist?
The main advantage of window structures equipped with a window is the ability to ventilate the room even in winter, without the risk of hypothermia. This allows you to maintain a healthy microclimate in the apartment.
A standard double-glazed window is also quite capable of providing normal ventilation. Modern profiles are equipped with a tilt-and-turn mechanism and have slot ventilation functions. It is also possible to install windows with an integrated ventilation system. She is able to independently control ventilation.
Many people are sure that the window controls the flow of cold air. It is not as noticeable to a person as when the sash is open. But in fact, warm air always rises up to the ceiling and floor; the baseboards will always be colder. The window will not affect this in any way.
It is generally accepted that a window is safer than a tilting window sash and children or pets will not fall through it. Indeed, a small child is not able to reach it. Cats and other pets heading outside cannot be protected from danger by a window.
Today, manufacturers equip PVC profiles with special fittings and make safety accessories that are very effective and affordable. So this advantage of the window is very conditional.
What you can’t argue with is that the presence of a window is convenient for lovers of indoor plants on the windowsill. Flowerpots do not have to be moved to ventilate the room.
Vents for plastic windows can be of three types:
- Mortise window: this is the most expensive and aesthetic option. The mortise window is an integral part of the window profile, so it matches the window perfectly in color and size. This window is strong and durable.
- A split window is a window that is installed in a finished window profile by cutting one of the sashes. The glass unit in it is replaced, the window is held on by overhead hinges. Such a window is not very reliable and not very beautiful. This option is suitable if you do not intend to change the window, but want to provide them with vents.
- The sliding window is an exclusive option. Such windows are made only to order. The glass is fixed on horizontal runners, which simultaneously hold the window and allow it to move. Very flimsy design.