Starting profile for PVC panels: dimensions and photos
It is impossible to imagine the installation of PVC panels without connecting elements that differ in shape. Such plastic parts are usually called profiles, components or moldings.
There are several types of this element, each of them intended for one purpose or another. Without the use of profiles, the design will not fully look complete, neat and solid.
And, naturally, without a starting profile, the installation of PVC panels cannot begin. Let's take a closer look at everything about the starting profile for PVC panels.
Advantages of a collapsible starting L-profile
The width of the upper decorative front trim has been increased.
If ordinary elements have a strip width that does not exceed 15 mm, then collapsible ones have a strip width of 22 mm. What does this give? It is much easier for builders to install panels; there is no need to accurately measure each of them, which takes a lot of time and increases the cost of work. Installation of L profile
It is no secret that not all rooms have strictly vertical corners; often such a deficiency is present in the bathrooms of Khrushchev-era apartment buildings. If you use a regular profile, then such a panel must be mounted after taking individual dimensions for each panel. A wide collapsible profile can compensate for the difference in the width of the wall in the bathroom up to 4 cm, this is quite enough to compensate for construction defects made during plastering of the walls of the room.
Now you can stack all the panels, measure the width of the wall at the narrowest point and at the same time cut to length. The process of installing panels is accelerated by 25–30%, which is quite a lot for small rooms. Another plus is that the amount of unproductive waste is minimized, the length of the segments increases by about 4 cm, which allows most of them to be used for covering bathroom walls in the future. The distance between the corners of the walls and the door or window openings is small; in these places, if desired, you can easily fix the short panels remaining after cutting the standard ones.
It is possible to adjust the gap taking into account the thickness of the panels. This property makes the collapsible L-profile universal. The maximum thickness of facing materials can be up to 15 mm, which allows it to be used not only for plastic materials of various thicknesses, but also when covering bathroom walls with moisture-resistant plasterboard or wood panels. Moreover, regardless of the thickness, the tight fit of the top strip guarantees the absence of gaps along the entire height of the wall. The upper bar fits into the lower one with latches; they firmly hold the two elements along the entire length.
PVC panel (drawing)
When performing repair work, the risks of damage to the panels are minimized. If it is almost impossible to remove a panel from an ordinary profile without cracks, then with a collapsible profile it is much easier to replace it. Use a thin object to pry up the top bar and remove it from the latch. Next, the damaged cladding element is dismantled, a new one is installed and the decorative element of the collapsible profile is fixed in its original place. The work can be repeated several times, the design does not change its original characteristics and is reused without preparatory work.
Installing slats in the starting profile
The scope of application of the collapsible profile is expanding. It can be installed both at the beginning of the cladding and at the final stage. The element is used at the junction of the cladding with platbands, window and door frames, and when finishing walls and ceilings.
The order of finishing the walls changes slightly; below we will give step-by-step instructions for installing plastic panels on the walls of the bathroom.
Installing slopes on windows yourself
Preparation of the slope surface
Before you begin installing the slope, you must wait at least 24 hours after installing the window unit. The wall surface must be cleaned of all protrusions, remove dust with a wet cloth, and allow to dry. It is advisable to treat the surface with some means to improve adhesion (a solution of silicate glue, for example).
The mounting foam protruding from the space between the wall and the window frame must be cut off with a sharp mounting knife so much that it does not interfere with subsequently attaching the starting profile to the frame. We recommend treating the surface of the foam with a sealant to prevent vapors from entering the pores.
Preparing the surface for installing a plastic slope
Installation of the starting profile
The starting profile is sold either three-meter or six-meter. Take the second ones, it’s better to leave them, but you won’t have to join them in the middle of the window. There is an inclined “start-clip” profile, it is intended for slopes made at an angle. For straight slopes, it is better to choose a regular L-shaped profile. The width is selected according to the thickness of the panels.
To install the profile you will need:
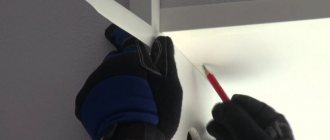
- roulette,
- pencil,
- fine-toothed saw for plastic,
- screwdriver with screwdriver attachment
- self-tapping screws – “bugs”, 15 – 20 mm with a tip – drill. The horizontal top profile is installed first. It can be made from wall to wall and screwed with self-tapping screws exactly along the edge of the frame in increments of 20 - 25 cm. With the accuracy with which the windows are installed, a level may not be needed. Vertical side profiles will require more precision, so use a tape measure. The gap can be made at the bottom, at the window sill, and the upper joint can be made as even as possible. Screw with the same distance between the screws, departing 4 - 5 cm from the joints.
Installation of the starting profile itself
Lathing along the slope wall
Wooden slats 20x40 mm, screwed to the walls of the slopes, after 40-50 cm and next to the joints of the panels, will give the necessary rigidity to the structure. Before installation, we recommend treating the material with protection against rot and insects and drying it. In the walls, two holes will be required for each slat; the slats are attached to them with dowels - nails. When installing the sheathing, the ends of the slats should not reach the edge of the wall and panel, because a couple of centimeters will be required to secure the F-shaped profile - the cover.
Installation of lathing on the wall
Installation of panels on slopes
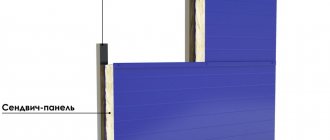
You can buy special panels for slopes (honeycomb structure) or make them from sandwich panels. The thickness of sandwich panels is from 10 mm, like slope panels, but they seem warmer due to the polystyrene filler. Sold in sheets 3000x1500 or 3000x2000 mm.
Before installing the panels, decide what material you will use to insulate the slopes. If it’s polyurethane foam, then more on that later. If you decide to use mineral wool, we recommend buying several mats. When installing panels, lay the space between the panel and the wall with plates cut to size.
The top sheet is installed first. Cut the panel to the length of the starting profile (or, if there is none, so much that it reaches the walls), insert it into the starting profile and screw it to the sheathing slats with short self-tapping screws with flat countersunk heads. PVC is flexible, so tighten the screws until the heads sink. If you do not want to mount the panel with self-tapping screws, glue the panel to the wall with tape during installation.
Installation of the panel in the starting profile
The side panels are cut to length from the window sill to the top sheet. To cut plastic, you need a sharp mounting knife or a large utility knife with a short blade. PVC cuts perfectly in any direction, so making a clear cut is not difficult. We recommend using a metal strip like a long ruler as a cutting guide.
Insert the panels into the starting profile, check the connection to the window sill and the top panel, insert insulation into the opening and secure with self-tapping screws along the outer edge. If the junctions are not completely tight, putty with liquid plastic (PVC dissolved in acetone). It hardens quite quickly in air, “welding” the panels to each other.
Fastening the panel to the slope sheathing
If you decide to insulate the slopes using polyurethane foam, we warn you in advance that the foam can expand greatly. To ensure reliability, the panels need to be spring-loaded with reliable spacers while the foam hardens. Before filling the space with foam, spray the wall with water from a household sprayer. The foam will expand less and adhere better to surfaces.
High expansion foams can push out the panel, so work very carefully or look for low expansion foam. These are high-quality foams, produced “for a gun”. The manufacturer indicates the expansion coefficient on the labels. Everyone knows the Macroflex brand; it is a popular brand with good characteristics. Competition among professionals comes from Titan O2 foam, which does not differ in price. The main destroyer of polyurethane foam is ultraviolet light, so all junctions must be insulated from sunlight.
Installation of the final slope profile
After installing the panels, all that remains is to close the ends of the panels with the finishing profile (F-shaped). A three-meter profile is sold with a price per linear meter. The price depends on the width of the shelves.
First, the upper profile is measured with an accuracy of 1 - 2 mm, the upper shelf remains wider, with the calculation of sawing “at an angle”. With light blows of the palm, the profile is fixed to the panel along its entire length. Then cut the side profiles to size with the same tolerance. For a better joint, saw the internal flanges of the profile with a fine-toothed saw at an angle of 45 - 50º. The upper wide shelves on the wall overlap each other at the junction. Place a profile lining under them so as not to saw the wall, and carefully saw off along the crosshairs at 45º. You will get an excellent joint. On the second side profile, do the same.
When fixing the finishing profile on sandwich panels, there is no need to glue it, but if you are using a regular corner, then purchase “liquid nails” glue. Glue the corner to both the panel and the wall.
Do-it-yourself plastic slopes are ready
Do-it-yourself plastic slopes are ready
Fitting sizes, possible colors
The fittings may have different sizes, but they are all systematized. The following sizes are used for standard panels:
- for simple corners – 15x15; 20x20; 30x30; 40x40 mm;
- for ceiling skirting boards – 6 x 0.5 m.
However, the dimensions used must correspond to the format of the panel products, without detracting from the attractiveness and functionality of the cladding.
Accessories for PVC panels
When choosing PVC wall panels, the modern buyer, first of all, pays attention to quality and size. He is usually of little interest in the color of the fittings, and, as practice shows, it is in vain
There are many examples when, when decorating interiors, moldings and other fittings made of wood or plaster are painted to match the color of the walls. This is done in order to emphasize the classic style in its purest form. In this case, the moldings that create and decorate a certain architecture do not stand out from the general background.
Important! Cornices, moldings and other components are considered to be required to be painted. Even if they are white, paint them white
This is done so that there are no joints. However, plastic fittings cannot be painted, as over time they lose their attractiveness.
PVC molding
Plastic wall panels are in high demand due to such properties as versatility, unpretentiousness, and a large number of possible design options. Components such as joining and connecting profiles, internal and external corners, ceiling or floor plinths:
- allow for high-quality fastening of wall panels;
- provide a fast and waste-free construction method.
Installation of panels using components takes three times faster than traditional framing. We invite you to watch a video on the topic.
External or external decoration of windows from the street side
Installation of external PVC panels is convenient and justified in further use, because they:
- Cleans well;
- Give the house an aesthetic appearance;
- Protect seams from moisture and external influences;
- They are inexpensive, quick and easy to install.
A special feature of the external finishing of slopes is the use of corners with a rotation of 105 degrees, with dimensions from 100*20 mm, when installing them. Such parameters make it possible to reliably protect windows and openings from wind and moisture, and the degree of rotation provides more opportunities for ease of installation. Of course, if you do not live on the ground floor, the installation of panels correctly and safely will be entrusted to specialists.
Features of installation of plastic panels
Finishing of floor and wall surfaces with panels is carried out according to the same principle. Work begins from the most protruding point of the plane.
On the walls
The boundaries of the installation of the sheathing can be drawn using a level lath, a construction tape and a simple chalk. Then the components of the structure are installed. If wooden slats are used, dowels and screws act as fastening elements. To control evenness, use a plumb line and a building level.
If you have to work with an uneven wall, level it with plywood pads. It is recommended to fill the area between the surface and the frame with insulating material. This will also improve the soundproofing qualities of the room.
Once the frame is ready, the panels themselves can be installed. If the latter have lost their performance properties, they can be removed and new ones installed in the same sheathing. Sometimes profiles are placed at the level of the resident’s main joints (hip, knee, shoulder) to prevent the panels from bending when a person touches the wall.
Possible colors
Profiles – both plastic and metal – are sold in a variety of colors. In addition, each of the materials can be colored according to the client’s preferences, which will allow the product to fit harmoniously into the interior of any style. The most common elements are white, which will be an excellent addition to any interior style.
Many designers, when creating decorative structures, partitions or panels in rooms, select the color of the molding in accordance with the colors of other finishing materials present in the room (for example, with a wenge-colored floor and doors, a brown shade profile with a suitable texture will look good). Another option is colored profiles used in children's interiors, bright showers or rooms with non-standard design solutions.
Purpose of fittings for plastic panels
PVC wall and ceiling panels are a functional and durable coating; they are available in a wide range of colors, have different textures and are ideal for decorative finishing of residential premises. Sheets are made from a polymer mixture using special equipment - a plasticizing machine or an extruder. The cut lamellas are painted with organic dyes, and the top of the canvas is coated with an antistatic agent and protective varnish - that’s why the material looks good and has high performance qualities.
However, for installation it is not enough to choose an impeccable plastic covering - you will need to purchase fittings and fasteners, which are currently not just a set of individual parts, but also a multifunctional and technologically advanced mechanism that performs different tasks.
Purpose of components for PVC assembly:
- fixing panels to the ceiling, walls and flooring;
- connecting finishing segments of different thicknesses;
- design and connection of joints at different angles;
- formation of a structure of any scale and shape.
The main material for the production of fittings is high-quality steel, although some parts can be made from alloys based on magnesium, titanium, and aluminum, processed by pressure. Polymer elements are used more for decorative framing than for creating a durable sheathing.
A characteristic feature of the profiles used is their ease of use - they can be easily adjusted to the required dimensions by cutting them with an ordinary construction knife. In some cases, it is better to fix the external molding using adhesives, thanks to which the panels are not damaged or deformed.
Methods for decorating PVC
The presence of a pattern on the plastic sheet indicates that it has been decorated. Plastic decoration occurs in two ways:
- Using thermal film, the design is transferred to a plastic surface with a hot roller.
- Direct high expansion printing using special expensive equipment. This affects the price of finished canvases. This type of plastic decoration is used to apply shades to it that imitate the color of wood, stone and fabric.
Characteristics and classification of accessories
Among the variety of molded products, there are varieties that allow you to mount panels on the wall and have only decorative functions. You can select the necessary profiles for installing plastic panels based on the task that the apartment owner sets for himself.
Start profile
A plastic U-shaped element, or starting strip for PVC panels, is used to finish all ends of the panels if they remain open and do not join with the same material. Starter strips allow you to finish only 1 wall or part of it:
- When installing from corner to corner, the strip is placed on both outer panels of the panels. They allow you to make a neat connection to an adjacent wall during frame and frameless installation.
- When installing wall coverings without skirting boards, the plank is placed at the top or bottom, creating an even joint between the wall and the ceiling or floor.
- When finishing part of a wall or window opening, the transverse sections of the boards remain open. The installation of a starting element allows you to give them an aesthetic appearance. It covers the cuts, forming a thin border. The plank allows you to trim the lower part of the wall with panels, combining it with a painted top, to frame panels in the opening of wall panels, etc.
Connecting element
An H-shaped PVC connecting profile is used to decorate the joint between parts of the same name that need to be lengthened. It is a double U-profile with a common internal partition. When cut, it has the outline of the letter H. The standard length is 3 m. The industry produces connecting strips with a thickness of 5 and 8 mm. When installing, the edges of the joined sections are inserted into the recesses of the joining profile.
Profile with corner
PVC F-profile is called so because of its corresponding shape. Its purpose is to decorate the ends of elements at the corners. The need to install it arises when finishing the slopes of a window or door. Its elongated part covers the place where the slope panels are fastened, and the crossbars cover the end of the wall panel.
Available in 20x30 and 50x30 mm versions. The standard length of the smaller corner is 3 and 6 m, and the larger one is 1.7-6 m. The product is made of white plastic.
External and internal corners
To form neat joints on complex surfaces, an angular profile is produced. These products can be designed for external or internal corners between adjacent walls. On sections, the outline looks like a double corner. During installation, plastic panels are inserted into the recesses between the edges of the corners. The pieces have a distinct purpose: the outer corner looks different from the PVC corner profile for the internal wall connection.
The peculiarity of both models is that they are used only for joints at right angles. If it is necessary to trim an acute or obtuse corner, then use another element.
Rental and universal corner
Plastic guides in the form of a corner are available in 2 more modifications:
- Rolled corners are used to finish external wall joints. This inflexible product is unable to change shape and is only suitable for right angle joints.
- Universal corners are capable of changing configurations and allow you to neatly arrange joints at almost any angle. Available in the form of a roll material: a tape with a recess for bending in both directions.
Ceiling plinth
The ceiling cornice is used to finish the junction of the wall and the ceiling, trimmed with plastic panels. Notches located at right angles allow it to be attached to the ends of both surfaces, and decorative molding disguises the junction and looks like a thin border element around the perimeter of the room.
The thickness of the products can be 5 and 8 mm, and the length of each is standard - 3 m.
What will you need?
When starting work with the formation of a ceiling from PVC panels, you should first of all use a starting type of plank. This is the name of the P-shaped molding that locks the panel from the end. Similar strips are also used when panels are placed on walls. But there they are already needed for another task - a more elegant design of door and window openings.
A profile in the shape of the letter F must be placed at the ends; it is needed to make corners and joints between PVC and other materials more beautiful. This profile is also used in the design of recesses for doors and windows. The joining is done using a molding like the letter H. It is used when it is necessary to connect the short edges of the panels due to the fact that one of them is not long enough to cover the ceiling space.
The outer and inner corners are needed respectively to mask the joints in different corners. Using a universal decorative corner, you can cover the outer intersections of the canvases, converging at an angle of 90 degrees.
Ceiling skirting boards can intersect:
- on ledges;
- next to the beams;
- near the columns.
In all three cases, outer corners of a special type (they are called that for ceiling plinths) turn out to be very valuable. Such products should not be confused with similar-named designs directly for panels.
Internal corners for baseboards help seal intersection points in areas farthest from the entrance. Sometimes the skirting boards are not long enough, and then a special connecting element helps solve the design problem
An important component of the fittings for plastic ceilings are slats (guides), from which the lathing is formed
Answers on questions
In what cases are liquid nails used?
Liquid Nails
If wooden slats were used during installation, then the plastic panels can be glued. It is applied to all slats at once approximately to the width of three panels. Next, collect them into a lock and press them against the slats. The thickness of the glue is approximately 0.5 cm. Gluing takes time; during this period, do not touch the panels or tear them off the slats. This method speeds up the installation process, but problems will arise if it is necessary to replace a damaged panel. It is very difficult to tear it off without damaging nearby ones. You will have to cut it into pieces and tear it off the slats piece by piece. In this case, use a sharp and durable knife to undermine.
Applying glue to the wall
You can apply nails not to the wall, but directly to the panels
How to cut collapsible profiles in corners? Additional difficulties arise when joining collapsible profiles at angles. This operation must be done in several stages.
- Using a mounting knife, cut off the part of the profile that has the latches. The length of the cut is 3–4 centimeters. Do not damage the face strips; the cut should be made as even as possible. This operation should be performed for two joining pieces of the starting profile.
- Insert the top bars into the latches until they stop. If they do not fit, check the cut; there are probably protruding areas left, remove them and straighten the cut. Reassemble your profile.
- Everything is fine - use a sharpened pencil to make marks where the top plates overlap. Marks must be made simultaneously on two plates in the two extreme places of overlap. This is a very important operation; the more accurate the marks are, the smoother the corner joint will be.
- Disassemble the profile and draw a line between the marked points. Cut the corners along it; you can work with ordinary scissors. If you don’t have practice, it’s better to cut with a margin of length. You will have to assemble the profile several times and adjust the cut location until both elements fit smoothly.
This method is suitable for joining profiles at any angle. If the angle is exactly 45°, then a special template can be used. If, despite all your efforts, a gap appears at the joint, cover it with silicone to match the color of the front parts of the profile. But we must remember that after a few years the silicone will peel off, you will have to remove the old one and repeat the putty.
How to dismantle casing with collapsible profiles? Much easier than with ordinary ones. The face plates are removed, allowing access from either side of the casing. Then everything is as always
Carefully remove the damaged plastic panel, clean and fix the new one. Reinstall the face plates after finishing work.
Removing panels
Is the high cost of collapsible L-profiles justified? First you need to understand what explains this cost. There are two reasons. First, such elements are much more difficult to produce than conventional profiles. More precise and complex molds from an engineering point of view are needed; the technological process is more difficult to control, which increases the number of substandard parts. In addition, to manufacture a collapsible profile you will need three times more material. The second reason is that a successful advertising campaign allows manufacturers to further increase the cost of selling their goods. As for the benefits, this is a controversial issue. There are both advantages and disadvantages. For professional builders, there is no fundamental difference which starting profiles to use. Both options, with practical experience, give excellent results.
Are collapsible profiles used as ceiling skirting boards? If desired, they can be used for these purposes. This is justified only in one case - the entire bathroom is decorated with plastic panels using these elements. Then it is possible to create a bathroom interior in the same style. In all other cases, it is more advisable to use special ceiling elements; they are easier to work with.
Finishing the bathroom with plastic panels
Design of a toilet finished with plastic panels
Preparation for finishing slopes
The window slopes are essentially the top and side walls of the opening.
Since, when installing a window, we divide the opening into two parts - external and internal, the slopes can be divided into two types, respectively: external and internal. The quarters of the opening act as external ones. Finishing of external slopes is most often limited to the installation of decorative corners and cosmetic repairs to the surface of the quarters (puttying, painting). Internal slopes require more serious treatment, since they are part of the interior of our home and should look, let’s say, decently, harmoniously combined with the impeccable appearance of a modern plastic window.
External slopes
The technology for installing external and internal slopes is basically the same, so only the finishing of internal slopes will be described below. Regarding external slopes, it should be said that there is no need for preliminary insulation of the walls of the opening (quarters), as is done when installing internal slopes. This simplifies the process somewhat. However, installation of external slopes is less convenient than internal ones, and on the upper floors, as you understand, it is also dangerous because you have to work halfway out of the window. When finishing the quarters with plastic panels, it may be difficult to adjust the lower edge of the side panels to the ebb, which is at an angle. But, if we turn to the topic of installing side corners, then there should be no problems here. And finally, the last thing regarding external slopes: if you plan to install them, you need to make the ebb ears large enough in advance :
to the width of the panel of future slopes, otherwise it (the panel) will unattractively protrude beyond the edges of the ebb.
Internal slopes
So, internal slopes. Based on the materials used, they can be divided into three most common types: plaster
,
plasterboard
and
plastic
.
Plaster ones are far from modern, but the cheapest. Perhaps price is their only advantage. Everything else can be attributed to disadvantages:
- long duration of finishing (several days), accompanied by a large amount of debris and dust;
- the need to then regularly tint the surface of the slopes;
- the plaster constantly cracks where it meets the plastic;
- the slope turns out to be cold and susceptible to freezing and mold.
Plasterboard slopes are in perfect harmony with a plastic window, but are easily soiled and require regular painting. If the walls of the opening are not insulated enough, the drywall may become damp in the cold and become moldy. When installed correctly, such slopes are a good option for office and ordinary residential premises.
Plastic slopes are perhaps the most affordable and fastest way to interior finish plastic windows. Given the simplicity of the technology, quite a decent result is achieved with little cost and time. Plastic slopes are ideally combined with a PVC window, as if merging with it into a single whole. In addition, they are practical and durable. If necessary, over time they can be easily and relatively “painlessly” replaced with new ones.
Preparatory work
Before you begin installing plasterboard or plastic slopes, you need to prepare the window and opening. Preparatory work includes installing a starting profile and insulating the walls of the opening.
Start profile
To pair the plastic panels with the window, a special U-shaped element, starting profile,
.
The start is attached to the window frame, and the panel is stuck into it with its rear edge. There are various types of starting profiles, including those specially designed for plastic windows ( start-clip ).
This starting profile has an additional edge with a latch, which is attached to the side groove of the window frame: In order not to bother searching for a start that matches the profile of your window, use the universal one ( L-start
), which is shown in the following figure:
It fits perfectly with plastic panels for finishing slopes, sandwich panels, and 10 mm thick plasterboard. This L-start is attached to the window along the edge using self-tapping screws with a pitch between them of approximately 150 mm. Self-tapping screws with a flat head base and a drill at the end, size 3.5×9.5 or 3.5×11, are best suited:
If you use a start clip, you must install it on the window frame. After clicking into the groove, such a start must be additionally screwed with self-tapping screws to the ends of the window to prevent the possibility of it falling out of the groove when installing the panels. You can do without self-tapping screws by spreading out the window installation over two days: on the first day, mount the window and foam the gaps, on the second day, start finishing the slopes. The dried foam will reliably press the starting profile to the frame and will not allow it to fall out when installing the panels.
You should pay attention to the following point: L-start is structurally designed for a small angle of rotation of the panels, therefore it is well suited for small installation gaps between the frame and the opening, when a large rotation of the slopes is not required (dawn). As for the snap-on start, some manufacturers make it with a noticeable turn and it is advisable to use it at large slope angles, for example, in the case of large installation gaps.
Let's focus on the universal L-start. First of all, the upper starting profile is screwed along the entire width of the frame:
Then the side launches are screwed on (docked to the top one from below):
The narrow shelf of the profile should face the inside of the window, the wide one should face the walls of the opening. You should try to screw the screws exactly into the center of the profile without tilting, visually checking the tightness of the start to the frame.
There is also a “no-start” method of installing slopes. In this case, the panels, like a window sill, are inserted a few millimeters behind the frame and pressed tightly against it with some elastic material, for example, pieces of dried foam. After this, the gap between the rear edge of the panel and the wall of the opening is evenly foamed from the inside so that the foam reliably fixes the slope. From the outside, the line where the panel joins the frame is coated with sealant. Unfortunately, such a joint does not retain its original flawless appearance for long and soon either darkens if silicone was used, or cracks (liquid plastic).
The starting profile is free of this drawback, and when used, the sealant will be applied only to the joints of the panels among themselves (above) and to the joints of the panels with the window sill (below). If desired, the lower edge of the side panels can also be framed with a starting profile, then the sealant will be applied only to the upper joints:
In this case, it is advisable to connect the side starts (on the frame) with the bottom ones (on the panels) at an angle of 45°. To do this, you need to prepare the lower ends of the side starts in advance - cut them at an angle of 45°, as in the following figure:
It is better not to frame the upper joints between the slope panels with a starting profile, but to coat them with liquid plastic, since the slopes on top are least susceptible to deformation from temperature changes, and cracking of the sealant (liquid plastic) is almost impossible there. And a joint carefully coated with sealant looks, believe me, more beautiful than one framed with a starting profile.
In general, I recommend using the start only around the perimeter of the window, and treating other joints (slopes between each other and with the window sill) with liquid plastic. Later during the operation of the window, the cracking sealant can be periodically restored (updated) if necessary.
Materials
Profiles are made from metals and plastics.
Plastic
PVC is produced hard and soft; the hard type is used for construction. Products of all types are elastic, the material does not crumble or crack at the places of cuts, since there is practically no chalk in the composition. Service life is from 10 to 20 years, they are not afraid of sunlight and do not turn yellow. PVC strips are cheaper, are well suited for decoration and cladding, and can be removed and reattached.
During repairs, the ceiling plinth is chosen from the same material. Colored types of skirting boards are available - white, brown, black. Therefore, it is possible to accurately select the desired color. The length of one unit is 300 mm. If it is not enough to decorate the perimeter, the parts are fastened until the desired size is obtained.
Metal
Metal slats are produced from steel and galvanized sheet metal and aluminum. Galvanized products are not subject to corrosion and are not afraid of moisture; their service life is long. A flexible frame made of aluminum or steel slats allows you to take into account all the nuances in finishing, as well as reduce the load on the walls and ceiling.
Fixing elements for plastic
The method of installing PVC panels, that is, attaching them to walls and ceilings, depends on the characteristics of the room - humidity level, curvature of working surfaces, the presence of communications and temperature bridges. In each individual case, certain fastening elements are used, which will be discussed.
There are three different methods of fixation.
The most inexpensive and simplest means of fastening plastic is silicone glue or “liquid nails.” You need to choose a special heat-resistant type of product. Silicone dries quickly, has high strength, allows the panels to be assembled in a short time, however, it can be used with a perfectly flat wall surface, and during repairs, this method does not allow replacing a damaged PVC lamella.
Clippers are universal parts; unlike nails, they do not damage the joints and locks of panels, fit tightly to the surface and ensure high quality assembly. Despite the strength of the fastening with brackets, minimal distortions remain, allowing the walls to settle while the panels are intact.
Overview of species
Profiles vary in cross-sectional shape and other characteristics and are marked by manufacturers. Each variety is used for stable operation during construction and finishing. To secure the slopes along the opening to the wall, special latches are used.
These types of plastic profiles are manufactured.
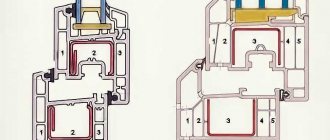
L-shaped. Attached at right angles to the surface of the window. It includes three shelves in cross-section, the larger one is applied tightly to the wall, and the smaller ones are applied to the window frame and the connecting seam, covering it. This overlay ensures sufficient masking of the seam when installing standard slopes with a width of 10 mm.
Metal profiles are divided into two types: flat and ceiling. Planar ones are produced by manufacturers to fix and strengthen the structure. They are designed for various surfaces and come in these types.
For walls. The products are used as the main ones during finishing work and redevelopment. With their help, partitions are erected. Marking letters UW. For ease of installation, the rails are equipped with holes. Overall dimensions – 50x40 with a length of 300 mm.
Ceiling slats are produced for installation work and strengthening elements on the surface. The profile of the CD brand is rigid, with special grooves. The metal frame used as the base fastener is marked UD. High reliability of the ceiling structure is ensured by corrugating and drilling holes in the starting rails to strengthen them on the ceiling. The flexible frame is easy to bend, perfectly adapting to any curvature of the ceiling surface. Metal slatted materials for creating arched openings are flexible and come in concave and convex types.
Convex samples have a length of 600 cm, an arc radius of 100 cm. The bending radius of the concave frame is 50 cm with a standard length of 300 cm. Corner profiles are fixed at the ends, which are subject to plastering, and also protect the corners of the building; the corners are made of galvanized steel. The holes in the corner strips are filled with mortar. This enhances the reliability of fastening at points of contact with the wall.
Installation
Even before the installation of auxiliary components begins, it is necessary to calculate their required quantity. Both corners and other moldings are usually sold individually. They are selected in accordance with the color of the PVC, as well as taking into account their thickness. The planks must be attached to zinc-coated nails or regular self-tapping screws. When fastening is carried out, it is necessary to retreat at least 5 millimeters from the edge of the part. If the element is external, then it is glued to the slabs with a polymer-based composition. It is also worth mentioning that the profiles, if necessary, can be easily cut and brought to the required size. To ensure that they are aligned and placed parallel to each other, a regular thread is used.
Before installing the starting profile, it is important to clean the surfaces from dirt and, if necessary, level them; the quality of leveling can be assessed by using a level. In general, if a window opening is to be designed, the walls must be thoroughly cleaned of fasteners and other protruding parts
The starting profile must be secured to the sheathing with self-tapping screws. In general, regardless of the type of profile, they need to be installed so that a distance of 50 centimeters is maintained between them - this way it will be possible to mask all surface irregularities. Then a panel is installed in this profile, which is mounted on a rail. When the coating reaches the corner, it is time to use a corner profile, external or internal. Towards the end, the window and door slopes are covered with an F-profile, and the joints with the ceiling are covered with skirting boards. If necessary, connecting molding is also used. Installation occurs using staples, screws, nails or adhesive solutions. In the second case, however, it is worth remembering that the use of chemicals is possible only under specific temperature, humidity and other factors.
If the installation of PVC sheets takes place on the ceiling, then each sheet must be inserted into the profiles on three sides, so that its long side ends up in the initial molding. A screwdriver is used to correct errors. Again, speaking of the ceiling, the last panel is attached so that both sides are in the profiles.
In general, a certain sequence of fastening the moldings can be distinguished. First, elements are installed along the perimeter of the wall or ceiling, that is, the surface that is to be decorated. Opposite elements are mounted in such a way that they are in the same plane. Otherwise, curvature of the structure may occur, which will affect the joining of the panels themselves and, as a result, their appearance. The first profiles are attached either to brackets or to self-tapping screws.
Finally, the intermediate profiles are attached so as to connect the parts for which they are intended. Any process ends with the installation of skirting boards for the floor and ceiling and corners. They perfectly hide the joints and give the walls a finished look.
Be sure to take into account that plastic panels can transform under the influence of temperature changes. Therefore, when connecting the profile and the plastic sheet, a small gap is left. But you should also not start work at temperatures below +10 degrees - some parts may break
Before you start attaching the moldings, it is also important to choose the further direction of laying the PVC panels
Details
Types of profiles
In addition to the initial profile, there are other types of moldings. For example, F-shaped is used when it is necessary to beautifully “close” the joints of the ends. These could be corners where two PVC sheets meet, doors or windows, other slopes, or connections of several materials with different characteristics (for example, wallpaper and plastic panels). In other words, it is used when moving to another plane. Judging by the name, it becomes clear that such a profile for joining is shaped very much like the letter F. The next type of mounting molding is the connecting one, which is chosen if you need to connect 2 panels together. For example, this is necessary if it turns out that the height of the panel is much smaller than the wall and it needs to be “grow larger.” This profile looks like the letter H (i.e. it is H-shaped). The outer corner, as the name suggests, hides the places where the panels create right outer corners. The outer corner can be considered the outer corner, and the inner corner will mask the sheet joint at the inner corners, and always be straight.
A universal general construction corner has approximately the same technical characteristics as decorative corners. It is available on the market in different sizes - the sides can be 1-5 cm, and it is used to hide those places where the panels are connected to each other at an angle of 90 degrees. Such moldings can serve different types of corners (both internal and external), and due to their unusual design they bend in the required direction. Galtel (we are talking about ceiling plinth) is used at the joints of the ceiling, as well as at the upper borders of PVC panels. It masks such a transition and gives the overall picture completeness. This molding can be colored and thus fits perfectly into any interior. In addition to the fillets at the top, you can also see profiles called external corners. They are used when peculiar protrusions are made at the top, for example, beams or columns. Finally, interior corners on the ceiling are installed where the walls create an interior corner.
If necessary, ceiling plinths are supplemented with a connecting element. Such a detail fixes two skirting boards together at once, when one is simply not enough. It should be noted that the length of a regular skirting board is 3 meters, but in large rooms this is simply not enough. Guide rails for sheathing, according to some professionals, are also considered one of the types of profiles. The purpose of this element is the convenient installation of PVC panels. If the sheathing, like the sheets themselves, is made of plastic, then the fastening is done using special clips. Finish molding, as the name suggests, is used to secure the final panel. It will “complete” the entire structure as a whole.
How to choose the right material
At the moment, the construction market is full of 10 mm starting profiles for PVC panels made of metal and plastic. Plastic products are quite inexpensive, but they do not shine with quality. It would be simply stupid to use them for serious tasks, which is why they are most often chosen as a decorative addition. In general, if we talk about how the PVC panel and the profile are connected, it turns out that the panel is partially “recessed” into the profile and fixed in it. For this reason, in order to ensure reliable fastening, it is worth giving preference to metal molding, which can be made of aluminum or steel. Typically, metal elements are additionally treated with a special composition that can prevent the formation of rust.
If we talk about lathing slats, they can be made of wood, however, such material can be called quite capricious. Despite the savings in terms of price, this design will not be able to please the owners for a long time - the wood may begin to rot, and may also be exposed to a fungal colony or become moldy. For this reason, the choice is still made in favor of other materials.
Dimensions
The dimensions of moldings for polyvinyl chloride panels completely depend on the sheets of plastic themselves, or more precisely, on their thickness. Usually there are 4 types of profiles, which can be 0.3, 0.5, 0.8 and 1 cm in thickness. The usual profile length corresponds to 3 meters, and for a profile with a thickness of 0.3 cm the length is 2.5 meters.
Sizes and colors
In the vast majority of cases, such products are painted white. This is quite reasonable: typical PVC double-glazed windows have a similar color.
It can even be changed during operation, for example, using the following colors:
- dark grey;
- bright yellow;
- light green;
- light brown;
- nut;
- citric;
- Red tree;
- sea wave.
However, the color of the profile must match the facade of the house. If the home is decorated in a classic style, then it is pointless (and even harmful) to use flashy colors. Woody shades are more acceptable. If you don’t like them, you can consider the option of soft, muted colors. It is imperative to ensure that the chosen color matches the tone of the doors and roof.
As for the dimensions, a lot depends on the manufacturer. For example, one of the small molding options has a shelf measuring 10 mm. In this case, its overall dimensions can be 3000x10x60 mm. There are also options available for sale (in mm):
- 18x40x25;
- 20x60x22;
- 25x60x3000;
- 35x35x3000.
That is why, when choosing, it is worth clarifying what this or that number in the product label means.
Useful recommendations from professionals
In order not to make a mistake when choosing one profile or another, you should contact a store where sellers will be able to offer you ready-made kits that are ideal for the corresponding PVC panel. Otherwise, you can buy constructs that will not fit with the coating or not buy something important. When purchasing, you should definitely take into account where such molding will be applied, and depending on this, buy certain types of initial profile. For example, if you need to decorate a part of the surface where there will be no window openings or corners, then only those profiles that form the sheathing are required. If you have to decorate the ceilings, then do not forget about the ceiling skirting boards. Almost all manufacturing companies produce moldings in white, which is ideal for any type of interior. but if there is a need for multi-colored models, then you should either look for them in specialized stores, or order them individually. When choosing plastic moldings, it would be good to find those that have increased strength characteristics. If we talk about technical parameters, then you should pay attention to the groove width that is intended for the panel. To learn how to install PVC panels, watch the video.
Profiles for PVC panels. What are PVC panels?
By plastic panels, builders mean a modern finishing material for finishing walls and ceilings. Features of PVC panels combine several advantages at once:
- lightness (the elements are hollow, a standard board 12.5x300 cm weighs only 660 g);
- strength (withstands loads up to 346 MPa);
- almost zero water absorption;
- resistance to any household chemicals;
- antistatic properties;
- easy installation, repair and dismantling of the coating.
The panels combine well with any other types of coatings. They are convenient to use for finishing part of a wall, or for zoning a room by simply changing the color. To make transitions easier and create smooth boundaries between the edge of the panel and the other covering, fittings or plastic finishing profiles are used.
These elements are manufactured in accordance with State Standards, are considered safe to use and are recommended for creating neat joints between adjacent walls, ceilings or floors with vertical surfaces. Among the models of fittings there are profiles for finishing window openings, aesthetically connecting the profiles themselves, etc.
pros
Today, PVC panels are the most used material for interior decoration, since this building material has many advantages:
- the price is not bad;
- wide range with a variety of colors;
- strength and lightness;
- moisture resistance;
- antistatic coating;
- easy installation and dismantling;
- you can replace the damaged part of the structure;
- easy care.
Due to these properties, PVC is used for the production of plastic panels. The strength of plastic depends on the amount of polyvinyl chloride in its composition. The more PVC in the composition, the stiffer the plastic sheets.
Flaws
Prolonged exposure to ultraviolet radiation, for example when exposed to direct sunlight, on PVC products leads to photodestruction, as a result of which the product loses its elasticity and strength. To prevent this phenomenon, light-absorbing dyes are introduced into the PVC composition, which allows limiting the degradation of a thin layer, about 0.05 mm thick, which changes its color (the process of “bleaching”, “burning out”).
Installation of profiles for finishing with plastic panels
One of the popular options for finishing the ceiling surface is the use of plastic panels, the choice of which is due to ease of installation, low purchasing budget and effective results. When installing the structure, only the stage of creating a frame for the ceiling can cause difficulties.
PVC panels are gradually conquering a niche that previously belonged entirely to finishing compounds, and there are a number of reasons for this, including the advantages that the material demonstrates:
- Plastic panels are considered the most economical surface design option;
- Installation is accessible even to amateurs;
- The ceiling surface does not need to be processed, since all defects and imperfections in the plane will be hidden by the facing elements;
- They do not require special care and are easy to clean;
- Resistant to external influences;
- The peculiarity of the panels is their environmental friendliness, the absence of an unpleasant odor and the release of harmful components under the influence of temperature changes.
Installation of a structure of this format requires the formation of a frame from a metal profile for fastening plastic panels. This procedure is considered the most critical stage in the entire installation event.
A ceiling made from elements of this type is considered suspended and is supposed to be attached to the surface using a profile. Installation can be labor-intensive and time-consuming, and workers will require the utmost care. The profile is attached around the perimeter of the room using aluminum guides, to which plastic panels are attached using self-tapping screws.
Why should you choose plastic products?
Plastic is the most common and versatile material.
Plastic slopes are most often installed
This is due to its performance characteristics and ease of installation. The advantages of plastic slopes include:
- Easy to care for the surface - just wipe the plastic with a cloth and soapy water;
- High-quality plastic does not fade when exposed to sunlight;
- Plastic looks best combined with the profile surface of plastic windows;
- The service life of these products is calculated in decades;
- For plastic slopes, when insulating them, you can use mineral wool. In this case, heat loss through the window structure is reduced and the effect of window fogging is eliminated;
- The moisture resistance of the plastic is obvious, so it does not collapse under the influence of condensation;
- Simple installation - the parts just need to be treated with adhesive and fixed to the surface of the base.
Installation
Plastic slopes can be glued in the traditional way - on polyurethane foam. This installation has some differences from that used for plasterboard slopes.
- At the initial stage, a starting profile is installed around the entire perimeter of the window opening . In order for the connection to have sufficient tightness, when attaching the profile, its back side is covered with a thin layer of silicone sealant;
First, the starting profile is fixed. Parts are cut out of sheet plastic 8 mm thick. The window is measured in the same way as when installing plasterboard parts;
A plastic part is cut to size. A frame made of bars is installed around the perimeter of the window;
A wooden block is installed around the perimeter of the window. A starting profile is attached to the wooden frame;
The starting profile is fixed to the wooden frame. The resulting parts are inserted into the U-shaped starting profile. First, a layer of polyurethane foam is applied in a wave-like manner to the entire plane of the base, thus completely filling the space between the block and the frame;
The gap between the block and the frame is foamed. The plastic elements are fixed with masking tape while drying.
After installing the slopes while the foam dries, they are fixed with tape
Installation of a ceiling in a bathroom made of PVC panels
PVC panels or plastic lining come in three main types - matte, semi-gloss and glossy. The first two types of panels are used mainly for exterior work, but glossy panels are used to cover the inside of the room. A standard panel is 600cm long and 25cm wide, while thickness ranges from 5 to 8mm.
Installation of a frame for PVC panels on the ceiling
Metal frame for PVC panels in the bathroom
- The frame for PVC panels can be either wooden or metal - both types perform the same function, and in exactly the same way. We will consider the installation of a metal frame, as it is more complex in execution due to the installation of an additional profile around the perimeter.
- First of all, you need to set the height level of the ceiling frame. Often this is done even without a level, just along the upper edge of the installed tiles, but if you need to lower the ceiling a little lower, then this level around the perimeter is set using a tape measure, a pencil or marker and a building code.
- The distance you need is measured from the tile seam and a mark is placed. Along the length of the rule, another measurement is made on the wall and a mark is placed. The marks are connected by a line.
- Perhaps the walls in your bathroom are lined with ceramic tiles installed diagonally - in this case, use a water level and place marks on the wall at the required distance from the main ceiling. You can draw a line between the marks using a building rule or a long level, or you can mark this line with paint thread or a chokeline.
- On the main ceiling, using paint thread, beat off lines 40-50 cm apart from each other across the intended direction of the PVC panels.
U-shaped hangers
Now, along the lines made on the main ceiling, you need to screw in U-shaped hangers or pawns, as they are commonly called among builders. The hangers are attached at a distance of 50-60 cm from each other.
CD profile nested in UD profile
Now you need to screw the UD profile around the perimeter of the bathroom. It can be installed either along the marked line or along the top edge of the ceramic tile. If there are no mounting holes on the profile, then they need to be made 40-50cm apart. You can drill holes in the profile simultaneously with the hole in the wall by attaching the profile to the installation site.
CD Profile Installation
- The fastening of PVC panels to the ceiling in the bathroom will be on CD profiles, which are used for installing drywall, so we measure such a profile to the required length and insert it into the UD under the screwed hangers.
- CD profiles will sag, and therefore this plane needs to be leveled. Considering that the bathroom is usually small, leveling the plane can be carried out according to the construction rule, applying it under UD profiles screwed to the wall.
The profile is fixed with a self-tapping screw to the U-shaped suspension
Screw the profile aligned on the plane to the U-shaped hangers using special self-tapping screws for a plasterboard profile. Also secure the junction of the CD and UD profiles with the same screws. Bend the hanging ears of the dewlaps to the sides.
Use of components during installation
To install PVC slats you will need a jigsaw, a flat screwdriver, a level, a metal saw, a tape measure, a screwdriver, clamps, and self-tapping screws (“bugs”).
Work algorithm:
- first, the sheathing is made - it can be made of metal profiles or timber with a section of 2x2 cm;
- guide strips are fixed to the base of the walls or ceiling using galvanized steel nails or self-tapping screws; an indentation from their edge must be left;
- if there are unevennesses, then the structure should be leveled using wooden pads;
- the starting profile is fixed in the left corner from which the assembly begins;
- The panel is placed on it from the bottom corner and secured with self-tapping screws so as not to damage the plastic; the fasteners should not be over-tightened;
- the next sheet is inserted tightly next, it is desirable that there are no gaps between them.
In order for the plates to fit organically against each other, it is necessary to correctly connect them - the panel is inserted into the corner with a tenon, due to which the groove remains open for the next sheet
If there is a gap near the thorn, carefully trim it
Then you should fasten the lamella to the sheathing and now you will need a clamp - its hooks are inserted into the groove, then the element is pressed tightly. The fasteners are secured with special self-tapping screws. For plastic, staples up to 2 mm high are used. Four of these parts are enough for 2 meters of length, however, with a large perimeter, their number can be increased. When working with a screwdriver, it happens that the “bug” turns the mounting clip, but it can be pressed and held with a screwdriver.
When installing PVC, it is important to focus on some points
- Since assembly begins with the installation of the box, it is necessary to install the slats correctly. The position of the panel installed first is checked especially carefully using a level.
- As work progresses, you need to monitor the accuracy of the fit of the individual sheets of material. There should not be large gaps between them. That is why the slabs need to be compacted as much as possible.
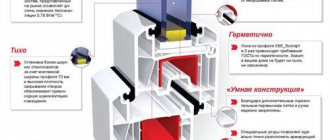
For plastic panels, you should choose high-tech fittings, and, of course, do not rely on their appearance or cheapness. With such a task as the construction of a reliable sheathing, savings are inappropriate. In addition, you should always focus on product compliance with quality standards and GOST.
Video instructions for installing PVC panels are presented below.