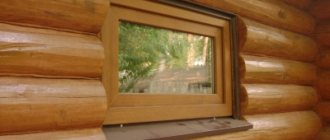
The first association that arises when you mention Euro-windows is single-chamber or double-chamber PVC structures in white. These are the windows that are installed in most apartments and private houses, replacing outdated frame structures. An alternative to plastic windows, which are inferior to wooden ones in terms of environmental friendliness, but superior in terms of performance characteristics, is Euro-windows made of wood. Their parameters are impressive, their appearance is up to par, and they are environmentally friendly. Unlike a plastic one, a wooden window frame with a proud “euro” prefix can be made independently. Making wooden windows with your own hands is a common thing for many FORUMHOUSE users.
DIY Eurowindow
Eurowindow - what is it and how is it done?
Eurowindow is a structure consisting of a frame, double-glazed windows and perimeter fittings controlled by a handle.
Perimeter fittings are a prefabricated harness made up of several parts mounted along the entire perimeter of the profile. It provides locking of the sash at several points, using one handle, which allows you to achieve the tightest possible fit and eliminates blowing. Thanks to this fittings, a window with an opening sash can operate in two modes – tilt and turn. In the rotary mode, the window opens only by turning; in the combined mode, the window sash opens and tilts.
The fundamental design difference between Euro windows and conventional windows is one frame, which can accommodate several double-glazed windows. The main technical characteristic of the “euro” is complete tightness, achieved through various seals. Thermal conductivity will depend on the number of air chambers, and on the type of glass in the double-glazed window, and on the correct installation of the window. Therefore, the material from which the profile is made does not play a significant role; the functionality of the structure and its characteristics are important.
Varieties
Double-glazed windows can have different performance characteristics, which are determined at the design stage and specified in the manufacturing order. Currently, domestic and foreign manufacturers produce the following types of double-glazed windows for PVC windows:
- With float glass, a standard package with a perfectly flat surface and high transparency, without special effects.
- Multifunctional - climate control system, with protection from UV rays and heat loss. Energy efficient packages, saving heating and air conditioning costs.
- Self-cleaning, reduces the time for routine window maintenance, thanks to a special coating of the glass with compounds that destroy dirt under the influence of UV rays, the easily washed off residues of which are washed off with atmospheric moisture.
- Soundproofing - with increased protection from street noise, thanks to the increased thickness of the glass sheet and enhanced sealing of the package.
- Mirror - reflective glazing, combining the advantages of regular and mirror sheets, is preferable in areas where windows are exposed to increased UV rays.
- Colored - also serves as protection against increased solar radiation.
- Tinted - a special protective film against UV rays is glued to the glass unit.
- With smart glass - they change their characteristics in terms of transparency and thermal conductivity when external atmospheric conditions change; in addition, such packages are endowed with self-cleaning characteristics and electric heating.
- k-glass - the highest class of energy efficiency with high mechanical shockproof characteristics, installed in the outer layer of the package.
- i-glass - the highest class of energy efficiency due to the soft i-coating with a layer of silver, they have very low mechanical protection, can be easily deformed, therefore they are installed indoors.
Read more about the types here.
DIY wooden windows
The process of manufacturing a wooden euro-window will require certain financial investments - the cost of wood, components, equipment. It is also easier to order double-glazed windows from professionals, although some craftsmen manage to assemble this unit themselves. But even taking into account the impressive cost of the finished product, which is an elite and therefore quite expensive product, the savings will be significant. If we are talking about building a new house or completely glazing an old one, the difference can be tens of thousands.
Preparatory stage
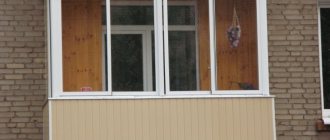
Window frames with double-glazed windows have long become integral parts of the exterior of not only city high-rise buildings, but also cottages and summer houses in gardens. The advantages of these structures in any design (PVC, iron, wood) are understandable: excellent sound and heat insulation, tightness, ease of maintenance and installation. Actually, this last quality pushes the most active residents to install glass packages with their own hands; it’s good that there are good guides on their installation and repair process.
- Selection of material and design. Here you can rely entirely on recommendations from friends, your own preferences and the first advertisement that comes your way. All models presented on the market comply with GOST 30921-02, have been tested and tested in practice. Please note that the product can be equipped with standard mounting hardware or mounted through the frame.
- Size designation. It is not suggested to take measurements of a glass package (meaning a prefabricated structure with packages) with your own hands: even if you planned to install it yourself, the manufacturer’s measurers will do it more professionally. No one will compensate you for the results of your mistakes after concluding the contract.
- Preparing tools. You will definitely need: an electric drill (perforator), an electric jigsaw, a rubber mallet, a hammer, a pry bar, a level and a knife. Materials used: dowel - screws, foam for installation work. When and why you need to take them into your own hands when installing a glass package, you will be able to find out from the video at the end of the publication and our comments.
- Placing an order and waiting for the finished product.
Important: only after receiving the complete product does it make sense to begin future actions
Materials, tools, drawings, connection of elements
Windows are constantly exposed to external influences and temperature differences between indoors and outdoors, which inevitably leads to changes in the geometry of the structure when it comes to wood. To minimize possible warping, frames and sashes are made not from solid timber, but from laminated veneer lumber. You can purchase a ready-made one if there are reliable suppliers, or you can glue it yourself. In the second case, a workpiece of at least three lamellas is assembled, so that the fibers are directed in opposite directions. If possible, choose radial sawn wood; tangential sawn wood “leads” more. For gluing, special, moisture-resistant compounds should be used.
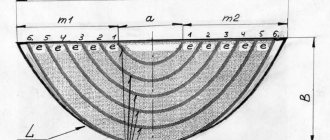
The section of the beam is chosen based on the number of double-glazed windows - for a window with one chamber, a 6x4 cm beam is usually used. In production conditions, grooves are selected in the frame not only for the double-glazed window and external seals, but also for internal ones. One of the former manufacturers of wooden European windows shared his drawings, by simplifying which you can get high-quality structures that are almost as good as ready-made ones. In order to make a window with your own hands, the drawings are quite suitable.
Considering that not everyone has professional equipment, and its purchase will negate all savings and is justified only for the purpose of manufacturing windows for sale, home craftsmen choose grooves for double-glazed windows, external sealing and fittings.
For these purposes, a milling cutter, a circular saw, and a hand tool for finishing are used. The participants of our portal are equipped with all the necessary equipment and Ravildon decided to make a window together with his brother (nickname Halvasenshiy) for his house.
RavildonForumHouse Member
We had hand tools, machines and other equipment. We welded a table, attached a hand router to it, bought a microtenon cutter and a movable carriage, and decided to dial the profile in length and thickness. A purchased profile costs from 1,600 rubles for six meters, so we will trim the finished beam, glue it, and then increase its thickness.
HalvaseniorForumHouse Member
They made this kind of pepelats: I had guides with carriages lying around, welded the frame, attached a manual circular saw to the movable table, and the result was a simple impostnik. The grooves are rectangular, so you can do without shaped cutters. The cutting depth is adjusted by a movable stop, the height by a set of plates and rectangular pipes. I cut the groove in five passes, changing the linings, and finished it with a file.
The brothers trained on waste, and the results were recorded in a journal so that in the future they could choose the most successful option. Once we got the hang of it, we started making the frames themselves.
Another of our forum members used ready-made laminated veneer lumber. The photos show this whole big process in detail.
cyan__FORUMHOUSE Member
The purchased timber was passed through a surface planer and a trimmer, on a circular saw with a homemade device (a high parallel stop with guides and 0.5 mm rulers) I made tenons and a profile, glued it together, selected the fitting grooves with a milling cutter, hung the fittings - checked how it worked, removed it, sanded it for painting. There are no special tricks, but you either need to have experience in carpentry, or first make several throwaway frames - practice.
Since the double-glazed window is planned to be double-chamber, the total cross-section of the timber turned out to be 80×78 mm.
If equipment and experience allow, the frame elements are cut obliquely, at an angle of 45⁰; they can be joined without a bevel, which, although less decorative, is technically easier. The parts are assembled using a tongue-and-groove joint, with the vertical parts being lugs and the horizontal parts being tenons. It is easier to make a single joint, but a double joint is stronger and more durable, since the gluing area increases; a triple tenon is even stronger. When there is only one tenon, it is worth additionally strengthening the frame with a corner, since the double-glazed window significantly makes the structure heavier.
Our portal member cyan__ tells how to make a wooden window using a three-tenon joint.
cyan__
I made three tenons for myself and put them on PU D4 glue, on another glue and one tenon under the double-glazed window, I would probably put a corner. As a test, you can glue one corner and test it for strength and deformation, loading it along the hypotenuse with a mass of one and a half glass units. Then it will become clear whether additional reinforcement is needed.
Correct measurements
To make a regular double-glazed window, you will need the height and width of the window.
Before you start making a double-glazed window at home, you need to correctly determine all the parameters. They are removed from the inside and outside. It is important that the depth of the opening is correctly determined. It is especially important to take measurements accurately in a panel house. Cases often arise when the opening is significantly skewed. This is due to the fact that the slabs and blocks are already used in cast form.
Most windows have ledges. In construction they are called quarters. According to standards, their length is 6.5 cm, 1/4 brick. A correctly measured window structure should stand 1.5 cm higher than the lower edge of the quarter so that a drainage system can be installed under the frame. The window extends beyond the upper quarters by no more than 1.5 cm, and beyond the side quarters by 4 cm.
The frame should not touch the opening itself. A gap of at least 4 cm is left between them for pouring polyurethane foam.
When taking measurements, it is necessary to take into account the place for pouring the polyurethane foam.
Measurements should be started from the outside. Three centimeters are added to the width of the slope. The width of the PVC profile structure should be greater than the opening and a quarter. When installed, the window itself rests on the slopes.
To determine the height of the product, you need to measure the distance from the edge of the top quarter to the base. You must subtract two centimeters from the resulting size. The result will be a place for the assembly seam.
If the window will be installed with low tide, the vertical measurement must be removed by another 4 to 6 centimeters. This distance will go to the stand profile.
Templates from the corner
Halva Sr. assembled a box of two lamellas to make it easier to select quarters and grooves for seals with a circular saw. There was no dried timber of the required thickness, either solid or glued, on sale at that time; we had to make do with material with a smaller cross-section. But the timber we found was dry, already jointed on all sides. The frames were glued onto a smooth fugue due to the lack of a comb of suitable width. To be on the safe side, the structure was reinforced with self-tapping screws - diagonally, from the edge to the center (the fastener heads will later be hidden by a quarter). After the final blowing with pneumatics, the finished frames were given to the eldest son for finishing - for putty
Windows made industrially are no better than so-called do-it-yourself windows - the photo confirms this.
The grooves for fittings in the sashes are selected based on its type and dimensions. To simplify his work, Halva the Elder made metal templates, according to which he selected all the necessary grooves.
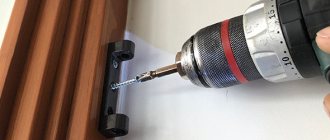
Halva senior
Before cutting the tenon and groove, I prepared the grooves for the locks - I made a template from a bent steel angle. The holes are 8 mm in diameter, the screw hole is 10 mm in diameter. First, mark the centers, then drill 8 holes - depth 26 mm. I set the stop and used a hand router to combine the holes into a groove, dimensions: depth 28 mm, width 8 mm. I did without length limiters - the boundaries of the groove can be felt to the touch.
Types of double-glazed windows
There are three types of double-glazed windows:
- Single-chamber.
- Two-chamber.
- Three-chamber.
The difference is in the number of internal glasses and in density.
Single chamber
It is rarely used when finishing residential premises, due to the low level of protection from external noise. Also has low thermal conductivity.
Widely used for glazing technical premises or office rooms. In residential buildings they are found when decorating balconies or loggias.
When choosing a single-chamber type for a living space, you should take into account the minimum temperature in winter. In such cases, they are suitable for areas with a non-cold winter season, as in European regions.
The main advantage is their low weight, which is why they are comfortably installed in voluminous window recesses with a large area.
Types of single-chamber structures by width, mm:
- 16;
- 18;
- 20;
- 24;
Suitable for profile systems with widths from 58 to 70 mm.
Double chamber
Used for glazing residential premises. At the base there are 3 glass sheets and two chambers with an air gap between them.
It features high protection from external factors, including noise from outside and heat transmission. The basic version of a double-glazed window is improved depending on the needs of the user.
Types of two-chamber elements in width, mm:
- 24;
- 28;
- 32;
- 36;
- 44;
Installation for profiles with widths from 58 to 82 mm.
Three-chamber
In northern countries and regions, a three-chamber package is the only way to preserve heat in the house. Due to their wide profile and large number of sealed walls, they provide excellent thermal insulation.
The base contains four glass sheets and 3 air layers. It has the best performance in protecting against external noise and retaining heat inside. It is important to understand that such high rates are justified by the significant dimensions and weight of the components, which should be remembered when choosing.
The biggest disadvantage of a three-chamber double-glazed window is the low transmission of light from the outside, despite its high thermal insulation. The structure is divided into parts and then put together during installation. This is required to comply with all technical parameters for the rigidity and strength of the frame.
Installed for profiles with a width from 70 to 82 mm.
Chamfering, assembly, finishing
All instructions recommend chamfering the joints; this improves the appearance of the frames, since minimal mismatches in the mating elements are hidden.
A cut or rounded corner is covered with a thicker layer of paint and varnish than a sharp one, therefore, it is more resistant to all external influences. Forum member Sukhov76, who made wooden windows for himself, advises his own method.
Sukhov76FORUMHOUSE Member
Instead of chamfering at 45⁰, it is better to round the corner by a radius of 3 mm - it looks more aesthetically pleasing and lies well under paint. Paints and varnishes are “afraid” of sharp edges, according to the law of surface tension, on sharp surfaces the paint layer is thinner, and according to the law of meanness, it is the edges that are the most vulnerable in operation, and the coating wears off faster, but on a radius the layer is even and is more difficult to damage.
The assembled window frames and sashes are sanded and treated with special impregnations, and then varnished or painted. In order for each subsequent layer to apply well and last a long time, all compositions used must be on the same base, water, etc. The glass in the frame is secured with glazing beads.
It’s not enough to make a window with your own hands - the video on our portal will teach you how to paint it correctly to protect the surface for many years!
For the second floor of his house, cyan__ also made wooden windows himself, using the technology already given. After the blanks were cut, grooves and tenon joints were selected, holes for fittings and frames were assembled, the final part remained - finishing and installing glass.
cyan__
Primed and painted the outer white side. Then, by sanding, I removed paint drips on the masking tape in a couple of places - the inner, translucent one. The stain is not paint; on the white side, if anything happens, it can be easily wiped off with a wet rag. I installed the glass on spacers and nailed the glazing beads - a copper nail every ten centimeters looks good. I sealed it with neutral (this is important) silicone; acidic silicone can destroy the sealant of the bag. I turned it over onto a sheet of foam rubber and sealed the reverse side, mounted the fittings, mounting plates and inserted it into the opening. The final step was to adjust the sash and insert seals into the grooves.
Consequences of glass replacement
Replacing only broken glass at home with your own hands can lead to the window starting to fog up inside the repaired double-glazed window. Even provided that its sealing is done efficiently. Repairs are usually carried out in the summer or during the cold season in a heated room.
In winter, in cold weather, on the surface of the inner glass of a single-chamber package or on the middle glass of a two-chamber package, conditions arise for the appearance of condensation of water vapor, which will certainly be in the air inside the chamber. And the moisture absorption capabilities that were inherent in the molecular sieve spacer during factory installation will already be exhausted. This is why it is recommended to replace the entire cracked glass unit.
If energy-saving i-glass breaks, then when replacing it with regular glass, the window will completely lose its energy-saving properties, and condensation will definitely appear - the spacer of such a window does not have perforations. And inside the frame is silica gel (molecular sieve), since instead of air at the factory, inert gas is pumped into the chamber. And quite often such windows have a single glazed unit. Therefore, when replacing cracked glass at home, you get a “cold” window.
Conclusion
Making a wooden window with your own hands is an opportunity not so much to save money as to express yourself. For many years, a beautiful, environmentally friendly design will remind you not of the money spent, but of your own skill.
Everything related to the technical parameters and features of Euro-windows, as well as step-by-step instructions, diagrams, installation details and characteristics of products from different manufacturers are discussed in the “Windows, profiles, glazing” section. Details of the manufacture of the wooden windows mentioned in the article are laid out step by step in the topic “Report on the creation of wooden windows”. After studying the article about the technology of gluing boards, you will learn how to obtain high-quality and durable timber for future frames. How to replace wooden windows with your own hands without dismantling the old frame - a video about new technology answers this question.
Subscribe to our Telegram channelExclusive posts every week