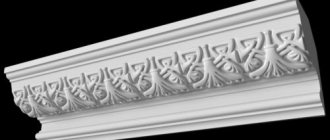
Plaster stucco emphasizes the solidity of the interior
Room decor styles such as Empire, Baroque or Renaissance require the use of gypsum stucco in decoration. These traditions came to us from time immemorial, because gypsum is a natural material, and we didn’t learn about it today. In the past, craftsmen performed sculpting by hand, mixing a small batch of mortar for each finishing area. Now this process is much simplified. Ceiling gypsum cornices, as well as other finishing elements, are manufactured in factories or specialized workshops where individual orders can be made. There is simply no better way to give a room a sophisticated and rich look. The beauty of real stucco can be seen in former noble mansions, many of which have now become museums.
Handmade stucco in Queen Victoria's mansion
Properties of gypsum as a natural material:
- Gypsum, or asbestos as it is also called, has many advantages. From an environmental point of view, this is the safest material used in construction today. It is non-toxic, fire-resistant, capable of absorbing moisture and releasing it into the air.
- This natural material has a high viscosity coefficient, does not shrink and does not smell . This means that it cannot cause an allergic reaction in the body. Asbestos is not electrically conductive and is not afraid of temperature changes.
- Asbestos blanks are easy to saw and sand. The finished product can be perfectly puttied and painted, which allows you to easily restore it if necessary. The main thing is that the putty is also gypsum based.
- To improve the natural properties of gypsum, many special additives have been created. For example, with their help, this rather light material becomes even lighter and stronger, which allows small products to simply be placed on PVA glue. In this case, the surface, of course, must be perfectly flat.
Plaster decorative elements on a perfectly flat surface
- If there are even minor irregularities on it, PVA will not help here - you will need special gypsum glue. But ceiling cornices made of plaster, as well as baguettes for lighting, require additional fastening with dowels or screws.
- Molded parts are even used for cladding fireplaces, since gypsum can easily withstand elevated temperatures, up to five hundred degrees Celsius. Due to its fragility, gypsum products cannot be used as load-bearing elements.
What needs to be done in advance?
Before you begin installing decorative elements made of gypsum, you must ensure that a number of conditions are met that will allow installation to be carried out reliably and without loss.
- The room where the work is planned should not be too cold (more than 18 °C) and sufficiently dry. Otherwise, the gypsum elements will crack or “float”. Therefore, it is not recommended to use such decor in small bathrooms.
- Preparation of the surface to be decorated is necessary. The protrusions are rubbed with sandpaper, the depressions are filled with putty. Without this, the parts will not fit tightly and subsequently they will come off. After smoothing, the walls and ceiling are primed with a special solution, which dries for 2-3 days.
- Marking. A high-quality connection of the parts is mandatory; if this is not the case, both surfaces are treated with abrasive or filed. You will also need to apply markers to the wall or ceiling in order to follow the general pattern of the location of the plaster elements.
Proper preparation of the premises and materials is the key to the durability of the installed elements.
How to glue
Required for work
Baguettes for the ceiling or cornices (their number depends on the size of the room); knife or hacksaw; gun for installation; special glue for fastening; acrylic based sealant.
Work progress:
- choice of material;
- Preparation;
- surface lining;
- preparation of cornices;
- gluing;
- final processing.
Material calculation
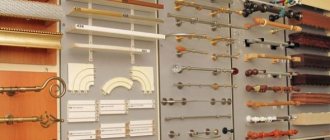
The owner of the room should know that the higher the ceiling, the larger the baguette is selected. The stores have a wide selection of products that vary in size, material and color.
Important! For a room measuring about 20 square meters with a ceiling height of 2.5 meters, it is better to select curtain rods up to 90 mm wide.
To calculate, we calculate the perimeter of the room by measuring it with a tape measure, then divide the learned number by 200 mm and round. It is better to buy one extra cornice in reserve.
Ceiling preparation, marking
In order for the product to adhere well to the surface, you need to carefully prepare it, removing all cracks and irregularities. After this we mark the surface. To do this, apply the first test die and mark its beginning and end with a pencil. We continue marking until the end of the dies. Using this procedure, installation will be easy and simple. Marks are made with a pencil and only in those places where they will be covered by baseboards.
Cutting cornices, baguette
We select the angle from which installation will begin and file it at an angle of 45 degrees. Then we place the product and saw it into the slots, adjusting it to an inclination angle of 45 degrees. We adjust the joints with a knife.
Installation
We load the glue into the gun and cover with a thin layer those surfaces of the cornice that will be connected to the wall and ceiling. Apply a few drops of glue to the joint. Press it to the surface for a few minutes.
The influence of product weight on installation methods
The heaviness of the stucco plays an important role. Depending on it, a certain technique, type of fastening, preparation of the surface and decorative element are selected.
Installation of light weight gypsum stucco is done as follows:
- The back of the product must be leveled. To do this, you need to run medium-sized sandpaper over it several times to smooth out the protruding parts.
- The surfaces to be joined are sprayed with water from a spray bottle, after which a layer of PVA construction adhesive is applied to the plaster and ground in so that it is evenly distributed.
- You will need to hold the decorative element for two to three minutes to tightly connect the parts together.
Small and lightweight gypsum stucco can be installed alone. For heavy or long parts, it is better to get help, otherwise they may break due to sagging and uneven support.
Installation of large plaster elements requires several different fastening methods.
First, the surface is prepared. Installation on “bare” concrete is desirable, and if there is plaster on the wall/ceiling, then frequent notches are applied to it to increase the adhesion force. The plaster is cleaned off. Before installation, the wall must be primed with PVA construction adhesive and water.
To enhance the adhesion of surfaces, nails and screws are used, which are placed at a distance of 15-20 cm from each other. The use of galvanized fasteners will prevent the appearance of rust and subsequent destruction of the structure. Holes for additional fasteners must be drilled in advance - they are made both in the part and in the wall.
To attach heavy decorative elements, you need to prepare a special glue: PVA is combined with water in a ratio of 40 to 60, after which gypsum powder grade G-7 or G-10 is added and thoroughly mixed until a creamy consistency is obtained. The adhesive mixture is applied to the back surface of the product, and it is firmly pressed against the wall/ceiling. After this, screws are screwed in, dowels or nails are driven in.
The remaining technological holes and joints of elements are rubbed with liquid gypsum mixture. The procedure must be carried out 2-3 days after the main installation, when everything is completely dry and well fixed.
Source: kakpotolok.ru
Step-by-step manufacturing guide
Next, we’ll figure out how cornices with a smooth gypsum profile are created.
Step 1: Prepare everything you need
To make a ceiling cornice
, you will need the following:
- Construction plaster (G-16).
- Plywood.
- Sheet metal.
- Scissors and a hacksaw for metal, or a grinder with a corresponding disk.
- Electric jigsaw, screwdriver.
- Fasteners – nails, screws.
- A set of sandpaper (of different grades), a file, needle files.
- Water based glue.
- Cycle.
- Hammer, square.
Also, before starting work, you need to create a full-size drawing of the product. You can use computer programs for 3D modeling or ready-made templates.
Step 2: Prepare Lubricant
It is needed so that the template slides well, and when removing it, the finished product is not damaged. For production you will need: stearin (approximately 100-150 g) and kerosene (200-250 ml). Preparation proceeds as follows:
- The stearin melts. To do this, the powder is placed in a metal container and placed on the burner that is turned on. The substance will become “ready” when it takes the form of a transparent liquid. Important: do not bring stearin to a boil, otherwise it will partially lose its properties .
- The resulting liquid is poured into a heat-resistant vessel. After cooling (10-20 minutes), kerosene is added to it.
- At the end, the mixture is mixed with a construction mixer (or a drill with an appropriate attachment).
If the necessary ingredients are not available, you can use vegetable or machine oil for lubrication. However, the mixture described above is the best option.
Step 3: Design and Create a Template
The most complex and time-consuming procedure is creating a template from a drawing. It is produced as follows:
- The drawing is superimposed on the workpiece and glued. In this case, it is necessary to leave a margin of 20-30 mm on each side.
- After the glue has completely dried, a template is cut out with scissors (or a grinder). A deviation of 1-2 mm is acceptable.
- The edges of the workpiece are processed first with a file, then with a needle file.
- If necessary, additional processing is carried out with sandpaper.
- Important: even the smallest burrs must be removed, otherwise the wall cornices will not turn out smooth.
- The metal template is placed on a sheet of plywood and its outline is outlined with a marker or pencil.
- The workpiece is cut out using a jigsaw. On both sides it is necessary to make an indent of 3-4 mm.
- The edges of the plywood are processed with a file.
- The metal blank is attached to the base using nails. It should protrude slightly (2-3 mm) beyond the edges of the plywood.
- The remaining structural elements are assembled using the same principle.
- All parts of the form are connected to each other with self-tapping screws. Evenness is checked with a square.
- A guide rail is cut from a planed board. Finally, it is secured to the side wall with self-tapping screws.
If you don’t have time, you can simply buy ready-made molds, or make them to order in a workshop.
Step 4: preparing and pouring the solution
The solution is added in the following proportion: 1.5 kg of gypsum x 1 liter of water. After adding gypsum to the water, you need to wait 1-2 minutes and only then start stirring.
Advice: the ideal consistency of the solution is the state of “country sour cream”.
After preparing the mixture, you need to lubricate the workpiece and the table on which it will lie. After this, the solution is applied to the table and the template is pressed against it. Using smooth movements, you need to ensure that the plaster completely fills the template. When the solution begins to thicken, cut off the excess.
If it is necessary to apply a new layer, the surface is wetted - this ensures increased adhesion. At the end, the workpiece is left for 15-20 minutes. After this time, the mixture will completely harden. After this, the edge is trimmed on both sides. At the end, the finished product can be sanded with fine sandpaper and painted.
How to properly install gypsum stucco?
Today, gypsum stucco molding has become accessible to absolutely everyone, so this decorative element is much more common in the houses and apartments of ordinary Russians. Designers assure that stucco decorations are appropriate in any interior design style. The growing popularity of plaster decor has led to people seeking to install stucco elements without the help of professionals.
Features of installation of gypsum stucco molding
If you decide to install gypsum stucco yourself, you should have not only special tools at hand, but also detailed step-by-step instructions. In addition, before starting work, you should familiarize yourself with all the features of fastening decorative elements:
Installation of gypsum stucco molding should be carried out in a room that is in the first stage of renovation. Working with plaster means the formation of a large amount of corrosive fine dust, which can ruin surfaces that have already been completely repaired.
Moldings are attached to already leveled and puttied surfaces without final finishing.
Decorative elements made of gypsum are well attached to concrete, plasterboard and plastered walls. Difficulties will arise when installing them on wooden walls. The fact is that gypsum and wood differ in their expansion coefficient and after hardening the element may fail or a crack may form.
When installing stucco molding on plasterboard walls, they should definitely be strengthened, since the decor weighs a lot.
Light stucco elements are attached to the walls using a special mixture prepared from water, soft plaster and PVA glue. For large decorations, galvanized screws are used.
How to install?
Installation of gypsum and other stucco molding is always carried out only after all other construction and finishing work has been completed. It is imperative that all structural parts are leveled and primed. All joints of cornice products are puttied. When they dry, the same joints are treated with fine sandpaper. This treatment will result in visually monolithic lines.
The next important point during installation is coating with an acrylic-based polymer primer. After this treatment, finishing (painting) is carried out. Without priming it is more difficult to achieve uniformity, and noticeably more paint will be used. Continuous painting is used only for smooth cornices; If there is a texture, gilding is applied along the top strip of the ornament. Decorative gypsum elements can only be installed at room temperature; In addition, it is very important that the air humidity is minimal.
Before installing the cornice, you will have to sand all the protrusions. The drying time for the primer under normal conditions is from 48 to 72 hours. High-quality connection of various parts is achieved only with correct markings. If necessary, the edges are subjected to abrasive processing or even sawed off.
You can accurately reproduce the desired drawings and layout diagrams if you use marker marks on the walls and ceilings.
The reverse side of the structure should be leveled. This is achieved through sanding. Surfaces are sprayed with water. Then the plaster is coated with PVA glue and rubbed in for uniform distribution. It is imperative to maintain the attached part for 2-3 minutes to ensure a tight connection.
Relatively light short moldings can be glued alone. It is advisable to install larger cornices by two or three people. Otherwise, the sagging and unevenly supported part may easily break. Large structures are recommended to be mounted on clean concrete; if the surface is plastered, it will have to be cut in order to increase the intensity of adhesion. It’s even better to simply clean off the plaster, and before installation, use a homemade primer (to obtain which you mix water with PVA glue).
In order to connect everything more firmly, it is necessary to use screws and nails. The distances between hardware are 150-200 mm. It is advisable to use galvanized fasteners. Holes for their installation both in the cornices and in the walls (ceilings) are drilled in advance. Residual technological channels and connecting points are rubbed with a liquid mixture based on gypsum.
Ceiling cornices are installed strictly before the finishing of the ceiling. When working with them, sometimes a mass of small dust particles is formed, which can damage already finished surfaces. Plaster is very difficult to attach to wood - and you shouldn't do it unless absolutely necessary, because differences in thermal expansion levels can lead to breakage. Plasterboard structures are pre-reinforced, because even the most delicate-looking cornice is quite heavy.
If the mounted element on the back has a protrusion in the form of an angle, this protrusion is cut off along its entire length. The adhesive solution can be prepared on the basis of gypsum or fugenfüller. It is recommended to use medium-thick mixtures. Excess fastening mass is immediately removed with a spatula or a construction knife so that it does not spoil the impression. Already a brief description of the process shows how difficult and dirty it can be; Therefore, it is better to turn to qualified specialists.
Installation steps:
Element preparation. If there is a protruding corner on the reverse side, it must be cut off along the entire length of the element. Use a hacksaw to make several notches on the back of the stucco. It must be completely covered with the adhesive mixture. Now leave the decoration on a flat surface until dry.
Place marks on the surface where the decor will be located. Pay attention to the presence of protrusions on the surface; if any, they must be eliminated.
After drying, the adhesive mixture forms a transparent film behind the element. Prepare a solution of gypsum or fugenfüller in a plastic bucket. Its thickness should be medium. Pour the mixture onto the back of the element and install it. To remove excess adhesive solution, you need to slightly move the decor from side to side. It takes at least 5 minutes to hold the plaster decoration for the solution to set.
Excess solution should be removed immediately with a knife or spatula, otherwise it will ruin the whole impression.
As you can see, you can install gypsum stucco yourself, but this process is very labor-intensive and dirty. If unsuccessful, you will ruin both the decorative element and the surface to which it was attached. Our recommendation is to contact professionals!
Source: lepnina.in
Subtleties of cornice production
Modern science does not stand still, and new 3-D technologies are also being introduced into the production of gypsum products. In specialized companies, a three-dimensional model is created for each element, which allows you to quickly offer the customer several possible design options. The use of molds (compounds) for casting gypsum allows us to produce products with high precision and higher quality. The broaching method makes it possible to obtain a plaster ceiling cornice without curvature and with a perfectly smooth surface.
- For those who want to make gypsum ceiling cornices with their own hands, we will tell you about this technology. In addition to the casting mold, you will also need a box for it. The box will not allow the soft silicone mold to deform if it is accidentally touched.
- Instructions on the topic: “How to properly prepare a solution from gypsum” can always be found on the Internet, but it’s best to watch the video.
- To make it easier to determine the required amount of solution, water for it is first poured into the mold. Then it is poured into a container for mixing the solution, where, stirring constantly, you need to add gypsum to the water until the consistency of pancake dough is obtained.
- After soaking the prepared solution for about ten minutes, you need to pour it into the mold to three-quarters of its volume. At the same time, its edges must be shaken, thereby creating vibration and compacting the solution. If it spills a little around the edges of the pan, carefully pick it up with a spatula. The same tool should be used to carefully smooth the plaster surface.
- To give strength, gypsum ceiling cornices are reinforced with copper or aluminum wire, thick twine, and tow. In this case, reinforcement is laid on the surface of the product, another layer of mortar is added and smoothed again.
- When setting, air bubbles will come to the surface - you will have to go over it with a spatula again. After 20-25 minutes, the solution will completely set, and the finished product can be removed from the compound. They turn it over and begin to remove it from the middle to the ends.
- This must be done on a flat surface, on which the cornice will remain until the plaster has completely hardened.
Installation instructions for gypsum products
Installation of gypsum products must be carried out by qualified specialists.
- The working surface must be puttied and primed before installing gypsum products.
- Work must be carried out in a room with a temperature of at least 18 degrees.
- Walls, ceilings, products must be dry and clean. It is recommended to paint walls and ceilings, as well as wallpapering after installation of the products.
- It is necessary to calculate the amount of material, taking into account the losses that occur when cutting corners.
- The installation of curtain rods is carried out by two people.
- Required tools:
Preparatory work
1. 48 hours before installation, all polyurethane products are brought into the room where installation will take place, removed from packaging and allowed to rest in ambient conditions. The glue must remain in the room for 24 hours.2. The surfaces to which the stucco molding will be attached, and the products themselves, must be clean, free of dirt, and dry. If necessary, the walls are leveled with special solutions and primed for better adhesion of surfaces with glue.3. Calculation of the lengths of cornices and moldings is carried out taking into account losses for joining the pattern and cutting corners. Glue calculation based on its consumption. The approximate consumption of the docking agent is 80 ml per 40 linear meters. m, installation - 290 ml per 8 linear meters. m.4. It is desirable that the room have a normal temperature - 15-25 ° C and humidity from 30 to 50%. Changes in humidity affect polyurethane products; they can become deformed and break joints. It is good for polyurethane stucco, as well as for natural finishing materials, and for human health, if a humidifier is used in the room and the humidity is maintained at the same normal level.
Plaster cornices
Today, gypsum cornices are increasingly being used for interior decoration. Despite the fact that a wide range of decorative elements can be found on the market of goods and services, cornices are especially popular. This popularity is due to the ability to use them to decorate any design style. Before you start choosing and purchasing, you should first study all the nuances, advantages and disadvantages of the selected gypsum material.
Video
For a better understanding of the material, you can watch this video, where the master clearly shows how to stretch a plaster cornice according to a template.
[su_youtube url=”
»]
And here I will finish this mind-blowing article about the construction of do-it-yourself cornices. Those who have any questions or additions can leave them here in the comments. I will definitely consider them, add to them, and perhaps we will discuss constructively. In the meantime, you read this article, I have prepared the next one for you - about finishing door and window slopes. Bye everyone, see you again.
Gypsum cornices: advantages and disadvantages of stucco molding
Gypsum products have many advantages, among which are:
- elements made of gypsum are fireproof, the class of these types of products is similar to products made of concrete or natural stone; in case of fire, the melting process will not occur;
- since gypsum is a natural material, it has no odor, the material does not fade during use, and with proper care it will last for many years;
- if necessary, the material can be painted with any coloring composition; if during operation the product was damaged or a crack formed due to mechanical damage, then the problem can be eliminated quite easily by using gypsum for this purpose;
- the appearance is much more attractive if you compare gypsum elements with other materials;
- if you place an individual order for the production of gypsum products, you can apply any image to the surface;
- Thanks to the wide product range, you can choose products of any shape, length, width.
Despite the large number of significant advantages, it is impossible to do without disadvantages. The disadvantages include the following features:
- high cost of finished products, which is due to the labor-intensive production process;
- These types of decorative elements are quite difficult to install yourself, since most products are heavy, they need to be secured using special glue or self-tapping screws, as a result of which they can be easily damaged;
- Not recommended for use in rooms with high humidity levels.
Necessary tool
Since it is difficult to peel off the ceiling plinth in some cases, experts recommend initially decorating the joints with elements that are easy to remove.
Removing glued or nailed decor can be done:
- using a hammer;
- mallet;
- a chisel, as well as a flat screwdriver;
- wooden wedges;
- scraper or small spatula;
- stationery and shoe knife;
- using a crowbar, as well as a nail puller.
You may also need a hair dryer or other heating tool to remove the glued baseboard.
Types of gypsum cornices for the ceiling
On sale you can find a large number of gypsum products that differ from each other in size, shape, decorative elements, and composition. Thus, gypsum cornices can be smooth or decorative.
Smooth - during the production process the usual method of tightening is used, the finished product is smooth, without the presence of decorative elements. To obtain such models, simple tin or plywood stencils are used, which are filled with plaster. Such models are suitable for decorating any premises: country houses, luxury housing, communal apartments.
Decorative - the most original products with ornaments applied to the surface. Thanks to the use of such elements, you can give the room a unique noble appearance and turn any design ideas into reality. These models are mainly used for exclusive interiors. As a rule, their cost is much higher than that of previous types.
If we consider both options, we can safely say that decorative gypsum cornices are most popular among consumers. Such models provide a huge opportunity for designers to design. If necessary, you can apply not only subtle patterns and ornaments, but also depict the faces of people and animals.
Installation of ceiling gypsum cornices
Before you begin installation, you should prepare the necessary construction tools:
- saw or hacksaw;
- knife;
- spatula - with its help you can easily apply glue to the surface;
- sawing box;
- roulette;
- plaster;
- small brush;
- fine-grained skin;
- syringe – thanks to it you can fill small holes with a solution;
- water spray.
To install gypsum elements, water-based glue or putty is used. If the products are light in weight, then putty will be sufficient, but heavy plaster cornices will need to be secured with self-tapping screws. In these cases, it is worth choosing white or yellow self-tapping screws, which will not become rusty during operation.
Installation work must be carried out from the corner of the room. The two elements are placed next to each other and the corners are carefully cut off. The joining process is carried out at an angle of 90°. It is necessary to ensure that the gap is as small as possible. The resulting cracks are sealed with putty from a syringe. Excess mixture is removed.
Once the cornice is installed, it can be painted using bronze or gilding. The coloring composition is applied using a small brush. As a rule, plaster products are designed in a single color, but if necessary, you can play with gradients. Some users make imitation antique, natural stones, but as practice shows, the leader is the universal white color.
Facade decoration
On the facade of any house you can make various decorations: ceiling fillets, belts or plaster cornices.
Lime-gypsum mixtures are used to pull out the corbels and cornices, and the covering solution is prepared without adding sand to it. Prepares 1:3, i.e. gypsum to lime paste. Gypsum must be sifted through a sieve.
The coating should be of medium thickness and applied in a continuous layer. When pulling out large-sized architectural elements, it is better to use cement mortar mixed with fine sand. The drawing process consists of the following operations: throwing out the solution, drawing out the element with a rough cut edge of the template, processing the decoration by secondary pulling the template through the blunt part of the edge, cutting corners. Large stretches are performed by 2-3 people, and small ones can be handled by one person.
Plaster cornices in the interior: photo
If you decide to decorate a room with plaster cornices, then it is important to understand that in the selection process the main thing is to choose the right elements in size. The first thing to consider is the height of the room. If the apartment is small, then you need to choose small skirting boards, the width of which varies between 2-4 cm. This choice is due to the fact that a wide cornice will eat up the space, and the room will seem even smaller.
If the ceilings in the room are high, you can use massive decorative elements made of plaster. In this case, there are no restrictions. A gypsum cornice can be smooth, embossed, or with an ornament applied to the surface.
Manufacturers often offer for sale products on which ornaments or thematic reliefs are applied. It is important to understand here that such cornices should be used as carefully as possible, since there is a possibility that they will not fit the designer interior. All these points should be taken into account before making a purchase.
Today, gypsum cornices with a geometric pattern applied to the surface are especially popular. Such models will ideally fit into the design of rooms made in the Art Nouveau, neoclassical, and art deco styles.
If the room is made in a classical style or Baroque and Empire style, then it is recommended to choose plaster cornices with floral motifs. These options are ideal for rooms with high ceilings.
As many consumers have already noticed, the use of decorative elements made of gypsum for decoration can make the room elegant and give it a finished appearance.
How to glue ceiling plinth: step-by-step instructions
It is difficult to imagine a complete renovation of a room without a ceiling plinth. Let's learn about the installation features of this part.
Types of ceiling plinths
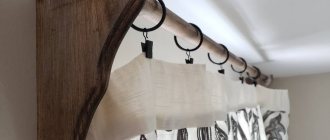
Ceiling plinths (baguettes, fillets, cornices) can be hard and flexible, made from natural materials (wood, plaster) or artificial (polyurethane, foam). The length of the standard product varies between 1300 – 2000 mm, but shortened skirting boards are also available. Cornices differ in other parameters - width, presence of ornaments, stucco moldings. When choosing skirting boards, experts recommend purchasing wide parts for installation in rooms with high ceilings, and narrow ones for low rooms. The more intricate and varied the pattern, the harder it will be to cut the part and combine the planks so that the joining points are not noticeable.
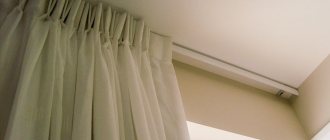
Installation of baseboards is usually the final stage of repair. They are installed after wallpapering or other wall coverings are installed. But sometimes cornices are installed before finishing the walls. This is done so that during the next repair you do not have to dismantle the parts. In standard shaped rooms you can use hard skirting boards. For rooms with complex configurations, it is better to use flexible curtain rods. They fit perfectly to the surface, leaving no gaps or cracks.
The plinth in section represents a corner, which is attached to the wall with one edge and to the ceiling with the other. The adhesive composition is applied to both internal surfaces of the cornice, with the exception of suspended ceilings. If this type of finishing was used, then the baseboards are attached only to the wall. They should not be glued to the ceiling to avoid deformation and tearing of the fabric or film.
Calculation of the number of skirting boards per room
To calculate how many parts you will have to purchase, you need to determine the perimeter of the room (the sum of all its sides). This figure should be divided by the length of one fillet. To the number of skirting boards calculated using this simple formula, 10% is added, or 2 - 3 fillets to make room for scraps and scraps.
Preparation for installation
Skirting boards can be mounted on almost any finishing material. Preliminary surface preparation consists of removing dust and debris that may interfere with the gluing of fillets to the wall. Then you should prepare the baseboard itself for installation.
Selection and installation of molded cornices on the ceiling and wall joints
You started a renovation. This is a troublesome business: floors, walls, windows, doors, ceilings - everything needs updating! Work was in full swing. And here are the first results: all window frames and door jambs have been replaced. Everything moves as usual, but the mood is spoiled by uneven walls, corners and some flaws on the ceiling, and the room seems very small. What to do?
A simple solution to these issues is to use gypsum stucco: molded cornices at the junction of walls and ceilings, as well as other gypsum decorative elements (in the same style as the cornice) in corners and on wall surfaces. All attention should be focused on the plaster cornice , since it is the main part of the decor, and all other moldings should “adjust” to it.
How to choose the size of the cornice? Most often, this size is selected depending on the height of the ceiling. But sometimes designers use little tricks: if the room seems small, then it is better to use plaster cornices due to the fact that they have the ability to visually increase the area of the living space. Also, large, complex cornices give the room a certain sophistication and chic, while simple and unpretentious ones impart simplicity and modesty to the interior. The former are used in living rooms, state rooms, the latter - in dining rooms and other rooms.
If you decide to make repairs on your own, then first of all you need to decide on the choice of interior style.
Installation recommendations
1. Prepare the walls thoroughly:
a) Clean, wash off the whitewash from the places where parts are installed on the wall and ceiling;
b) Level the walls (if necessary, treat the walls with putty and primer);
How to properly install gypsum stucco?
Today, gypsum stucco molding has become accessible to absolutely everyone, so this decorative element is much more common in the houses and apartments of ordinary Russians. Designers assure that stucco decorations are appropriate in any interior design style. The growing popularity of plaster decor has led to people seeking to install stucco elements without the help of professionals.
Smooth
A similar version of cornices is obtained by so-called tightening. There can be no question of the presence of any design elements with this approach to the manufacture of the structure. But everything turns out relatively simple and elegant in itself. Precisely designed stencils made of tin or durable plywood are used as a basis; they are filled with plaster, and after taking shape and hardening, they are disassembled. Smooth products are appropriate in a variety of places: in private homes, in offices, and in luxury cottages.
Features of installation of gypsum stucco molding
If you decide to install gypsum stucco yourself, you should have not only special tools at hand, but also detailed step-by-step instructions. In addition, before starting work, you should familiarize yourself with all the features of fastening decorative elements:
Installation of gypsum stucco molding should be carried out in a room that is in the first stage of renovation. Working with plaster means the formation of a large amount of corrosive fine dust, which can ruin surfaces that have already been completely repaired.
Moldings are attached to already leveled and puttied surfaces without final finishing.
Decorative elements made of gypsum are well attached to concrete, plasterboard and plastered walls. Difficulties will arise when installing them on wooden walls. The fact is that gypsum and wood differ in their expansion coefficient and after hardening the element may fail or a crack may form.
When installing stucco molding on plasterboard walls, they should definitely be strengthened, since the decor weighs a lot.
Light stucco elements are attached to the walls using a special mixture prepared from water, soft plaster and PVA glue. For large decorations, galvanized screws are used.
Preparing the plane
Even a perfectly flat ceiling will require a little processing before the installation of gypsum stucco begins. It consists of applying special primers that prevent the absorption of glue and improve the adhesion properties of the surface.
If the ceiling is not too smooth, then it should be carefully leveled and sanded before further actions. After sanding, the treated area is primed and left until the primer dries completely.