Today, gypsum cornices are increasingly being used for interior decoration. Despite the fact that a wide range of decorative elements can be found on the market of goods and services, cornices are especially popular. This popularity is due to the ability to use them to decorate any design style. Before you start choosing and purchasing, you should first study all the nuances, advantages and disadvantages of the selected gypsum material.
Styrofoam
Due to its minimal cost, this is one of the most popular materials that imitate ceiling stucco.
Its undoubted advantages include:
- Very low price
- Low mass, which can actually be neglected
- Flexibility and flexibility in processing
- Resistance to water and high humidity
- Abundance of ready-made forms on the market
All of the above together allows you to choose foam stucco molding for any ceiling. You can decorate almost any surface with this material - foamed polystyrene creases and bends very well, allowing you to glue cornices and shaped parts even on an uneven ceiling.
It also cuts easily. Foam plastic is a very light material, so the installation of elements can be done not only on suspended, but even on tension structures. For installation, you can use regular PVA glue.
This material can be used in rooms with high humidity. He is also not afraid of flooding from neighbors above.
But it also has disadvantages. They are as follows:
- Products made of foam plastic are characterized by a “loose” texture and low detail, especially small ones, as a result of which foam molding is easily identified by eye
- Expanded polystyrene is very flammable; when burned, it emits acrid smoke - it is prohibited to use it near electric lighting devices, especially incandescent lamps
- It is very fragile and brittle and cannot withstand any loads
Painting the ceiling fillet
For painting you will need the following consumables:
- paint of the desired color;
- masking tape;
- paint brush of appropriate size;
- rubber spatula.
Painting the baseboard can be done in two ways:
- The ceiling fillet is already installed. Painting in this case is harder and more expensive; you need to cover the furniture with plastic film, cover the floor with paper, and stick masking tape around the entire perimeter so as not to stain the wallpaper with paint. To paint ceiling plinths, it is better to use water-based paint. It should be diluted with water according to the instructions. You need to grab the paint onto the brush little by little and slowly, so that there are no streaks or smudges left, and paint the baseboard. When the paint is completely dry, you need to remove the tape and wipe the contour of the fillet.
- The ceiling plinth can be painted before installation. After the paint has dried, the fillet is installed and the joints are adjusted.
Using the advice of professionals and your wishes, you can create coziness in your apartment by simply painting the fillets a different color or making a more pronounced shade, and you can also use many colors to color the edging, ornament or design.
In the modern market, the range of materials for use in interiors is expanding. In practice, you can successfully implement any design ideas, which not only increases the internal comfort of the premises, but also makes it possible to apply innovations when working with ceilings. New materials in terms of variety and manufacturability include flexible polyurethane ceiling moldings. They are appropriate when installing original ceiling structures. A flexible cornice makes it possible to use the most complex suspended structures on ceilings. They can be spherical or radial in shape and give the room a final, presentable look.
Polyurethane has high-tech properties - flexibility and elasticity. Under dynamic loads, the bonds between polyurethane molecules are not destroyed, but only change direction and shape. As a result, the material becomes strong, flexible and stable. Industrial polyurethane is similar to rubber in its molecular structure and linear arrangement of molecules. Polyurethane is also wear-resistant. It can withstand temperature differences over a wide range, from -60 to +800ºС. Polyurethane moldings are wear-resistant and do not interact with aggressive environments.
The modern market offers ready-made fragments of ceiling moldings, curved at the desired angle. Polyurethane skirting boards are classified according to the angle. There are three categories: 30, 45, 600. This makes it possible to select the cornice according to the optimal curvature for each individual option.
Features of installing polyurethane moldings are as follows:
- Installation should be carried out on a finished surface. Wallpaper and plaster are perfect, bendable cornices will hold up well;
- installation is carried out using adhesives and liquid nails on a two-level ceiling. They interact well with concrete and plaster. To seal cracks and seams, use acrylic-based finishing putty;
- To install polyurethane baguettes in the corners, you will need a miter box; cutting polyurethane baseboards is done with a mounting knife or a hacksaw.
In a room where columns, suspended ceiling structures or radius panels of complex shapes are installed, there are a number of subtleties and nuances when installing bent skirting boards. Since polyurethane panels and moldings are elastic, they are first securely fixed to the structure using masking tape or thin nails, the length of which is within 20–25 millimeters. There is no need to drive the nails all the way in; after fixing the adhesive, the nails are removed. When working with small arcs, self-tapping screws are used, then they are masked with acrylic putty.
Curved ceilings are the most attractive type of apartment design. Polyurethane fillets help to successfully equip rounded corners and technically solve the problematic finishing of radius surfaces.
To learn how to glue ceiling plinths, see the following video.
The influence of product weight on installation methods
The heaviness of the stucco plays an important role. Depending on it, a certain technique, type of fastening, preparation of the surface and decorative element are selected.
Installation of light weight gypsum stucco is done as follows:
- The back of the product must be leveled. To do this, you need to run medium-sized sandpaper over it several times to smooth out the protruding parts.
- The surfaces to be joined are sprayed with water from a spray bottle, after which a layer of PVA construction adhesive is applied to the plaster and ground in so that it is evenly distributed.
- You will need to hold the decorative element for two to three minutes to tightly connect the parts together.
Small and lightweight gypsum stucco can be installed alone. For heavy or long parts, it is better to get help, otherwise they may break due to sagging and uneven support.
Installation of large plaster elements requires several different fastening methods.
First, the surface is prepared. Installation on “bare” concrete is desirable, and if there is plaster on the wall/ceiling, then frequent notches are applied to it to increase the adhesion force. The plaster is cleaned off. Before installation, the wall must be primed with PVA construction adhesive and water.
To enhance the adhesion of surfaces, nails and screws are used, which are placed at a distance of 15-20 cm from each other. The use of galvanized fasteners will prevent the appearance of rust and subsequent destruction of the structure. Holes for additional fasteners must be drilled in advance - they are made both in the part and in the wall.
To attach heavy decorative elements, you need to prepare a special glue: PVA is combined with water in a ratio of 40 to 60, after which gypsum powder grade G-7 or G-10 is added and thoroughly mixed until a creamy consistency is obtained. The adhesive mixture is applied to the back surface of the product, and it is firmly pressed against the wall/ceiling. After this, screws are screwed in, dowels or nails are driven in.
The remaining technological holes and joints of elements are rubbed with liquid gypsum mixture. The procedure must be carried out 2-3 days after the main installation, when everything is completely dry and well fixed.
What needs to be done in advance?
Before you begin installing decorative elements made of gypsum, you must ensure that a number of conditions are met that will allow installation to be carried out reliably and without loss.
- The room where the work is planned should not be too cold (more than 18 °C) and sufficiently dry. Otherwise, the gypsum elements will crack or “float”. Therefore, it is not recommended to use such decor in small bathrooms.
- Preparation of the surface to be decorated is necessary. The protrusions are rubbed with sandpaper, the depressions are filled with putty. Without this, the parts will not fit tightly and subsequently they will come off. After smoothing, the walls and ceiling are primed with a special solution, which dries for 2-3 days.
- Marking. A high-quality connection of the parts is mandatory; if this is not the case, both surfaces are treated with abrasive or filed. You will also need to apply markers to the wall or ceiling in order to follow the general pattern of the location of the plaster elements.
Proper preparation of the premises and materials is the key to the durability of the installed elements.
Types of gypsum cornices for the ceiling
On sale you can find a large number of gypsum products that differ from each other in size, shape, decorative elements, and composition. Thus, gypsum cornices can be smooth or decorative.
Smooth - during the production process the usual method of tightening is used, the finished product is smooth, without the presence of decorative elements. To obtain such models, simple tin or plywood stencils are used, which are filled with plaster. Such models are suitable for decorating any premises: country houses, luxury housing, communal apartments.
Decorative - the most original products with ornaments applied to the surface. Thanks to the use of such elements, you can give the room a unique noble appearance and turn any design ideas into reality. These models are mainly used for exclusive interiors. As a rule, their cost is much higher than that of previous types.
If we consider both options, we can safely say that decorative gypsum cornices are most popular among consumers. Such models provide a huge opportunity for designers to design. If necessary, you can apply not only subtle patterns and ornaments, but also depict the faces of people and animals.
Plaster cornices in the interior: photo
If you decide to decorate a room with plaster cornices, then it is important to understand that in the selection process the main thing is to choose the right elements in size. The first thing to consider is the height of the room. If the apartment is small, then you need to choose small skirting boards, the width of which varies between 2-4 cm. This choice is due to the fact that a wide cornice will eat up the space, and the room will seem even smaller.
If the ceilings in the room are high, you can use massive decorative elements made of plaster. In this case, there are no restrictions. A gypsum cornice can be smooth, embossed, or with an ornament applied to the surface.
Manufacturers often offer for sale products on which ornaments or thematic reliefs are applied. It is important to understand here that such cornices should be used as carefully as possible, since there is a possibility that they will not fit the designer interior. All these points should be taken into account before making a purchase.
Today, gypsum cornices with a geometric pattern applied to the surface are especially popular. Such models will ideally fit into the design of rooms made in the Art Nouveau, neoclassical, and art deco styles.
If the room is made in a classical style or Baroque and Empire style, then it is recommended to choose plaster cornices with floral motifs. These options are ideal for rooms with high ceilings.
As many consumers have already noticed, the use of decorative elements made of gypsum for decoration can make the room elegant and give it a finished appearance.
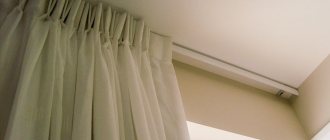
At what distance from the ceiling should I hang a cornice?
An important point when installing ceiling mounts is that they can only be installed after the final ceiling covering has been installed. The problem immediately arises: at what distance from the ceiling should the curtain rod be hung?
In this matter, it is important to comply with certain requirements:
- the profile must be wider than the window opening. This is approximately 35-50 cm;
- you need to leave a step from the top of the window opening to the curtains. This is done so that during further use the curtain does not interfere with opening the window sashes. The minimum distance will be 5 cm;
- The optimal distance from the cornice to the ceiling is considered to be 10 cm. It all depends on how the curtains are attached.
Curtains should not be adjacent to window frames or radiators.
Therefore, it is important to consider not only at what height from the ceiling to hang the cornice, but also the space from the wall to the curtain. Then it should be at least 10 centimeters
To determine the optimal location, you need to pay attention to the following points:
- from the center of the window, measure the distance to fix the brackets;
- the height of the cornice from the ceiling can be from 5 to 15 cm. If necessary, this distance is reduced or increased;
- When marking brackets for curtains, the reference point should be the ceiling, not the level. The ceiling covering often has some curvature. If you use a level to measure the distance of the cornice from the ceiling, the fastenings will appear crooked.
Next, let's talk about some types of brackets.
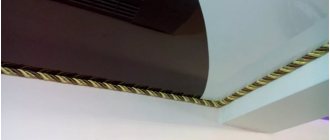
Illuminated cornices
You can create an interesting finish to the ceiling surface by installing cornices to illuminate the ceiling. Such models can be mounted when finishing a rounded ceiling surface.
Illuminated cornices on the ceiling visually increase the height of the room, while the light source becomes invisible. The lighting in this case will be diffused, coming from the ceiling.
The disadvantages of this design include the delay of light by the niche. A large amount of light will simply be absorbed by the profile and ceiling covering. Another negative point. This profile requires frequent cleaning. If you ignore cleaning, the brightness of the lighting will be reduced to zero due to accumulated dust.
How to make stucco with your own hands
Gintr executive gypsum ceilings, which are made from lightweight gypsum and are used to decorate ceilings in offices and public spaces, are offered for sale on the domestic market to consumers.
At the same time, anyone can make a gypsum ceiling with their own hands if they wish. Silicone molds are used to cast plaster products intended for installation on walls or ceilings. The matrix is installed in a special casing or box to avoid deformation when creating stucco.
Those who want to know how to make a gypsum ceiling can familiarize themselves with the process of creating it, which looks like this:
- To determine how much solution is required for the product, water is poured into the mold, after which it is poured into the container where the composition will be made.
- Gypsum is poured there - the result should be a liquid solution, it needs to stand for about 10 minutes, then it is mixed again and poured into the matrix.
- The form is filled slightly incompletely, and the composition is distributed with your fingers. After this, you need to get rid of air bubbles that get into the solution. The edges of the form rise slightly on one side and then drop sharply. Similar actions are performed on each side of the matrix. When performing these manipulations, you can see how air bubbles appear on the surface.
- The product must be reinforced, for which a choice of plumbing tow, hemp, aluminum or copper wire is used. The reinforcement is laid out on the surface of the solution and smoothed with a spatula, and then filled with the remaining composition, which should be mixed again before pouring into the mold. The surface is leveled using a spatula, which is slightly wider than the matrix.
- The product, which is clearly visible, begins to set after a couple of minutes and you need to go over the top with a spatula again. You can use this tool or other sharp object to make incisions to ensure artificial adhesion. When setting, the solution heats up, and after the process is completed, it begins to cool. Depending on the thickness of the product, this takes from 10 to 15 minutes.
- To remove the stucco molding, the matrix is turned over and freed from the box, and, starting from the middle, gradually freed.
- Since the product has not completely dried, it is laid out flat on a flat surface in a dry room, then it will not move.
- Complete drying occurs after 3, maximum 5 days, which depends on the microclimate in the room and the parameters of the stucco molding.
If the solution in the preparation container begins to set, then it must be thrown away, since the product made from it will harden for a long time and will turn out crumbly and brittle.
Subtleties of cornice production
Modern science does not stand still, and new 3-D technologies are also being introduced into the production of gypsum products. In specialized companies, a three-dimensional model is created for each element, which allows you to quickly offer the customer several possible design options. The use of molds (compounds) for casting gypsum allows us to produce products with high precision and higher quality. The broaching method makes it possible to obtain a plaster ceiling cornice without curvature and with a perfectly smooth surface.
- For those who want to make gypsum ceiling cornices with their own hands, we will tell you about this technology. In addition to the casting mold, you will also need a box for it. The box will not allow the soft silicone mold to deform if it is accidentally touched.
- Instructions on the topic: “How to properly prepare a solution from gypsum” can always be found on the Internet, but it’s best to watch the video.
- To make it easier to determine the required amount of solution, water for it is first poured into the mold. Then it is poured into a container for mixing the solution, where, stirring constantly, you need to add gypsum to the water until the consistency of pancake dough is obtained.
- After soaking the prepared solution for about ten minutes, you need to pour it into the mold to three-quarters of its volume. At the same time, its edges must be shaken, thereby creating vibration and compacting the solution. If it spills a little around the edges of the pan, carefully pick it up with a spatula. The same tool should be used to carefully smooth the plaster surface.
- To give strength, gypsum ceiling cornices are reinforced with copper or aluminum wire, thick twine, and tow. In this case, reinforcement is laid on the surface of the product, another layer of mortar is added and smoothed again.
- When setting, air bubbles will come to the surface - you will have to go over it with a spatula again. After 20-25 minutes, the solution will completely set, and the finished product can be removed from the compound. They turn it over and begin to remove it from the middle to the ends.
- This must be done on a flat surface, on which the cornice will remain until the plaster has completely hardened.
What styles are used for ceilings with gypsum stucco?
The details will not spoil any decor; it all depends on the shape and texture of the elements.
Simple geometric patterns are suitable for framing the ceiling, regardless of the style of the room, but figured lamellas require a more careful approach:
- Empire style This is a style that should have a lot of gilding, heavy textures, and curved shapes.
- Art Deco. Rosettes with ornaments, moldings with leaf patterns, and calmer, pastel colors would be appropriate.
- Baroque. Details should visually expand the room, give it lightness and volume. Consoles, hemispheres, and caissons will come in handy. Framing in natural patterns: leaves, flowers, fruits.
- Classic. Simplicity and elegance are needed here. A large panel with a frame is enough to highlight the beauty of the decor.
A good option is a ceiling design with stucco in the New Art Nouveau style. Decorators allow you to combine different shapes and formats, the main thing is to maintain the harmony and grace of the design.
Methods for installing baguettes in a room
There are two options for mounting the plinth: on wallpaper or on a fine finish (a leveled wall or a wall coated with paint). In the first case, you can avoid subsequent peeling of wallpaper that was not pressed with a baguette. In the second, the work is easier, due to the absence of increased requirements for accuracy of execution: putty residues are easier to remove from a clean wall than from figured wallpaper.
Convenient installation of ceiling plinths after finishing or on pre-painted walls takes a minimum of time.
Therefore, it is ideal for doing it yourself. To carry out the work, you will need to prepare any high-quality finishing putty, the required number of baguettes, and a couple of spatulas. The performer will also need a miter box and a hacksaw, which will be used to trim the baseboards.
How to attach decorations
Gypsum and foam stucco moldings are glued to PVA.
To attach the ceiling decor you need:
- If you choose stucco molding made of polystyrene foam or gypsum, then use polyvinyl acetate (PVA)-based construction adhesive. If the decorative elements made of gypsum are massive and large-sized, then PVA glue mixed with alabaster is often used to attach them. Sometimes such heavy decor is fixed with dowels and self-tapping screws.
Polyurethane decor is fixed with “liquid nails”.
- If you choose polyurethane decorations, you will need “liquid nails” to attach them. This construction adhesive has 10 times the holding power of PVA. It is not capable of spoiling the decorative coating.
When installing decorative polyurethane elements in the living room, bedroom, and children's room, only water-dispersed glue “liquid nails” is suitable. In this case, select a composition that has the shortest setting period.
How to attach?
When we settled on a specific type of curtains, with the material and design of the brackets, all that remained was to find out how to attach the ceiling cornice to the ceiling.
When choosing ceiling strips, the place for their fastening is prepared during the covering of the ceiling surface. The most difficult fasteners for cornices to the ceiling are considered to be for plasterboard coverings and tension fabrics.
So, for a plasterboard ceiling, a special groove is installed during installation. Then the bar will be fixed directly to the ceiling. You get an interesting solution when the curtain falls straight from the ceiling surface, since the profile is not visible.
The ceiling cornice is attached to the suspended ceiling after installing the timber under the canvas. Then the structure is fixed using self-tapping screws.
Installation Methods
Before installing the ceiling plinth, how to glue is an important question. There are two points when gluing the ceiling plinth? This is the choice. Before wallpapering the walls, or after?
- If you glue it directly to the wallpaper, you can shorten the repair process. Using adhesives “Moment Installation”, “Dragon” or white acrylic sealant
- The second option is to frame the ceiling first. Smooth out all seams and irregularities between the wall. You can use putty or acrylic sealant as an adhesive material.
From a savings point of view, the second option looks preferable. Firstly, you won’t have to remove the fillets during future repairs and wallpaper changes. And secondly, it’s easier to repair all the unevenness of the walls. And the entire surface looks like a single whole.
When working you need the necessary tools. This is a device for giving the required angle (miter box), a metal file or shoe knife, putty, spatula.
A crucial point during installation is the processing of corners. For this purpose, the miter box has guides for the outer and inner corners. And also cutting at an angle of 90⁰. Before processing the corners, it is best to take several samples of the baseboard and try cutting the corners on them. If plastic stucco is used, a hacksaw will come in handy. Using gentle movements without pressure, cut the corners so that there are no rough chips.
Preparation for installation
In order for the installation work to proceed without complications, you need not only to understand the installation technology, but also to purchase the necessary materials and tools in advance. In addition to the basic materials, the list of which will be given below, you need to stock up on putty and paint - they are used for finishing the baseboards.
To work you will need the following set of materials:
- Ceiling gypsum plinths
. It is almost impossible to make a mistake in choosing - gypsum products are used only for finishing the ceiling, so any options you like will do. Before purchasing, you need to calculate the required amount of materials, taking into account the size of the ceiling and the finishing features. - Glue for plaster
. To install gypsum parts, a special glue is used, which ensures a reliable connection between the baseboards and walls, and it sets almost instantly. Having information on the required number of skirting boards, you can easily select the required amount of glue - usually its consumption is indicated on the packaging. There is no point in overpaying for unnecessary materials. - Self-tapping screws for metal
. Self-tapping screws are needed for additional fastening of skirting boards. During the installation process, they will be screwed into the metal frame directly through the baseboards. The length of the screws is selected individually, but they must be 3-4 cm longer than the thickness of the baseboards.
The list of tools needed for the job is as follows:
- Roulette and pencil
. These tools are used for marking. The tape measure should be longer than the baseboards used for finishing. It wouldn’t hurt to add a square as well – it helps to correctly set the corners of the baseboards. - Chop cord
. The paint cord is needed to apply a perfectly straight line to the wall surface. Gypsum skirting boards cannot be bent, so any unevenness in the walls will interfere with their installation. The cord avoids this problem by providing a clearly visible reference point on the wall. - Construction knife
. Any construction knife with a set of interchangeable blades will do. This tool is used to trim the plaster ceiling plinth before connecting it to another part. - Hacksaw
. A fine-toothed hacksaw is best for cutting plaster baseboards. The choice of hacksaw is not particularly important - either a regular version or a hacksaw for metal will do. - Screwdriver
. This tool is used for screwing in self-tapping screws and drilling mounting holes. For a complete set, you will also need to purchase metal drills. It is advisable to supplement the list of tools with a regular screwdriver - it allows you to screw in screws more accurately. - Putty knife
. A spatula about 10 cm wide is suitable for installing gypsum skirting boards. This tool is used both during installation and after it, when applying putty. - Glue gun
. A special gun is used to more conveniently apply the adhesive composition - doing this work manually is much more difficult.
At what distance from the ceiling should I hang a cornice?
An important point when installing ceiling mounts is that they can only be installed after the final ceiling covering has been installed. The problem immediately arises: at what distance from the ceiling should the curtain rod be hung?
In this matter, it is important to comply with certain requirements:
- the profile must be wider than the window opening. This is approximately 35-50 cm;
- you need to leave a step from the top of the window opening to the curtains. This is done so that during further use the curtain does not interfere with opening the window sashes. The minimum distance will be 5 cm;
- The optimal distance from the cornice to the ceiling is considered to be 10 cm. It all depends on how the curtains are attached.
Curtains should not be adjacent to window frames or radiators.
Therefore, it is important to consider not only at what height from the ceiling to hang the cornice, but also the space from the wall to the curtain. Then it should be at least 10 centimeters
To determine the optimal location, you need to pay attention to the following points:
- from the center of the window, measure the distance to fix the brackets;
- the height of the cornice from the ceiling can be from 5 to 15 cm. If necessary, this distance is reduced or increased;
- When marking brackets for curtains, the reference point should be the ceiling, not the level. The ceiling covering often has some curvature. If you use a level to measure the distance of the cornice from the ceiling, the fastenings will appear crooked.
Next, let's talk about some types of brackets.
Which ceiling plinth is better
Manufacturers of skirting boards for ceilings
The reputation of the manufacturer is the key to the quality and high performance characteristics of any product. Therefore, experts advise not to save money and spend 10-15% more, but to purchase products of good quality rather than dubious fillets, which will most likely have to be replaced after a short period of time. On the modern market of construction and finishing materials you can find products from the following well-known companies:
- Matteo is a manufacturer from Germany that produces polystyrene foam skirting boards, the width of which ranges from 3 to 10 cm. However, colors and shapes vary;
- Villa Deco is also a German company that produces polystyrene foam fillets. Its products fully comply with quality standards, and the products are presented in a wide range;
- Kindecor is a company from Russia, founded in 1994. The company produces not only ceiling moldings, but also a number of other finishing materials;
- Penopol Company LLC began its activities in 2004 and presents its products under the Glanzepol brand. The main focus is the production of polystyrene foam ceiling skirting boards, so the company boasts a wide range of products;
- GC "Format" is a Russian enterprise engaged in the production of Konigdeko ceiling plinths using German equipment.
Plastic cornice
A plastic cornice to the ceiling is considered the most common and budget solution. Despite the low price and simple design, such models are not inferior in terms of functionality to expensive options.
The features of plastic strips include the following points:
- neutral white design matches any interior design of the room;
- The bar design can withstand light and medium curtains;
- models come with rounded ends;
- The elastic material of the product allows them to be used on ceiling surfaces in the form of a semicircle.
Plastic models go well with decorative elements.
Decorative cornice
Installing a decorative cornice for the ceiling is recommended if there is a decorative strip. This bar is installed to hide structural elements.
It is important that the decorative elements are combined with the decor and overall interior of the living space. Typically, decorative models are made from wood. Therefore, competent selection of curtains for such a design is also important. For example, light curtains made of transparent material will not look good on a massive decorative strip made of wood.
Where is gypsum stucco molding used?
Gypsum is a finishing material. Stucco molding is made from it, which decorates the walls and ceiling and gives the interior sophistication and originality. With its help, unusual elements are created; it helps to hide small defects in surfaces and communications. In some styles, columns and half-columns are made from this material, as well as decorations for fireplaces, bar counters, window and doorways.
Gypsum with protective additives and impregnations is suitable for exterior finishing, since it is quite hygroscopic and susceptible to mechanical stress. It is advisable to protect products from direct exposure to precipitation. Stucco molding on the facade walls looks luxurious. The building, decorated with elaborate elements, immediately stands out against the background of similar monumental buildings.
Stucco molding is used to decorate public institutions
Decoration of stucco ceiling and walls
Facade stucco
Related article:
Advantages of gypsum cornices: what are they?
Gypsum cornice is rightfully considered a traditional ceiling design option. They are exclusive, aesthetic and have a wide selection of shapes. It is worth noting reliability and environmental friendliness.
In addition, they are resistant to fire. The plinth is a traditional wall finish; it is a decor that is used in almost all rooms. Ceiling plinth is an important interior element; it frames the joints of the ceiling and wall.
Sometimes skirting boards are called cornices or base profiles. Finishing materials in this sector have a lot of positive characteristics. With the help of skirting boards you can solve both practical and decorative problems. It is worth finding out when gypsum skirting boards should be used:
- If it is necessary to use non-standard skirting boards of the original size or shape,
- When connecting skirting boards to stoves or fireplaces,
- For fire safety requirements in public buildings, for example, shopping centers.
There are curved and radius plinths. They cost several times more than traditional ones. This is explained by the fact that such elements require more production and installation efforts. To create a gypsum plinth for a curved surface, you need to remove a template for that surface, and then develop a suitable template.
Using the template, a substrate is created, which is a piece of wall with a certain radius. After using shellac and drying, the backing needs to be pulled back. Gypsum skirting boards are delivered to the site and installed using hardware and glue.
When choosing a plinth, you need to take into account the fact that the plinth should not be interrupted at doorways. It is better to order installation from professional specialists. Gypsum, although a durable material, is still quite fragile, so it is better to entrust the installation to professionals.
Ceiling plinth made of natural gypsum is an important interior element. This decor emphasizes the taste of the owner of the room. If desired, skirting boards visually delimit the space.
You can make several sectors at once. The main task of a gypsum floor plinth is to mask the gaps between the floor and the wall. Skirting boards and some moldings are installed at floor level.
[custom_ads_shortcode2]
The use of stucco in ceiling design
During the Dark Ages, decorating ceilings with stucco as an art was forgotten. And only with the heyday of the Renaissance, the decoration of ceilings by creating relief figures, ornaments and patterns from plaster was actually revived. Since then, the use of stucco decoration for ceiling decoration has been considered a sign, firstly, of wealth, and secondly, of good taste.
Modern finishing technologies, in addition to such well-known materials as gypsum and alabaster, can offer the use of inexpensive and practical synthetic materials such as foamed polystyrene (better known as polystyrene foam) and polyurethane. Using each of these options has its pros and cons.
The ceiling design itself using curly elements is to give the ceiling an exclusive look, carefully masking household and technical elements that spoil the overall appearance:
- Ceiling defects (unevenness, potholes, etc.)
- Cable wiring, incl. power and network cables
- Outputs outside the wall of drain pipes and cables and split systems
- Technological openings - ventilation, etc.
Let's figure out what methods we have for this.
Tips and tricks
When installing skirting boards, you should adhere to the following advice from experts:
- you need to paint the plinth, baguette, fillet before installing it;
- It is necessary to attach ceiling cornices before finishing the walls;
- It is not recommended to glue a baguette to a suspended ceiling, since the ceiling can be damaged during installation, and it is also necessary to cover the ceiling sheet with polyethylene so that the glue does not get on the sheet;
- the end of the fillet must be sanded;
- It is worth using special tools when installing skirting boards: a ruler, tape measure, a simple pencil, a miter box (a machine for cutting fillets at the correct angle), a hacksaw, a painting knife;
- during installation, it is necessary to seal the cracks with putty or a special sealant;
- to calculate the required amount of ceiling plinth, you should measure the perimeter of the room, then divide the resulting number by the standard length of the fillet, while you need to take into account the length of each wall, try not to allow many joints;
- you need to decide on the choice of glue, it depends on the material of the baseboard and wall, and you need to take into account the humidity of the room. The glue must be non-toxic and safe; it is recommended to choose between polymer and acrylic compounds; preference should be given to acrylic, as it is safer. But there is one drawback - the acrylic composition is water-based, and when exposed to moisture, it loses its adhesive ability. The polymer composition of the glue is moisture resistant, but has a specific odor, the room requires long-term ventilation, and is not cost-effective.
How to decide what to glue first – baseboard or wallpaper. According to the technology, both options are possible, but the optimal and correct option is that you should first install the baseboard and then decorate the wall.
Decorating the corner beautifully and correctly with molding is the main feature of the installation. For this, there are special stencils 45, 60, 67.5, 900; for an ideal right angle you need to take a stencil 450. First you need to determine which edge of the plinth will rest on the wall and which on the ceiling. When making a left cut in a miter box, the lower ceiling part is located at the top, and for the right cut, vice versa. At the inner corner, the outer edge of the plinth should be shorter and the inner edge longer.
For a room with external corners, the plinths are cut in exactly the same way; the cut is obtained with the same angle, but only in the opposite direction. The outer edge is longer, and the inner edge is shorter.
It is also important to correctly connect the joints of the ceiling moldings along the length. You can use two methods: oblique and straight
In the straight version, two fillets are joined at their ends, and in an inclined version, oblique cuts are made on each fillet. When gluing skirting boards, one should have a sharp corner at the bottom, the second should have a sharp corner at the top.
Using gypsum stucco in different styles
Before choosing stucco as a decoration for a room, you should think about the style and design of the interior.
Roman style and art deco
A characteristic feature of interior design in the Roman style is stucco, so it is impossible to overdo it here. Decorative elements are present in large quantities on both the ceiling and wall surfaces.
The principle of art deco design is to combine the incongruous. Any elements that will give the interior a special chic and luxury can be used here. Plaster stucco molding can not only harmonize with each other, the ornament is often repeated in the decor.
Baroque, Rococo and Empire
For interiors decorated in the Baroque style, choose stucco with decorative relief; it will create special luxury and pomp. Be sure to decorate not only the walls or ceiling, but also the fireplace portal, window sills, doors, as well as wall panels and mirrors.
Related article:
Rococo design is characterized by small, intricate elements. They give the interior a touch of coquetry and grace. You don’t have to adhere to symmetry in the design. Just asymmetry and pretentiousness will create a romantic mood.
The Empire style is characterized by its monumentality and solidity; based on this, they choose massive stucco molding, which is necessarily supplemented with small elements.
Classicism, Renaissance and Romanticism
In a classic interior, stucco molding should emphasize the shapes and support the overall style. The most commonly used are cornices, moldings, frames, columns and consoles.
The Renaissance and Romanticism styles are similar; they are characterized by multi-level ceiling structures and niches. Interiors decorated in Renaissance design are often decorated with plaster figurines, and for romanticism they choose decor that gives lightness to the space.
Modern interior
Modern interiors do not deny gypsum stucco, but allow only single use. These can be cornices, a small panel, consoles as supports for shelves. The base of the coffee table can be a cast from an ancient sculpture.
Ultra-modern techno and hi-tech allow wall decor from 3D panels made of plaster with additional lighting. Boho or eclecticism is characterized by an overload of decor and colors, so plaster elements are allowed in any quantity.
How to choose a ceiling plinth
The choice of ceiling plinth must be made based on the following criteria:
- material;
- width and shape of products;
- baguette color and size.
Application area
It depends on the type of material that forms the basis of the decorative element:
- PVC is most often used for finishing ceilings made of plastic lining. Such a plinth can perform not only a decorative, but also a functional role, namely, serve as a profile to which the panels will be attached;
- polystyrene foam is used only for finishing plasterboard ceilings;
- expanded polystyrene goes well with plastic ceilings or surfaces decorated with plaster stucco;
- In modern interiors, gypsum moldings are used as ceiling moldings framing molded elements on the ceiling. For example, sockets;
- polyurethane harmonizes well with suspended ceilings and PVC lining;
- wooden skirting boards play the role of classic decorative elements and perfectly complement ceilings trimmed with wooden lining.
The width of the ceiling plinth and its shape
Products are usually produced in a standard length of two meters. The width of the baguette can vary from 1 cm to 20 cm.
When deciding which ceiling plinth to choose, narrow or wide, you need to understand where you can decorate the ceilings with wide fillets, and where only narrow plinths will look appropriate:
- A wide baseboard will visually smooth out sharp corners in the room. With such baguettes the room will take on a rounded shape, become cozy and harmonious;
- With the help of a wide plinth, you can effectively mask finishing flaws at the junctions of walls and ceilings, as well as visible surface irregularities.
When choosing a ceiling plinth width, take into account the following main points:
- the wider the element you choose, the smaller the room will seem;
- for small rooms, install a thin baseboard, since a very wide molding will lower the ceiling space even more.
When choosing the shape of the plinth, be guided by your own preferences, as well as the style and design direction in your room:
products with complex patterns will look appropriate in classic antique interiors; universal skirting boards of simple shape suitable for any decoration
Merging with wall and ceiling surfaces, they do not draw attention to themselves.
Ceiling plinth with lighting
You can create an original interior if you include a decorative plinth for the ceiling with built-in lighting. Such products can be made of wood, polyvinyl chloride, polystyrene or polyurethane. They are represented by decorative strips with special grooves, where LEDs are placed after completion of installation work. Some products are equipped with special plastic inserts that cover the tape and diffuse the light from it.
The grooves can be located at the top or bottom of the baseboard. In the first case, the light will flow towards the ceiling, in the second - towards the wall.
Ceiling plinth color
After you have chosen the material and shape of the ceiling fillets, you need to decide on their shades
Please consider the following recommendations:
white baseboards to match the ceiling will visually increase the space
This option is best used in low rooms (2.5m); wide dark products that contrast in color with the wall surface, on the contrary, will lower the ceilings; when choosing decorative elements for decorating the ceiling, pay attention to the fact that their color should match the main shade of the color scheme in the interior, and the number of main colors should not be more than three; Ceiling moldings in contrasting tones will look good, for example, the color of natural wood against the background of white walls and ceiling.
Instructions for finishing the ceiling with gypsum stucco
Decorating the ceiling in the classical way (using gypsum or alabaster) is done as follows:
- Dry plaster or alabaster is thoroughly kneaded, any lumps identified are removed, and then diluted with cold water using a 0.5-1 liter container for molding solution. The consistency of the solution should resemble thick kefir.
Mixing gypsum mortar
- The solution is thoroughly mixed, filled into prepared forms and compacted well with a spatula to avoid voids.
- Leave the molds with the solution until it hardens for at least 15 minutes. Hardening must take place at room temperature. It is prohibited to use auxiliary heating with heating devices, since the stucco molding may crack.
- After the solution has hardened, the stucco molding is removed from the mold and cleaned with fine-grained sandpaper.
- Stucco elements are glued to the ceiling with PVA glue or liquid nails, after which the joints between the elements are covered with putty and cleaned after the putty has dried.
- When the finishing is completed and no defects are found in the stucco, it can be painted if desired.
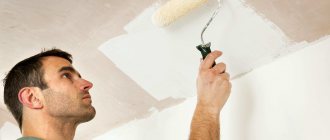
How to glue foam ceiling plinth for painting.
Use this method if you are going to make a new ceiling painted with water-based paint, glue new wallpaper or paint walls. Before gluing the foam ceiling plinth (cornice), you need to putty, then sand the walls and ceiling. In other words, prepare the surface completely for painting and wallpapering. Among the tools, we will need a spatula with a width of one hundred millimeters, a brush with a width of twenty to forty millimeters, a small jar of water, a pencil, a mixer, and a drill. Having prepared the baseboard for the first corner, prepare the glue. We will need some sheetrock mineral finishing putty (gypsum putty cannot be used), and some PVA glue. Approximately 500 ml is required for the perimeter of one ceiling. solution. Add glue to the putty, stir, bring to the state of liquid sour cream (approximate proportion of 0.5 liters of putty # 0.2 liters of glue). Apply the putty to the ceiling plinth with a spatula along the glued plane in a layer of two millimeters.
A layer that is too large will drip, be squeezed out too much when gluing, and will cause unnecessary inconvenience. We begin to glue the ceiling plinth. We glue the cornice, greased with adhesive solution, into place. We press into the center of the baseboard with our fingers along the entire length.
The excess solution will be squeezed out. We collect the main part of the solution with a spatula, running it along the baseboard. Wipe off the remaining solution with a brush moistened with water.
We lubricate each cornice with the solution from the end. The end joints almost always do not match. After installation at the ends, we eliminate the imperfections with a spatula and putty. In the corners, remove excess adhesive mixture with your finger, and remove the remaining residue with a brush moistened with water.
After painting, the baseboards will look perfect, in one piece.
Installation of polyurethane stucco on the ceiling
Polyurethane is called a modern analogue of gypsum; one can argue for a long time about the validity of this statement, but in the end it will still be necessary to admit that gypsum products are decor for centuries, while products made from polyurethane are temporary decoration.
The main advantage of polyurethane stucco molding is its low weight, which makes installation of products a very simple and easy process. Fixation is carried out using an adhesive composition, which is popularly called “liquid nails”.
However, it is advisable to additionally fix fairly large products with several screws, the traces of which are then filled with a special putty glue.
To connect individual elements of the composition to each other, it is necessary to use a special joining adhesive, which is practically invisible and therefore will not spoil the appearance of the decor.
https://youtube.com/watch?v=KCIMiwujjNMrel%3D0%26amp%3Bcontrols%3D0%26amp%3Bshowinfo%3D0
- remontcap.ru
- rembud.ru
- mastremont.ru
STRETCH CEILING AND STUCKING. "PROS AND CONS"
For the article “Drawing a ceiling plan,” I received a very interesting comment about how to “attach” a beautiful cornice to a stretch ceiling: “What can you come up with with cornices in the case of a white matte stretch ceiling? I had a sad experience installing polyurethane. Now I understand that the problem was due to incorrect installation, but having made a mistake once, I won’t risk installing something like this again.”
Let's try to speculate together on such a sore subject. And let’s try to figure out what can and cannot be done in dream houses.
PotolokSpec.ru
So, to begin with, I want to voice my humble opinion regarding the general existence of suspended ceilings. Otherwise, the topic is sensitive, and opinions on it are very, radically opposite: from hate and fu-fu, to love and adore.
The main disadvantages in favor of NEVER making a suspended ceiling at home:
- chemical film - we don’t have enough chemicals and various nastiness around us in life, so we also drag it into the house.
- glossy and colorful - this is not at all fashionable, not in trend, and we don’t live in sex clubs, but in the most normal dream houses.
- a low-quality ceiling gives itself away a mile away, but a high-quality one costs money, so thinking that saving a budget is a mistake no. 1 - everything must always be taken into account.
white flat ceiling. photo: Potolokino.ru
The main advantages for choosing a stretch ceiling:
Do I have any examples of stretch ceilings in my practice or in my own life? EAT. ONE AND ONE - in 2010 I installed a suspended ceiling in my St. Petersburg apartment in the kitchen and hallway, for this very reason - quickly, cleanly. Do I like him? NO... Did I have an alternative? It wasn’t at that moment; I had to do the repairs on my own in a week. It is not very realistic to restore a 3.5 m high ceiling with stucco on your own. Conclusion - I ordered a WHITE, MATTE, FABRIC ceiling. Now he is 7 years old. The flight is normal, but I want to wait for the moment and find the strength to carry out normal repairs and return the original appearance of the ceilings...
A decorator's nightmare
So that’s what I’m talking about all this about my experience - about what I only accept if it’s WHITE, MATTE, FABRIC. All my other films go a very long way in a certain direction. Actually, colleagues (the majority) also relate to this. Because the desire to do it cheaply arises among 99 percent of the population, but not everyone thinks that cheaply can then “show” invisible beauties even in the matter of a stretch ceiling. And turn your dream home into a dull creature.
Does everyone know how to make a suspended ceiling?
Two powerful men come to your house (or even a clean and renovated apartment) with a heat gun and a roll of the ceiling of the future. A profile is laid along the entire perimeter, the ceiling is stretched, then the visible gap is sealed with plastic contour tape, 2-4 hours. The ceiling is ready.
photo: remont.mogilev.by
Therefore, we immediately note to ourselves:
- The stretch ceiling still EATS several centimeters of your ceiling. Depending on its “evenness” you will get one or another result.
- You will not be able to make a suspended ceiling and save your historical stucco. The profile must be fixed to the wall - hence the conclusion that if you live in a 19th century house with unique stucco, then either you forget about this history, or you lose the stucco (well, it will live between the old ceiling and the new suspended one)
photo: mirpotolkov116.ru
Now separately about stucco molding and suspended ceiling. How to combine? My point of view here is banal - no way. Only some very scary and terrible stories can tell me that I need to offer customers a complex story of combining two materials: film and plaster.
What could this situation be? Well, for example... the original ceiling is absolutely terrible, and the builders themselves doubt that they will be able to level it perfectly in a short time. For some reason we cannot use drywall - well, a fantastic assumption - the ceiling cannot be tapped to fit the guides. True, this is from the realm of modern science fiction.
Or the terrible and well-known situation with a neighbor who floods with stubborn regularity. If you “don’t kill your neighbor” or don’t sell your apartment, you’ll have to put up with a suspended ceiling. At the same time, we choose beautiful, high-quality ones.
All other stories are just your personal preferences, laziness to “bother”, desire to save money, and so on. Therefore, I do not impose my opinion, but I draw your attention - think before making decisions in favor of this or that step and weigh all the PROS and CONS very well.
So, let's return to stucco and the original question from the commentary to the previous article - “HOW TO COMBINE”.
It is possible to combine. BUT! There is always the notorious BUT, and it relates primarily to the professionalism of your builders who took on this project.
A friend of mine, a “builder-foreman,” discusses and advises on this topic today:
“According to the perception of a stretch ceiling, as I noticed for myself, people are divided into groups:
- Never. Terrible film, terrible joint with the wall and does not care that it does not crack and is not afraid of flooding with water.
- We do it throughout the entire apartment! We will stop noticing the joint on the second day. So what if it’s film, you might think the rest of the objects are made of solid wood, from the homeland of the hobbits. But it’s fast, cheap, and saves you from neighbors who forgot to turn off the tap in the bathroom.
- How can we make it look like a normal ceiling and have all the practical advantages?
For the last group of practical aesthetes, we often make a suspended ceiling, but cover it around the perimeter with a polyurethane or plaster cornice.
Gypsum is better suited because... its shape can initially be molded so that it is attached only to the wall .
But even with polyurethane there are some tricks when we use a profile or timber to create a triangular base on which we attach the cornices.
Well, a little trick to make it easier and safer to putty and paint - cotton swabs are perfect... “
project by decorator Svetlana Arefoeva (this is not a suspended ceiling! this is an example of beautiful stucco molding)
Installation steps:
Element preparation. If there is a protruding corner on the reverse side, it must be cut off along the entire length of the element. Use a hacksaw to make several notches on the back of the stucco. It must be completely covered with the adhesive mixture. Now leave the decoration on a flat surface until dry.
Place marks on the surface where the decor will be located
Pay attention to the presence of protrusions on the surface; if any, they must be eliminated
After drying, the adhesive mixture forms a transparent film behind the element. Prepare a solution of gypsum or fugenfüller in a plastic bucket. Its thickness should be medium. Pour the mixture onto the back of the element and install it. To remove excess adhesive solution, you need to slightly move the decor from side to side. It takes at least 5 minutes to hold the plaster decoration for the solution to set.
Excess solution should be removed immediately with a knife or spatula, otherwise it will ruin the whole impression.
As you can see, you can install gypsum stucco yourself, but this process is very labor-intensive and dirty. If unsuccessful, you will ruin both the decorative element and the surface to which it was attached. Our recommendation is to contact professionals!
Installation of gypsum skirting boards
The technology for installing gypsum ceiling plinths consists of the following steps:
First of all, the surface is marked. At this stage, it is necessary to apply marks on both sides of the ceiling. These marks will serve as a guide in the future when installing skirting boards. In order for the marking accuracy to be high enough, you need to take a template from a piece of plinth. A dye cord is stretched between the marks. The cord must be pulled away from the surface of the ceiling and released so that it hits it. As a result, there will be a perfectly smooth and clearly visible mark on the ceiling, which will need to be followed during the installation of the skirting boards. The next stage is preparing the surface for work. To ensure a high-quality connection between the baseboards and the supporting surfaces, several cuts must be made on the latter using a knife. It is advisable to place the cuts crosswise - this way the surface will be as uneven as possible, which will ensure a good connection. It is also recommended to cut the baseboards themselves. Of course, you need to cut them exactly on the side that will stick to the ceiling and walls. The ends of the parts are also cut through. This stage of work does not take much time, but the benefits from it are significant. Now you can start applying the glue. First they need to coat the back side of the plaster baseboard - the same side that has the cuts. The adhesive composition must be distributed so that it covers the gypsum baseboard in an even line along its entire length. A separate point that will need to be repeated several times during the installation process is applying glue to the areas where the baseboards are connected. There are no special features here - the ends of the parts are simply coated with adhesive and connected. The parts must be aligned strictly along the line left by the cord. Having joined the skirting boards in the corner, you need to make sure that they fit snugly to all surfaces. After making sure that the gypsum ceiling plinth is positioned correctly, you just need to hold it for about 20 seconds so that the glue sets. Excess glue must be removed using a damp sponge. Mounting holes for self-tapping screws are drilled in the installed baseboards. The diameter of the holes should be 1 mm less than the thickness of the fasteners. The hole spacing is 30-35 cm. Thanks to fastening with self-tapping screws, the possibility of moving the ceiling plinths is completely eliminated. Using a spatula, you need to chamfer the holes. To do this, insert the spatula into them at an angle and turn it
Special care is not required when performing this work - these areas will still be covered with putty. Self-tapping screws are screwed into the prepared holes. Do not apply too much force - the plaster may crack
The screw heads should not protrude beyond the gypsum baseboard. If a two-level structure is being installed, then the lower part of the gypsum plinth can be additionally covered with a narrow baguette made of a similar material. Of course, this point needs to be thought out in advance and the parts must be tried on in their place before installation. At the points where the baguette joins the wall surface, you need to make the same notches as in the case of baseboards. Notches are made along the entire length of the products so that the connection is of the highest quality. The adhesive composition is applied to the back of the baguettes in two strips, which must be placed at a distance of 1 cm from the edge. The coated baguettes are glued to the ceiling and held until the glue sets. The installed part must be immediately leveled so that it matches the baseboard and other molding. All that remains is to secure the parts with self-tapping screws. The required actions repeat the technology used for installing baguettes. The only difference is that it is best to use a screwdriver to screw the screws into the baguettes - using a screwdriver can damage the finishing material.
Advantages and disadvantages of finishing the ceiling with stucco
- Aesthetic appearance
. Stucco decoration allows you to effectively emphasize the individuality of any interior. The most popular elements of ceiling molding are sockets for lamps, caissons and moldings. Often the above details are used in a mono version, but if desired, they can be combined to create complex interior compositions and scenes. - Optical correction of room proportions
. The use of stucco elements to decorate the ceiling helps to favorably emphasize the advantages of the room design and visually change its proportions. - Strength and durability
. If installation work is carried out correctly and cared for properly, gypsum stucco on the ceiling will delight you with incredible beauty for decades. Synthetic stucco products are less durable, usually their service life ranges from 5-6 years. - Practicality and functionality
. Using elements of stucco decoration, you can discreetly disguise errors in the ceiling surface and hide all the technical “stuffing” of the room - network cables, electrical wiring, ventilation ducts and grilles. - Possibility of repairing damaged elements
. If necessary, defective fragments of stucco can be easily restored or replaced with new ones.
Special recommendations for careful work
To ensure that the installation of fillets in the corners of the room is done as accurately as possible, you need to visually assess the required cutting angle. To do this, you should lift the plinth and determine what cutting angle will be optimal.
The selected indentation must be cut using a hacksaw, and the prepared plinth should be placed at the junction with the adjacent one. Putty can be applied only when a proper joint has been obtained (no gaps). Using this method, the installation of the plinth on the ceiling will be carried out correctly and there will be no problems with the sloppy appearance of the frame.
Before installing baguettes yourself, you should carefully read the above instructions and additionally study photo reports on installing the plinth yourself. Detailed descriptions will help you carry out the work easily and completely eliminate problems with uneven or sloppy gluing of fillets. And the use of high-quality putty and baguettes will allow you to properly finish the room, which will retain its original appearance for many years.
How to Install Gypsum Ceiling Cornices
Room decor styles such as Empire, Baroque or Renaissance require the use of gypsum stucco in decoration. These traditions came to us from time immemorial, because gypsum is a natural material, and we didn’t learn about it today. In the past, craftsmen performed sculpting by hand, mixing a small batch of mortar for each finishing area.
Now this process is much simplified.
Ceiling gypsum cornices, as well as other finishing elements, are manufactured in factories or specialized workshops where individual orders can be made. There is simply no better way to give a room a sophisticated and rich look. The beauty of real stucco can be seen in former noble mansions, many of which have now become museums.
Properties of gypsum as a natural material:
- Gypsum, or asbestos as it is also called, has many advantages. From an environmental point of view, this is the safest material used in construction today. It is non-toxic, fire-resistant, capable of absorbing moisture and releasing it into the air.
- This natural material has a high viscosity coefficient, does not shrink and does not smell. This means that it cannot cause an allergic reaction in the body. Asbestos is not electrically conductive and is not afraid of temperature changes.
- Asbestos blanks are easy to saw and sand. The finished product can be perfectly puttied and painted, which allows you to easily restore it if necessary. The main thing is that the putty is also gypsum based.
- To improve the natural properties of gypsum, many special additives have been created. For example, with their help, this rather light material becomes even lighter and stronger, which allows small products to simply be placed on PVA glue. In this case, the surface, of course, must be perfectly flat.
- If there are even minor irregularities on it, PVA will not help here - you will need special gypsum glue. But to buy plaster ceiling cornices, as well as baguettes for lighting, require additional fastening with dowels or self-tapping screws.
- Molded parts are even used for cladding fireplaces, since gypsum can easily withstand elevated temperatures, up to five hundred degrees Celsius. Due to its fragility, gypsum products cannot be used as load-bearing elements.
Advantages and disadvantages of gypsum skirting boards
The list of positive qualities of gypsum ceiling plinths is as follows:
- Excellent decorating options
. Ceiling cornices made of plaster themselves look good, but most often they are additionally decorated so that the details match the overall interior of the room. A variety of finishes can be used as finishes, but the most common option is paint. - Possibility of repair and restoration
. Unlike polystyrene products, gypsum skirting boards lend themselves well to restoration. Any damage can be repaired using regular putty. Gypsum is quite hard, so all coatings stick to it very well. - Environmental Safety
. Gypsum skirting boards do not contain any aggressive substances, so there will be no threat to human health. In addition, the material in question is completely resistant to fire, which suggests the high fire safety of such products. - No noticeable defects after installation
. Parts whose joints were covered with putty and sanded after installation will end up looking like a monolithic finish. Most analogues do not have this advantage. - Durability
. The finishing used to process gypsum does not lose its visual properties over time. That is why such skirting boards can last a very long time and not deteriorate the interior during operation. - Excellent selection of skirting boards
. On sale you can find a huge number of different skirting boards, which will differ in shape and color. However, there is also the possibility of creating custom-made skirting boards - for this, silicone molds are used, which are filled with ordinary plaster. You can even use this option yourself.
Among the shortcomings, the following qualities stand out most:
- Heavy weight
. Gypsum, unlike expanded polystyrene and polystyrene, weighs quite a lot. This quality imposes a number of requirements on the installation of parts - they can only be installed in strict accordance with the technology, having correctly completed all the necessary operations. - High rigidity
. Gypsum ceiling plinths are quite rigid, so it is impossible to bend them in any way. Because of this, all the unevenness of the walls to which the baseboards adjoin become very noticeable. However, rigidity can also be considered an advantage - there is practically no risk that the baseboard will bend. - Low strength
. Of course, gypsum products have a certain margin of safety, but it is not large enough. If you drop a gypsum plinth from a great height, it can simply break, so you need to be careful when installing it.
[custom_ads_shortcode1]
How can you make a stucco ceiling yourself?
Stucco on the ceiling. Fragment
Often, a gypsum ceiling is decorated with a wide plaster molding and a rosette for a chandelier. Sometimes there are a couple of additional fragments in the form of a bandage or some figures.
But sometimes the entire ceiling is covered with decorative plaster slabs, and upon entering such a room you feel some kind of palace luxury and beauty.
Plaster rosette for chandelier
Production of gypsum boards, cornices and frieze
- All gypsum products that are installed on the ceiling or walls are cast in silicone molds. When casting, the matrix itself is placed in a plaster box or casing so that the mold does not deform during casting.
- To cast a plaster product into a mold, you need to pour water, and then pour this water into a container where the solution will be prepared in order to determine how much solution is needed for one product.
- First, water is poured into the mixing container, and then gypsum is added and a liquid gypsum solution is mixed, which is left for ten minutes, and then mixed again and poured into the mold.
- The mold is not filled to the top, the solution is distributed with your fingers, and then the air bubbles are expelled. To do this, the edges of the form are slightly raised and sharply lowered - first on one side and then on the other. With these actions, you can see how air bubbles come to the surface.
- If the solution spills onto the edges of the mold, it is collected with a spatula and shaken back into the matrix. After this, the product is reinforced and for this reinforcement, hemp, plumbing tow, splinter, or simply aluminum or copper wire are used. The reinforcement is laid on the poured surface and smoothed with a spatula.
- After this, the remaining solution is poured in, which is mixed beforehand. The surface of the back side of the product is leveled with a wide spatula, which is slightly wider than the form itself. When the product begins to set after a few minutes, and this is visible to the eye, since the mirror takes on a matte tint, then they go through the spatula again. After this, using the same spatula or some other sharp object, notches are made for artificial adhesion.
The mold is turned upside down and removed from the product
- During the setting process, the solution heats up, and when the main hardening phase has passed, the solution begins to cool (this whole process does not take more than 10-15 minutes - it all depends on the thickness of the product). In order to remove the product, turn the mold together with the box upside down, remove the box, and then gradually, starting from the middle, free the product from the silicone mold.
- Since the product has not yet dried completely, it is placed flat on a flat surface in a dry room so that the product does not “lead.” Complete drying can last from three to five days, depending on the size of the product and the microclimate of the room in which it is located.
Types of gypsum baguettes
Ceiling cornices made of plaster with a smooth profile fit well into a classic interior. They are installed where the furnishings of the room do not imply any frills - an assembly hall, a library, a hotel lobby.
The specificity of stucco production allows you to create a more complex profile with an exclusive ornament and decorative insert , as in the photo below.
Such gypsum skirting boards are good for creating a formal atmosphere. They can be installed in the living room, banquet hall, wedding palace. Another option is a gypsum ceiling cornice made from composite parts. This decorative element does not have to be solid. It can be combined from different types of cornices, which will serve as an additional decoration for the room.
At the same time, moldings, friezes and various artistic painting techniques are used - as much as the designer’s imagination allows. Believe me, with the help of a specialist you can create such a masterpiece that it will look no worse than palace stucco. Or maybe you are also good with a brush? Of course, in modern mansions no one paints the ceilings with gold leaf, but bronze gilding also looks good. In proportion to the complexity of the design, its price also increases. But those customers who can afford such expenses will not be able to resist such beauty.
Installation and decor
Installation of gypsum moldings and other stucco elements is carried out after all major construction work: windows and doors must be installed, electrical installation work must be done, all structural surfaces must be leveled and primed.
- After installing the cornices, their joints need to be puttied and, after complete drying, walked over them with fine sandpaper. Thanks to this, the joints will not be visible at all - the surface of the baguettes will look like a continuous line.
- Then they need to be coated with a polymer acrylic primer; it will protect the plaster surface from chips and scratches and make it stronger. Thanks to the primer, the paint will lie on the plaster more evenly and with less consumption.
- Decorative finishing is the very last, final stage; it begins after the room has been thoroughly cleaned. There should be no dust in the air, because it can settle on a freshly painted surface.
- Gypsum stucco molding is used to decorate not only the perimeter of the ceiling, but also door and arched openings, bay windows, and columns. The ceiling border frames the lighting fixtures - and this is a very interesting design technique.
- Painting the surface of the cornice is continuous only on its smooth varieties. On a gypsum plinth that has a decorative texture, a thin layer of gilding is applied along the top line of its ornament. This technique allows you to create the impression of an airy, voluminous lace surface.
Doing this work yourself, or turning to specialists, is up to you to decide. The main thing is to achieve the desired result. And we have told you in as much detail as possible what it should be. Of course, it also depends on your financial capabilities. But if you are planning to amaze others with a chic design, gypsum stucco will be the best option.
Scheme for cutting a baguette at angles using a miter box
It is worth mentioning right away that ceiling skirting boards are glued to the wall in two ways - with wallpaper, with glue or with putty, before gluing the wallpaper.
As practice and numerous reviews from people doing repairs show, gluing fillets onto wallpaper is preferable and more convenient. Moment Montazh glue is ideal for these purposes; it works reliably and without mistakes. If, despite the repairs, you still have uneven walls, then there will be large gaps between the wall and the fillets, which can be quite successfully covered with the same “Montazh” glue; it is white and therefore looks invisible.
The installation of the ceiling plinth is very well done using a sealant, which is called “Acrylic Sealant”. Acrylic is very flexible, does not crack, does not fall out of cracks and can be painted. Some craftsmen glue the fillet with liquid nails or silicone sealant, which cannot be painted, so it is better to opt for acrylic.
You can set a goal and carry out a thorough repair of the walls, aimed at perfect alignment, but it will be easier to glue the ceiling skirting boards before wallpapering the walls, using putty. You can use putty to smooth out the unevenness and immediately seal all the cracks, and then adjust the wallpaper to the fillets; it will work out quite well, but everyone must decide for themselves which method is preferable for them.
We should not forget that with obvious unevenness and distortions of the walls or ceiling slab, the fillet will only emphasize the imperfections, but this rule works the other way around. The overall appearance of the interior and the quality of the repair as a whole depend on how you install the ceiling plinth with your own hands.
Installation of ceiling plinths begins from the corners of the room, because the corners are most striking during a visual inspection of the room. You should try to use the most solid and longest fillet sections so that the number of joints is kept to a minimum. In places where the baseboards are not very noticeable, for example, corners above doors or the area behind the eaves, you can use the remaining trim.
Return to contents
Before work, you should collect all the necessary tools for a smooth procedure for gluing the ceiling plinth.
To work you will need the following tools:
- miter box;
- small saw;
- gun for tube with sealant;
- sandpaper;
- roulette;
- square;
- pencil;
- rubber spatula;
- sharp knife;
- masking tape (optional);
- clean rags.
Materials you will need:
- fillets;
- ready-made corners (optional);
- sealant, putty or glue;
- primer for painting.