Each window is mounted in a pre-prepared mounting opening in the external wall.
The opening for a window in the enclosing structure must satisfy a number of structural, operational, architectural and planning requirements, as well as current standards.
Description: what is it?
An opening in the wall for a window is a structural element that is installed in the outer wall for the purpose of further installation of a translucent element. There are two types of wall openings:
Planned - laid down by the project, at the stage of creating the design diagram of the structure, as a result of which the designer sees the places that need to be strengthened during construction.
Thus, after the construction of the building, additional measures to ensure the load-bearing capacity of the structure are not required.- Punch-through windows - installed at the operational stage of the facility if the building owner requires the installation of an additional window. In such cases, a separate strength calculation is required with subsequent reinforcement of the structure with framing profiles or reinforcement.
The openings vary:
- according to form;
- dimensions;
- device location;
- elevation;
- the presence of framing elements.
What elements does it consist of?
All full-fledged openings in external walls consist of the following structural elements :
- The body of the opening, which is limited by the ends of the external walls intended for the installation of a translucent structure.
- Window sill block - a section of the wall directly below the opening, intended for fixing the heating device. The standard height of this element is from 700 to 900 mm.
- A lintel is a section of the enclosing structure located directly above the window. It works according to a beam scheme, most often, it is subject to reinforcement in the lower zone.
- Partitions are parts of the outer wall located on the sides of the window opening. Designed for rigid connection with perpendicular load-bearing structures, ensuring the rigidity of the structure.
Each of the listed elements absorbs part of the internal forces when organizing the opening, since the removal of a wall fragment contributes to the occurrence of stress concentration and a change in the deformation properties of materials.
Regulatory requirements according to GOST
The organization of openings in the walls and the requirements for them are regulated by the following regulatory documents :
GOST R 56926-2016 “Window and balcony structures for various functional purposes for residential buildings. General technical conditions".- GOST 34378-2018 “Translucent fencing structures. Windows and doors. Installation work, control and requirements for work results"
- GOST 230166-2021 “Translucent fencing structures for windows and balconies.”
According to these standards, a number of strict design requirements are imposed :
- Compliance with approved design solutions.
- Consistency of geometry - the maximum discrepancy between the lengths of the sides from the design dimensions, including when checking diagonals, should be no more than 1/150 of the length of the measured side.
- Strength of the frame - the structures for reinforcing the opening must satisfy the conditions of strength and stability.
- Ensuring thermal properties - when organizing an opening, effective insulation must be located in each structural element, right up to the end of the outer wall.
- The quality of the end surface intended for fixing the window block - if necessary, the landing plane is subject to modification or finishing.
Before installing a window unit, the installer checks the quality of the opening, after which he decides to improve it to the standards specified in the current regulations.
Specifications
Window openings installed in the external walls of residential and public buildings are distinguished by the following technical characteristics :
- Standard - with the presence of a lintel, window sill block or partition, or panoramic with the absence of any of the listed parts of the structure.
- With a quarter - a special opening profile, when only the inner part of the wall is cut out for window frames, without affecting the facing materials. As a rule, the dimensions of the quarter range from 30 to 65 mm (a size that is a multiple of a standard brick).
- Without a quarter - this form of opening is typical when installing a window block in a wall with a hinged ventilated facade, or in wooden buildings.
- Window or balcony (part of the window sill block is cut out).
- With a frame (when punching through a structural element) or without a frame (when creating an opening at the construction stage).
- Insulated (with an additional insulating contour around the perimeter), or in a technical design (insulation is arranged during the installation of window structures).
- Depending on the presence and type of slopes, openings can be without slopes, as well as with straight or oblique slopes along the perimeter of the vertical and upper parts of the window opening.
When installing a balcony door, it is necessary to take into account the presence of effective insulation in the wall, as well as its location. The dew point must form strictly in the body of the installation gap after installing the window frame. In such situations, maximum energy efficiency of the entire structure is achieved.
Standard sizes of windows and doors in a private house
The dimensions of these products largely determine the living comfort of residents. Doors that are too narrow or windows that are too small can cause many inconveniences. The sizes of windows for a country house, as well as the parameters of doorways, are regulated by building codes and state standards.
The adopted standards greatly facilitate the issue of building design, allowing for the creation of optimal operating conditions for residential premises.
Options for installing doors
The convenience of entering/exiting a room directly depends on two interrelated parameters:
- Standard door opening dimensions.
- Door leaf parameters.
Standard domestic doors have a height of 1.9 or 2 meters and a width of 0.4 to 0.9 meters. The parameters of European models are slightly different. The height of such products is 202 and 215 cm, and the width can be 62, 72, 82 or 92 cm.
If you are planning to install regular swing doors, the finishing opening for them should be 70-80 mm larger than the leaf itself. If your plans include installing sliding doors, arrange the opening 50-60 mm smaller than the door leaf parameters. It is worth noting that the openings of interior doors are, as a rule, smaller than the parameters of the entrance ones.
Options for installing windows
The accepted standards for installing windows in a private house, as well as for balcony doors, are determined by state standard 11214-86. According to the standards, the width of a standard opening varies from 870 to 2670 mm, and the height ranges from 1160 to 2060 mm. The doors to the balcony have the same height (2755 mm), but may differ in width: 870, 1170 or 1778 mm.
The parameters depend on several factors:
- Room area.
- Necessary lighting.
- Architectural specifics of the room and the building itself.
Depending on the opening for windows planned in the house, the glazing system is determined, as well as the required number of sashes and transoms.
In addition, GOST regulates the height of window sills, which must be taken into account when organizing openings.
The window sill in the bedroom should be at a height of 700-900 mm, in the kitchen - 1200-1300 mm. Window sills for bathrooms and utility rooms also have their own standards. For the former, the height of the window sill should not be less than 1600 mm. For the latter, this value should be in the range from 1200 to 1600 mm.
Jumper
A lintel for a window opening is a structural element that represents a section of the outer wall above the window block.
The jumper
works according to the beam scheme , and the need for its additional reinforcement depends on the following factors:
- Span - the width of the window opening.
- Role in the design diagram - as part of the load-bearing frame of the structure, or part of the curtain wall.
- Number of layers of the enclosing structure.
- Type of product - prefabricated or erected during the construction process.
The lintel, regardless of its type and design, is the most critical part of the opening; increased requirements are placed on it to ensure strength, deformability and resistance to cracks. Subject to detailed calculations to ensure safe operation.
Requirements
The lintel is subject to the same requirements as a standard beam structure on two rigid supports :
- Sufficient strength of the lower edge in the span, and the upper edge in the support areas.
- The maximum deflection of the lintel should be no more than 1/150 of the span for a length of less than 1000 mm, 1/200 for up to 2000 mm and 1/400 of the opening width for a product length of more than 2000 mm.
- Ensuring a rigid seal in the piers to the calculated length to avoid the formation of a movable hinge.
- The presence of insulation, which eliminates the formation of thermal inhomogeneity and cold bridges.
- With a multilayer structure, there are connecting elements that ensure an inextricable connection between all parts of the composite element.
- Each lintel must have the same width as the outer wall to ensure continuity of the facade and interior decoration of the space being used.
When making a lintel for non-load-bearing walls, an expansion joint is placed between its upper plane and the bottom of the floor slab. The element compensates for the deflections of the slab filled with elastic materials. If this requirement is not met, the vertical movement of the floor disk will cause off-design forces in the body of the element, which will lead to the formation of cracks or destruction.
What materials can it be made of?
Most often, the lintel is made of the same materials as the main structure of the outer wall , in particular:
- For wooden buildings - made of timber.
- For structures made of blocks and bricks, the same materials are placed on a pre-prepared load-bearing frame made of steel profile elements.
- When arranging monolithic lintels, the beam scheme of work is carried out due to the hidden reinforcement of the element with working longitudinal rods and transverse clamps.
- When installing prefabricated prefabricated lintels, the reinforced concrete element is delivered to the construction site in finished form, made of reinforced concrete, with prestressed or conventional reinforcement.
When erecting a monolithic structure, the lintel must be included in the design diagram, which ensures the redistribution of internal stresses to adjacent wall parts, as well as to the reinforced concrete floor disc.
General installation rules
When installing lintels to design a window opening at the construction stage, you must adhere to the following rules and take into account a number of nuances :
Reinforcement elements must be embedded into the body of the wall by an amount of at least 150 - 200 mm.- The prefabricated lintel should rest on a bed of hard cement-sand mixture.
- If the length of the partition between the windows does not exceed 400 - 500 mm, the best solution would be to use a single continuous lintel covering two or more spans at once.
- When arranging a reinforced concrete lintel for the backfill of the masonry, it is necessary to provide an additional attachment point for the insulation and the outer part of the facade.
- It should be remembered that the prefabricated lintel has a top and a bottom, which is regulated by the location of the working fittings. If a reinforced concrete element is installed incorrectly, characteristic cracks will appear on it in the span.
The junction points of the jumpers must be rigid and motionless. If this condition is not met, cracks appear on the surface of the decorative finishing of the room over the years, which requires its restoration. To avoid such problems when building a private house, finishing work should begin no earlier than 6 to 12 months after assembling the building frame.
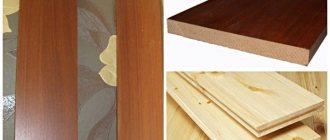
Finishing window openings with wood panels
You can buy slats for the slopes of windows in a cottage in a store or make it yourself. To make wood panels with your own hands, you will need jointing and circular equipment, as well as:
- sandwich panels, plywood;
- hand jigsaw;
- corners internal, external;
- mineral wool or polyurethane foam;
- sanding plate, level;
- drill-driver, saw (circular);
- primer;
- "nails";
- silicone;
- surface planer
Half of the tools will also be needed when installing ready-made wooden planks. The products are installed at the final stage of work. First, part of the walls is primed and puttied.
For finishing you will need the following equipment:
- putty solution;
- putty knife;
- metal profile, falcon;
- Master OK.
You will also need building materials for cladding and tinting the surface of a wooden product. A varnish that preserves the natural appearance of oak and larch is suitable. The list of fixtures and equipment depends on the installation method.
Plates for wooden or plastic windows are made using the following technology:
- a jointer is used to clean the boards from defects;
- unnecessary parts are removed, the surface is ground to the required thickness;
- the corner of one rib is filed 90 degrees;
- the boards are leveled and cut to the width of the side walls;
- make cross cuts to make the bevel oblique;
- one edge is rounded and made external.
Before installing the panels, you need to study the instructions on how to finish plastic windows in a wooden house:
- the prepared planks are cleaned with sandpaper;
- align the ends, remove unnecessary parts;
- drill recesses for self-tapping screws;
- wooden panels are applied to the wall surface, the dimensions are checked;
- if there is a distance between the tiles and the box, use bars;
- Self-tapping screws are placed in the holes (the cap should sink a little), tighten with a screwdriver;
- Cover the surface with putty and sand it.
- other cladding is installed in the same way;
- After installing the slats, the platbands are attached.
After the slopes in a wooden house have been installed, it is necessary to treat them with a paint and varnish composition. It is better to install ready-made slabs. The coating protects the wooden product from negative factors.
The frame is treated with an antiseptic; the face strips do not require such a procedure. Alcohol or water stains are used as decoration, then the panel is coated with acrylic, polyurethane or alkyd varnish.
Node of connection to the filling element
The translucent structure is installed in the opening in compliance with the following requirements :
- For correct installation, the opening must be 30 - 50 mm larger than the dimensions of the window frame, so that a gap is formed between each side, intended for filling with foam.
- The window is installed strictly behind the brick quarter, and, in the absence of facing masonry, at the place where the dew point forms.
- When installing a window in a three-layer enclosing structure, the profile is “hung” above the insulation using mounting plates.
- After filling the window with foam, a special polymer tape - PSUL - is installed on the outside, and on the room side, the window is covered with a vapor barrier membrane around the perimeter.
- If necessary, the seam filling elements are protected with silicone or acrylic sealants.
To disguise the mounting assembly, quarters are used on the outside, or decorative products are used, with the help of which slopes are formed on 3 sides of the opening. In the lower part, the gap is protected by ebb on the façade side and by a window sill board in the room.
Creation Rules
To create an adjoining unit, you should use a working design, serial albums for arranging window blocks in external walls, and also be guided by the requirements of GOST :
To set the gap between the window frame and the end of the opening from the bottom, it is necessary to use mounting spacer plates of a fixed thickness.- When creating gaps on the other 3 sides, spacer plastic wedges are used, which are dismantled after fixing the structure with self-tapping screws.
- After installing the frame, the width of the gap is checked, which should be the same on each side.
- Particular attention should be paid to the size of the upper gap under the lintel, since if it is too small, the structural element can cause deformation of the window if it accidentally bends.
- Each gap is equipped with a waterproofing membrane on the facade side and a vapor barrier on the interior side. If this requirement is neglected, condensation may form on the inner surface of the window.
After completing the junction, you need to wait up to 24 hours for the foam to completely polymerize, and then cut it off. Once the decoration is completed, the window can be used in operating mode.
The nuances of installing a wooden window
Most often, wooden frames are chosen by premium and business class homeowners who are not deterred by the relatively high cost of such products. The advantages of wooden windows include:
- Ecologically clean wood that does not emit toxic substances;
- Long service life, which is ensured through proper care;
- Improving microclimate indicators in the premises of the house;
- Excellent heat and sound insulation characteristics;
- Attractive appearance.
To install wooden windows in a frame house, you will need tools: polyurethane foam, a jigsaw and drill, a hammer, fasteners, a hacksaw and wooden pads.
Device technology and photo
As mentioned above, there are two types of window openings - designed at the construction stage and punched through a ready-made external wall. The technology for constructing a structural element of each type is described below.
During construction
If a window opening is provided for in the project, the following algorithm is performed when installing it :
- The outer wall is erected in a continuous line to the top of the future window sill block.
- After installing the lower part of the wall, a quarter and the internal dimensions of the future opening are marked.
- After marking, the wall is erected in sections - piers, to the level of the bottom of the lintel.
- On the upper part of the pier, a bed of rigid cement-sand mixture is arranged, on which a steel lintel structure or a finished reinforced concrete product is laid.
- Between the jumpers, the remaining space on top of the piers is filled.
- If there is a part of the wall above the lintel, it is erected to the design level of the bottom of the floor slab.
- The top of the suspended structure should not reach the design level of the ceiling by 10 - 20 mm, in order to organize an elastic insert.
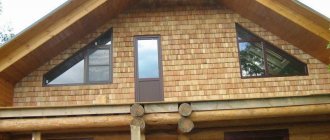
The photo shows an example of a window opening during construction:
If a monolithic wall is being erected, the structure for installing the window is formed from reinforcement, after which a box is fixed in the body of the panel formwork, the edges of which are the ends of the future structural element.
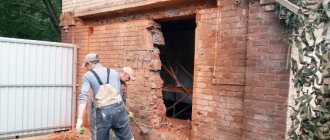
Punching after
When punching a window into a finished wall, a detailed calculation of the enclosing structure is required to design framing reinforcement that guarantees safe operation.
The work is carried out in accordance with the following step-by-step instructions :
- Markings are applied on the outside and inside of the wall, along the entire contour of the future opening.
- When performing work at height, it will be necessary to involve industrial climbers, hang a cradle, or install an assembly scaffold.
- To avoid injury to passers-by, it is necessary to fence off the area where the section of wall is being dismantled with warning tapes and post a person on duty.
- The cutting begins from the outer part of the wall. The tool used is a grinder with a diamond blade, or a professional tool.
- After cutting the contour, the operation is repeated from the side of the room. The larger the diameter of the cutting disc, the better the effect is ensured when performing the work.
- When the contour is cut on both sides, it is necessary to knock out part of the wall until the ends of the structure are completely cleaned.
When constructing an opening, it is strictly forbidden to use jackhammers without cutting the contour. Since the impact will lead to a weakening of the structure of the entire enclosing structure.
Preparing for work on installing an opening in the wall
To make an opening in a wall, regardless of the material from which it is made, you will need the same type of construction tool:
- Hammer;
- Drills for concrete (brick) with a length exceeding the wall thickness by 100-150 mm;
- Angle grinder (grinder) with a disc diameter of at least 400 mm;
- Cutting discs for stone (concrete) d-400 mm or more;
- Cutting discs for metal (for cutting reinforcement);
- Sledgehammer;
- Chisels;
- Pick;
- Hammer;
- A set of tools for working with electrical wiring;
- Building level;
- Plumb;
- Spatulas and trowels for concrete mortar;
- Mixer for preparing the solution;
- A set of wrenches for fastening metal structures of the lintel and strengthening the opening;
- Welding machine.
In addition, you should prepare a protective suit, respiratory protection against construction dust, construction glasses or a plastic shield to protect your eyes, and covering material for the floor and interior items.
Strengthening Rules
Strengthening the window opening around the perimeter is carried out exclusively in cases where the structural element is not installed according to the design, at the stage of operation of the facility. The following materials and designs are used for reinforcement :
- If it is necessary to fix the lintel, a steel angle is cut into the body of the partitions from the outer and inner sides of the opening.
- The two corners should be fixed to each other locally, with gaps between the steel plates, in order to avoid the formation of thermal inhomogeneity.
- If necessary, the opening can be strengthened on 3 or 4 sides, for which a steel frame from corners is pre-made, which is subsequently fixed around the entire perimeter.
After installing the steel frame, it is necessary to coat it with metal paint to avoid corrosion after installing the window unit.
Popular types of openings
Homeowners of monolithic modern housing under construction rarely adhere to standards and rely, to a greater extent, on their own taste. However, in order for the casing and finished double-glazed window to meet your requirements, you need to carefully choose the location, insulation and design of the window spaces. PVC frames are used for a long time and solve the intended functional problems. Non-standard double-glazed windows will cost much more and their installation will be much more expensive. Photos of production, examples of diagrams and design can be viewed on the Internet.
Popular varieties and window openings:
- ordinary rectangular;
- panoramic;
- curved;
- arched;
- with sliding frame;
- French;
- window in a niche;
- with a rotating frame.
Features and adjustment algorithm
In some cases, at the request of the owner of the property, or due to new design and functional requirements, it is necessary to adjust the size of the opening. This operation is performed with a decrease or increase in the linear dimensions of the structural element.
Reduce and full bookmark
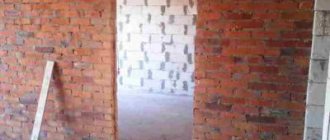
When reducing, enlarging, or completely blocking a window opening, part of the structural element is laid with brick, covered with plywood or other materials, or cast in a monolith.
When performing this procedure, you need to take into account a number of nuances:
The section of the wall being built up is a full-fledged enclosing structure, which requires insulation and cladding.- When filling the opening with brick or concrete, it is necessary to ensure a connection with the capital structure, which requires drilling anchors into its end and reinforcement devices.
- The filling of the opening, as a rule, is carried out without constructing an expansion joint, and the installation gaps are closed with a cement-sand mortar that does not lend itself to shrinkage, such as NC.
- When laying plywood or other sheet materials on both sides, a layer of insulation is placed between the outer edges of the elements.
- If partial filling of the opening is carried out from the lintel side, it is necessary to create supports for the masonry from the corner between the piers.
If the room is finished and the walls are plastered, to ensure a complete connection of the new cement-sand mixture with the old materials, it is necessary to partially remove them from the wall to a width of up to 30 cm along the entire perimeter of the former opening.
Expansion and enlargement
Expanding the opening means trimming it in the area where the partitions are located (in width), lintel or window sill block (in height). Trimming is performed using the same tools as for constructing the structural element.
After expanding the opening, most often it is necessary to clean its end, as well as install framing reinforcement to ensure safe operation.
Rules for taking measurements
To measure the cut you will need: a tape measure, a ruler, a pen and paper to make a drawing. The length and thickness of the gap between the internal slopes is measured closer to the frame. In brick and panel houses, holes are measured on both sides. The distance between the inner upper slope and the installed window sill, between the plane of the window sill and the edge of the upper slope is measured. Opening the window on the slope, take measurements from the street side. The width is measured from the bottom and top of the staircase opening.
Possible mistakes
When constructing openings, many beginners often encounter a number of difficulties. To avoid problems, and to ensure the result meets your expectations, you need to listen to the following expert advice :
- The opening is arranged exclusively in accordance with the design solution.
- Before cutting, precise markings are required using modern metrological equipment.
- The cut is made only with a diamond disc so that there are no burrs left on the brick.
- If an opening is made in a multi-layer wall, it should be remembered that the internal and external cuts may not coincide. To do this, you should make 4 through holes in the corners of the future opening to check the correctness of the markings.
- When dismantling part of a wall, only serviceable and powerful power tools are required, especially if we are talking about a monolith.
Making an opening in an external wall is a responsible and complex procedure. The best solution for performing such work would be to turn to professional builders.
A few words about polyurethane foam
REHAU professional foam can easily be classified as the best installation material that fully meets the needs of builders and the demands of end consumers.
This is due to the following qualities:
- When hardened, REHAU polyurethane foam provides an unprecedentedly uniform structure, which protects assembly joints equally well from freezing and drafts.
- This material has excellent adhesion to various building materials, which completely eliminates the occurrence of cracks and other flaws.
- REHAU polyurethane foam has controlled expansion during hardening, which significantly expands its scope of application. For example, it can be used for installing ebbs, window sills, doors, all kinds of utilities, drywall sheets, as well as for sealing cracks and seams between various building structures. Whatever the area in which this installation material is used, it will always provide 100% tightness with guaranteed respect for the integrity of building structures.
As you can see, REHAU polyurethane foam is not only tightness, but also the absolute quality of the installation joint.
When is dismantling required and how to do it?
Dismantling, that is, laying the window opening, is required when any of the following situations occur :
The location of the room is on the south side, which causes excessive UV radiation.- Changing the functional purpose of premises.
- Carrying out redevelopment - combining used spaces, partitioning off a dark room.
- Features of the implementation of the design solution.
- Presence of a source of air pollution under the window.
- Other reasons related to the wishes of the customer.
If the opening is laid in an apartment or other officially registered real estate property, a project for redevelopment of the premises must be agreed upon, as well as a change in the façade of the building must be legalized. If this is not done, the owner will not be able to sell the property in the future with the re-registration of the cadastral passport to the buyer.
How to choose a material for creating a purlin?
The choice of material should be made not on the basis of what will cost less, but taking into account the future load that will fall on it.
There are materials that can withstand the same load, but some will be more convenient to work with. This should also be taken into account: the easier it is to install the structure, the faster and cheaper you will solve your problem.
To correctly select the size of the run and calculate the load on it, you need to use the requirements of SNiP. They clearly state the amounts of overlap. It is also necessary to take into account that the purlin should be slightly wider than the window opening itself: for example, if the length of the opening is 1200 mm, then the purlin should be no shorter than 1600 mm.
Reinforcement