Vadim
21189 0 0
Vadim September 9, 2016
A good owner always strives to furnish every corner of his home beautifully and, no less important, functionally. A balcony or loggia has long been transformed from a spare storage room into a useful space. In modern design there is even a separate direction responsible for this sector of the apartment. In this article I will talk about how to choose or make your own table for a balcony or loggia.
Folding furniture on the spacious balcony.
What is a folding table
A folding table is a type of furniture that is attached to the wall. The design allows it to be folded when not in use. This feature helps save space. Balcony tables come in different sizes. It can be round, oval, square, etc.
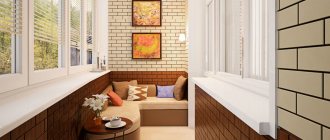
Installing a folding table on the balcony is an excellent idea.
It can be made of wood or metal. Folding tables in apartments are installed on the balcony. This room is usually narrow, and therefore this design fits perfectly into it.
Required materials for installation
Of course, you will need an electric jigsaw, which allows you to evenly cut wood or other material. If you don't have a jigsaw, you can use a hacksaw as a substitute. However, it should be noted that after the hacksaw, the material requires additional leveling.
It will be necessary to process the edges of the cut materials. This work is performed with a special manual milling machine, which is also capable of drilling holes and making various decorative patterns.
Processing and grinding of surfaces to the required smoothness will be carried out using a grinding machine.
If you chose chipboard or plywood as the main material, then you will definitely need a screwdriver. It will significantly speed up the assembly time of the product.
A tool that you clearly cannot do without is a drill. It is with the help of a drill that all the necessary holes will be drilled to secure the folding table.
Related article: Adjusting sliding windows on the balcony
You need to stock up on a tape measure, a pencil and a ruler - things that are probably in every home. In addition to them, it is advisable to have a water level.
Advantages and disadvantages of the design
As stated above, the main advantage of such a table is space saving. Located on the wall, assembled, it does not take up free space. The design of the table is as simple as possible, so it is very convenient to arrange and remove it.
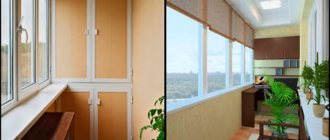
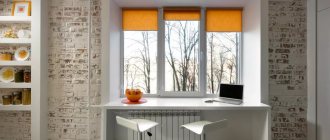
Today, even small loggias are used as functional space.
The folding table generally creates coziness on the balcony. It will fit well into the interior, thanks to the many options for its design. But there are some disadvantages, the main one being that such a table will not be able to withstand a lot of weight.
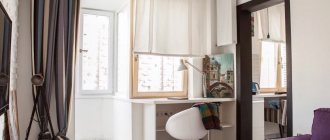
Installing a folding table will make your balcony not only more beautiful, but also functional.
If you are planning to make a piece of furniture that will have to hold a large mass, then it is better to take care of additional fasteners.
Interesting design solutions
A table with canopies is perfect for open balconies. This structure is attached to the balcony parapet using two metal profiles. The tabletop constructed in this way looks very stylish and folds up in a couple of moments.
It is clear that small tables are not very versatile. If you particularly wish, you can install a small wardrobe with a folding section on the balcony. This will create a very comfortable workplace.
Decor plays an important role in design. The most commonly used option is tinting or varnishing the table. Ceramic mosaic will look interesting.
DIY folding table for the balcony
The table can be bought in the store. Nowadays many ready-made options are sold. But we recommend trying to assemble a folding table for a balcony with your own hands. This way you can make a piece of furniture that is perfect in size, material, color and shape.
Making a table with your own hands is not difficult.
Despite the fact that a folding table for a balcony is a transformer design, it is not difficult to manufacture. The mechanism itself is similar to that installed on the tables that we lay out for the holidays. It's quite easy to recreate this idea.
Make a drawing before making the table.
The standard design consists of two main parts - the tabletop and the clamps. To make a hanging table with your own hands, read the step-by-step instructions.
Choosing a table design
The choice of design and appearance of the table will depend only on your fantasies and desires. Many people make the structure the color of natural wood, since balconies are usually lined with clapboard and the table goes well with the walls.
You can paint the table however you want.
You can add some color and make the table in a bright color. Just pay attention to what kind of paint you buy. The climate on the balcony changes in exactly the same way as on the street, so it is necessary that the paint is frost-resistant and does not peel off from exposure to moisture.
Selecting Tools
To assemble a table for a balcony with your own hands, you will need the following tools:
- electric jigsaw;
- drill;
- screwdriver or screwdrivers;
- roulette;
- level;
- hammer;
This is a standard set of tools for assembling furniture. It will be possible to do without some things, but the list may be expanded, depending on what nuances relate specifically to your build.
Preparation of materials
Materials for creating a table must be selected and prepared in advance. You will also need fittings in the form of self-tapping screws, screws, nails and connecting elements. Their choice will depend on how you decide to mount the table to the wall.
Use quality tools to assemble furniture.
Remember that before you begin assembly, each piece of wood must be sanded well. If this is not done, the boards will not be level, and household members will easily get splinters.
Be prepared for the fact that you will need an impressive set of tools.
Plus, untreated material is very difficult to wash or wipe with a cloth, and on the balcony dust accumulates many times faster than in an apartment, and the furniture there requires more frequent cleaning.
Making a table
The production itself should begin with a drawing. The diagram must clearly display the size of the finished product, the room where it will be located and the dimensions of the necessary parts. After this, you can prepare the tabletop and fixings. The materials for them can be ordered, they will be made to the required sizes, or you can make them yourself.
The table model can be made in a special program.
Once you have all the necessary parts, you can begin assembling the finished product. First, install the clamps. They can be attached to self-tapping screws, after which place a tabletop above them, which is attached to the wall using hinges.
Use a quality mechanism to assemble the table.
They will allow you to unfold and remove the table.
Chipboard, wood, lining
Decide what the product will be made of. It can be natural wood, chipboard, boards from old furniture, etc. The first option will cost a little more, but will last longer and be more reliable.
Chipboard is one of the most popular materials for furniture.
Other types of materials should also not be excluded; they have their advantages. First of all, it is economical cost. Chipboard is a fairly popular material, and its price-quality ratio is considered ideal.
Wood is the main material for making furniture.
Lining is a board that is installed, clinging to the previous one. They are made from different types of wood. The most expensive of them are boards made of larch or aspen, and the budget option is pine needles. A board made from budget material is perfect for a balcony.
Even a small table on the balcony will create coziness.
Expensive types of wood are usually used in baths, or other rooms where there are high temperatures. Since there are no such indicators on the balcony, coniferous boards will perfectly fulfill their function and retain their appearance.
Decor features
Decoration should be given special attention. If you want the table to be made in color, then the parts must be painted before you hang it on the wall. If for some reason it was not possible to do this in advance, do not be discouraged. Painting can also be done on the finished product, but this must be done carefully, having first protected all surfaces around it.
You can make the table in any color.
An excellent decorative option would be color film. It tolerates temperature changes well and can be washed. Plus, gluing it does not require any special skills. You can also decorate the table using complex elements, for example, wood carving.
Minimalistic style is relevant at any time.
If you have a talent for this art, now is the time to use it. Many people leave furniture on the balcony in a natural wood color. This option fits into almost any interior and looks advantageous.
Use wood varnish.
However, it is recommended to pre-treat the boards with varnish so that they do not swell when exposed to moisture and changes in temperature. Also, untreated material is difficult to clean, so pay special attention to this point.
Types of transformation mechanisms
Each model of the furniture discussed is equipped with a transforming mechanism. There are several types of such devices. All of them have their own disadvantages and advantages, based on which you should choose the most acceptable option for yourself. The following transformation mechanisms are distinguished:
- One of the most improved and modernized is the “acrobat”. The design involves a metal frame with a spring axis, the main table top is attached to the top. The plugs that hold the pull-out part are located on the sides of the furniture. Furniture with an “acrobat” mechanism looks like a small coffee table; it is not difficult to assemble it with your own hands. Transformation into a standard dining model occurs in a few seconds.
- The sliding mechanism of the transforming table increases the tabletop thanks to hidden sections secured under the product. It is enough to pull the main parts to the side, and a free space will appear, along the edges of which grooves are installed; an additional part is placed in them. Experts advise giving preference to metal mechanisms, since plastic parts significantly reduce the service life of the table.
- The lifting mechanism (“book”) is the very first transforming device. During the USSR period, furniture equipped with such a design was found in almost every home. The book-table unfolds by lifting the side tabletops and placing a support under them. Previously, such pieces of furniture were equipped with a metal frame, which increased the size and weight of the structure. Now such products are made from laminated chipboard. Regardless of the lightness and compactness of such tables, such models are considered obsolete options.
Mechanism Acrobat
Sliding mechanism
Table-book
Where can the structure be placed?
A folding table made by yourself can be placed not only on the balcony. It will fit well in almost any room in the apartment. It can also be built at the dacha, for example, by equipping it with a veranda.
Such a piece of furniture can be relevant everywhere, as it takes up virtually no space. If desired, you can make it so that when assembled it will be completely retracted into the wall. To do this, you will need to make a small space in the wall so that the tabletop fits partially or completely into it.
A homemade table can be made easily.
A DIY balcony table is an excellent solution that will not only decorate your apartment, but also make your balcony more practical. Agree, it’s nice to sit on the balcony on a summer evening and enjoy a cup of aromatic tea.
Expert advice
- On an unglazed balcony, materials that absorb moisture and are exposed to ultraviolet radiation should not be used. Plastic or glass are the best options for open spaces. You can also use natural solid wood with a special impregnation that prevents the material from deforming when exposed to water and sunlight.
- The more metal parts, the more reliable and durable the design. Standard (factory) mechanisms must be used as components for folding and folding products.
- The thickness of the working surface should not be less than 10 mm. Otherwise, the tabletop may bend, deform, or break.
- The preferred height of the dining table and desk is 75 cm. Products assembled with your own hands must also meet the generally accepted standard. An exception may be designs made for people with physical disabilities (too short or too tall, disabilities, furniture for children's institutions, hospitals).
- The depth of the tabletop should be 50...150 mm greater than the supports under it, and at the same time not exceed the total dimensions of 600 mm.
- When the table width is more than 90 cm, it becomes necessary to use several support bars or legs.
Table options for the balcony in the photo
Let's sum it up
There are many types of folding tables. The assortment of stores allows you to choose a table to suit every taste and budget. If you don’t want to shell out money for a new purchase, then creating a small folding table with your own hands is not as difficult as it might seem at first glance. The result is a multifunctional and convenient corner in your balcony. Creative people will find this activity a very exciting process, and the finished table will please the eye and be the personal pride of the apartment owner.
Table transformer
The main advantage of transforming tables is that they are most convenient to pull out and push apart. It is often used in the kitchen, instantly turning the work area into a mobile dining room. Once the meal is over, the table can be transformed into a more compact version or even “disguised” among the kitchen attributes.
For a small kitchen, miniature tables are provided that lack a supporting leg or are equipped with only one such part. It is advisable not to overload such structures.
A transforming table will come in handy in a student’s room, who can study in the reading area at any convenient time. Then, having folded the folding transformer and freed up space, start playing games and other active entertainment.
Preparing wood for installation
Dimensions 2000*800*400
To make a wooden rack, well-dried bars are used, since wet wood will warp after drying. As a result, the structure may become askew, the fastening points will become loose, and the shelves will have to be reinforced again.
The bars are inspected, and if necessary, they are sanded: irregularities, burrs, and peelings are smoothed out. Sandpaper is attached to the sanding block, and the wood is sanded manually. Instead of a manual sanding block, you can use a grinding machine (preferably a belt or vibrating one). It is not necessary to sand all the wooden elements; it is enough to sand only the shelf boards and bars that will be on the front of the rack.
Important. Sanding is carried out only along the grain of the wood. First, the treatment is carried out with the coarsest sandpaper, then medium-grain, and finally the finest.
The tree has a significant drawback - it is attacked by wood-boring insects. It is also susceptible to rotting if kept in a humid environment. Since it is not always possible to create favorable conditions for wood on the balcony, it should be hidden with preventive antiseptics. The wood is treated with an antiseptic twice, but a second layer is applied only after the first has dried.
Metal rack
Metal shelving is stronger than wood and can support very heavy objects. They are designed for storing large power tools and other metal objects. Structures welded from water pipes are especially reliable.
Frames are assembled from the profile according to the same principle as from wooden blocks, and shelves are laid on the crossbars. Instead of a profile, you can use metal corners. Only the supporting frame is made of metal, and it is better to make the shelves from wood. This will lighten the weight of the structure and reduce the cost of its manufacture.
If pipes are chosen as the material for the rack, only a portable structure can be welded from them. When the frame is welded, it should be treated with anticorrosive and painted. If gaps remain under the first layer of paint, after it has dried, the pipes are painted again. When the metal rack is installed on the balcony, boards or chipboard sheets cut to the size of the shelves are laid on the crossbars.