Expert answers: 7
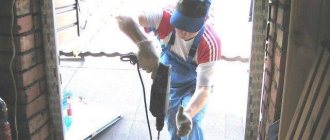
Installation of a roof window in Obukhovo (2015). Roofing of any complexity
I am Mikhail, director of the company, I have been working exclusively with roofs for more than 15 years. Below I will tell you about the intricacies and secrets of roofing materials. If you have any questions, I will be happy to answer and help. Mikhail, STM-Stroy LLC
The issues of insulation and finishing of roof windows are closely interrelated with each other, so I propose to consider them together.
My employees have more than once encountered the consequences of incompetent insulation of roof windows, which we had to eliminate. Therefore, you, as the owner of a house with an attic, need to know some of the features of such insulation in order to be able to control the work of the installers.
Subtleties of insulating roof windows
In recent years, an increasing number of homeowners, seeking to expand the living space in their home and give greater utility to the attic space, are transforming it into an attic. As in any residential space, insulation of the attic in this case becomes a very important issue, directly affecting the comfort of the people living in it. One of the main ways to insulate an attic is to insulate the attic windows.
At the same time, the roof window, being part of the roof, must have sufficient tightness to prevent moisture from penetrating into the living space. Thus, the correct installation of this structural element, as well as its proper insulation, are key points in ensuring comfort for those living in the attic.
The insulation of roof windows will be quite effective, and the windows will have sufficient tightness if two basic rules are followed:
- firstly, as a roof window you should always use only a kit specially designed for this purpose, which includes both the window frame and the heat-insulating material corresponding to this purpose;
- secondly, the installation of the window must be carried out in compliance with all existing norms and regulations.
Since the main topic of our article is the insulation of attic windows, we emphasize that when monitoring the work of roofers, special attention should be paid to the quality of their operations for insulating slopes.
More opportunities for carrying out such operations are provided by window modules that are recessed into the thickness of the roof. When making the final equipment for the attic, it is worth thinking about installing heating devices directly under the windows, which will provide the opportunity to warm up the slopes and prevent fogging of the windows.>
Proper completion of work
The insulation has been installed, but the process must also be completed correctly. It must be protected from damp vapors from the room. For this, a vapor barrier film is installed. Moreover, the overall result greatly depends on the thoroughness of execution. Although each package is supplied with instructions, let us briefly repeat:
- The subsequent canvas overlaps the previous one by at least 15 cm.
- The joints are taped with special tape.
However, attic vapor barrier has a dual purpose. Oddly enough, it also protects the residents themselves. The fact is that vapor-permeable insulation is not strong enough and can be slightly weathered. From the outside this is not so important, plus it is protected by the roofing membrane. And inside it is necessary to exclude even the minimal possibility of the insulation components being released into the air - to reliably cover it.
The final stage is covering the insulation with canvases, on which the finishing is subsequently applied. Source obustroeno.com
Of course, this does not apply to Penoplex. But it is also recommended to protect against it; an effective material is penofol.
As for insulation of any type. In addition to the vapor barrier device, a technique that at first glance is unnecessary, but effective, is often used. Before finishing, intermediate, seemingly unnecessary material is installed. It can be OSB, GVL or GKL - it depends on the design. Moreover, the technology is fully observed - all joints are carefully sealed. This is an additional barrier against the unwanted effects of materials.
Everything will happen, as in that children's cartoon - we looked, looked and decided to insulate
The photo does not cover all insulation objects, but shows many - the floor, walls, ceiling, and windows. Attic insulation technology does not recognize trifles
To begin with, determine the methods of insulation, so to speak, of an external nature:
- First, consider a design with a ventilation duct between the tiles and the outside of the attic surface . It is necessary to provide an air outlet channel through the roof ridge.
- Secondly, insulate the space under the tiles.
- Thirdly, install reliable windows that retain heat well . An ideal option would be three-chamber double-glazed windows with a ventilation valve. Insulation of plastic windows along their entire perimeter must be carried out regardless of the installation location.
- Fourthly, decide on the possibility of installing general heating pipes for the building in the attic and installing radiators, respectively . The attic is located at the farthest and highest point from the heating boiler and pump, so it will be necessary to select a boiler of sufficient capacity and a pump of sufficient power to deliver the required amount of coolant to any point in the heating system.
Proper insulation also requires the use of the “right” materials. If you work with the latest, innovative materials, you will never go wrong - expanded polystyrene, polyurethane foam, polyurethane
When all the necessary auxiliary operations have been carried out, you can think about solving the problem of how to insulate the attic, about choosing insulation.
Possible options include:
- Styrofoam . This material is mentioned here for only one reason - the prevalence of its use, although we recommend avoiding it in every possible way, even despite its cheapness. Polystyrene foam does not meet fire safety standards and is toxic. Moreover, it is completely incompatible with high humidity, which is especially important for attics.
- Chipboards . As an alternative to the cheapness of polystyrene foam, so-called fiberboard slabs are perfect. Their cost is sometimes even less, but fiberboard provides very good sound insulation and does not deform due to temperature changes. Perhaps the insulating properties of such boards are slightly inferior to foam plastic, but they are also easy to install, and the outer side is ideal for wallpaper. An ordinary hammer is often needed as a tool for fastening fiberboard, and ordinary nails are used as fasteners.
But the basis of everything, of course, is carefully completed external work - from external roof insulation to laying tiles. Insulating the attic gable will also be one of the tasks
- Glass wool . This long-known material has not lost its relevance today. The low price of glass wool is perfectly complemented by its low thermal conductivity, non-flammability and non-toxicity. The problem is the inconvenience of working with glass wool - the admixture of glass chips and excess dust will bother you for some time even after the work is completed. To work with glass wool, you will have to prepare special clothing and, of course, gloves, which should be thrown away after completion of all work. A mandatory attribute for a master working with glass wool is glasses.
Always, when performing any insulation work, it is necessary to strive to create such a layered structure that best retains heat
- Mineral wool . Mineral insulation for the attic based on basalt, having a density of at least 18 kg per cubic meter, is recognized today as the most successful option. Mineral wool is environmentally flawless and has excellent sound insulation. Unlike glass wool, mineral wool is completely harmless to the body - its composition is synthetic fibers and small stone chips. And the fact that this material is more expensive than others did not scare anyone away when it first appeared on the market, especially since the increased price of mineral wool is not an obstacle to its use today.
Tools, devices, consumables
To install slopes on roof windows, you will need the following set of tools and consumables:
- For marking slope:
- Roulette.
- Ruler up to 1000 mm long.
- Steel carpentry corner.
- Pencil with soft lead.
- Building level.
- For cutting finished products:
- Jigsaw.
- Hacksaw with small goiter.
- Grinder with abrasive disc.
- Cross-cutting machine with adjustable bed.
- Folding construction knife.
- For fixing straps or other slope framing elements:
- A drill with the required drill bit, depending on the material of the opening end.
- Dowel-nails.
- Screwdriver with a set of bits.
- Slotted or Phillips screwdriver.
- Trowel for applying plaster compound.
- Rule for leveling soft plastic plaster composition.
- Mounting gun for adhesive compound supplied in cylinders.
- For finishing slopes:
- Container for mixing putty.
- Paint tray.
- Roller, set of brushes.
- Rags for degreasing the surface.
- Sandpaper with fine abrasive to prepare the surface before painting.
- Consumables:
- Liquid Nails.
- Set of self-tapping screws.
- Pull rivets.
- Primer.
- Interior paint.
- Impregnation for wood.
- Files, abrasive discs.
- Solvent, degreaser.
All tools must be sharpened, cleaned of dirt, prepared for work, consumables must be used strictly before the expiration date.
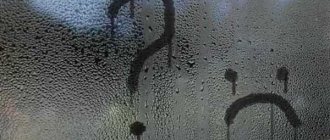
Elimination of condensation on roof windows.
Very often people face the problem of condensation, which leads to high humidity and mold formation.
Reasons for appearance:
- Poor quality roof or window installation, poor waterproofing and vapor barrier;
- No bacteria under the window;
- Temperature difference between outside and inside.
If the cause of condensation is improper installation of the roof, then it will either have to be completely redone or additional insulation should be made in problem areas.
To identify such areas, measurements are taken with a thermal imager. It is also necessary to inspect the entire roof annually to identify deformation and wear of materials.
The absence of a battery also leads to the fact that warm air rising upward collides with cold air and steam is formed, which settles on the windows. The heater will circulate air throughout the window, preventing ice and condensation from forming.
- A lot of useful information about do-it-yourself roof windows.
- Installation of roof windows - expert advice here https://mrokna.ru/mansardi/ustanovka-mansardnyih-okon.html
- How to insulate the slopes of plastic windows - expert advice, see here.
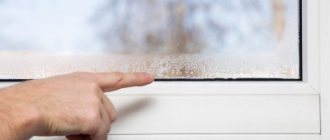
If moisture accumulates due to poor-quality window installation, then additional insulation is necessary. To do this, remove the slopes, remove the old layer of waterproofing and insulation, carefully lay new materials, secure and install the slopes.
And also watch a video on how to install roof windows. Expert recommendations:
I also have attic windows at home. And over time, I began to notice that one window was leaking, I read the article and decided to take the advice, they checked the seal and it really was no longer of the same quality as it was originally. They replaced it and that’s it, the windows are like new. Thank you.
The house has a couple of skylights. One of them leaks when it rains heavily. The outside edges were treated with sealant, but it didn’t help, water still leaked out. What to do? Removing and installing again?
We need to understand why this happens. If they are depressurized, then you need to repair the window by changing the rubber seals, and also check and adjust the fittings. Working mechanisms need to be lubricated from time to time. This could also be due to improper installation of the window; professional help is needed here. If the technology is seriously damaged, the window will have to be replaced completely.
We insulate the outside
For owners of apartments in high-rise buildings, it is always better to entrust the insulation of the slopes of plastic windows from the outside in the absence of a balcony to professional installers in order to avoid possible risks of falling from a height. If you have a balcony, do not forget about insurance and caution.
Scheme of insulating a slope from the outside with a mini-slab
So, how to properly insulate slopes from the outside:
- In the case of a new installation, first remove excess polyurethane foam and treat the surface with a primer that protects against fungus and mold.
- Plaster will be required if the window slopes are uneven.
- To improve thermal insulation, we choose Penoplex insulation. We cut the material into pieces of the required size, apply special glue and glue it to the surface. For strength, Penoplex can be secured with dowels with mushroom-shaped screws. Such parts do not break the structure of the material and hold it well on the vertical surface of the plastic window.
- Next comes the installation of a special corner.
- We apply glue to the insulated external slopes and place a fiberglass mesh in it, carefully leveling the surface. Let it dry a little and apply another layer of glue, then level it with a spatula.
- After the surface has completely dried, apply water-based paint.
Features of waterproofing
Sealing a roof window is one of the most important tasks: since the opening is located in the roof and is located at an angle, there is a high probability that if the sealing is insufficient, it will let moisture into the room, and the glass will begin to fog up, which also has a negative effect on the condition of the walls and roofing pie. Features of the work:
- A drainage gutter must be installed above the window opening. Waterproofing is placed around the structure; it will also need to be placed under the gutter, between the sheathing. This is necessary so that moisture gets into it and not onto the structure.
- To properly protect windows from water, use a waterproofing apron, which is sold together with the windows. It will need to be laid around the frame as tightly as possible, attached to the sheathing beam using a construction stapler.
- After installing the apron, the roofing material is laid and the installation of the flashing proceeds. They start with the lower apron, then move to the upper one, the side ones are mounted last.
- The flashing is attached to the sheathing made for the window frame. In order for the flashing to fit tightly to the window, it is pressed down with a special element, also sold complete with the window.
- The joints cannot be covered with polyurethane foam, as it quickly becomes unusable under the influence of the sun; special waterproof sealants are used.
Requirements
According to current standards, the following regulatory requirements apply :
These finishing elements should not negatively affect the operational properties of the window unit.- In case of accidental impact impacts of the movable sash, the frame material should not be destroyed by plastic deformations.
- The slopes must be designed in the same style as the interior of the attic and satisfy the planning requirements of the working project.
- It is recommended to choose such designs for framing window openings that are subject to repair if minor damage is detected.
The main requirement for the framing elements of window openings is their durability - the slopes must last at least 15 - 20 years, without the need to replace, restore or carry out major repairs.
Shape and how to choose it correctly?
When choosing the optimal shape of a window slope for attic translucent structures, it is necessary to study 3 basic types of such finishing elements :
- Decorative slopes. Most often, they are manufactured in a factory and consist of plastic, steel or wooden overlays, MDF sheets, which are attached to the end of the opening with adhesive compounds, and can have a beveled, straight, stepped or shaped shape. In some cases, home owners resort to installing lining or plasterboard boxes with their subsequent finishing and painting.
- Insulated slopes. They are made from the same plastic linings, under which a layer of effective insulation is placed - polystyrene foam or mineral wool. Such structures are more difficult to install and can also delaminate during operation. To prevent this from happening, special flat sandwich panels are available on the market, which are initially made using insulating materials.
- Plaster slopes. The most reliable designs that combine with modern interiors. Their installation requires a rigid foundation, as well as adherence to the technological map.
Depending on the design decisions and skill of the installer, they can be straight, beveled, or curly.
Thus, the best solution would be to construct flat slopes, since dust does not collect on them, and the ends of the openings will be reliably insulated with insulating materials along the entire plane.
What should the angle be?
The angle of repose is an important design and functional parameter that affects the performance properties of the window:
Orthogonal slopes - the end of the opening is finished strictly at a right angle.
In such situations, the opening takes up less space in the room, but at the same time, the room does not receive the proper amount of sunlight in the morning, since the dawn angle is obscured by the building structure.- The tilt angle is within 60 - 85 degrees - the oblique rays of the morning sun enter the room, increasing the insolation rate by 5% - 15%. With a thickness of the enclosing structure of 200 mm, the installation of such frames will require at least 60 - 80 mm of free area.
- A tilt angle of 45 degrees - diagonal slopes - are considered the most effective when it is necessary to achieve the maximum level of natural light in the attic, but when they are installed, each side of the opening increases by the thickness of the slope, which does not always satisfy planning requirements.
When choosing the desired slope angle, it is recommended to initially measure the inner perimeter of the window opening. As a rule, experts recommend installing slopes with an angle of inclination between 60 and 75 degrees. In such cases, maximum ergonomics is achieved, in combination with the illumination of the attic.
Insulating the attic roof
Guide on how to insulate an attic roof:
- A layer of waterproofing is laid on the sheathing under the roof, along the rafters along the entire height of the roof of the building, right up to the ridge. The film is pressed with bars, forming ventilation ducts up to 5 cm high between the sheathing and the insulation. The waterproofing is attached with a sag of 2 cm to prevent rupture due to temperature changes at the fastening points. To ensure free movement of air, break the film near the ridge at a distance of 5-10 cm from it.
- The insulation material is cut into slabs that are 4-5 cm shorter than the height of the rafters. The thickness of the insulation is selected based on the climate.
Insulation of an attic roof must include ventilation gaps to prevent the occurrence of excessive moisture under the roof. In winter, ventilation gaps prevent heating of the roof covering, and, consequently, the formation of an ice crust. In summer, they help avoid overheating of the living space in the attic.
Dew point problem
Ideally, the roof in the attic should be insulated from the outside at the stage of forming the roofing pie. However, often this is done the other way around from the inside, when the house is already covered with a roof. And here certain problems arise.
The correct and ideal roofing pie is several layers of different materials laid on top of the rafters tightly on top of each other without gaps. Such a sandwich ensures that the dew point will be located on its outer side. As a result, all condensate formed outside will quickly evaporate into the atmosphere.
When insulating an attic roof from the inside, it is extremely important to leave a gap between the insulation and the existing roof for ventilation and evaporation of condensate formed due to temperature changes
By doing insulation from the inside, after installing the roof, it is impossible to form the exemplary roofing pie described above. It will not be possible to press the insulation onto the roof so that there are no voids left between them.
But steam always moves towards cold air. And then, each of the formed cavities will begin to accumulate condensation and moisture. And this is a direct path to damage to the thermal insulation material and wooden elements of the rafter system.
When insulating an attic internally, the dew point has to be shifted into the space between the laid roof and the insulation, leaving an additional 5–10 cm gap there for ventilation. Only such a technology and such a cake will avoid moisture in the insulating material.
To achieve proper air exchange in the under-roof space, it is recommended to install deflectors on the ridge and provide special holes in the eaves
To reduce the amount of water vapor in the insulation, its installation should be done using a vapor barrier film. A vapor barrier is installed from the inside of the attic on top of the thermal insulation material.
The steam must first encounter this film and mostly remain in the room. The less of it gets into the insulation layer, the better.
How to insulate attic windows with your own hands
Many owners of private houses convert a cold attic into a warm attic to increase their living space. When the roof of the house is hip or, according to the design of the project, the windows should be on the roof, you should seriously think about how to install and properly insulate the window in the attic. Even if you have good attic ventilation in your home, poor installation can lead to serious problems.
Ventilation of a warm attic is necessary to remove condensation and excess moisture from under the roof space.
We do not recommend installing roof windows yourself, as this will void the manufacturer's warranty. We warn you that even the best waterproofing and thermal insulation will not save you from possible leaks in the future if the windows are installed and adjusted poorly. It’s better to entrust the installation of window structures to professionals, and do the insulation yourself.
Insulation of window slopes in the attic
Before installing and insulating a window in the attic from the inside, first plan where it will be located. When cutting rolled waterproofing on the roof, it is not cut close to the opening, but a margin of 20 cm is left on all sides. The roof at the opening site is removed and the sheathing is cut off. The distance between the roof rafters and the window frame should be sufficient for high-quality sealing of the seam with polyurethane foam.
Finishing alternatives
The slopes inside and outside can be plastered. The result is a flat surface suitable for painting, but its heat-insulating properties are poor. Not every home craftsman will agree to work with plaster mixtures - the labor-intensive process is intimidating. But for finishing the outside this method is not bad.
Slopes for plasterboard windows are only afraid of dampness, but they will last a long time and look beautiful. If you choose a moisture-resistant material, the problem disappears, and the flat surface is easy to decorate.
Plastic panels for window slopes are a logical choice for framing a PVC window from the inside. They are easy to care for, they will save heat (if installed correctly), they are inexpensive, and you can choose them by color.
Attic roof thermal insulation technology
To properly insulate the attic from the inside, you need to create a pie of five layers, starting from the roof inward:
- Ventilated air.
- Wind and moisture insulation from a vapor-permeable membrane.
- Insulation between rafters.
- Vapor barrier.
- Attic ceiling lining.
The vapor barrier is made from glassine, polyethylene or polypropylene film. The best option is special membranes, with one side rough and the other smooth. With these materials, the risk of condensation forming directly on them is reduced to almost zero.
The following membranes are suitable for wind and moisture insulation:
- porous;
- two-layer film;
- three-layer superdiffusion;
- perforated.
Superdiffusion membranes last the longest and are the most effective. However, they are more expensive than other options.
At the same time, it is recommended to use perforated fabrics and films when insulating a residential attic only as a last resort. They are more designed for waterproofing cold sloping roofs in non-residential attics.
When installed with insulation in a warm room, these materials are often covered with frost in severe frosts, which reduces their vapor permeability to nothing.
Layer #1 – roof ventilation ducts
Before you start insulating the attic from the inside with your own hands, you first need to treat the wood of the rafters with antiseptics and fire retardants. Only then will it be possible to begin forming the thermal insulation cake.
If you add insulation from the bottom of the rafters, the interior space of the attic will be reduced. The thickness of the thermal insulation cake often reaches 30–40 cm. If you subtract these centimeters from the top and sides, the room may turn out to be too low and small.
At the same time, the installation option with lining the sheathing under the rafters and laying insulation on it eliminates the appearance of cold bridges. If mineral wool or EPS is inserted between the beams, then they themselves and the gaps that form over time in the thermal insulation layer near them will draw heat from the attic.
In order for the ventilation in the under-roof space to comply with the requirements of SNiPs, deflectors or other openings for air outlet should be provided on the ridge.
The steam, along with the air currents, should rise to the highest point of the roof and leave from there completely outside. Moreover, this should happen without obstacles and as quickly as possible.
Before packing the membrane onto the rafters, you must first correctly calculate the thickness of the insulation. If the thermal insulation layer turns out to be larger than the size of the rafter beams, then you will have to build them up with bars. The main insulating material should be inside this frame and not protrude from it.
Layer #2 – vapor-permeable membrane
At the top of the formed under-roof pie there should be a material with high vapor permeability from the insulation to the street and high waterproofing in the opposite direction. The purpose of this membrane is not to prevent steam from escaping from the thermal insulation, while preventing water and moisture that can drip from a leaky roof from entering it.
The best material for this vapor-permeable layer, which also performs the functions of wind and moisture protection, is superdiffusion membranes. They are not clogged with dust and ice formed from condensation in severe frosts.
Such membranes are laid in horizontal stripes with a 10–15 cm overlap of the top row onto the bottom row from the outside. The result should be a single canvas, so that if water drops hit it through the roof from the street, they would flow down without getting into the insulation.
The joints of the membrane rows from the inside of the attic are glued with mounting tape. It should be purchased under the same brand as the vapor-permeable film.
The composition of the adhesive and the membrane material from the same manufacturer are selected so as not to harm each other and remain reliably glued for many years. If you take them under different brands, then problems are possible.
Layer #3 – main insulation
The thickness of the insulation is selected in accordance with SNiP 02/23/2003. To do this, appropriate calculations are carried out, which take into account climatic conditions, the design and structure of the roof, as well as the characteristics of the thermal insulation material and the internal lining of the attic.
Manufacturers of thermal insulation provide instructions for the material they sell and post detailed recommendations on their official websites for determining this thickness. It is best to focus on these calculations.
Installation of insulation is carried out from the inside of the attic on top of a laid vapor-permeable membrane. If mineral wool is chosen, then it must be cut into pieces with dimensions 2–3 cm wider than the gaps between the rafters or sheathing bars. The mineral wool should fit between them with light pressure and stay there due to the spacer.
Selection of required materials
There are a lot of insulation materials. However, not all of them are recommended for installation in a residential attic. The attic space is characterized by fairly high humidity due to the rise of heated air from the lower floors of the cottage. Plus, the environmental friendliness and safety of the material should also not be forgotten.
If the attic is uninhabited, then due to natural ventilation through vents, soffits and dormers, steam quickly evaporates from it to the street. As a result, condensation does not form inside, and the rafter system is not negatively affected by excess moisture.
In the attic the situation is different. When insulating it, you have to create a barrier for heat to escape outside and reduce air exchange with the street. As a result, all the steam remains inside the attic rooms.
Therefore, if the insulation is not reliably protected from moisture, it will not last long. After all, any thermal insulation material, after getting wet, partially or completely loses its properties.
To insulate the attic from the inside, it is recommended to use stone mineral wool or penoplex. Other options are of little use for this type of work.
When choosing insulation, you need to evaluate it:
- thermal conductivity;
- vapor permeability;
- volume weight;
- flammability;
- sound insulation;
- environmental safety.
If you choose too heavy a material, the rafters will be overloaded. And the attic is often equipped from an uninhabited attic. Rafter beams, in this case, are not designed for unnecessary additional loads. You shouldn't tempt fate here.
In terms of thermal conductivity, most insulation products on the market are similar. You just need to choose the right thickness to achieve the required thermal insulation parameters.
It is not recommended to use sprayed polyurethane or foil polyethylene to insulate the attic from the inside due to the high risk of condensation directly on the wooden rafters if the slightest mistakes are made during installation
Of the entire range of thermal insulation materials, the most suitable for internal insulation of attics are mineral wool (basalt) and extruded polystyrene foam. Moreover, the first option is more preferable than the second. Mineral wool is not flammable and has better sound insulation.
You should not use glass wool because of its susceptibility to crumbling. Small glass particles are very dangerous for humans. And ordinary polystyrene foam is also not recommended for use in the attic. Compared to EPS, it is more flammable and environmentally harmful. In addition, it will have to be laid in a thicker layer.
Insulation of attic windows
So, what do you need to know about insulating roof windows?
- Most often, problems arise in the area of the upper or lower slopes. This is due to the fact that the technical conditions for their arrangement create zones (at the junction of the slopes with the windows) where there is very little space for insulating material.
- The use of window models with deep installation in the roof makes it possible to quite effectively increase the space for window insulation in the areas of the upper and lower slopes. Such windows (for example, from the Fakro company), in most cases, are insulated using two insulating circuits, and it is possible to install a third one. They are usually tested under very harsh conditions of sudden temperature changes and are able to withstand prolonged exposure to 50°C frosts without freezing the window frame and glass unit.
- In addition to standard insulation contours, you can use other types of insulation, preferably in the form of hard stone wool mats or similar, which do not sag under their own weight, have a long service life and a high degree of thermal protection. The rule is the following: the less space for insulation, the more effective it should be in its characteristics. Do not forget that stone wool and a number of other insulation materials need good, reliable waterproofing.
- Alas, a very common mistake made by many would-be installers is insulating roof windows with polyurethane foam. Ignorance of the properties of this material and an attempt to solve the problem in a simpler way lead to irreparable consequences: when hardening, the polyurethane foam expands greatly and causes a displacement of the rotating window frame in relation to the frame. All clearance adjustments are violated, cracks appear and, as a result, drafts and leaks.
- An additional and, I would say, mandatory measure is the installation of heating devices under the attic windows. The flow of warm air will solve two problems: warming up the window slopes and preventing condensation from occurring on the surface of the glass unit. Deviation from this rule is permissible only in very extreme cases.
- I never use metal elements in the slope area to install finishing materials, since their use can create cold bridges and lead to freezing of window slopes.
- When installing window sills under attic windows, I make sure to leave a gap under it sufficient for the circulation of warm air. Although this measure, like the previous one, can just as easily be attributed to the next part of today’s article - the finishing of roof windows.
Preparation
All wooden surfaces must be treated with antiseptic and fireproof impregnations.
All wooden components must be treated with protective materials Source remontik.org
It is necessary to immediately identify “unreliable places” on structural elements. For example, the connection of the outer rafter to a pediment made of facing bricks. Or an overlapping connection between a rafter and a screed, made without insulation. It is necessary to eliminate the shortcomings - if possible, foam them or line them with a sealant. Otherwise, they will not be able to withstand through blowing and freezing.
It is necessary to minimize the use of metal fasteners. This is especially true for metal linings secured with bolts. Of course, the bolted connections will remain, but the plates should be made from thick, durable plywood and replaced. The remaining metal parts are painted with primer-enamel and covered with a layer of polyurethane foam. Metal directly in the insulation is a source of condensation and dampness.
Answers to popular questions
What is the best insulation for an attic under metal tiles?
Metal tiles do not place any special requirements on insulation. All types of mineral wool and foam plastics are suitable. The main condition is a sufficient layer of insulation, reliable waterproofing and vapor barrier.
Soundproofing insulation should be installed under a metal roof. Basalt wool and polystyrene foam have these qualities. In addition, roll and block insulation materials with a soundproofing substrate are produced.
How to insulate an attic if the roof is without waterproofing
If there is no waterproofing, it should be installed. With a cold roof, the absence of a water barrier is not critical - if there is no difference in the external and internal temperatures, there will be no condensation, as well as ice dams.
The waterproofing film can be laid from the inside, securely connecting the joints. In this case, the need for ventilation under the roofing should be taken into account. Therefore, there must be an additional sheathing above the waterproofing film to create a ventilation gap. If there is no gap, the roofing material is laid on the rafters, then it must be removed.
Waterproofing is laid on top, connected without gaps, sheathing is made and the roofing is installed.
Possible errors and difficulties
When decorating the slopes of skylights with your own hands, beginners can easily make a number of serious mistakes. To prevent this from happening, experts often share important recommendations on online forums :
- Cracking of plaster - for finishing slopes with plastic cement-sand mixtures, it is necessary to carefully monitor the consistency and water-cement ratio to achieve a mass with mobility no more than P2.
- Peeling of paint from plaster - pigment compositions are applied exclusively after treating the surface with putty, followed by removing dust.
- Delamination of self-adhesive film - in order for the material to reliably stick to the surface, it is necessary to degrease it and remove any traces of dust, and then thoroughly dry the material.
- Bending of plastic coverings - before installing the element, it is necessary to check that the adhesive composition does not have the property of self-expansion after application.
- Bending of metal decorative boxes - when installing sheets, it is recommended to use self-tapping screws with rubber washers, which eliminates stress concentration.
If the home craftsman adheres to the recommendations listed above, the designed slopes will serve no less than the window structure itself - from 10 to 15 years and more.
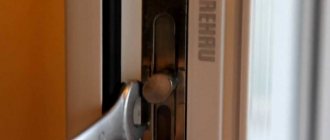
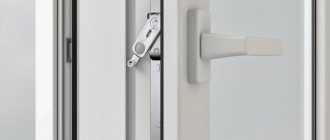
Adjusting the clamping mechanism
During operation, the window is exposed to mechanical and climatic factors. As a result, loss of sealing rubber volume may occur. What causes air to get inside the house. To solve this issue, it is not at all necessary to resort to replacing the gasket, unless, of course, it is completely in unusable condition. You just need to adjust the clamping mechanism.
To begin, find the protruding cylinder - the axle - in the cut places of the metal plug. Then move the hooks to the required position or adjust the trunnions. To change the position of the hooks, loosen the bolts. When moving to the street side, the pressure increases, and in the opposite direction decreases.
Video briefing with detailed instructions
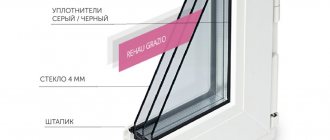
Constructed according to the rules, the complex “pie” of the roof retains heat, does not accumulate condensation on the surface, and serves for a long time thanks to perfectly functioning under-roof ventilation. Equivalent responsibilities are placed on the “fragile shoulders” of skylights, which, moreover, must open freely and not cause difficulty in closing. Windows flush with the roofing system will have to repel atmospheric attacks. Therefore, it is recommended to equip attics with special structures:
- with tempered glass or triplex glass;
- with an energy-saving light-transmitting element;
- with hermetic seals and linings;
- with a strong frame, protected from constant exposure to water and UV rays;
- with devices that provide shading, easy operation, ventilation in summer and winter, protection from insects and dust particles.