Installation of window sills is an important stage of construction, which simultaneously ensures comfort and safety in rooms for various functional purposes. Thanks to well-chosen geometric parameters and high-quality installation, the window sill board fully satisfies the required indicators for strength, reliability and durability, maintaining its original technological characteristics throughout the entire operational period.
Currently, concrete window sills are becoming increasingly popular because, in addition to their high strength and reliability, they are distinguished by a wide variety of geometry and textures to suit every taste.
- What document regulates the installation of window sill slabs?
- What should be the height/distance of the window sill from the floor?
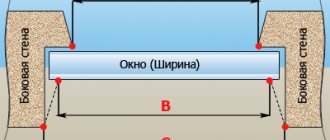
- How long should the window sill be?
- How far should it protrude from the wall?
- How to choose the right width?
- How deep should the window sill be?
- What thickness?
- What should the slope of the window sill be according to GOST?
- What should be the installation of a window sill according to GOST: video
Windows without quarters
When deciding how to measure a window without quarters, you need to do a few simple steps.
The width of the future window is calculated after measuring its upper and lower parts. In this case, for the calculation, a smaller value is taken, from which 4 cm is subtracted for the placement of installation seams on both sides - the result is the width of the future product. It is worth considering that the greater the error when measuring the width in several places, the greater the number of centimeters that will need to be subtracted to determine the final size.
The size of the seams must be subtracted from the width of the window opening.
Calculating the height of a window product occurs according to the same rules as determining the width, only in this case, about 2.5 cm should be subtracted from the resulting value for the installation seam and 3 cm if a stand profile is installed.
Why do you need a stand profile?
A stand or substitution profile is an element that is placed at the bottom of the window product and has a height of 3 cm. An external drainage system made of powder-painted metal is attached to the stand profile. The ebb prevents the accumulation of precipitation and protects the installation seam from it.
A support profile is needed to secure the drainage system
On the inside of the room, a PVC window sill board is attached to the stand profile, which also hides the installation seam and makes the appearance of the window aesthetically pleasing.
A window sill is attached to the substitution profile from the inside
It is important to know that when installing a PVC window sill, its width will be 5 cm greater than a standard wooden one. At the customer’s request, the window sill can be made up to 70 cm wide, but it is necessary to take into account that a heating radiator does not pass under it, since a wide window sill will prevent proper warm air circulation
It is not recommended to install a window sill that is too wide above the battery
When calculating the width of the window sill, take into account its overhang, which cannot be less than 1 cm. The length of the window sill is equal to the width of the opening with access to the wall on both sides, which should not be less than 5 cm.
General recommendations
- When working with a hammer drill, protect your hands with gloves and your eyes with special glasses.
- Polyurethane foam adheres much better to a wetted surface. Before foaming, wet the surface of the base and the back of the window sill using a spray bottle.
- It is best to pump the sealant in strips, leaving space between them.
- The protrusion of the window sill beyond the window slope line should not be more than 60 mm, and the length should exceed the width of the window opening by a maximum of 15 cm.
- If the length of the window sill should be strictly horizontal, then the width should be slightly inclined from the window. The slope should not exceed 3%.
- When installing window sills, it is necessary to take into account the location of heating devices so as not to worsen the microclimate of the room.
- The rigidity of a PVC window sill increases significantly when using a wooden backing. All bars must be the same size. The length of the bar is equal to the distance from the window frame to the edge of the opening. The distance between the fixed strips is 25 cm.
- After the foam has completely hardened, its excess is removed. The wall under the window sill is puttied and decoration begins.
After reading the article to the end, you learned how to properly install a polyvinyl chloride window sill in several ways. Each installation method has its own advantages and disadvantages. With the right approach and high-quality execution, installing a new window sill is not as difficult as it seems at first glance.
At the end of the article, we recommend that you watch a video about installing a PVC window sill yourself:
https://youtube.com/watch?v=20AsGO02gPE
Watch another video about installing a window sill. The apartment owner shares his installation experience.
Types and material of manufacture
However, flashings can be installed not only on external joints, but also on internal ones. For these purposes, various decorative versions of these additional elements are made, which allows them to fit organically into the interior of the room.
Cover strips can be made from various materials:
- Tree.
- Plastic.
- Metal.
For the production of metal flashings, aluminum alloys, galvanized sheet steel, and tin with an external polymer coating are most often used. Their thickness varies from 0.5 to 2 mm. Such modifications are durable in use and are not afraid of external aggressive influences - dampness, temperature changes, solar ultraviolet radiation. They are available in a variety of colors, which allows them to be successfully combined with the colors of the walls and window frames.
Wooden strips are made in the form of flat strips, corners or triangular in cross-section. Thickness - up to 3 mm. On the outside, they can be painted in various colors, varnished, or laminated with polymer compounds. Wooden shutters are used both outside and inside the window. Most often, they are made from pine wood, as it is a more accessible and inexpensive material.
However, on sale you can also find more exotic options, often intended for interior decoration - from wenge, mahogany, or from the more familiar beech, birch, and oak. They fit well into the wood-look interior decoration. At the same time, along with high aesthetic properties and environmental friendliness, they have a number of significant disadvantages:
- They are afraid of dampness.
- They may crack under the influence of temperature changes.
In this regard, wooden flashings are more suitable for interior design of window joints.
Plastic shutter strips are multifunctional decorative elements that can be used for both internal and external sealing of window joints. Polymer strips are available in two versions:
- Hard, in the form of planks 2-10 cm wide and up to 6 meters long.
- Flexible, in the form of a tape 2-7 cm wide, sold in rolls up to 50 meters long.
Among the advantages of polymer flashings are their budget cost, excellent color and texture compatibility with the plastic window frame, and resistance to dampness and frost. Disadvantages - the likelihood of peeling off the adhesive base in extreme heat under the influence of deformation forces and twisting of the tape. Planks made of polyvinyl chloride may acquire a yellowish tint under the influence of ultraviolet radiation, losing their decorative qualities.
How and what are window sills for PVC windows made from?
High-strength plastic is used to make window sill boards. The models differ in appearance, parameters and performance characteristics, but at the same time, the design features of the PVC window sill remain unchanged, regardless of which manufacturing company manufactured it.
The design and material used of the products are standard:
- The base is a hollow panel with a wall thickness of 1.5 to 3.0 mm.
- The inside of the window sill board is filled with stiffening ribs, which act as supports and provide mechanical strength . The quality of the product depends on the number of ribs, therefore, the more of them, the higher the rigidity index, which means the board can withstand heavy loads and not deform.
The strength of the plastic board is ensured by stiffening ribs
- Smooth or rough (textured) coating. A distinctive feature of a smooth surface is the need for constant care, since the touch of fingers leaves marks that reduce aesthetic values. But such marks can be easily removed with a damp cloth soaked in soapy water. A rough matte surface does not have this feature, but over time its pores fill with dirt, which cannot be removed by simply wiping with a napkin, which means you will have to put in more effort.
Window sills for PVC plastic windows are available in different sizes:
- The length of the panels is up to 6000 mm;
- Width - from 100 to 800 mm in increments of 50 mm.
- Board thickness - from 20 mm.
Modern window sill boards are made of rigid PVC, so they are characterized by high strength and wear resistance . They come in various shapes.
Kapinos in a plastic window sill
Kapinos is a free hanging edge - a small part of the window sill with a rounded edge. The edges of the slab are specially rounded from the sides or front, due to which:
- The thickness of the board visually increases;
- Aesthetic indicators improve;
- The degree of safety increases, since there are no sharp corners;
- A special “trick” appears in interior design.
Manufacturers are very meticulous about their products and pay great attention to the decorative properties of PVC window sill boards, including kapinos. Therefore, you can always find a model of the corresponding parameters. Some manufacturers produce window sill boards with two capinos.
Installation Features
In order to correctly carry out all the necessary work on installing a window, a specialist must take into account the characteristics of the materials of the building walls, window sills, the window profile itself and much more. So, if there is a layer of heat-insulating material on the walls in the room, only the accuracy of their cutting can ensure complete heat retention in the future. The stand profile in this case acts only as a specific seam.
The entire installation process consists of:
- installation and alignment of the substitution strip in place of the window;
- checking for correctness when installing the window profile itself;
- if necessary, additional adjustment of parts;
- installation of the window itself;
- filling the space between the wall and the profile with polyurethane foam.
If the strip is not included with the profile, specialists can place wooden blocks under the window to raise it to the required level.
How does installation technology according to GOST differ fundamentally from conventional installation?
The main distinguishing feature of installing PVC windows according to GOST is the high quality of work. However, in the case of installing windows and doors, it can only be fully felt during operation, so the advantage of installation in compliance with building regulations is initially assessed by other criteria.
| Installation steps | Installation according to GOST | Installation without compliance with standards |
| Preparing the opening | Cleaning walls of debris, eliminating defects, leveling planes | Of the preparatory work, only the removal of construction waste is possible |
| Window fixing | Selection of the optimal type of fastening elements, maintaining the distance between fixation points and permissible deviations vertically and horizontally | Using predominantly anchors to fix frames, periodically checking only horizontal deviations, using fewer fasteners |
| Formation of the assembly seam | Use of foam suitable for weather conditions and additional materials (sealing tapes) protecting the seam during operation, step-by-step blowing | Using any polyurethane foam without taking into account temperature conditions, ignoring protective materials, quickly blowing the seam in one go |
| Slope finishing | Compliance with recommendations from GOST, insulation of the space between the wall and the slopes, the use of technologies that eliminate the formation of gaps between the opening and the slopes | Carrying out work without insulation, possible incorrect selection of facing materials and errors in their fixation |
| Installation of window sills and ebbs | Installation at the correct angle, sealing problem areas, using sound-absorbing materials, correct connection to slopes | The use of “loud” flashings made of thin metal, the distance of the front edge of window sills and flashings from the front plane of the walls is too large or insufficient, an arbitrary angle of inclination |
Taken together, all of these differences provide high or low quality installation. Moreover, ignoring at least one point can have negative consequences:
- depressurization of windows and doors both along the perimeter of the opening and in the adjacent zones of active sashes;
- frame deformation;
- increased heat loss;
- condensation formation;
- ingress of street dirt into the premises;
- deterioration of sound insulation;
- the appearance of ice in winter.
You can order premium windows assembled from energy-efficient profile systems and double-glazed windows, and then experience discomfort in cold rooms. The reason for the low temperature in this case is unprofessional installation in violation of standards. To avoid such scenarios, it is fundamentally important to choose a reliable window company whose employees comprehensively comply with the requirements of GOST 30971-2012.
Purpose of the part
So, a wildcard profile is needed:
- to protect the main profile during storage, lifting to the installation site and transportation;
- quick and high-quality leveling of the main structure for reliable fastening;
- ensuring the absence of cold bridges under the window sill;
- installation of additional window parts.
It is worth noting that installing a stand profile enhances all of the listed advantages when using polyurethane foam. Together, the strip and foam provide maximum energy savings and reliability of the installed profile.
It is interesting that experienced specialists in big cities do not consider the cost of this element separately. Each custom window already has a price taking into account the cost of this profile. Less experienced companies rarely use the element in question in their work by default, so it is still possible to purchase a window sill profile as a separate element.
Preparatory work
Dismantling
If it is necessary to dismantle the old window, perform the following steps:
- Remove all sashes from their hinges.
- Remove the glazing beads and remove the glass from the fixed sections of the window.
- Detach the trim, drain and sill from the frame.
- Remove the mortar and foam between the frame and the window opening.
- Using a grinder, cut off all frame fastenings.
- Pull the frame out of the opening.
- Remove any remaining foam and mortar from the frame location.
Window preparation
Before installing a plastic window in the opening, it is necessary to carry out a number of preparatory work:
- Remove the window sashes from their hinges by knocking out the awning rods using a hammer and screwdriver.
- Remove the glass panes from the fixed sections of the window. To do this, you need to knock out the glazing beads from the mounting grooves; this can be done using a rubber hammer and a wide chisel or spatula.
- Attach the support profile to the bottom crossbar of the frame. When connecting the profile and frame, use PSUL as a spacer between them.
- Install anchor strips around the perimeter of the window. The tapes are screwed to the frame and stand profile using screws. For ease of installation, lead the ends of the anchor strips indoors. Depending on the size of the window, from 2 to 4 fasteners are installed on each side of the frame.
- Glue the PSUL onto the top and side posts of the frame, so that the tape protects the outer seam after filling it with foam.
- Apply diffusion tape to the support profile on the outside of the window.
- To protect the inside of the seams, apply vapor barrier tape to the frame.
Features of measuring window openings in private houses of old construction
Before measuring a window opening in an old private house, it is necessary to identify the actual dimensions of this opening. This requires dismantling the slopes. Often, significant gaps are hidden under the slopes, sealed with cement or insulation.
Before measuring a window opening in an old house, it is necessary to dismantle the slopes
During dismantling of the old frame, this entire additional structure may collapse and it turns out that the opening is much larger, which will only be a plus. But, if measurements were previously made using old windows, then all the free space will have to be restored instead of using wider windows.
If you order windows without measurements, be sure to understand the need for a stand
If you plan to measure windows yourself, then it is extremely important to understand what a window stand is. Windows are always manufactured according to the dimensions provided, in which the stand profile is not taken into account
In other words, if you provided the size of a window with a height of 1000mm. then, together with the stand profile, its height in the opening will become 1030 mm. Forgetting such an important window element is the most common mistake made by novice measurers.
- With stand profile
- Without stand profile
Please note that if there is no support profile in the window, then problems with fastening the window sill and drainage appear. The window sill turns out to be simply leaning against the frame, and not recessed under it
If you press on such a window sill, it will be torn out of place, and with it the slopes. The problem with installing a drainage system is that in the absence of a support profile, the frame is recessed by a quarter, and there is nowhere to attach it.
In addition, in the absence of a support profile, there is no space for attaching mosquito nets, and the tightness of the mounting seam at the bottom of the opening is also significantly deteriorated.
If you order windows according to your size, be sure to figure out whether you need a stand profile.
Measuring the opening of a plastic window
First, we will tell you how to correctly measure openings for plastic windows in openings that have a “quarter” (a quarter is a protrusion from the outer sides of the window, half a brick to which the window frame is adjacent), in width.
- Since the window itself extends beyond the quarter by 1.5-2.5 cm from the side, you need to add 3-5 cm to the internal size of the window - this will be the correct size of the window you will buy.
- Explaining the above: the actual size of the window will be slightly wider than the one you measure inside (in contact with the side internal slopes).
- The width of the window will be less than the width of the opening with the window sill.
Now we measure the window height:
- If measured from the outside, then 2 cm is subtracted from the height between the outer upper slope and the base of the opening for the mounting foam.
- Next, 1.5-2.5 cm is added to this size so that the window can fit into the upper quarter.
- If you have a window with a sill and a window sill, then subtract 3 cm from the resulting size, because we need to find out exactly the size of the window.
When using a stand profile, the height and width of the window will be 3-8 cm smaller, which will be spent on mounting foam. Sometimes it happens that a quarter is more than 5 cm. In this case, an additional profile is used so as not to leave much space for the mounting foam.
Remember: the height of the plastic window should be less than the distance from the upper internal slope to the window sill. Together with the stand profile, the height of the window should be less than the distance from the upper internal slope to the lower side of the window sill.
If your opening does not have a quarter, then the correct measurement of a plastic window will be as follows:
- 3-8 cm is subtracted from the width of the opening.
- 5-6 cm is subtracted from the height of the opening, 3 cm of which will go to the stand profile, the rest to the mounting foam.
In conclusion, we draw your attention to the fact that walls often have curvatures that need to be taken into account. Based on this, windows need to be measured along their smallest sides (the widening of the wall can always be covered with foam)
If you do not plan to install plastic windows yourself, we recommend inviting a specialist to take accurate window measurements.
Manufacturing of casing (plugs)
The first thing the installation of windows begins with is the installation of the casing. But is it always necessary and how to do it correctly?
When can you do without a joint?
A new wooden house made of logs or beams will shrink in any case. And no one has canceled seasonal soil heaving. In this case, the casing is required - it will protect the window from distortions, torsion or bends.
It is important to use only dry and durable material for casing boards - a 50 mm thick edged board and a 150x100 mm or 50x50 mm edged beam. The width should be equal to the thickness of the wall
But in a frame house you don’t have to make a frame - the frame itself is already formed for window and door openings and provides the necessary rigidity. Some builders also do not install a casing in a log house that has stood for more than 10 years, arguing that it has already undergone shrinkage and is not deformed. But for peace of mind, it’s better to do it in your home; this process is not that complicated.
How to make casing correctly
There are three most popular types of sockets - in a tenon-monolith, in a embedded block and in a deck.
The last option is the most labor-intensive, but also the most reliable. If you have any doubts about your own carpentry skills, it is better to casing it into an embedded block. For this:
- An edged board is laid on top of the embedding block and secured flush with self-tapping screws - two at the top and bottom. To do this, pre-drill a small recess with a diameter slightly larger than the screw head.
- If the “tenon-monolith” casing option is chosen, then the pre-cut T-shaped element is simply driven into the groove and also screwed with self-tapping screws.
- Vertical elements should not reach the upper edge of the opening by 8 cm - so that the 5 cm thick top laid on them is at a distance of at least 3 cm from the wall beam. This will be the shrinkage gap.
- The top should fit into the grooves with little effort, and not move freely in a horizontal plane. It is also fixed with self-tapping screws, screwed in at an angle.
- The insulation is placed in the shrinkage gap and closed on the inside with a vapor barrier, and on the outside with a windproof membrane. Under no circumstances should the insulation be covered on both sides with vapor-proof films - accumulated condensation will cause mold to form on the wood adjacent to the insulation.
And this is how casing is done “into the deck”:
When the frame is ready, you can proceed directly to installing double-glazed windows.
Window support profile: why is this detail important?
July 28, 2015 — 10:54
When installing a window, a special plastic profile is attached to its lower end. It is called stand-up (basic). After the final finishing and installation of window sills and ebbs have been made, this window detail cannot be seen, but its role, in contrast to external inconspicuousness, is very significant.
Strong support
A window sill is attached to the stand profile from the side of the room, and from the street - an ebb to drain water. It occurs when a contractor saves on an invisible detail; of course, an ordinary buyer will not understand this. In this case, additional holes are made in the window frame, which is strictly prohibited! What will happen? Firstly, this will lead to precipitation getting inside, and secondly, to deformation of the entire window structure. According to the technological rules for installing windows, you cannot drill a plastic frame - it may crack!
The window is even warmer
Thermal insulation of the installation seam is another important function of the stand profile. There is a layer of polyurethane foam under the window sill and drainage system. The stand profile provides protection for the joining seam and additional heat retention.
Long life of your window
The profile contributes to the correct geometry of the window structure. It helps to install the product exactly at the level, and this is the key to high-quality and correct operation of the fittings, which are under stress when the sashes are opened. Any defect during installation and the crookedly installed window will not work correctly, which will ultimately result in premature failure of the new window.
Note to buyer
- The height of this part is 2-3 cm, Width 2 - 4 cm.
- The wall thickness of the product must be at least 2 mm for good thermal insulation.
- The profile must certainly be multi-chamber, with at least two cameras.
- The stand profile is installed in a special groove at the bottom of the product and must be secured in it using self-tapping screws or special clamps.
conclusions
Using a stand profile:
- — Blowing and freezing at the bottom of the window are excluded.
- — The structural stability of the product and its proper operation are ensured.
- — The window sill and ebb are securely fixed.
- — The appearance of a gap between the window and the window sill is excluded.
A stand profile is always used when installing a window.
Insulating materials used when installing a window
The functions of the layers of the assembly seam are different. They are designed to provide steam, sound and heat insulation:
- The main one – provides sound and heat insulation.
- External - protects the seam from penetration of atmospheric moisture.
- Internal – protects against steam coming from the room.
- Additional (installed in concrete and brick buildings) – protects against the absorption of moisture from the wall material by the joint material.
The layers of the assembly seam perform different functions
Therefore, different types of vapor barrier tapes are used in different areas:
- PSUL - installed to seal external joints. It has a self-expanding ability, and therefore adheres tightly to surfaces.
- BC (BC+) - used for vapor barrier of internal slopes installed using the dry method, meaning plasterboard or plastic.
- VM (VM+) – used when finishing internal slopes, which will subsequently be covered with plaster.
- GPL (GPL+) is a universal tape capable of performing the functions of vapor, sound and noise insulation. It is made on the basis of foamed polyethylene, laminated on one side with a polyurethane film.
On the outside, membrane-type waterproofing tapes are also used, which serve to remove precipitation.
To improve performance, additional elements that protect against atmospheric agents can be used. For example, flashings and trims, as well as ebb installed at the bottom of the window.
The inside of the seam is plastered or slopes and a window sill are installed.
Window sill installation
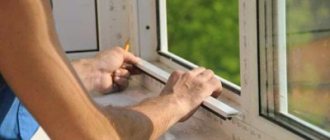
Before you begin installing the window sill, you need to check whether its length matches the length of the window opening. As a rule, during its manufacture a small margin of length is always given. To give the window sill the desired size, you should cut off the excess part using a grinder or jigsaw. Next, the window sill is applied to the stand profile and leveled. If the result is too large a gap between the window opening and the plane of the window sill, then it is sealed with cement mortar. In this case, the window sill must be removed. If there are no particular shortcomings, then you can simply fill the space with foam.
Special plugs are placed on the edges of the window sill. The size of the window sill is calculated so that it fits into the window opening along with the plugs. Typically, the plugs are attached to the window sill using super glue.
To check the window sill for subsidence, lightly press it with your hand in three or four places. If the window sill has held up, then you can fill the space under it with foam. At the same time, some heavy object is placed on the windowsill so that the foam does not bulge upward. After a day, excess foam is simply cut off with a sharp knife.
in Moscow terrapol at a low price Similar news
- Interior doors made of solid oak are a timeless classic without flaws. The construction market is now replete with many different types of doors: veneered, painted, and 07/21/2014 A few words about glass doors Over time, human tastes, needs, wishes change, technologies and techniques are improved 07/13/2014 Subtleties of choosing entrance doors Choosing a high-quality entrance door is not very difficult, but you need to know certain subtleties. Entrance doors07/01/2014
Why are window sills needed for plastic windows?
Not a single window is complete without such a detail as a window sill, and the plastic version meets all the requirements assigned to it:
- withstands temperature changes well;
- resistant to mechanical stress and moisture;
- not exposed to ultraviolet radiation;
- looks aesthetically pleasing and durable.
Plastic window sills are durable and resistant to moisture.
All these characteristics are predetermining for the installation of plastic boards along with window structures. There is a wide range of plastic window sills on the market, so you need to know how they differ and how to choose them.
Varieties and characteristics
The main differences are in the cross-sectional dimensions, the number of chambers, their filling (or lack thereof), the thickness of the outer walls and internal partitions between sections. In addition, there are differences in compatibility with profile systems from different manufacturers.
Main characteristics of the stand profile:
- The length of the bar, like that of its frame counterparts, is 6-6.5 m.
- The width, depending on the model, ranges from 2 to 10 cm.
- The minimum number of cameras located horizontally is 1; maximum – 5.
- The thickness of the outer wall is not fixed, but cannot be less than 2 mm.
- Internal partitions – about 1 mm.
Double-chamber products are used mainly for arranging cold glazing, which is a relatively rare phenomenon for windows. There are models with vertical chambers (one above the other), the thermal insulation of this profile is minimal. Options with five insulated sections have better energy-saving characteristics, especially if part of the chambers are filled with thermal insulating polymer (usually extruded polystyrene foam).
Tall prefabricated modifications (10 cm or more) have both horizontal and vertical sections, some of which can be reinforced with reinforcing elements. Such systems are provided with special connecting elements for splicing in height, which allows them to be assembled with sealant without additional fasteners.
At the top of the stand rail, in the part that is in contact with the frame, there is space for additional placement of some kind of insulation or sealant (most often this gap is filled with polyurethane foam).
PSUL tape is also often used
The options described above are intended for installation inside the structure and are not visible after finishing. However, there are a number of models that, in addition to performing supporting and reinforcing functions, can completely replace the elements of a metal-plastic window. The Rehau company, for example, produces a stand profile (108 561860), which completely replaces the external drainage system. Its use is possible if the protruding part of the ebb of 56 mm is sufficient.
Installation of windows in wooden houses
When choosing the type of installation, it is necessary to take into account the type of building material. For example, the differences in installing a window in a foam concrete or brick wall are only in the size of the anchor recess, but for wooden structures a completely different approach is used. It should be taken into account that the installation of windows in a wooden building must be done a year after the construction of the house. Why wait? In order for the material to shrink.
A window in a wooden house is installed not in an opening, but in a wooden box (casing, or frame), which will reliably protect the structure from damage. At the same time, the window block itself should not show signs of defects or fungus. Before starting work, it is necessary to treat with an antiseptic. The house will shrink even after the windows are installed, so you should leave a 3 cm gap in the upper part of the opening between the casing and the wall.
The standard ebb for wooden structures can be used. The window sill should be chosen wooden or polymer. But it should be borne in mind that wood tends to allow evaporation to pass through, which will affect the properties of the polyurethane foam, so before applying it it is recommended to use a special vapor barrier tape.
Measuring window openings: general rules for do-it-yourself work
It's no secret that all construction and repair work is subject to general mathematical rules
This statement fully applies to such an important matter as measuring window openings for plastic windows. Existing measurement rules make it possible to quickly and easily install exactly those plastic windows that are ideal for a specific room
So what are they:
- the proposed measurer must have an analytical mind, good spatial thinking, and have personal experience in installing windows;
- measurements must be taken both inside and outside. The inside of a plastic window is always larger than the outside;
- before starting measurements, it is necessary to complete all preparatory work (brick laying, removing old plaster, etc.);
- in many houses (especially panel houses) there is a misalignment of the window opening. In order to avoid through gaps, it is necessary to maintain the minimum standards of plastic window panels: the size of the inner part of the window is 30-40 mm in width and 15-20 mm in height larger than the size of the outer side;
- Before you start installing a window, you must compare its dimensions with the calculations that were made at the initial stage. A mechanical error may be made, which will nullify all the work carried out in the previous stages.
These rules are mandatory for any craftsman involved in taking measurements and installing windows and double-glazed windows in apartments, offices and private homes.
Regulations
Installation of PVC windows in accordance with GOST will guarantee its long and trouble-free service. Today, all types of work related to this area are regulated by four main standards:
- GOST 30674-99 . It contains general information on the issue and basic requirements for windows. There is practically no mention of the installation process itself in this GOST.
- GOST R52749-2007 . This standard focuses on the process of installing windows using vapor-permeable, self-expanding sealing tape.
- GOST 30971-2012 . This document contains the most detailed information on the issue. It also contains exact requirements for window sizes, device parameters and joint filling materials, methods of fastening structures and similar information. It also describes the requirements for regulatory documentation, some warranty obligations of the work contractor and general requirements for the performance of work. This standard was introduced at the beginning of 2014 and replaced the outdated GOST 30971-2002 for window installation.
- SNiP 02/23/2003 . The standard sets the parameters for thermal protection of premises. Suffice it to mention that it requires the installation of a 3-chamber double-glazed window for most climatic zones of Russia and a 5-chamber double-glazed window for Siberia.
The standards take into account the climate zone in which the plastic window will be installed
All of the above regulatory documents are valid, but not mandatory. The only exception was various requirements related to safety in one way or another. Compliance with GOSTs only helps to achieve the highest quality window installation.
Stand profile
Stand profile (base profile) is a plastic stand on which the window is installed and into which the window sill snaps into place. As a rule, the stand profile is supplied with the window. On the inside of the stand profile there is a latch for the window sill. The classic stand profile has a height of 30 mm. When installed, the stand profile is not visible to the eye and is hidden by the window and sill.
On full-fledged window systems, the stand profile is made of white plastic, and on budget window systems, the composition of the plastic can be secondary, i.e. The stand can be made from used and recycled plastic. The use of recycled plastic in this case does not affect anything.
MATERIAL AND TECHNICAL RESOURCES
4.1.2. An approximate list of the main necessary equipment, machines, mechanisms, technological equipment, tools and accessories is given in Table 4.1.
Name of machines, mechanisms and equipment
Quantity per link, pcs.
Construction mast lifts with a lifting capacity of 0.5 t
Lifting products and materials
Flatbed vehicles with a carrying capacity of up to 5 tons
Along with the installation of plastic windows, it is best to install a PVC window sill, which is logical. The use of identical materials ensures a harmonious combination of structural elements. This also means full compliance with technical characteristics, the same service life of products and surface care. Therefore, PVC window sills are ideal for plastic windows, which can be matched to any color scheme of the window structure. This choice allows you to improve the functional features of the window design and decorate the interior with taste.
The best manufacturers
Window profile systems from large manufacturers are usually equipped with a stand profile.
Their separate purchase may be required if:
- The complete profile is not suitable or the customer is not satisfied with its characteristics (lack of thermal insulation filler, number of chambers).
- In case of loss (happens quite often with domestic installers) or breakdown;
The most common manufacturers on the modern market:
- Rehau. Popular models: energy-saving five-chamber profile - 561910 and two-chamber with reinforcing filler - 561790;
- KBE. A three-chamber version (article 342) 46 mm wide, 3 cm high and its analogue with a pressure wing (article 343) are often used.
- Veka. The products of this company are represented by models of the Softline line - a two-chamber profile with a pressure wing and Euroline - a three-chamber version without filler.
What functions do stand elements perform?
The stand profile for windows can also be called basic, and with all its technological simplicity it surprises with the number of functions it performs:
- protects the window from damage during transportation of the product to the installation site - in this case, the base profile serves both as a shock absorber and as an additional gasket between various surfaces and the window frame;
eliminates “cold bridges” in the lower zone of the opening - a stand profile with hollow internal chambers significantly slows down the processes of heat transfer between cooled walls and the window;
allows you to aesthetically install an external window sill - when installing it, the basic stand element makes it possible to carefully place the canvas directly under the frame profile;
ensures tightness and prevents the window from blowing from below - the joint seam between the frame and the stand profile does not allow air and water to pass through, due to which the likelihood of condensation and the appearance of mold and mildew in this area is extremely reduced;
eliminates the possibility of distortions in the structure - the presence of a solid base part in the lower area of the frame gives the entire window additional stability;
allows you to compensate for minor shrinkage - in this case, a plastic part hollow from the inside performs a shock-absorbing function;
is the basis for reliable fixation of the lower ebb - this ensures the integrity of the main frame profile.
In addition to all of the above, the stand profile for PVC windows allows you to almost perfectly accurately level the structure. Thanks to this, it is possible to achieve correct operation of the fittings for a long time, since the absence of distortions allows you to not adjust the opening mechanisms for a long time. Some manufacturers include these elements in the estimate, but do not install them, so after delivery of the windows it is recommended to check the windows for the presence of support profiles. This is very simple to do - at the bottom of the frame there must be an additional element that is narrower than the main profile.
Step-by-step window installation according to GOST
In order not to miss important points that need to be paid attention to during the work, you need to familiarize yourself with the installation process in detail. For full quality control, it is necessary to know how the requirements listed in the regulatory framework are implemented in practice.
Preparing the opening
At the initial stage, it is important to take into account the difference between openings in newly built and long-term buildings.
In a new house, windows are installed for the first time, and usually in such cases the walls do not require serious preparation. The second situation, when installation is planned in houses that are already in use, is more common and complex. It requires preliminary inspection and preparation of the opening. The need for additional measures is dictated by the unsatisfactory condition of the walls. Long-term loads, atmospheric influences and dismantling of old windows are the reasons for the appearance of cracks, cavities, chips and other defects around the perimeter of the openings. It is impossible to attach frames to such walls, so a set of preparatory measures is necessary:
- Inspect the walls and clean them of any construction debris: peeling mortar, broken pieces of concrete or brick, old insulation and sealants.
- Fill areas with obvious defects with waterproof compounds: potholes or cracks more than 2 mm wide and more than 10 mm deep.
- Align the walls inside the openings so that the opposite sides are in parallel planes.
The preparation of openings is often ignored, since when eliminating defects it is necessary to use compounds that require 1 to 3 days to completely dry. Installation cannot be performed before this time, so many installers skip the steps of sealing gaps with sinks and subsequent leveling of the walls. The result of such carelessness is the risk of depressurization of window and door units.
When performing preparatory work, it is important to prevent the formation of so-called “thermal bridges”. This means that equal gaps must be left on each side for the installation seam. That is, the frames should not come into contact with the walls anywhere, otherwise additional paths for heat transfer will appear. Since in most cases the windows have already been manufactured and delivered to the site, the fulfillment of this condition depends on professionally performed measurements.
Window fixing
When installation begins, the window must be level. The maximum deviations allowed by GOST are no more than 4.5 mm over the entire height of the structure. In this case, the norm is 3 mm per 1 meter. To avoid alterations and drilling of unnecessary holes, the plumbness of the frame should be checked not just before foaming, but during the installation process. This installation procedure will allow you to quickly correct errors and ensure the vertical position of the door or window unit. Fastening the window begins in the lower zone of the frame with the installation of support pads, which create a gap between the frame and the lower zone of the opening. The linings also help to level the structure horizontally. First, the fasteners are installed at the bottom of the frame, then at the top, and then on the sides.
The anchor elements should be tightened completely only after checking the correct position of the frame. Moreover, it is advisable to control the vertical and horizontal after tightening each fastener.
You can fix the profile structure in the opening in different ways: with anchor bolts or plates, MRS screws.
Sometimes during the installation process several fasteners are used simultaneously. This method is called combined. It is used mainly for glazing balconies or loggias, as well as during the installation of door blocks indoors. Each technology has its own advantages and disadvantages, so the choice most often depends on the installation features.
| Installation method | pros | Minuses |
| Anchor bolts | Fast and secure fixation | Depressurization of the window unit along the perimeter of the frame, difficulties during dismantling, formation of “cold bridges”, moisture ingress to the lower section of the assembly seam, destruction of canopies when glazing balconies, incompatibility with the walls of dilapidated buildings |
| MRS self-tapping screws | Wide range of applications (loggias, balconies, dilapidated buildings), speed and reliability of installation, the ability to reduce the distance between fastening points and ensure minimal distance from the front plane, the possibility of through installation, simple and quick dismantling | Depressurization of frames and door frames, formation of “cold bridges”, condensation draining onto the assembly seam in the lower zone of the structure, deterioration in the quality of fixation of fasteners in some areas of the opening |
| Anchor plates | Preserving the integrity of frames, ensuring tightness, the ability to quickly adjust the position of door and window units during installation, compatibility with loose or multi-layer walls, the ability to install new windows in historical buildings | The likelihood of plates falling out of the groove of the frame profile (the problem is relevant for unreinforced windows), the need for partial dismantling of decorative trim elements |
| Combined mount | The ability to carry out installation in difficult conditions, when the use of only one type of fastening elements is not able to ensure high quality installation | Depends on the type of fasteners selected |
Regardless of the type of fastening elements, the installation of PVC windows in accordance with GOST must be carried out taking into account their number and relative position. Building regulations require the use of at least 14 elements when fixing a double-hung window in a typical opening. In other cases, the recommended distance must be observed between fasteners.
Formation of the assembly seam
Sealing the gap around the perimeter of a window or doorway is a responsible process consisting of several stages. It is also regulated by GOST 30971-2012. Compliance with the requirements will allow the installation seam to withstand:
- changes in the width of the gap between the frame and the opening;
- low temperatures;
- exposure to UV rays and precipitation;
- mechanical loads.
The document also lists the materials that will be needed at this stage. To form a high-quality seam around the window you need:
- polyurethane foam with characteristics that allow you to perform work in specific conditions;
- PSUL;
- silicone;
- metal or plastic flashings;
- steam and waterproofing tape.
Some installers of profile structures claim that the updated GOST with the requirement to use pre-compressed tape was lobbied by PSUL manufacturers.
These are speculations that have no factual evidence base. After all, sealing tape is necessary because it allows the seam to “breathe”. It allows steam to escape unhindered and does not allow water to seep into the gap. This extends the service life and maintains the tightness of the assembly seam. In fact, the mounting layer has a three-layer structure. PSUL tape is fixed outside the opening. Then the gap is blown with foam, which should dry. Curing is necessary to form a strong protective shell around the frame. After the foam has hardened, a vapor barrier tape is placed on the inside of the opening over the mounting foam. Only the lower seam zone is different. In this place, vapor barrier foam is applied on both sides of the profile.
According to GOST, the installation of a window at the stage of blowing in cracks along the perimeter of the opening should be done so that the installation seam does not contain volumetric cavities with air. To fulfill this requirement, foaming must be performed in the correct sequence:
- After final fixation of the frame, you need to fill the gaps with the first layer of foam.
- A second layer must be applied over the primary seam.
- When installing in a quarter window, it is necessary to separately foam the gap between the frame and the protrusion in the wall.
Theoretically, this algorithm of actions allows you to create an assembly seam with a fine-porous structure. However, in practice, installers often fill the gap with foam in one go. This leads to the formation of air pockets. The problem is especially relevant when installing energy-efficient windows with an installation depth of 70 mm or more. Only experienced specialists can carefully blow out a deep seam in one go without forming air pockets.
Installation methods
Most often, one of two options is used to install the stand profile, which will be discussed in detail below.
First way
It is used relatively rarely by novice installers or in the case of self-installation at home. The essence of the method is sequential installation: first the stand profile, and then the window block.
Algorithm of actions:
- In accordance with the dimensions of the frame, the stand strip is marked and cut;
- The prepared part is leveled at the bottom of the cleaned opening;
- The distances between the top of the opening and the profile are measured with a tape measure, after which a preliminary fitting of the block is performed. If there is an excessively large gap (more than 3 cm) at the top, between the frame and the window, it is reduced by adjusting the position of the lining strip. Typically, plastic spacers of different thicknesses are used for this (it is not advisable to use wooden blocks or wedges - wood changes its size depending on the season and surrounding humidity).
When the permissible gaps are set around the entire perimeter of the opening (optimally 1.5-2 cm), they are sealed with polyurethane foam.
Second way
Qualified installers do things differently. The window is installed together with the profile in the following sequence:
- First, remove the profile screwed to the block; to do this, you need to unscrew the fasteners and pull the bar out of the docking grooves.
- If possible, insulation is inserted into one of the chambers.
- The junction of the lining strip and the lower frame profile is filled with sealing tape or foam (a combination of these materials is possible).
- Attach the lining profile in its place from the bottom of the frame.
- The window block is leveled in the opening, fixed to anchors or brackets, and then the gaps are filled with polyurethane foam.
Detailed video instructions:
Note! A minimum gap is made at the bottom of the stand profile, sufficient for full penetration of the polyurethane foam. It is unacceptable to install a window unit without a bottom gap (simply on a backing strip), since in this way it is impossible to achieve the required joint density and maximum tightness of the structure.
After the foam has polymerized (2-3 hours), its excess is cut off and a place is prepared for installing the window sill. Installation is carried out in the L-shaped recess formed between the frame and the stand. In this case, the window sill partially (10-15 mm) extends under the frame, and it is fixed from below with the same mounting foam.
The ebb is attached to the support strip in the recess on the outside of the block. This prevents water from getting under the outer part of the window. The surface of the opening must be pre-prepared so that there are no voids under the drainage system.
REQUIREMENTS FOR WORK QUALITY
The composition of controlled indicators, scope and methods of control must comply with the requirements of SNiP 3.01.01-85* “Organization of construction production”, GOST 23166-99 “Window blocks. General technical conditions", GOST 30971-2002 "Seams of assembly units connecting window blocks to wall openings. General technical conditions" and technical recommendations TR 152-05 "Technical recommendations for ensuring the quality of installation of window and balcony blocks."
Quality control of construction and installation works should be carried out by specialists or special services that are part of construction organizations or hired from outside and equipped with technical means that ensure the necessary reliability and completeness of control.
The window sill is placed under the frame to a depth of about 1 cm. If the gap between the window sill and the bottom of the opening is too large, it is partially filled with cement mortar, leaving a gap of 5-10 mm. The edges of the window sill must extend into the wall by approximately 1.5-3.0 cm.
The importance of correct measurements
The manufacturer usually offers the services of its own measurer. This service is free. The product is manufactured on the basis of a measurement sheet, where the measurer indicates all the necessary parameters. If, when installing a window, difficulties arise due to an incorrectly manufactured product, the manufacturer will bear responsibility.
As a rule, window measurements are carried out by the manufacturer
If the customer provides the dimensions himself, then at the stage of signing the contract for the provision of services for the manufacture and installation of plastic windows, he signs the measurement sheet, which is drawn up by the manager based on the provided dimensions.
With his signature, the customer confirms the correctness of the dimensions indicated in the measurement sheet, in his words, which means that if the window does not fit during installation, the customer will bear responsibility and all financial costs for remaking the product will fall on his shoulders
When taking measurements yourself, it is important to approach this matter extremely responsibly
Why do you need a stand profile?
When installing a plastic window, the window sill and external drainage are attached precisely to the stand profile, of course, if they have not saved on it and it is installed at the bottom of the block. You can also screw the ebb directly to the street part of the frame. Such an installation violates the tightness of the window, significantly reducing its energy-saving characteristics. In addition, such an installation is not able to ensure a tight connection between the frame and the ebb, which is why water will get into the bottom of the opening. High-quality installation of a window sill is also only possible with a stand profile; without it, cracks will appear at the joints over time, requiring additional sealing.
An equally important function of the stand rail is additional thermal insulation of the lower mounting seam. Structurally, the profile is divided into several chambers, which reduces the overall heat loss of the structure; in addition, there are models whose chambers are filled with a special foam polymer with low thermal conductivity.
The stand profile provides additional rigidity while maintaining the correct geometry of the window unit. With its help, it is much easier to level the structure without fear of breaking it over time. This, in turn, is the key to the proper operation of the fittings, which will function much longer if the structure stands without distortions.
Detailed analysis of warm stand profiles: