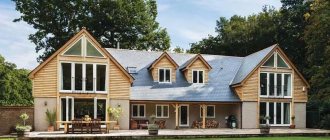
A dormer window is nothing more than an ordinary window located on the roof of a house. Each of us can see it in the nearest private house with an attic, which is why it is popularly called a dormer window. But this modern name is not suitable for windows present on buildings and cathedrals built in past centuries. They are the ancestors of modern such windows. And they called them an interesting word - lucarna.
Dormer window photo
Lucarna: what is it?
A dormer window or a lucarne are the same thing, but they are separated by a time frame. Lucarne was widely used in the architecture of the 19th-20th centuries, but it is known that it began to be used back in the 15th century in England on roofs with a pointed structure. Lukarna has its own distinctive features - it is a superstructure on the roof of the house, in the front part of which a window was installed. The façade itself was decorated with lush stucco and was the hallmark of the entire house. Later, this unique architectural element began to be used on the roofs of rich houses and seemed to signal the status of its owners.
Lucarne window photo
The word lucarne is French, but has a Latin origin from the word lux - light. Practical significance of the design: at that time it was the only way to provide lighting in the attic space, if torches and candles were excluded.
Lucarna photo
Design specifics
- With a slight roof slope (up to 1 to 5), the ratio of the window and floor areas in the room should be 1 to 6 – 1 to 8.
- The preferred window sill height is 0.85-0.9 m.
- It is best to keep the height of the opening for windows within 1.2 - 1.5 m.
- The window should be wide enough to ensure a normal level and uniformity of lighting in the room, as well as to create the effect of visually expanding the space. The recommended window width (if there are 2 or more windows with partitions, then their total width is assumed) is half the total width of the room and above.
Dormer window: why is it called that and what is it for?
Dormer window is already a domestic name for a window on the roof; it is designed less pompously and is more likely to have a practical meaning rather than an aesthetic one. There are two versions of why this window was named that way:
First version: previously the word “rumor” had a slightly different meaning and meant an opening, a hole. Which explains the purpose of such a window - illumination with natural light and ventilation of the room.
The second version is directly related to the name of the master Slukhov, who managed the roofing work at the Moscow Manege during the reign of Alexander I. According to this version, the roof of the building was initially built without a ventilation system, which led to its deformation under the influence of external natural conditions. Later, when the tsar himself found out about this, Slukhov soon corrected the situation by building windows that were named after him.
Dormer window photo
Dormer window on the roof photo
Dormer window on the roof: shape and design features
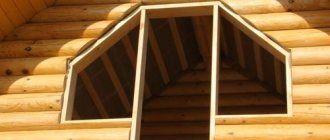
A traditional dormer window with its entire structure, when viewed from the side, resembles a house. After all, it has exactly its shape, so the lucarne not only performs the function of lighting and ventilation, but also increases the space in the attic. In addition, opening such windows is much easier, since they use hinged frames, rather than sliding ones, as with modern roof windows installed in the plane of the roof. That's why they are called vertical dormer windows.
Dormer window on the roof photo
Such a lucar window can be located in any part of the roof of a modern house, no matter whether it is the main plane or the end plane. Its size and shape are also determined by the design features of the roof and the exterior style of the entire house. The height of the roof and the area of the attic are also taken into account. And of course they are not built on roofs with a small angle of inclination.
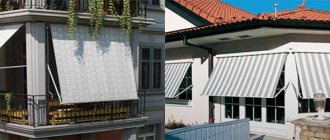
Skylight
Another type of hatch is a recessed window into the superstructure structure. This is usually done on large windows to build a balcony. The only disadvantage of this design is that it does not increase the living space. Therefore, it is relevant only in large attics.
Lucarna photo
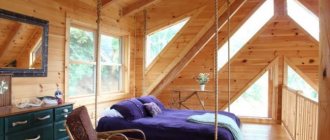
A dormer window can also be made into the plane of the roof, which gives them the right to be called dormer windows. They are good because they do not form an additional structure on the roof, which in turn makes it easier to clear it of snow in winter. Also, such windows increase the level of illumination in the attic by exactly half. Therefore, it is not recommended to place them on the sunny side of the roof, but they are very welcome on the shady side. But it is worth saying that such windows require good waterproofing with a precipitation drainage system and, of course, are supplied with no less high-quality thermal insulation.
Roof window photo
It is also worth saying that lucarne windows can have a wide variety of shapes, in addition to traditional squares and rectangles, in architecture you can also find them in triangular, polygonal, round and oval shapes. This diversity is explained by the peculiarities of the exterior style.
Lucarne on the roof
Dormer windows or lucarne windows have firmly entered the architecture of suburban private construction. It is worth saying that they can be built on an already erected house, you just need to change the design of the rafter system. Well, when constructing them, it is worth strictly focusing on the features of the roof and, in general, taking into account the entire architecture of the building.
DIY construction technology
The construction of a roof with these elements should be approached with all responsibility:
- A scale sketch is created. The width of the opening equal to the distance between the rafters will be ideal.
- If such a roof is installed in a multi-storey building, a permit is required.
Next, you should prepare the material and tools for work.
For installation you will need:
- nails of different sizes;
- triangle and protractor;
- roulette;
- vice;
- hacksaw;
- chisel;
- film;
- timber (material measuring 10*5 centimeters is most often used);
- window (it is better to buy one that does not require complex maintenance);
To create a standard dormer window, you need to go through certain steps.
The work plan is as follows:
- The area where work is being carried out should be protected.
- Walkways are created under the working hole.
- Warning signs are posted below, warning that dangerous work is underway.
- The frame of the window opening is being constructed.
- The window is being installed.
Creating a hole:
- Two support beams are cut out of the timber and placed between the beams. They are secured on both sides with nails.
- Two more beams are cut to create reinforcement, they are placed between the outer beams, a vice is used for this. We also nail them.
Creating a reinforced structure for corner risers:
- A piece of timber is cut for the lower support. Its length should be equal to the width of the hearing aid + 20 centimeters. Attach it from below, parallel to the support beam, directly to the floor. It should protrude onto the borders of the beam from both sides in equal parts.
- Two more pieces (for one and the other side) are cut to a length slightly larger than the distance between the roof and the floor. Marks are made on them at the locations of the reinforcing beams. The timber is cut according to these marks.
Installing a corner post:
- Measure two beams, the size should be slightly larger than the height of the future window. Each of them is nailed in two places - to the reinforcing beam and to the support located below.
- The upper reinforcing structure is placed on the reinforcing beam, at the same time, it is pressed close to the post running in the corner, then it is nailed to this post. To strengthen it you need to use a vice. The lower structure is attached in a similar way. Work is carried out on both sides in order.
The corner posts are aligned:
- A beam is cut as wide as the depth of the window, adding 25 centimeters. One end is applied to the support beam, the other to the corner structure. The horizontal position is checked, after which the beam is cut at the bottom of the segment at the point of contact with the post and the reinforcing beam.
The upper rod is installed and the ceiling of the structure is formed:
- The beam is measured with a length equal to the distance between the ends of the outer corner posts. It is installed on the sections of the posts and secured with nails. And the side ceiling becomes a block that was used to level the corner posts.
Creating a window sill:
- The clearance between the racks is measured, a beam 2 centimeters more than this distance is taken. Grooves for the window sill are cut out in the corner posts, the depth is 1 centimeter. These places need to be thoroughly cleaned.
- Next, the window sill is inserted into the prepared grooves and secured with nails. The window sill is fixed with two more pieces, which are also nailed.
- Transverse ceiling beams are attached to the roof side. There are only three of them, the length is equal to the distance along the inner edges of the beams on the sides. They are attached in increments of 40 centimeters to the side ceilings. Then the side posts are nailed at the same interval. All that remains is to sheathe the structure.
Roof installation:
- The number of slanting slats for the roof is calculated as follows: the width of the roof is divided by 30 centimeters. The bars are cut to the obtained length. Stepping back a centimeter from the ends, draw a line diagonally on each element. An incision is made along these lines.
- Planks with a narrowing are installed with the flat side down, the wide end faces towards the house, and the narrow end is laid on the side ceiling. All the planks are attached in turn, the distance between them is 2.5 centimeters. Plywood or chipboard is fixed on top of this structure.
- All that remains is to nail the covering boards and edge the roof around the window, seal the cracks with moisture sealant, and secure the drip strip. Then the window is installed.