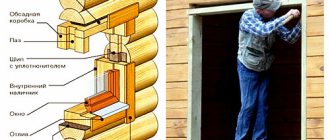
One of the key elements in a wooden frame is the door and window frame, also called “casing” or “window frame”. Despite the fact that types of casing differ significantly from each other in manufacturing and installation methods, their design must take into account a number of general requirements and limitations.
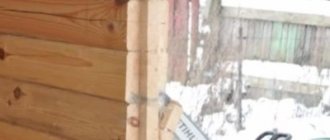
It should be noted that the installation of casing is a mandatory operation not only for log houses made of rounded logs, but also for houses made of timber (including structures made of profiled timber).
For what purposes this unit is installed, we wrote on the page “Embedding (jamb) in a wooden house,” and in this article we will look at the features of its manufacture and installation.
Design options
Casing "in a spike"
Today, there are three basic schemes for installing casing in a wooden house:
- The pigtail in the embedded block.
- U-shaped casing (or “pipe into the deck”).
- T-shaped socket (or “thorn socket”).
From a technological point of view, the simplest option is a socket in an embedded beam. To install it at the ends of the opening logs, it is necessary to select a groove in which timber is placed on the thermal insulating seal, creating vertical risers of the frame.
At the top and bottom the frame is closed by spacer bars. The height of the entire structure is 60-100 mm less than the height of the opening, and installation is carried out in such a way that the frame moves freely relative to the logs.
It is important to consider that the casing of any design is assembled without fixed connections between the load frame and the log house. For the same reason, you cannot seal the gaps between the casing and the frame using polyurethane foam, since it creates a fairly strong connection.
Pigtail in the embedded block
Advantages:
- minimum cost;
- ease of assembly.
Flaws:
- low rigidity;
- the need for decorative finishing of the log house after installing the casing.
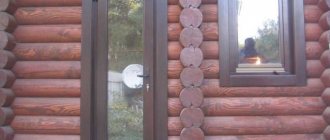
U-shaped casing
Pit "in the deck"
The most universal casing option is a U-shaped casing. Vertical posts of this design are wooden “covers” placed on a tenon or profiled end of the frame. The upper and lower beams of the frame are installed in the spacer and are manufactured in accordance with the requirements for a specific element of the house (window, doorway, beam, etc.).
It is this option that is most often used for finishing the casing, when after installing the casing, additional finishing of the opening is no longer needed.
Advantages of casing in a deck:
- maximum rigidity in all directions;
- convenient for subsequent installation of internal structures (doors, windows).
Flaws:
- high material consumption and, as a consequence, high price (due to the large width of the timber for vertical posts);
- the complexity of manufacturing frame elements (due to figured locks and complex geometry).
Let us immediately note that recently glued U-shaped frames have often been used, the price of which is noticeably lower.
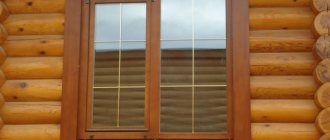
T-shaped casing
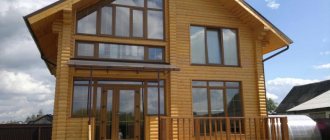
For windows with modern double-glazed windows, a T-shaped casing is mainly used, since after its installation the ends of the opening are framed by a flat frame that does not protrude beyond the frame. Installation of double-glazed windows in this case is carried out in full compliance with the requirements of building codes and regulations.
The cross-section of the vertical casing board of the tenon joint has a T-shaped appearance (hence the name). The connection to the log house is made according to the tongue-and-groove pattern through a sealing gasket.
Please note that if the tenon in a T-shaped frame is attached to a vertical post with self-tapping screws, then cold bridges will subsequently appear along the entire perimeter of the junction. The optimal solution for tenon casing is a solid casing.
Pigtail "thorn" monolith
Advantages of T-shaped casing:
- high rigidity in the vertical and horizontal plane;
- relative simplicity of design.
Flaws:
- high material consumption when manufacturing a frame from solid timber;
- the complexity of manufacturing a combined version (a hermetically sealed fit of the tenon on a vertical post is required).
For T-type bindings, glued casing is also used, with polymerization of adhesive joints using factory technologies.
When designing a casing of any design, you must remember the main rule - the casing frame does not have rigid connections with the log house, and between the top crossbar and the log house there must be a shrinkage gap, the dimensions of which are set in accordance with the climatic zone (usually in the range from 60 to 100 mm) .
Photo report on the production of the finishing pigtail
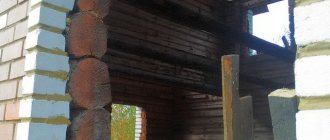
The work was carried out in a log house that had been standing for a year. We used purchased kiln-drying timber and the remnants of profiled construction, which had been drying along with the house for a year. The casing is monolithic U-shaped. The width of the tenon was approximately 45 mm. This distance remains if you make a cut with a circular saw on both sides of the wall. In order not to modify it later with a chain saw, it was decided to make the tenon wider. Its height is 35 mm. The spike under the bottom/window sill is 1 cm high. Its task is to prevent a draft from occurring.
We start by preparing the openings. First, cuts were made in the side planes of the walls using a circular saw. There were no problems with vertical cutting, but when cutting horizontally, the saw kept trying to go up and down. Be careful in this part.
First, use a circular saw to make cuts on the walls.
We also repeat outside
Tightly control the position of the saw when cutting horizontally
Then we take a chain saw and modify the tenon. This is the most responsible and delicate work. We make the first pass from top to bottom. Its depth is only 1-2 cm. All subsequent ones are from bottom to top, gradually increasing the depth. In order not to mess up, we used a step-by-step algorithm: first we made the cut with a circular saw, stepped back 0.5-1 centimeter from the cut, cut it with a chain saw, and brought it to the required depth with a grinder and a plane. Long, but reliable.
Cut carefully so as not to cut off the thorn
Next, use a circular saw to make cuts at the ends of the openings. We work on problem areas in the corners with a multitool or chisel.
These influxes need to be removed
The opening is ready. Let's start making the casing. The first thing we do is the bottom-window sill. We make a groove in it with a depth of 10*45 mm. Also, do not forget about the protrusions: the window sill must “fit” onto the wall.
Made a groove
These are the sides
This is how it looks almost installed
Now we make the sides. They are made of 200*100 mm timber. It was adjusted to size and polished. The groove was formed using a milling cutter. It could have been done with a circular saw - it would have been faster, but less accurate.
The groove was cut with a router
After using a circular saw, a quarter is made - its size is 70-30 mm.
Already ready and no quarter yet
Next you need to cut out the locks. On the sides, those that go to the bottom, are simple. All you need to do is cut off 20-40 mm on three sides. If, like me, there is a quarter, then on this side we cut out less to the depth of the quarter, i.e. cut out 10 mm (40 mm - 30 mm = 10 mm). Now the spike is ready.
Lower Castle
Next, we place it on the lower part, trace the outline with a pencil, and remove all excess. The castle is ready. Having installed everything in place, we see quite decent gaps. Now the task is to bring them to a minimum through gradual adjustment. The main thing here is not to cut off the excess, since it is impossible to increase it. Therefore, little by little we polish and try on, polish and try on.
Achieving minimal gaps
When the bottom locks are ready and adjusted, you can cut the sides. They should not reach the top of the opening by 6 cm. This is how we cut it.
We make the top itself in the same way as the side posts, then cut out a quarter of it. You'll have to tinker with the lock. There are two conditions:
- The distance at the top should be the same as at the bottom. We adjust all the dimensions of the spike based on this postulate.
- Then we also outline it, but the shape here is much more complicated. It is advisable to cut it so that there are no through connections, so that air does not have the opportunity to freely enter from the street.
That's why we make stepped cuts.
Shape of tenon and mate at top
Another perspective
This is what it looks like when folded
When the mold is ready, the fitting begins again by sanding. We work gradually, slowly. When the desired result is achieved, we disassemble the box, sand it, and round the edges. In general, we bring beauty.
Grinding
Here is the final version
After sanding, we cover all parts (including openings) with antiseptics. After drying, the casing elements can be painted in the required color. In any case, you can go through the paint once.
While everything is drying, we place jute tape in the opening. There is no tape covering the entire width of the casing; it was laid in two parts with an overlap in the tenon area. Apply a layer of sealant on top of the insulation.
Apply a layer of sealant
First, they laid the bottom (it was never possible to install it on jute - it was torn off during installation, but the voids were filled later). The sides sat down, but with difficulty. But the top part didn't fit at all.
The top part could not be installed
We take the spacer, first set it obliquely, then use a hammer to make it more horizontal. The sides are moving little by little. As a result of these manipulations, the upper part also fell into place.
After installation, the spacers “settled” and the upper part of the casing
To prevent it from moving, we install wedges. They are removed after installing window or door blocks. This is what happened as a result.
Installed casing
Materials and processing
Considering that the casing is an important power unit in the design of a wooden house, the material for the casing should only be of high quality.
The fire pit board must maintain its strength characteristics throughout the entire life of the house.
Ideally, the timber for the frame should be made from boards of category “A” and higher, made from hard and resistant wood (larch, ash, cedar, etc.).
Casing made of laminated veneer lumber
But given that in practice this is a very expensive solution, there is a constant search for alternative options, one of which is a laminated veneer lumber frame.
Wood gluing technology today has reached an exceptionally high level of quality and reliability. Glued laminated timber is actively used for the production of not only auxiliary elements, but also as the main building material.
Since studded casing posts have a complex profile and require a lot of labor when manufacturing them from solid timber, the use of composite materials for assembling the casing can be very promising.
The thickness of the casing board varies from 50 to 70 mm and depends on the purpose of the specific element.
The gaps between the casing frame and the frame are sealed with jute or linen. At the same time, it is recommended to carry out general caulking of the house only after the installation of the casing is completed.
As has already been said several times above, the casing is an important power unit of the entire structure of wooden houses, and it is highly advisable to take all measures to ensure that this unit retains its qualities for as long as possible. These measures also include antiseptic treatment of both the casing posts and the ends of the frame.
But since many people perceive the use of antiseptics for treating internal elements of the house very skeptically, its implementation depends on the personal preferences of the customer.
Casing in a wooden house: price and manufacturing features
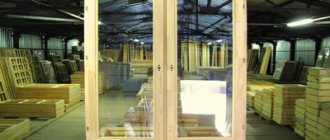
The box is made from dry (chamber dried) calibrated timber, glued or solid. Raw material (with a moisture content of more than 15%) is not suitable for casing, regardless of the type of wood.
When using an array, take a carriage or beam with a thickness of 50...90 mm or more (the selected groove for the P-type should be no more than 1/3 of the thickness in depth), and the width of the board should be equal to the thickness of the wall. Glued laminated timber is used with face or micro-tenon gluing.
Important: for large windows and doors (“French”, arched, panoramic), only reinforced glued cladding, the so-called power type, is used. Its thickness reaches 90 mm or more. The cost of the casing greatly depends on the selected type of wood, the method of its processing, the width and thickness of the boards, and the selected profile
Thus, the most expensive products will be made from larch, cedar, and oak; models made from pine and spruce are much cheaper. Also, the final figure is influenced by the configuration of the box, the presence of additional elements - for example, platbands
The cost of the casing greatly depends on the selected type of wood, the method of its processing, the width and thickness of the boards, and the selected profile. Thus, the most expensive products will be made from larch, cedar, and oak; models made from pine and spruce are much cheaper. Also, the final figure is influenced by the configuration of the box and the presence of additional elements - for example, platbands.
Due to their complexity and labor intensity, arched and polygonal casings are the most expensive. They are made by gluing or connecting into a self-jamming lock several elements that form a given opening line.
In the table called “in the deck” we mean a U-profile casing box. Prices are approximate, without adjustments for the cost of wood.
Relationship between construction and design
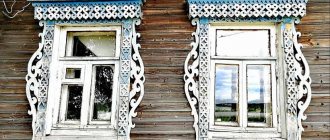
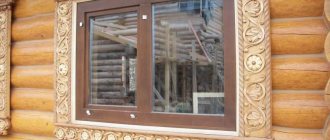
Finishing T-shaped pigtail
In some cases, you need to make a pigtail that combines power and decorative elements. This solution is called “finish casing” and is by far the most expensive casing option.
As a rule, all elements of the finishing casing on the side of the log house are profiled for a tongue-and-groove connection, and on the outside - for installing a window or door. The bottom bar of such structures is a finished threshold or window sill.
Separately, it is worth noting that the installation of doors and windows is not always carried out in a rectangular opening. Thus, attic windows often have a triangular or trapezoidal shape and tenon casing is most often used for their reinforcement.
An example of an arched casing
The most complex version of the pigtail can be called an arched solution, which is distinguished by a special structure of the apex.
In cases where the opening in the log house has a rectangular shape, but it is planned to install doors with a rounded top, the top is a spacer beam, the inner arc of which is selected according to the pattern.
In a more complex version, when the opening has an arched vault, the apex is assembled as a complex trapezoidal structure.
What to consider when assembling casing
In conclusion, here are a few technological points, knowledge of which will help save time and money at the stage of manufacturing and assembling casing structures:
- to create better thermal protection, it is advisable to also install the lower strip of the casing frame “into a tenon”;
- when installing frames for interior doors, it is permissible to use the casing in the embedded beam and without the bottom strip;
- When adjusting the casing elements during assembly, it is necessary to remove the material extremely carefully, since building up in this case is unacceptable.
accepts orders for the manufacture and installation of casing of any design, including decorative and protective treatment. You can calculate the cost of products and installation, as well as find out the timing of their production using any coordinates published on the “Contacts” page.
Calculate the cost of painting and insulating your home right now