The process of using a plastic window inevitably leads to the fact that the sashes lose their clamping density, move relative to the frame, and begin to open or close with certain difficulties. Adjusting Rehau plastic windows will help solve the problem. You can do it yourself or contact specialists.
Why adjust PVC windows
| Timely adjustment of Rehau structures is part of their maintenance. It helps to extend the life of the structure and make it as comfortable as possible. For example, adjusting Rehau windows to winter and summer positions helps to increase the pressure density and retain heat during the cold season. And in warm weather - reduce the load on the mechanisms, extending their service life. If a sash misalignment is detected in a timely manner, you can also correct it yourself. Comfortable use of the structure is out of the question if the handles dangle or you have to exert significant effort to open the doors. |
Sealing the seams of a REHAU window with thermal insulation materials
In case of improper installation, sealing the seams with thermal insulation materials may be the only solution. Sealing installation seams and joints with special heat-insulating materials is one of the most effective ways to insulate REHAU windows.
How can I seal the street seams of a REHAU window?
- polyurethane foam, which must be plastered or covered with strips
- mineral wool, which must be covered with strips
- polystyrene foam, which must be covered with strips
— liquid rubber (STIZ)
How can I seal the internal joining seams of a REHAU window?
- silicone sealant
- acrylic sealant
— cosmofen (liquid plastic)
The described problems with REHAU (rehau) windows can appear due to poor-quality installation of a metal-plastic structure or during a long service life - longer than 10 years. During installation, installers had to familiarize themselves with the design properties of REHAU windows and teach owners how to use REHAU windows.
The end of summer, the beginning of autumn is the time to prepare REHAU windows for winter. If you take care of REHAU window insulation in advance, you will definitely not freeze at home in winter!
Adjusting Rehau windows “winter and summer” - instructions
Not all users of PVC structures know that they have three modes of use: winter, summer and neutral. By default, the third one is most often set during installation. However, in winter, for the best heat retention, the shutters should be switched to cold mode. And in the summer - in a warm one, to avoid premature wear of the mechanisms. Next, we’ll look at how to adjust Rehau windows for the winter.
To begin with, we note that the adjustment of Rehau window structures has general adjustment specifics. Only for Euro 60 and Delight Design there are minor differences due to the characteristics of the window sashes.
You can determine which operating mode is set by visually inspecting the sash. You should open it and see where the trunnions - eccentrics - are located.
How to adjust Rehau windows for winter mode:
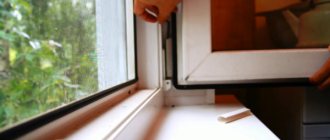
- Remove the mosquito net.
- Clean the glass unit and fittings from dirt and dust. Lubricate the mechanisms.
- Check the condition of the sealing contour, it is important that it remains elastic and is not covered with cracks. Otherwise, the rubber band should be replaced. If there is no damage, wipe the circuit with soapy water and lubricate it with a silicone-based compound.
- Using a hexagon or screwdriver (the choice of tool depends on the type of eccentric head), turn the trunnions clockwise so that they take the same position.
- Check the tightness of the fit by trying to turn the handle. You can also squeeze a sheet of paper between the flaps and try to pull it out. If this was not possible, the sheet was torn, which means the settlement was successful.
Please note that if the room is warm with the trunnions in the neutral position and there is no blowing, then you should not change the mode - increased pressure reduces the service life of the fittings and seal.
The specifics of adjusting Rehau plastic windows for the winter depend on the fittings used. If this is MAKO, then to switch to warm mode, manipulations should be carried out on the dismantled sash.
If Siegenia Aubi, then tighten the mounting screws. And the adjustment of Rehau Blitz (Rehau Blitz) with Roto fittings must be carried out by specialists.
The second option for adjusting Rehau plastic windows for the winter involves removing the cap from the bottom hinge. A small hole with a switching mechanism will open. To increase the pressure density, you should turn the mechanism counterclockwise. Moving in the opposite direction will help ease the pressure. The maximum gap will decrease by 8 mm.
Checking the tightness of a REHAU (rehau) window (how to check where the wind is blowing from a REHAU (rehau) window?)
If in summer the problem of ventilation of REHAU (rehau) windows worries us little, then in winter we don’t want to freeze at home. So, three ways to detect a REHAU window blowing. We check the windows for ventilation, look for where the wind is blowing from the REHAU window.
The first way to check the tightness of a REHAU window : using a sheet of paper, half an A4 is quite enough. We open the window sash slightly and expose half of the sheet to the street, close the sash, and lower the handle all the way down. Important! The sheet of paper should not fall on the locks that are installed on the window frame, otherwise it will simply be bitten and the experiment will be carried out incorrectly. We pull out the sheet. Three options: the sheet flies out with a whistle, the sheet comes out with difficulty, it feels like the sheet is about to tear. Important! Thus, the entire perimeter of the window sash is checked. If in most places of such a check the sheet comes out freely (flies out with a whistle), the seal needs to be replaced. If the sheet comes out with difficulty in most places of inspection, the problem of window tightness can be solved by adjusting and lubricating the window. If the sheet is about to tear in most inspection places, you do not need to do anything with the REHAU window. You won't be able to blow from this REHAU window!
The second way to check the tightness of a REHAU window : using a soap solution. Do you remember how you were looking for a hole in a bicycle tube?))) We make a soap solution. Apply REHAU around the perimeter of the window. Where the bubbles appear is where it blows.
The third way to check the tightness of a REHAU window : using a candle flame. Carefully move a burning candle around the perimeter of the window. Where the flame fluctuates, that is where the REHAU window blows from.
How to understand that the window is adjusted correctly
| After the adjustment of Rehau plastic windows to winter/summer mode is completed, it is important to determine whether mistakes were made. Pay attention to the following features:
Correct adjustment of Rehau plastic windows in winter/summer mode is the key to increasing the service life of the structure. |
How to transfer (prepare) plastic windows to winter mode?
Even high-quality windows with excellent waterproofing and thermal protection can sweat and freeze in the winter. And this does not mean a manufacturing defect or installation errors; perhaps you simply did not prepare your windows for the cold.
We will tell you how to switch plastic windows to winter mode, additionally insulate the frame and protect the room from drafts. To do this, it is necessary to separately consider the insulation of each “weak” part of the window, which can let cold air into the room.
Accessories
First of all, I would like to say something about the fittings. Most modern plastic windows have fittings with two or three seasonal modes: “summer and winter” or “summer, winter and autumn”.
Some are not even aware of this feature of their windows and, with the advent of cold weather, they condemn “negligent” manufacturers for defects or outright negligence, but all they had to do was turn a couple of “bolts” and switch their fittings to winter mode.
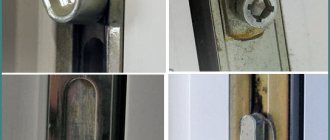
The window pivot has seasonal modes. The trunnion is a small mechanism for holding the sash in the closed position, which can be located around the entire perimeter of the sash. The characteristic click when the sash slams shut is the sound of the trunnion moving.
The trunnion can be made in the form of a small ring, resembling a nut in shape, or in the form of an oval lever.
Other forms also occur, but much less frequently. The nut-shaped axle has a small hole, the location of which indicates seasonal conditions.
Before preparing plastic windows for winter, make sure there is such a mark on your trunnion and check its location.
If the hole is closer to the frame and seal, then the fittings are set to winter mode. In this mode, the sash fits as tightly as possible to the profile, thereby preventing any penetration of cold air into the room.
With such a fit, the seal around the perimeter of the light opening and the sash quickly wears out and becomes unusable, so it is not recommended to leave the trunnion in winter mode all year round.
The easiest way to adjust the oval-shaped trunnion is that you do not need any additional tools. To adjust the trunnion in the form of a nut, you need to equip yourself with a hexagon of a suitable diameter.
Insert the hexagon into the hole and turn it so that the small circle on the trunnion is in the desired position (in our case, closer to the window seal). This simple technique is necessary not only to prepare plastic windows for winter, but also to prepare them for summer.
Don't forget about handles with loops too. They need to be lubricated before the onset of cold weather. It is best to do this in mid-autumn. You can lubricate the fittings with vegetable or machine oil.
You can also purchase special products for treating door and window hinges, which are sold in a convenient tube - a syringe. Take a small amount of oil into a syringe and pour it into the joints between the fittings.
Sealant
The seal is a rubber gasket between the frame and the sash. The sealant around the edges of a glass unit can also be called a sealant. Before the onset of winter, the seal on the sash and profile must be checked for elasticity. To do this, it is enough to feel it around the entire perimeter, especially in the corners.
The seal should be soft, bend easily under pressure and instantly return to its original shape; no defects should be visible around its perimeter. If your seal is too hard and loses its shape, no folk remedies for “revitalizing” it will help you.
Unfortunately, the seal will have to be replaced. You can read more about how to do this in the article “Replacing the seal on plastic windows.” Previously, you learned that the tight fit of the sash to the profile greatly affects the properties of the seal, so before switching plastic windows to winter mode, you need to prepare the seal.
Purchase silicone rubber lubricant from your local hardware or hardware store. Absolutely any will do; it can be sold in the form of an aerosol, tube or syringe. Since we don’t need a large volume of the product, it is best to buy lubricant in a syringe or small tube.
Wash and dry the seal thoroughly. To do this, you cannot use any solvents, alcohol or products with abrasives (hard particles); dishwashing gel is ideal. If you have a multi-petal seal (most often such seals are found in REHAU and KBE windows), first apply a small strip of product between the petals.
In this case, there is no need to additionally use a brush or sponge; the lubricant itself will be evenly distributed over the entire area.
After this, apply silicone to the seal itself and carefully spread it with a small brush or fingers. It is also necessary to prepare the sealant around the edges of the glass unit for winter.
Usually this part of the window is protected with a glazing bead (a small plastic frame between the profile and the glass unit), but it happens that the manufacturer did not take this detail into account or the glazing bead simply broke.
In this case, the glass seal needs to be lubricated, just like a regular one. To avoid staining the glass, use paper or tape.
How to eliminate distortion and sagging of the sash
Very often, sashes more than a meter wide begin to sag under their own weight. You can try to solve this problem on your own. It is very important not to ignore sagging, otherwise it will cause depressurization of the structure, the appearance of ice, blowing, and heat leaks.
How to adjust Rehau plastic windows:
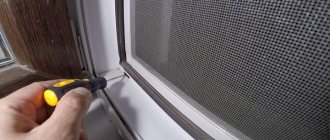
- To operate, you will need a hex wrench.
- Open the doors completely and remove the decorative curtains from their hinges.
- Tighten the adjusting screw of the upper hinge from left to right, so the lower corner of the sash will rise.
- After closing the sash, tighten the screw on the bottom hinge, adjusting the vertical position. When you turn the key to the right it goes up, and when you turn it to the left it goes down.
- Next, you should check the operability of the sashes, try to open and close them, they should not cling to the frame. A leak test can be done using a candle or lighter. You need to light it and bring it to the window; vibrations of the light indicate a violation of the seal.
To avoid sagging, preventative adjustments should be carried out twice a year.
A situation is possible when the sash hangs on the lower hinge. The main reason is the incorrect position of the handle during ventilation.
To fix, you need to:
- Move the handle to the folding position.
- Press the sash tightly against the frame.
- Try to close the door.
The distortion of the glass unit can be eliminated by adding a spacer. It is located under the glazing beads. Having detected a distortion, the sash is opened, the double-glazed window is lifted and an additional cover is placed in the deformed area. After which the beads are installed in place. It is important to control the accuracy of the work level. If you don’t have the skills, then you shouldn’t take risks, it’s better to turn to the experts.
Setting up fittings from different brands
Each brand of window fittings has its own method and procedure for switching modes. It doesn’t matter who released the profile, be it Century or Rehau or another company. Adjusting the fittings for the winter is done by adjusting the position of the trunnion, but each brand does it differently. The most frequently used:
Maco. The eccentrics of this company's fittings take the shape of a rather large oval. Pliers or a wrench are suitable for adjustment.
Torx. The fittings of this brand are distinguished by their reliability and proven durability. To switch modes, you need a slotted screwdriver or a six-sided wrench.
Roto. Due to its popularity, it is installed on many plastic windows. Equipped with round heads. To make adjustments for the winter, you will need a special key.
What to do if the handle does not turn and the window does not open
If you suddenly change the position of the handle, it may jam - that is, it becomes impossible to change the position of the accessory. Most often, the sash is open, and the handle itself looks down. The main reason is a malfunction of the lock that ensures the operation of the locking mechanism. Remember that you cannot turn the handle by force, as this may cause it to break.
In this case, the adjustment of the Rehau plastic window depends on the brand of the lock. The SL mark on it indicates that it is necessary to pry up the plastic tongue and move it towards the edge of the sash, then return the handle to its normal position.
Adjustment of Rehau plastic windows based on AUBI fittings should be carried out as follows:
- Find a plate with a spring near the handle.
- Click on it.
- Rotate to a horizontal position.
Another option on how to adjust the fittings of Rehau plastic windows:
- Remove the decorative curtains and press down on the top hinge pin.
- Remove the pin with pliers, after which you can remove the sash by removing it from the hinges.
- Move the knob to the 12 o'clock position.
- Find the “scissors” element in the upper part of the mechanism; it is attached to the upper loop from which the pin was removed.
- Press the “scissors” against the seal, press the lock and move the handle to the “9 o’clock” position.
- When the “scissors” return to place, install the sash.
If the handle moves with considerable effort, the hinges and mechanisms should be lubricated with a special compound. Often a malfunction of the fittings becomes the reason that it is impossible to fix a problem with the handle. In this case, you should contact the experts.
Difficulties and errors
The procedure for switching modes is extremely simple: the mushroom on the end of the sash just needs to be turned to the appropriate position, and sometimes this can even be done with your fingers.
Therefore, if we consider the event itself, difficulties arise extremely rarely. Is it possible to highlight the following errors :
- incorrect, unclear position (overstretched or understretched);
- the positions of the marks were mixed up, the locations of the different eccentrics were not identical.
One leaf may have not one, but several trunnions (usually a maximum of three). If different eccentrics are in different positions, for example, the user forgot to tighten one of the elements or did it inattentively, then the mode will not be set correctly and a misalignment will occur.
It is important to ensure that all indicators are in completely identical positions (a deviation of 0.8 mm is allowed). The same applies to elements on different sashes of the same double-glazed window - if their position is not the same, the modes on them will be different, which will create discomfort and cause an incorrect, uneven load on the entire system.
Difficulties associated with incorrect operation and shortcomings of other elements of the system:
- The initial distortion and incorrect pressing of the valves will lead to the fact that even with the correct position of the eccentric, the mode will be set incorrectly. That is, you need to switch over a working, correctly adjusted system. If necessary, before the procedure, calibration must be performed horizontally/vertically, for fit, carried out on loops, scissors;
- Dirt on the seal, the fittings may cause misalignment and poor fit. It is advisable to inspect the fittings and profile and, if contamination is detected, clean it and apply new lubricant.
If you don’t have special products at hand, then as a first-priority measure you can use a wipe with a soft rag and spray with a universal WD solution (it’s silicone, so it’s suitable for seals, profiles, and metal fittings at the same time).This substance is liquid and is supplied in a stream, which is convenient for washing away dirt. In the future, it is recommended to use a more consistent lubricant.
It is advisable to switch the modes of a plastic window at positive temperatures in the range of +5...+10° C. You can check whether the pressing force has been set properly with a sheet of paper: if you insert it between the sash and the frame and it holds, then everything is correct.
Adjusting Rehau windows in case of draft
Adjusting the pressure of Rehau windows will help you cope with the problem of blowing. The technology depends on the fit mechanism.
Main options:
- If there are eccentrics, they are tightened, transferring them to winter mode. To ensure that the fit remains uniform, all trunnions are rotated to the same position, an equal number of times.
- If there is a plate to enhance the fit, you should pay attention to the position of the tongue. When extended, it indicates the tightness of the structure, therefore, it is necessary to adjust the hinges.
Other types of fittings adjustment
In addition to setting the winter-summer fitting modes, more subtle adjustments may be needed. The manufacturer has provided the ability to change the pressing force, dismantle broken mechanisms and install new ones, eliminate sagging sashes and the appearance of drafts without replacing the entire window structure
These additional steps are needed if:
- when opening or closing, the sash grinds, hitting the profile on the sides or bottom;
- during cold weather, there is a draft, heat loss, despite a change in regime;
- the handle does not turn or close;
- the fittings become loose;
- there is sagging of the structure, which especially often happens with balcony doors.
To return window geometry to its original form, the following procedures are provided:
- shifting horizontally or vertically;
- adjusting the position of the upper corner;
- strengthening or weakening the pressure against the frame.
Some work may be related to handle problems.
Order adjustment from the company Windows Germany
You can adjust the shutters yourself, but if you are not sure that you can strictly follow the instructions, then it is better not to risk it. will help with maintenance, switch the window to winter or summer mode without damaging the mechanisms and hinges.
Our advantages:
- Every client is important.
- Willingness to fulfill your requirements as quickly as possible.
- Work in Moscow and the region.
- Low prices.
- Only experienced and qualified craftsmen.
We specialize in Rehau products, so we can competently adjust any fittings.
Cleaning dirt and lubricating REHAU window fittings
Start insulating your windows for the winter by inspecting the REHAU window fittings. Remove dirt, especially from the top of the window sash. All folds must be cleaned of deposits and dirt, especially cement and plaster residues. Direct exposure of the fittings to moisture and contact with cleaning agents should be avoided. Then lubricate the window fittings with REHAU. REHAU window lubrication points are marked with special markings. How to lubricate a REHAU window? The most common ones are WD-40, machine oil, grease. Do not under any circumstances lubricate with sunflower oil or olive oil or anything else! Edible oils dry quickly, turning into a sticky substance that will break the REHAU window mechanism. After this, rotate the fittings in different modes several times to distribute the lubricant. Wipe off excess oil from the REHAU window.
Work order
When switching windows to winter mode, you need to be careful. Do not turn the eccentrics all the way, using great force. After work, the handle should not turn too tightly. The ideal setting is when the sheet of paper can be pulled out of the rebate with little effort.
How to switch windows to winter mode instructions:
- Clean the sash from dust and dirt.
- Lubricate the mechanisms with grease or silicone grease.
- Determine in what position the marks or points on the trunnions are located.
- Turn the levers using a wrench, screwdriver or fingers to the desired position. If winter is ahead, the marker should “look” into the house.
- To check, insert a sheet of paper into the narthex and close the window. If it is impossible to pull out the leaf, everything was done correctly.
Pen problems
The following problems are often associated with the handle:
- it jams and does not rotate to the desired position;
- she was blocked;
- it's broken.
If the handle jams and does not turn as it should, there are 2 possible options:
- Needs cleaning. The handle is removed and all mechanisms are cleaned with a special brush. After which the mechanical parts are lubricated and the handle is reinstalled.
- Adjustment required. If the handle is too tight and does not rotate to the desired position, it feels like it is stuck, then it is necessary to weaken the pressing force of the sash. This can be done by adjusting the eccentrics that are located closest to the handle. Also, it would be a good idea to adjust the bolts on the back of the hinge.
Sometimes the handle becomes blocked, making it impossible to turn. Often, the essence of the problem is the blocker that fixes it. The setting depends on what fittings are installed. If there is an inscription AUBI on the shutter, then you need to direct the door to a vertical position, press the plate with the spring and turn the handle in the required direction. If the inscription is different (the company is different), you will need to adjust the tongue. It is located under the handle. You need to press it and turn it towards the elastic band.
A broken handle must be replaced with a new one. Just buy the model you like, remove the old one and insert the new one. You can remove the broken element by turning the cover on the handle 90 degrees. This method will open the mounting bolts. Next, unscrew them and pull out the handle while gently and lightly shaking it. Installation of a new product is carried out in the reverse order.
Vertical-horizontal shift
You can adjust the vertical position of the sash by adjusting the bottom hinge. It is often equipped with a protective cap or plug. There are 2 points under protection. One adjusts the position vertically, the other adjusts the horizontal position. To make vertical adjustments, you need to turn the screw located at the top of the hinge. To raise the sash, turn the screw to the right. For lowering - vice versa.
To adjust the horizontal position of the structure, it is necessary to adjust 2 hinges, upper and lower. The second screw on the hinge located on the side is responsible for changing the horizontal. By turning it from the right position to the left, the sash will come closer to the fastener, and in the same way in reverse, to move it away, turn from right to left.
By adjusting the vertical and horizontal, you can eliminate drafts caused by the fact that the sash is not installed quite correctly. Blowing is also possible if the upper corner of the window is not locked. The degree of its pressure is adjusted by turning the adjusting screw on the side of the upper hinge until the sash fits evenly and tightly.
In cases where the profile is equipped with slot ventilation, then when changing the horizontal position, leave a gap of a couple of millimeters between the hinge fasteners and the door.