Hardware stores and gift wrapping departments stock many beautiful boxes of varying sizes and purposes. Small wardrobe items, cosmetics, threads and household items are stored in boxes.
Gift boxes are also used to beautifully present gifts for holidays and memorable dates. But you don’t have to buy boxes if you really need them - you can make them yourself from cardboard and thick paper.
Heart gift box
What do you need
- Sample;
- White paper;
- scissors;
- pencil;
- thick paper;
- glue gun.
How to do
Print the template on plain white paper. Cut and fold along the lines. On a narrow part you need to make a horizontal cut along the line indicated by the arrow.
Frame: Sarah Johnson – Pugdemonium / YouTube
Trace the templates onto construction paper and cut out. You will need two hearts and two stripes of each type. Follow the fold lines with scissors, without cutting through the paper, and fold it.
Frame: Sarah Johnson – Pugdemonium / YouTube
On all four long pieces, make many vertical cuts before the fold. Glue the wider pieces to the smaller heart so that the cuts are on the back side. Details are shown in the video.
Frame: Sarah Johnson – Pugdemonium / YouTube
To get the box lid, make the same vertical cuts on the narrow parts. Glue these parts to another heart so that the cuts are on the inside. Close the box with the resulting lid.
Frame: Sarah Johnson – Pugdemonium / YouTube
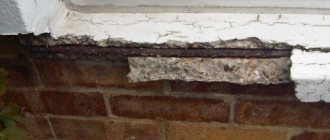
Use when installing an embedded block
This option is carried out as follows:
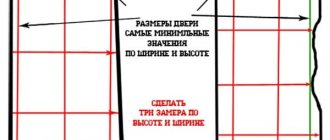
Window freeze.
- A vertical groove is selected along the entire length of the window opening (from its ends).
- Take a block with a cross-section of 50 x 50 mm and a length less than the height of the opening and place it in the groove made without the use of fasteners so that it does not rest against the upper crown when shrinking. This block plays the role of a guide, providing free vertical movements and eliminating such horizontal movements.
- The window frame is attached to the block using screws, which should not be long enough to come out on the other side.
- A roll-type seal is placed between the ends and the product.
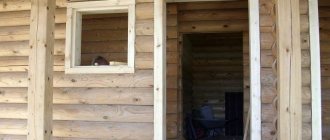
Unlike the previous option, the window frame itself must be completely assembled in advance and mounted in the opening in finished form. Its thickness may be less than in the version described above, since there are no grooves in it.
A fragment of a monolithic box with a groove in the frame (“tenon-monolith”).
After installing the box, a window is inserted into it, the frame of which is connected with screws to the installed frame, and the gaps are filled with foam (it cannot be used to fill the distance between the ends and the window frame).
At the last stage of work, the installation of platbands (external and internal) is carried out. They should hide the gaps between the ends and the frame. This installation option can be used for all types of wooden houses, with the exception of buildings made of calibrated logs whose diameter exceeds 0.35 meters. The material used is usually unsanded and unplaned edged timber with natural moisture. After installing the windows, it is necessary to install and finish the slopes.
Polygonal gift box
What do you need
- Thick paper;
- compass;
- ruler;
- pencil;
- scissors;
- glue;
- bow.
How to do
Draw two circles with a diameter of 5 cm on paper. Without changing the pitch of the compass, make six marks on the circles at an equal distance from each other. Connect these marks with straight lines inside each circle.
Draw lines on the outside of each corner as shown in the video. For one figure they should be 4 cm long, and for the other - 2 cm. Connect these lines so that you get six rectangles. To the right of each of them, draw a small detail with a beveled top.
Cut out the shapes along the lines. Using scissors, draw along the sides of the polygon inside the circle and along the line of the piece with the beveled top. Bend the shapes along the marked lines and glue each of them. Place a lid on the box and decorate it with a bow.
For such a craft, you can make a voluminous lid. It looks very original. By the way, the box itself in this video is made using a different, more intricate technique:
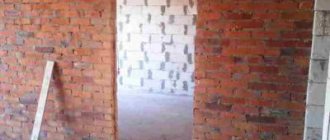
Making a window frame. Layer one.
The first step is to take care of the lumber. We use scraps of “fifty” coniferous boards of sufficient length. They sat for two seasons and dried well.
You cannot use a damp board.
If you get a damp board, you can do the following. After sawing it into blanks, place them on hot batteries. They will dry out in two to three months. If you don’t want to wait for this period, look for those who do carpentry, make wooden kitchens, furniture and the like. They often have drying chambers in which drying generally takes no more than an hour. It won't be expensive. We saw boards 50 mm thick into lengths. Our lengths are 109 by 133 cm. When installing the frame, one of these “lengths” will decrease by almost 10 cm. But more on that later. For now, it’s better to cut the scraps with a margin of a few centimeters. Let's make the length 115 by 140 cm. A little later it will become clear why this reserve is needed.
Next you need to cut the sections to a width of 65 mm. The thickness of the blanks will remain 50 mm, that is, the thickness of the board. My circular saw has a special bar that allows you to fix the width of the cut:
If you try to measure the actual thickness of the “fifty” boards, you will find that none of them are exactly 50 millimeters. Their thickness will vary from 45 to somewhere up to 52 mm:
It's not scary.
There are no boards of the same thickness in nature, and this should not be confusing. And one more thing. We, of course, try to choose pieces without knots. But if you reject all the boards with knots, a lot of wood will go to waste. The frame will subsequently be glued together, and no more than two sides will remain “visible” to the workpieces. Therefore, in some cases it is possible to use blanks with knots. Here, for example, is a board that, it would seem, is not suitable for anything. But after sawing into blanks, it is clear that only the middle block will be scrapped. The last two can be put into action.
Now we go through the blanks with a plane one at a time. We set the plane to almost the very minimum:
This will be enough to remove the “fringe” remaining from the board after sawing
Now you can roughly lay out the future window frame from the blanks:
We cut the workpieces to the calculated lengths. The time has come to say why these lengths were originally cut off with a margin. The fact is that when we go through workpieces with a plane, at the end of the plane it seems to “dive”, making a “wave”.
Square gift box
What do you need
- Scissors;
- thick paper;
- ruler;
- pencil;
- glue;
- bow.
How to do
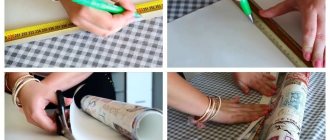
Cut out a square measuring 20 × 20 cm from paper. Draw two vertical and two horizontal lines on it, stepping back 5 cm from each edge. In the middle you will get another square.
Use scissors to follow the marked lines and make grooves without cutting through the paper. Bend it along these indentations. Cut along short lines, bend the resulting parts and glue them together as shown in the video.
Cut out a square measuring 16 × 16 cm from paper. Draw two horizontal and vertical lines on it, 3 cm away from the edges. Then cut, bend and glue in exactly the same way as the previous piece. Place the lid on the box and glue a bow on top.
Instead of a regular lid, you can make two triangles that fit completely onto the box:
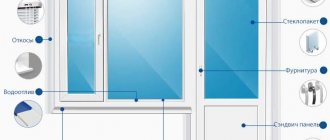
How to make laminated plastic windows
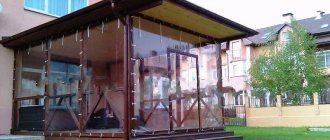
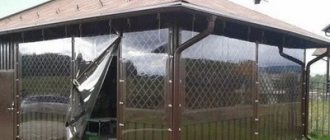
Specialized technologies are used to produce laminated window blocks. A special film is applied to the plastic profile, which is attached to the surface with glue. The film consists of several layers with embossing on its surface, and to apply it to a plastic surface, you need to use laminating equipment.
Lamination is necessary not only to make windows look more aesthetically pleasing: in this way they become more resistant to all kinds of atmospheric phenomena, durable and remain extremely easy to maintain. There is a film whose surface resembles natural wood. Dust and dirt are practically invisible on such a decorative film, so plastic windows laminated to look like wood, photos of which can be seen below, are incredibly practical.
Laminated window blocks have quite a few advantages. First of all, it should be noted that they are quite resistant to mechanical stress, since it is much more difficult to scratch PVC film than paint. In addition, such a film retains its excellent appearance for a long time: with a “wood-like” coating, aluminum windows and any other window structures can look good even after several decades of use. Learn more about aluminum windows.
In addition, film-coated windows are resistant to temperature fluctuations and weather conditions. The structure covered with PVC film is not sensitive to precipitation, and the film itself retains its color even under prolonged exposure to sunlight.
Another undeniable advantage of laminating with PVC film is its wide range of colors and textures, among which there is a suitable option for any occasion.
Pyramid gift box
What do you need
- Scissors;
- thick paper;
- ruler;
- pencil;
- plate or disk;
- hole puncher;
- yarn or ribbon.
How to do
Cut out a square from paper. Using four lines, divide it into nine parts. Make a mark in the center of each side of the large square. Inside the squares adjacent to the marks, draw triangles as shown in the video.
Place a plate or disk on the sides of the triangle and trace. Cut out the shape along the marked lines. You should end up with something like a flower.
Bend the figure along all straight lines and connect the pyramid. Make holes in the tops of the triangles, thread yarn or ribbon through and tie.
Such a pyramid can also be made using the origami technique:
Gift box clamshell
What do you need
- Pencil;
- disk;
- thick paper;
- ruler;
- scissors;
- ribbon.
How to do
Trace the disc on paper. Draw two perpendicular lines through the center of the resulting circle. Place the disk so that its edges touch the beginning of the lines at the top right and trace. Divide the new circle in the same way as the first.
In each part, trace the disc as shown in the video. Then deepen the lines.
Cut out the piece along the outer contours and bend along the deepened lines. Place the gift inside, fold the box and tie it with a ribbon.
Gift box with flip lid
What do you need
- Ruler;
- pencil;
- thick paper;
- scissors;
- glue.
How to do
Draw two lines on the two narrow sides of the sheet at a distance of 1.5–2 cm from the edge and fold the paper along these lines. Bend and straighten the sheet as shown in the video. You will get two folds in the middle.
Draw lines on the long sides of the sheet at the same distance. For clarity, draw the bends made in the middle. Make cuts down to long horizontal lines. Glue the paper together as shown in the video.
The hinged lid can be made from a separate sheet:
Gift box-chest
What do you need
- Sample;
- thick paper;
- scissors;
- stationery knife;
- glue.
How to do
Print the template, cut along the solid lines and cut along the bottom dotted lines. Fold the shape along the remaining dotted lines. Glue it together as shown in the video. Connect the top pieces and thread them through the holes to close the chest.
You can leave the box as is or cover it in the middle with paper of a different color and decorate it with a bow.
Required tools and materials
To make boxes at home, you will need simple tools: a stationery knife, tape (painting and double-sided), glue and scissors.
Material for work is taken from stores or used in large used cardboard packages. Depending on the functions of a particular box, the density of the material—cardboard—varies.
Gift box-bag
What do you need
- Thick paper;
- ruler;
- pencil;
- scissors;
- disk;
- glue;
- yarn or ribbon.
How to do
Fold the wide side of the sheet, moving 5 cm from the edge. Fold the resulting strip and cut off the remaining paper along the edge. Bend it back once.
Make one mark at the top and bottom, stepping back 5 cm from the narrow edge. Fold the edge along these marks, then fold the entire piece like an accordion.
Unfold the paper completely and make cuts along one wide edge of the sheet to a horizontal line. Cut off the narrow part, folded into an accordion, at the top and bottom. It should remain in the middle.
On the other wide side, mark the middle of the resulting squares with a pencil. Take a disk or some other round object and connect the center marked points of the squares with the corners opposite.
Fold the paper along semicircular lines. Glue the box together as shown in the video. Punch holes at the top, thread yarn or ribbon through them and tighten the bag.