Currently, in private construction, purchased concrete blanks used as lintels are practically not used. Today, most owners of country houses prefer to make door and window lintels with their own hands.
To make your own lintels from poured concrete, you do not need to have any special skills. All that is required of you is to pay due attention to the materials in this article and follow all the instructions given in it.
What is needed to fill jumpers?
I used:
- fittings diameter Ø 12 mm;
- wire rod diameter Ø 6 mm;
- knitting wire diameter Ø 1.4-2 mm;
- edged board 25×200 mm;
- nails 70 and 100 mm;
- cement grade 400;
- river sand;
- crushed diorite stone fraction 20 mm.
I used reinforcement with a diameter of Ø 12 mm, since I plan to build a second floor or attic with a concrete floor and I was on the safe side so as not to calculate the load-bearing capacity of the structure; there will also be a seismic belt under the ceiling; I will describe how to make a seismic belt in the next article.
Filling jumpers
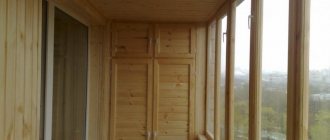
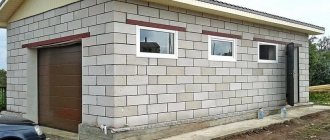
The photo shows how the formwork for the lintel is installed over a doorway measuring 800x2100 mm, the width of the interior wall is 200 mm, the minimum depth of the lintel support is 200 mm. Since the width of the board matches the width of the wall, there is no need to knock down the shields.
First, the height of the door is measured, taking into account the space for foaming and slopes. Since the board is 2.5-3 mm thick, you can immediately measure according to the height of the door. After removing the formwork, you will have a gap equal to the thickness of the timber used. Next, mark the level of the opposite side from the foundation base or from the first mark using a hydraulic level. After the marks are made, we nail pieces of boards in the shape of the letter - T, the upper edge of which passes under the mark. For this I used 100mm long nails.
Next you need to prepare 3 shields, for this I have 3 boards. Along the edges I have half a stone that will cover the ends of the formwork, the first board is 800 mm long and 2 more 1200 mm each, since the support depth is 200 mm and we must have a reserve. To extend the durability of the wood for further use, I wrapped the formwork boards with cling film, which costs $1 per roll. We lay the bottom board, 800 mm long, on already nailed T-shaped supports; there is no need to nail it to the supports. Next we install the side shields. First, we nail them along the edges to the wall, and then we knock the corners together diagonally from top to bottom. To facilitate the dismantling of the structure, 70 mm nails were driven along the top, on which a binding wire was attached to tighten the top of the lintel formwork. You can use pre-prepared timber, I used this method to save used wood, which can still be useful during the construction process.
How to reinforce lintels?
Using my door as an example, the following were prepared:
- 4 reinforcement rods with a diameter of Ø 12 mm, size 1200 mm;
- 6 wire rod quadrangles with a diameter of Ø 6 mm, size 100 by 100 mm;
- knitting wire.
The frame was knitted with a regular 100 mm nail. Since hooks must be ordered, for the convenience of tying the frame, 2 reinforcement pins, which are narrower than the size of the reinforcement, are driven into the wall.
The frame was knitted with a regular 100 mm nail. Since hooks must be ordered, for the convenience of tying the frame, 2 reinforcement pins, which are narrower than the size of the reinforcement, are driven into the wall. To start knitting, take 2 reinforcement pins and place them on the prepared pins driven into the wall, and mark a step of 200 mm with chalk or a marker. Along these marks we string prepared quadrangles from wire rod, distributing them according to the marks made with a marker, and tying the frames with knitting wire. Having tied the frames at the top, we place the remaining 2 reinforcements at the bottom and continue tying.
After our structure is ready, we immerse it in the formwork.
Let's move on to preparing the solution for the jumpers. I did this: for a bucket of cement grade 400, 3 buckets of sand and crushed stone. The mixing was carried out in a homemade trough, which was made from a galvanized standard sheet 1000x2000 mm and 4 boards, 2 boards 2.5x200x950 mm and 2 2.5x200x2000 mm. The trough was reinforced with knitting wire at the corners and boards along the bottom.
After the solution is ready, fill a couple of buckets and lift the reinforcement frame so that it does not touch the formwork from below, after which we fill it completely.
Prices for work in the Russian Federation
| № | Types of jobs | Dimension | Average cost , rub . |
| 1 | Monolithic works | 1 m 3 | 6000 |
| 2 | Installation of ready-made lintels for technological openings | m.p. | 400 |
| 3 | Production of metal jumpers and on-site installation | m.p. | 1000 |
| 4 | Production of aerated concrete lintels on site | m.p. | 1200 |
DIY window lintels
Window lintels are a mandatory element used in the construction of any residential buildings or outbuildings. Indeed, at a certain stage of construction of a summer house or country house, there is always a need to install functional lintels that provide rigidity and strength to load-bearing walls and enclosing structures.
Conclusion
Monolithic reinforced concrete structures are very heavy, so when designing window or door openings, it is advisable to choose aerated concrete products that can be installed easily. They are practical and have good thermal insulation, securely holding the masonry above the opening.
Important points in construction when creating lintels are height and width. With proper calculation and installation, the structure becomes reliable. But, if the distance to cover is very large, then the solution is to use monolithic reinforced concrete beams.
Key Features
Modern construction technologies provide for the possibility of using several types of lintels:
- factory reinforced concrete;
- monolithic products made directly on site;
- metal;
- brick;
- combined.
Despite the reliability of ready-made reinforced concrete products, it is much easier and cheaper to make window lintels yourself, saving time and significant money on transportation costs, materials and labor.
A lintel is a part of a wall or partition that covers the top of a door or window opening. If the weight of the ceilings or enclosing walls is transferred to the wall in which the opening is located, then it is recommended to install load-bearing lintels. In the absence of such loads, self-supporting (non-load-bearing) reinforced concrete, metal or brick lintels are used. In some cases, wedge (arched) lintels are made, which serve as an additional decoration of the exterior or interior of the building. They are also used to organize openings in rooms with vaulted ceilings (ceilings).
Note!
When planning to make window lintels, you should remember to select the correct length of the product. In load-bearing walls, the support of products on the walls must be at least 250 mm, in self-supporting structures - at least 120 mm.
Today, experts recommend giving preference to concrete lintels, finished factory products or products made on the construction site. They are more durable and reliable, take less time to install and are designed for higher loads. The production of concrete lintels can be done directly at the construction site in two ways:
- Pouring on site, with further installation of the product.
- Filling over the opening using removable, collapsible formwork.
Key advantages of steel angle
To make lintels, reinforced concrete monolithic or prefabricated blanks are used. However, for the manufacture of some structures it is recommended to use steel products, including rolled corners.
Among the main advantages of using metal products, the following should be noted:
- simplicity and speed of installation;
- the ability to continue laying a brick or block wall immediately after installing the lintel;
- high levels of strength and durability with the condition of correct selection based on the operational characteristics of the building.
Installation of reinforced concrete lintels
To organize concrete lintels, formwork panels should be prepared according to the dimensions of the opening. To do this, first purchase wooden boards with a thickness of at least 20 mm, which will be fastened together with screws or nails. Experts advise using self-tapping screws, which can be easily removed later using a screwdriver.
Reinforcing mesh is laid on the lower shield and then the vertical shields are secured with self-tapping screws. For additional thermal insulation of the lintels located in the facade walls, insulation is laid on the outside of the formwork: mineral wool, penoplex or dense foam.
At the next stage, the structure is reinforced. The diameter of the steel reinforcement is selected taking into account the load-bearing load of the lintel, its length and width. Metal rods are laid along the lintel, fastening them together with a special knitting wire.
Note!
Experts do not recommend using welding when working with metal, only technological bonding.
To fill the lintel, prepare a concrete solution from high-quality certified cement, small crushed stone and washed sand. The solution can be prepared using an electric concrete mixer or manually in a large container, thoroughly mixing all the ingredients. It should be remembered that crushed stone is added to the finished solution last. Before pouring concrete, small chips of concrete or brick are placed under the reinforcing mesh to a height of 15-20 mm so that the metal is completely recessed in the mortar and the finished structure.
Note!
It will be possible to remove the formwork only after a few days, after waiting for the concrete composition to set. The lower formwork panels and spacers are left for at least 3-4 weeks until the concrete is completely strengthened.
Types of steel angles for lintel equipment
Steel construction angles are made by rolling or bending. If the design involves increased loads, rolled metal is used, which is characterized by:
- high strength due to thickening at the bend;
- clarity of the contours of the outer corner in comparison with a rounded corner made by bending;
- increased wall thickness parameters due to production features.
To make a rolled corner profile, conventional steel alloys saturated with carbon are used, most often St3. For the production of metal products used in aggressive environments, it is recommended to use low-alloy raw materials marked 09G2S.
Taking into account the width of the shelves, unequal and equal shelf products are distinguished. At the same time, it is the latter that have become widespread in various fields of industry.
DIY window lintels
- 1 Materials and tools
- 2 Preparing the box
- 3 Pouring lintels and dismantling formwork
- 4 Videos
- 5 Photos
Currently, in private construction, purchased concrete blanks used as lintels are practically not used. Today, most owners of country houses prefer to make door and window lintels with their own hands.
To make your own lintels from poured concrete, you do not need to have any special skills. All that is required of you is to pay due attention to the materials in this article and follow all the instructions given in it.
Construction of houses
When building any house, there is a need to use reinforced concrete lintels. You can order them or make them yourself. But given the price of reinforced concrete lintels, it is preferable to choose the second option. Of course, many people think that factory-made products are more convenient or reliable, but making high-quality jumpers with your own hands is quite simple. In addition, you will significantly save your money, since you only have to pay for materials. In this article we will look at the technology of self-manufacturing jumpers.
Content:
Types of reinforced concrete lintels
Reinforced concrete products are widely used in the construction industry. Their strength, durability and versatility place them at the forefront of today's building materials. Concrete lintels occupy a high place among other reinforced concrete products, despite their small size and weight. Without lintels, you will not be able to construct a single house from concrete and foam concrete stones, bricks, etc. Reinforced concrete lintels are needed to support the part that is located above the door or window opening. They are used to cover window and door openings in block, stone and brick walls.
A simple technology for the production of reinforced concrete lintels gives very effective results. This is due to the fact that the concrete composition is poured into the formwork with pre-laid steel reinforcement. Metal reinforcement takes the load for various bends and tensions, and concrete reinforcement takes the load for compression.
Lintels can be arched, steel, brick, reinforced brick, etc. There are several types - timber, prefabricated, window and load-bearing lintels. They are made of heavy grade concrete and are designated by the corresponding letters, which indicate the length, design load and standard size.
Reinforced concrete prefabricated lintels are the most popular. They are marked with the designation PR and consist of classic reinforced concrete bars and slabs. The prefabricated property is a huge advantage, since during the masonry you can install the lintel and continue to do the masonry. It is not necessary to cut bricks and lay out rows, due to the modularity of the lintel dimensions.
Concrete window lintels are used to cover window openings. This type is widely used in brick buildings, but can also be used in buildings made of natural or artificial stone.
Load-bearing reinforced concrete lintels are used when it is necessary to close the openings of load-bearing walls. Reinforced reinforced concrete lintels are needed to accommodate the loads from the partition slabs. Load-bearing beams take the load only from the wall located above the opening. Purlins are large lintels, and crossbars are horizontal beams with a shelf, which is necessary as a base on which higher structures will rest. Like all other types, they are widely used in the construction of various objects.
There is another type of reinforced concrete lintels. These are pencils - thin load-bearing jumpers, which are often used in interior partitions with a thickness of 120 millimeters. They are also often used in door openings. The most popular are lintels for window and door openings.
Methods for manufacturing reinforced concrete lintels
To make reinforced concrete lintels you will need the following materials - reinforcement, angles, boards, nails, a concrete mixer (optional), strapping wire, cement, crushed stone and sand for the concrete composition. You may need other materials that you can use if you wish. Before starting work, you need to choose the right type of jumpers.
For small buildings with lightweight construction, regular lintels can be used for additional savings. They should also be used in cases where the ceiling vaults of all floors place emphasis on reinforced belts, which themselves take the loads and distribute them evenly.
Let's look at the technology for making reinforced concrete lintels with our own hands. You can pour the lintel directly above the opening or make it first on the ground, and then install it in the opening. You can use a more convenient option. If you prefer the first method, you will have to tinker with the formwork, if the second method, you will have to lift and install the already made lintel yourself.
The latter option is heavier; you may have to hire a crane to lift it. In this case, it is necessary to make even two jumpers, the width of which is 150 millimeters. At the same time, the thickness of the backfill masonry is 300 millimeters - 100 millimeters of insulation and foam block.
Making formwork for lintels
But if you give preference to the first method - filling the lintel already in the opening, you will save your effort, money and time. An additional advantage is that in this case only one jumper is needed. Installing formwork may raise some questions, but we will try to answer them.
Materials and tools
Boards for making formwork
To successfully complete the task, you will need the following consumables:
- a set of edged boards of suitable thickness;
- set of metal corners;
- thin reinforcing mesh;
- polyethylene film;
- nails with a wide head;
- self-tapping screws of the required size;
- knitting wire.
Jigsaw for cutting wood
As for the tool, for work you will need to prepare:
- regular hammer;
- electric jigsaw (hacksaw);
- electric drill or screwdriver;
- installation tool (mount);
- “trowel” (trowel);
- small capacity bucket.
Preparing the box
Manufacturing of formwork
Work on arranging a lintel begins with the manufacture of a wooden frame (box) used to pour the concrete mixture and obtain a building element of a given shape. To install such a box, you will need one bottom and two side wooden panels, from which you can subsequently assemble the formwork.
The linear dimensions of the finished panels must correspond to the dimensions of the window opening, and the side panels must cover it both in height and width. The bottom shield is made exactly to the size of the opening being closed. In the sides of the formwork, holes are prepared in advance for the binding wire, through which the panels will be held in a given position. The bottom and side surfaces of the boards are then lined with polyethylene film, which is attached to the formwork using glass nails.
Laying reinforcement
- The assembly of the box usually begins with the installation of the lower shield, which is carefully adjusted both in width and length to the dimensions of the window opening. The correctness of its horizontal installation is controlled using a building level, after which several supports are installed under this shield (taking into account maintaining the leveled position).
- Side shields are placed in a certain sequence; in this case, one of them is first fixed on the wall (using self-tapping screws, for example) and only then fixed on the already mounted lower panel. Note that for walls made of silicate or gas silicate blocks, this task is significantly simplified, since the panels can be fixed to their surface using ordinary nails.
- The second side panel is also fixed first on the wall, and then attached to the bottom of the box using self-tapping screws. When securing the formwork, you should not skimp on self-tapping screws, since when dismantling the structure you can unscrew all the fasteners and use them for other purposes.
- To avoid the “collapse” of the panels under the pressure of the concrete solution, the side walls of the structure are fastened together with binding wire. Such wire (pre-cut into pieces) is threaded in a double ring into previously prepared holes in the shields. After this, a suitable sized reinforcing rod is inserted in the center of the twist, with which it is tightened.
- Then the ready-made reinforcing mesh is placed into the formwork. It is placed in such a way that the reinforcement bars do not touch the walls of the box; At the same time, small pebbles are placed under its lower row.
To fill homemade lintels, it is best to use concrete mixed with fine gravel.
Determining the degree of load and choosing a design
When choosing lintels for aerated concrete structures, you first need to determine the degree of their load. There are 2 options:
- load-bearing jumper. It takes on the load not only from the overlying blocks (ordinary), but also the weight of floors, beams, and other structural elements;
- not load-bearing. It only serves as support for the gas blocks laid on top of it and does not experience excessive loads.
It is necessary to determine in advance which of the lintels is load-bearing and which is not, so as not to create preconditions for subsidence or the formation of cracks in the aerated concrete wall. There are several ways to determine the magnitude of the loads:
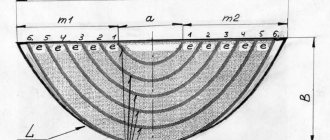
- equilateral triangle method. The magnitude of the load is determined on a vertical plane, in an area in the form of an isosceles triangle. The length of the sides is equal to the width of the opening. A lintel is considered load-bearing if floors, beams or other building elements fall into the triangle;
- square method. We consider a square-shaped area with a side equal to the width of the opening. This method is recommended if lintels are being calculated during winter construction;
- method 1/3. Loads are considered on a rectangular section, the base of which is the width of the opening, and the height is equal to 1/3 of its width. This calculation method is used when carrying out summer construction work. In this case, it is necessary to take into account the unhardened solution.
Once the load level of the jumper has been determined, you can select the appropriate type of part. Monolithic reinforced samples are chosen for load-bearing lintels, and prefabricated elements are used for non-load-bearing openings.
In addition, it is necessary to take into account the characteristics of the material. As a rule, lintels in aerated concrete walls are made of the same material. This makes it possible to more uniformly organize the thermal contour of the building, eliminating the formation of cold bridges. This means that the overall temperature of the walls must be equal to the temperature of the lintels.
Since reinforced concrete has a higher thermal conductivity, the temperature of the parts will be lower. Condensation will begin to settle on a colder surface, aerated concrete will begin to absorb moisture, and will gradually deteriorate. Therefore, lintels in aerated concrete walls must be made of the same material - for regions with low average annual temperatures this is the main condition.
Video
For information on pouring reinforced concrete lintels in practice, watch the following video:
Jumper Installation Using U-Blocks
Scheme for manufacturing a monolithic lintel
Reinforcement frame for window lintel
Prepared formwork
Lintel after pouring concrete
Removing formwork
DIY lintel over window and door openings
Hello. This summer I started construction. I decided to build a small extension to the house. Naturally, with your own hands. After the construction is completed, I will describe the whole process, but for now I want to tell you how I came up with the idea of building reliable and frost-free lintels over window and door openings from improvised means.
There are a great variety of technologies for constructing lintels. Ready-made reinforced concrete lintels are sold, you can put metal corners, you can build formwork and pour it yourself from concrete, etc.
But ready-made jumpers are quite expensive, and you have to pay for delivery and unloading - you can’t bring them in a car)))). And then you can’t throw one up.
Metal corners are also not cheap (after all, you need quite powerful ones). In addition, I also encountered such a drawback - over time, rust passed through the putty and wallpaper. After all, the layer of putty above them is very thin - the plaster hides their thickness, and above them there is only putty. I do everything myself, I like to work alone, so I decided to pour concrete on site.
There are some “moments” here: The concrete lintel should not freeze, otherwise the window openings will “cry” in winter. This problem is usually solved by laying 5 cm of extruded polystyrene foam on the outside. It's not cheap either.
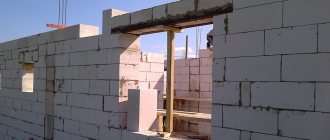
I build from gas silicate blocks. The manufacturer has U-shaped blocks that can be laid out on a support, and then concrete can be poured into the resulting trench. It seems to be normal, but... The cost of such blocks is not at all humane. (Exactly four times more expensive than usual), and again you have to go with a trailer for them..
So I did it easier.
So, we will need: 1. Boards for formwork. (Any ones you don’t want) 2. Gas silicate blocks. 3. Cement. 4. Sand, or ASG 5. Reinforcement.
First of all, we build the formwork:
So, I got “permanent formwork” made of porous, non-freezing material. The space remaining in the middle, measuring 100 by 250 mm, is more than enough to make a powerful reinforced concrete lintel. (Especially since 250 is the height.)
All that remains is to make the concrete. I prepared it from M500D20 cement and sand and gravel mixture. It can also be made from sand, but I had PGS.))))). By the way, when making from sand, the volumetric proportions of cement/sand should be maintained at 1/3. And when using ASG, the proportion can be increased to 1/5 without losing the concrete grade. (If there is no clay in the ASG).
Having opened the barn, I sadly realized that getting a concrete mixer was not so easy. I haven't received it since the fall.
Then again sand and again cement. It’s better to do this on a steel sheet or concrete pad, but I only had unnecessary old film on hand.
Which brick lintel is more reliable: reinforced or on a steel corner?
| Page 1 of 2 | 1 | 2 | > |
Equipment for excavation of mine workings, POS, standard control, KR, AR
A cement-reinforced lintel is used in 90% of cases for new designs, and corners are used in cases where this reinforcement cannot be used or during reconstruction. The fittings there are for approximately 50-60 years, and the corners are for 30-50 years. IMHO. IMHO, I have a suspicion that due to some defects in the masonry, the corners may not bear the required load. The same can be said about the fittings. In case of heavy loads, something else is used in any case.
How to choose the right wardrobePlumbing for shower system
- Electric heated floor
From personal experience. When reconstructing or overhauling old brick buildings in cities, you should always strengthen all openings with additional lintels, regardless of the calculation results.
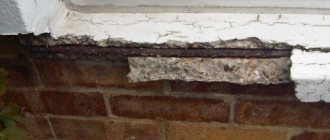
The corner is more reliable in terms of execution. The reinforcement bars in the lintel are usually not completely in the solution. If the masonry is carried out in winter, then the likelihood that the mortar will be removed along with the formwork increases significantly. I primed the corner, stuck it in, and forgot about it.
Sent from my Redmi Note 7 via Tapatalk
Equipment for excavation of mine workings, POS, standard control, KR, AR
| 5.4 For the reinforcement of stone structures in accordance with SP 63.13330, the following should be used: for mesh reinforcement - reinforcement of classes A240 and B500; for longitudinal and transverse reinforcement, anchors and ties - reinforcement of classes A240, A300, B500. |
| 5.2 For the reinforcement of stone structures in accordance with SP 63.13330, the following should be used: - reinforcement of classes A240 and B500 - for mesh reinforcement; — reinforcement of classes A240, A300, B500 — for longitudinal and transverse reinforcement, anchors and ties. |
| In all cases, the thickness of the protective layer of concrete should also be taken not less than the diameter of the reinforcement bar and not less than 10 mm. In enclosed spaces at normal and low humidity 20 mm |
At least paint?
SP 28.13330.2017 “Protection of building structures from corrosion. Updated edition of SNiP 2.03.11-85" (with Amendments No. 1, 2) 7.8 Steel parts in masonry must be protected from corrosion in accordance with the requirements of 5.5. 5.5.5 Protection against corrosion of the surfaces of non-concrete steel embedded parts and connecting elements of prefabricated and monolithic reinforced concrete structures, depending on their purpose and operating conditions, should be carried out: with paint and varnish coatings (in rooms with dry and normal humidity conditions with non-aggressive and slightly aggressive degrees of environmental influence); protective metal coatings applied by hot or cold galvanizing or gas-thermal and thermal diffusion spraying (in rooms with damp or wet conditions and in the open air); combined coatings (paint and varnish on the metallization layer with a medium degree of aggressive environmental influence).
Also SP 15.13330.2012 Stone and reinforced stone structures. Updated version of SNiP II-22-81* (with Amendments No. 1, 2, 3) Multilayer walls (lightweight masonry walls and brick cladding) 9.30 The durability of products and materials used in multilayer walls should be taken into account the service life of the structure. Reinforcement of the front layer should be done with meshes made of corrosion-resistant steel or steel with an anti-corrosion coating. The minimum thickness of the zinc coating is determined in accordance with paragraph 5.5.8 of SP 28.13330.2012 and is 30 microns for the galvanic application method. 9.32.1. It is allowed to support the facing layer of masonry on factory-made parts made of reinforced concrete or corrosion-resistant steel.
Reinforced concrete window lintels
How to make reinforced concrete lintels with your own hands in order to perform the necessary reinforcement of door and window openings. The main task and purpose of reinforced concrete lintels is to carry the load on its own structure of the entire weight of the wall, which is located above the window or doorway. In private construction, when constructing small residential buildings, lintels can be cast from monolithic concrete or prefabricated from factory blanks.
Features of reinforced concrete lintels PB
By combining two different reinforced concrete materials in their structure, the lintels acquire the required load-bearing capacity. Such materials in the body of window lintels are: metal and concrete. The purpose of concrete is to provide the final product with compressive strength and stiffness resistance. The steel gives the lintel a high level of tensile strength. The concrete layer in reinforced concrete lintels is also designed to protect steel reinforcement from corrosion. It is important to comply with the requirement regarding the thickness of monolithic concrete in the overall design of the PB lintel.
How is the opening size calculated?
The size of the opening and the support of the lintels are calculated individually, depending on the type of materials used for the construction of the building, which can only withstand a certain load. Should be considered:
- The weight of the lintel parts, as well as the assembled structure as a whole.
- The weight of the future wall being built above the window recess.
- How exactly will the weight of the wall surface above the opening be distributed (if the masonry is being done in summer, then it is enough to use the weight of 1/3 of the upper part of the wall in the calculations; if it is being laid in winter, then you have to take into account the load exerted by the entire wall).
- The load exerted by floor slabs and beams.
There are also the following formulas for measuring the main parameters of the future jumper:
- load value = specific gravity of the material used * value of the width of the opening * value of the thickness of the masonry in the opening * height of the wall above the lintel;
- strength = resistance of the base material * resistance of a single part * coefficient 1.12.
It is advisable to take the help of professionals to determine the correct size of openings so that during future construction, unforeseen situations such as collapse of materials do not occur.
Reinforced concrete lintels are often used in the construction of walls of private houses.
Advantages of reinforced concrete lintels PB:
- Ability to withstand high loads
- Ability to cover long openings
- Low cost of materials and labor costs for installation (installation) of jumpers
- Variety of ready-made sizes and a wide range of products
- When constructing a private house, standard PB reinforced concrete lintels make it possible to bridge openings up to five meters wide. To correctly calculate the load, the designer selects the type of reinforcement for the lintels, the class (grade) of concrete, and the section of the beam.
In common parlance among builders, reinforced concrete lintels are simply called monolithic. To obtain reinforced concrete products of the desired shape, it is necessary to construct a sealed formwork of the correct rigidity. Incorrect selection of materials for formwork and errors during its assembly can lead to its destruction during concrete laying.
Industrial plants that produce wall blocks from cellular concrete or expanded clay concrete often prepare y-shaped elements for concrete lintels, which are also permanent formwork. This suitable method for pouring lintels speeds up and facilitates the work, since such elements only need to be installed on a flat surface, and you can pour reinforced concrete products. Steel reinforcement is placed in the installed formwork. Between the reinforcement rods and the walls of the blank elements, a gap of two centimeters is installed using plastic spacers. This allows, when pouring, to provide an insulating layer of concrete for the reinforcement, protecting it from corrosion. The most popular concrete mixture for pouring lintels is M300 concrete. Concrete laid in formwork requires further maintenance. During the hot period of the year, it is important to prevent the concrete from drying out (protection from direct sunlight), and in winter weather - to provide heating and protection from the wind. Excessively rapid drying of concrete in summer is avoided by applying water to the surface of the concrete during the first week of its curing. In the case of collapsible formwork, when concrete hardens naturally, it is recommended to remove the formwork no earlier than 14 days. Concrete will fully acquire its brand strength declared by the factory only after 28 days.
Figure 1 shows the lintel and the type of lintel reinforcement.