Installing plastic windows is not an easy job and must be done with full responsibility.
To make a window frame of the required size, you will need its dimensions. You can do them yourself or call a specialist from a window company.
If you decide to involve specialists, then knowing the technology of taking measurements will not be superfluous. This way you can monitor the work and determine the level of their qualifications. Or you can do without specialists and take measurements yourself and save some money.
Correct measurement of a plastic window
Before you take measurements of plastic windows, you should understand that this should be done if for some reason the installer cannot do it. The optimal solution in this situation would be to trust a specialist who will help avoid a number of inaccuracies and problems.
The design costs quite a lot of money, and it is very important to take into account all the points, because if the delivered window does not fit in size, it will be you who are to blame, and not the contractor, which is natural.
Those who do not know how to correctly measure the size of a plastic window need to pay due attention to this.
If it suddenly happens that errors are made during the measurements, and the window is slightly smaller than the size required, then the resulting cracks will have to be sealed with polyurethane foam or the slopes increased. Naturally, this will waste not only additional finances, but also time.
After a certain period of time, the window will begin to deform, gaps and cracks may appear. The appearance of cold air, greater freezing, and the formation of mold will be noticeable. As a result, the window will not only cease to fulfill its main purpose, but also lose its appearance.
However, the real difficulties arise when the structure simply does not fit into the opening. In such a situation, new solutions will be required that will significantly correct the situation. That is why it is important to know how to correctly measure the size of a plastic window.
Well, now, from cautionary advice, we move on to direct recommendations for those who nevertheless decided to fully understand the question: how to determine the size of a plastic window.
And in turn, how to correctly measure openings for plastic windows? The first thing you need to know is that you need to start by determining their depth. We pay attention to both the external and internal sides.
It is not uncommon for panel houses to have errors and distortions in the finished blocks that come from the factory. In this case, even a qualitative measurement will show numbers that will lead to an increase in the future product.
After measuring the internal and external parts, you need to evaluate the results, which may practically coincide, or may have significant differences.
Unevenness can be corrected by using slopes, which experienced craftsmen do not recommend neglecting, since in addition to the visual function, they also have a number of other advantages. They do not allow excess moisture into the room, which means mold and mildew, which are not so easy to combat.
Device technology and photo
As mentioned above, there are two types of window openings - designed at the construction stage and punched through a ready-made external wall. The technology for constructing a structural element of each type is described below.
During construction
If a window opening is provided for in the project, the following algorithm is performed when installing it :
- The outer wall is erected in a continuous line to the top of the future window sill block.
- After installing the lower part of the wall, a quarter and the internal dimensions of the future opening are marked.
- After marking, the wall is erected in sections - piers, to the level of the bottom of the lintel.
- On the upper part of the pier, a bed of rigid cement-sand mixture is arranged, on which a steel lintel structure or a finished reinforced concrete product is laid.
- Between the jumpers, the remaining space on top of the piers is filled.
- If there is a part of the wall above the lintel, it is erected to the design level of the bottom of the floor slab.
- The top of the suspended structure should not reach the design level of the ceiling by 10 - 20 mm, in order to organize an elastic insert.
The photo shows an example of a window opening during construction:
If a monolithic wall is being erected, the structure for installing the window is formed from reinforcement, after which a box is fixed in the body of the panel formwork, the edges of which are the ends of the future structural element.
Punching after
When punching a window into a finished wall, a detailed calculation of the enclosing structure is required to design framing reinforcement that guarantees safe operation.
The work is carried out in accordance with the following step-by-step instructions :
- Markings are applied on the outside and inside of the wall, along the entire contour of the future opening.
- When performing work at height, it will be necessary to involve industrial climbers, hang a cradle, or install an assembly scaffold.
- To avoid injury to passers-by, it is necessary to fence off the area where the section of wall is being dismantled with warning tapes and post a person on duty.
- The cutting begins from the outer part of the wall. The tool used is a grinder with a diamond blade, or a professional tool.
- After cutting the contour, the operation is repeated from the side of the room. The larger the diameter of the cutting disc, the better the effect is ensured when performing the work.
- When the contour is cut on both sides, it is necessary to knock out part of the wall until the ends of the structure are completely cleaned.
When constructing an opening, it is strictly forbidden to use jackhammers without cutting the contour. Since the impact will lead to a weakening of the structure of the entire enclosing structure.
Quarter windows
Before you learn how to measure your own windows to replace them with plastic ones, you need to pay attention to certain options. According to statistics, most mounted windows are equipped with quarters that prevent the window from falling out. This name comes from among builders, and there is an explanation for this. The size of the protrusion may vary, but if you follow the rule, then 6.5 or, as you can also say, a quarter of a brick - this is the source of the name.
Not every architect's layout takes quarters into account. As practice has shown, real objects are not at all ideal. Also, quarters can be larger or smaller than normal, and even have different lengths on each side. This must be taken into account when figuring out how to correctly measure the opening for a plastic window.
If the measurement is carried out correctly, then in the end the window should be located higher than the lower edge of the quarter by about a couple of centimeters. This gap is left specifically as a place for drainage.
The window should not extend far beyond the projections of the quarters, and the frame itself should not come into contact with the opening.
A gap should be left between the opening and the window for foaming. At the bottom it should be about 4 centimeters, and at the top and sides no more than 5. It is necessary to ensure that the gaps are not wider than the recommended parameters. If it doesn’t work out otherwise, then it’s better to consult a specialist.
Window measurement taking into account the quarter
Let's figure out how to measure the opening for plastic windows and a quarter. Correct calculation requires accurate information on the width and length of the window. All measurements must begin from the outside.
- The width of the slope will depend on how far the window extends by a quarter, plus 3-5 centimeters. With the help of such simple mathematical calculations we get the desired size;
- In width, the window should rest against the slopes, that is, it should be larger than the size of quarters. Therefore, it is not difficult to understand how to measure a window for installing a plastic window; you just need to add 4-6 centimeters to the distance between the quarters.
- There is nothing complicated in the question of how to take measurements for plastic windows. You need a distance from the quarter at the top to the opening. Subtract 2 centimeters from the number you get and get the assembly seam.
Features and adjustment algorithm
In some cases, at the request of the owner of the property, or due to new design and functional requirements, it is necessary to adjust the size of the opening. This operation is performed with a decrease or increase in the linear dimensions of the structural element.
Reduce and full bookmark
When reducing, enlarging, or completely blocking a window opening, part of the structural element is laid with brick, covered with plywood or other materials, or cast in a monolith.
When performing this procedure, you need to take into account a number of nuances:
The section of the wall being built up is a full-fledged enclosing structure, which requires insulation and cladding.- When filling the opening with brick or concrete, it is necessary to ensure a connection with the capital structure, which requires drilling anchors into its end and reinforcement devices.
- The filling of the opening, as a rule, is carried out without constructing an expansion joint, and the installation gaps are closed with a cement-sand mortar that does not lend itself to shrinkage, such as NC.
- When laying plywood or other sheet materials on both sides, a layer of insulation is placed between the outer edges of the elements.
- If partial filling of the opening is carried out from the lintel side, it is necessary to create supports for the masonry from the corner between the piers.
If the room is finished and the walls are plastered, to ensure a complete connection of the new cement-sand mixture with the old materials, it is necessary to partially remove them from the wall to a width of up to 30 cm along the entire perimeter of the former opening.
Expansion and enlargement
Expanding the opening means trimming it in the area where the partitions are located (in width), lintel or window sill block (in height). Trimming is performed using the same tools as for constructing the structural element.
After expanding the opening, most often it is necessary to clean its end, as well as install framing reinforcement to ensure safe operation.
Window measurement without a quarter
How to measure plastic windows with low tide? It is necessary to subtract from 4 to 6 centimeters from the result of vertical measurement. This distance will be quite enough for the stand profile. The window size should be 7 centimeters smaller than the opening.
- First measure the width of the window opening. It is advisable to do this at different heights in several places, and then select the smallest indicator and subtract another 4 centimeters from it. The spread between measurements can be very different, and the larger it is, the more will need to be subtracted for the final result;
- The same must be done with the height, but in this case the subtracted number will be no less than 2.5 centimeters;
- Remember that the edge of the opening should be lower than the bottom edge of the window, provided that you are going to install a water drain, the penetration of which into the walls can lead to irreversible consequences.
Regulatory requirements according to GOST
The organization of openings in the walls and the requirements for them are regulated by the following regulatory documents :
GOST R 56926-2016 “Window and balcony structures for various functional purposes for residential buildings. General technical conditions".- GOST 34378-2018 “Translucent fencing structures. Windows and doors. Installation work, control and requirements for work results"
- GOST 230166-2021 “Translucent fencing structures for windows and balconies.”
According to these standards, a number of strict design requirements are imposed :
- Compliance with approved design solutions.
- Consistency of geometry - the maximum discrepancy between the lengths of the sides from the design dimensions, including when checking diagonals, should be no more than 1/150 of the length of the measured side.
- Strength of the frame - the structures for reinforcing the opening must satisfy the conditions of strength and stability.
- Ensuring thermal properties - when organizing an opening, effective insulation must be located in each structural element, right up to the end of the outer wall.
- The quality of the end surface intended for fixing the window block - if necessary, the landing plane is subject to modification or finishing.
Before installing a window unit, the installer checks the quality of the opening, after which he decides to improve it to the standards specified in the current regulations.
Measurements for a plastic window, taking into account the installation of a window sill
It is not enough to know how to take dimensions for plastic windows; it is important to understand that everything will not be limited to these calculations. Installing a window sill also requires taking correct measurements, and its dimensions will differ from the old one.
In most cases, the standard width of previous window designs is approximately 10 centimeters. The width of the plastic ones is 6.5 centimeters. As a result, a space is created that covers the window sill.
From this we can conclude that the new window sill will be wider than the old one by about 5 centimeters. However, you need to know when to stop and not make it too large, especially if there is a battery underneath it. There is even a certain building code that does not allow the battery to be covered by more than a third.
In order for the measurement to be correct, you will need to calculate its depth, or more precisely, the width of the future element, with an overhang that should be more than 1 centimeter.
Measuring the length of the window sill before measuring the window for a plastic window is not at all difficult. Take the width of the window opening and add it to the openings on the walls.
Window sizes
When choosing windows, one of the key characteristics is size. The choice does not come down solely to aesthetic indicators. There are many more factors that determine the optimal window sizes. The requirements for illumination, the purpose of the building and its parameters are taken into account (the requirements in the Khrushchev-era building will differ significantly from the similar parameters of modern high-rise buildings), geographical features of the area and the degree of natural light during the day, the relationship between the dimensions of the room and the size of the opening, the light indicators of the double-glazed window and etc.
You can find out the window sizes that match the type of your home on the window cost calculator page.
Our managers and measurement experts will help you measure and calculate the size of your windows, determine the shape and color. To avoid a situation where, due to a too small or large size, it becomes impossible to manufacture a window, we suggest that you familiarize yourself with the limitation tables.
Measuring openings in houses of various types
So, how to measure a plastic window yourself, what is needed for this. The first thing you need to acquire is a tape measure, because, as has already become clear, correct measurement guarantees successful installation and subsequent use of PVC windows. If the measurement is carried out in a panel house, then it must be carried out from the intersection of the slope and the walls.
Measurement in a panel house
How to measure a plastic window in a panel house? It should be understood that the main feature of such houses is a peculiar cross-section in the shape of the letter L, which allows the window to be held. Particular attention is paid here to the numbers demonstrating the dimensions of the opening from the inside of the room. We measure the distance between the slopes at the top and bottom, and then the height from the window sill to the slope on both sides.
The width of the window sill in this case will be the result of calculations, where the thickness of the wall, subtract the width of the profile, and the distance of the outer wall to the step in the wall. Add a protrusion (from 05 to 10 cm).
Measurement in a brick house
Next we move on to the question: how to measure a plastic window in a brick house. In this case, it will be necessary to identify the beginning of the brickwork. The plaster in this situation may have a fairly dense layer, the thickness of which will be the error taken into account.
In this situation, not everyone knows how to calculate the size of a plastic window according to the opening. When taking external measurements, it is necessary to determine the width of the opening and its height, as well as the segment from low tide to the opening, its upper part on both sides.
It is important to determine the angle of perpendicularity of the slope to the wall; for this purpose, measurements will be taken from the outside and inside.
The width of the window sill will be equal to the thickness of the wall minus 5 centimeters. The same indicator is necessary for finishing slopes from the street.
Measurement in a wooden house
For those who do not know how to measure plastic windows in a wooden house, it is important to take into account the fact that the slopes here are parallel, and their measurement is carried out in the same way as in a brick house.
It often happens that in a wooden house you have to modify the opening, expanding it. In this case, a power saw is used to help change the opening. The width of the window sill is equal to the thickness of the wall.
If you are already registered, enter your login information!
Next article
Rules for measuring and installing windows
Methods for measuring window openings, plastic windows (PVC), important nuances in window installation.
It is unlikely that anyone will argue with the statement that incorrect installation of even the “coolest” windows can negate the entire expected effect of their use. Therefore, if you are going to install new windows yourself (and at the same time take full responsibility for the quality of installation), then it will be extremely useful for you to pay attention to all the subtleties and unexpected difficulties that are practically not described anywhere. The biggest problem is correctly determining the size of the future window. This is all the more difficult because in most cases there is an old window in the opening, which makes it impossible to reliably predict “what’s inside behind it”?
- Rule one:
The master taking measurements must have excellent spatial imagination and an analytical mind, be well acquainted with the design of the future window and have personal installation experience. In most cases, measurers approach measurements with less demands, hoping “at chance,” and they try to solve problems that often arise “on the job,” i.e. over the next few months. So what should a surveyor know and take into account?
- Rule two:
The future window should be measured from both sides of the opening: from the inside (from the room) and from the outside (from the street). Both of these measurements are essential to determine the quarter depth of the existing window opening. Obviously, the window must be no smaller (!) than the external dimensions of the opening, so as not to “fall out” outside. But how much more it should be depends on many factors, we will consider them below.
- Rule three:
Never forget to check with the customer whether the outline of the existing opening from the outside will be preserved for your next visit. For old plaster, sewn-on lining may be removed from it, an additional row of bricks may be laid, or a team of builders will expand it “to other sizes” without prior notice. And your complaints about this will come down to: “Well, that was obvious!”
- Rule four:
It is necessary to take into account the fact that the existing opening can be greatly skewed (especially in panel houses), which leads to the need to increase the size of the window by the amount of the skew. In other words, in order to prevent through gaps between the edge of the opening and the edge of the window frame, the size of the window must be larger than the outer size of the window opening by at least 30-40 mm in width and 15-20 mm in height. This can be achieved in two ways: either simply increase the overall size of the window frame, or expand the window using special additional profiles that snap onto the frame.
- Rule five:
Make sure that your taste and the taste of your customer coincide regarding the appearance of the window on the street side. Because some people like to have almost the entire window frame walled up in the wall and not visible from the outside, while others prefer to show the window in all its glory. And try to prove which of them is right. In the same case, if the first option is preferable, do not forget about possible distortions of the window opening (see point 4), so as not to overdo it and hide not only the box itself, but also the edge of the glass unit inside the wall. The second option is more preferable due to the lower likelihood of errors and the lower severity of their consequences.
- Rule six:
Never forget that on the outside of the window at the bottom (and sometimes at the top) a drip should be installed to drain rainwater. Therefore, the lower edge of the window frame must not be lower than the outer edge of the opening (regardless of the method of installation of the ebb). This is necessary in order to ensure that the special drainage holes on the outside of the window frame are not blocked. In addition, the joint between the ebb and flow and the frame (as well as between the window sill and the frame) must be sealed, for example, with silicone (preferably antiseptic). In general, it is advisable to install the sill under the window in order to eliminate any possibility of water leakage at the junction of the sill and the frame. We should also not forget about the window sill, which should also be installed under the window (and not butted to it), and sealed with silicone, which, on the one hand, increases the mechanical strength of the connection, and on the other, prevents moisture from leaking through the joint under the window sill. To prevent condensation (if any) from flowing under the window, the window sill is installed with a slight downward slope (SNIP recommends a slope of 3 degrees).
- Rule seven:
After you decide on the dimensions of the future window, compare them with the internal (control) dimensions of the window opening (see point 1). This comparison allows you to promptly detect a mechanical error in previous calculations, estimate how thick a layer of plaster will have to be applied to the internal slopes in order to level them with the edge of the window, and also whether you will have to “bite into” the slopes with a hammer drill in order for your window to fall into place. In any case, we should strive to ensure that there is less of this kind of stupid work.
A small digression.
It is no longer a secret that with all the variety of building materials, the only practical method of sealing a window is to fill the joint between the window frame and the wall with polyurethane foam. The list of undeniable advantages of this option includes: excellent thermal insulation and sealing, the ability to absorb and evenly distribute mechanical stress and wind loads, indifference to the unevenness of the sealed surfaces, ease of use and relative low cost. Indeed, there is no more technologically advanced method today. But thoughtless and inept use of this method is fraught with very unpleasant complications.
Firstly, the foam breaks down (darkens and dries out) under the influence of sunlight and atmospheric exposure. Foam is not a waterproofing material, so it must be (!) protected. Our current self-expanding tape, PSUL (Pre-Compressed Sealing Tape), is a permanently elastic, high-quality tape sealant. This elastic tape is designed for sealing joints between walls and window frames, door frames, in the quarters of window frames, in facade seams, etc., it expands well up to 30-40mm (can be heated with a hairdryer in the cold season) and protects the polyurethane foam.
PSUL tapes are distinguished by: - excellent weather resistance; — excellent resistance to ultraviolet rays; — resistance to rain and wind under pressure up to 600 Pa; - excellent adhesion and flexibility.
PSUL must be used in conjunction with Vapor Barrier . Self-adhesive vapor barrier (butyl rubber) tape (duplicated with metallized or aluminum film) is used in the installation of windows and doors. Seams covered with vapor barrier tape provide reliable protection of the mounting foam from moisture from the room and thereby prevent condensation from falling on the surface of the internal slopes. The foam does not lose its properties for a longer time. There is an old way from ten years ago - to protect the foam with a layer of sealant, plaster or, in extreme cases, paint. But it is enough to look at the freshly baked facades of new buildings to be convinced that almost no one not only does not plaster the foam, but does not even cut off its excess hanging from the canopies and joints.
Secondly, it has recently become clear that even dried foam can change its volume under the influence of temperature by at least 5%, up to 10%. As a result of these periodic “retractions and protrusions”, with a large joint thickness (8-12 cm), the window frame “walks” by an amount of 4 to 6 mm. This, on the one hand, leads to the destruction of the layer of plaster adjacent to the window, and on the other hand, to disruption of the locking mechanisms of the fittings, and the window either does not close or does not open, depending on the season. Thus, installing products only on foam, i.e. without mechanical fasteners, which was widely practiced immediately after the appearance of polyurethane foam on the market, does not withstand any criticism, does not provide rigid fastening of the window in the opening and does not prevent the foam from expanding the frame. In connection with the above, please read the following rules:
- Rule eight:
Strive to ensure that the width of the joint between the wall and the window frame does not exceed 3 cm, especially for large window sizes! Moreover, this is not at all difficult to do - all manufacturers of window profiles, in addition to the main set necessary for the manufacture of the window itself, necessarily produce a full set of additional profiles that allow you to increase the width of the window frame while maintaining the same glazing dimensions. These profiles are specially designed and intended for such cases, so you should not be afraid that the window will become “defective”. Moreover, I categorically do not recommend saving on such expanders. It can be difficult to explain to the Customer the need to spend his money on incomprehensible but important details.
- Rule nine:
In order to avoid serious misunderstandings in the future, it is imperative to seal the outer seam between the frame and the wall. If all the sashes in the window open, there are no big problems, the external seams are always accessible. But if there are blind parts, then it is better to seal immediately, because after the window is installed and the double-glazed windows in the blind parts are put in place, access to the external seams ceases, and the Customer will not want to remove the double-glazed windows again, or, worse, call climbers and plasterers. This point should be discussed in more detail, because a legitimate question arises: “What is the best way to seal?” Unfortunately, a technologically advanced, universal and inexpensive method is still unknown. The problem is this: the surface of the wall adjacent to the window is in most cases uneven, and the opening is skewed. Because of this, the width of the seam around the perimeter of the window ranges from 0 to 5 cm. In such cases, the only way out is to plaster and then paint to give the seam at least some elasticity at the junction with the frame. If the width of the seam does not exceed 15 mm, then you can choose, at your discretion, either silicone sealant, or use a technologically advanced, but very expensive polyurethane self-expanding sealing tape (PSUL).
The dimensions of the future window directly depend on the size and features of the opening. Panel houses have standard openings; in brick apartment buildings, the dimensions of the openings may differ by several centimeters. In a private home, industrial and commercial premises, openings can be of any kind. It is necessary to carry out measurements in such buildings with special care.
Measured in a house with quarter openings.
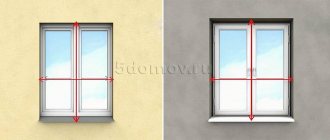
When measuring openings in a house with a quarter, it should be taken into account that the window should extend beyond the external slopes (Figure 1, A) on each side by 15-30 mm (only the top and sides). This is due to the generally accepted standard “Measuring and installing PVC windows” according to T.R. 152-205, GOST 52749-2007.
Measuring the width of the window.
Figure 1. Measurement of the opening width.
Thus, it is necessary to add 30-60 mm to the width of the outer slope (Figure 1, size A) (less if there is a curvature of the wall). The resulting size will be the size of your window.
To check the correct measurement (width) you can use the following methods:
- The width of the window should be less than (or equal to) the distance between the places where the slopes come into contact with the frame (Figure 1, size B).
- The width of the window must be smaller than the internal window opening (Figure 1, size C).
If these conditions are not met, we strongly recommend that you contact a professional measurer to clarify the circumstances of such discrepancy.
Window height measurement.
Figure 2. Measurement of the opening in height.
From the base of the opening to the outer upper slope (Figure 2, dimension F), it is necessary to subtract 20 mm (the gap for the mounting foam in the lower part). To the resulting size (Figure 2, size D) it is necessary to add 15-30 mm (entering the upper quarter). If a stand profile is used (a prerequisite for windows with a window sill and ebb), it is necessary to subtract 30 mm (profile height) from the resulting window size. Hint: most often, dimension D is equal to the height of the window.
The dimensions of the window, both in width and height, with a stand profile should be 30-80 mm smaller than the opening for the mounting seam. If, based on the measurements, it turns out that the quarter is more than 50 mm and the foam joint is more than 40 mm, then it is worth using an additional profile.
To check the correctness of the measurement (height) you can use the following methods:
- The height of the window, excluding the support profile, should be less than the distance between the upper internal slope and the window sill (Figure 1, dimension E).
- The height of the window, taking into account the support profile, should be less than the distance from the upper internal slope and the lower edge of the window sill (Figure 2, dimensions E+G).
Measured in a house with quarter-less openings.
When measuring in a house without quarters, it is necessary to take into account that the installation gap when installing PVC windows should be within 15-40 mm (on each side). Therefore it is necessary:
Subtract 30-80 mm from the opening width. This will be the width of your window.
Subtract 50-60 mm from the height of the opening (30 mm is occupied by the stand profile). This will be the height of your window.
Be sure to take into account the possible curvature of the wall.
If these conditions are not met, we strongly recommend that you contact a professional measurer to clarify the circumstances of such discrepancy.
To help the measurer.
So, you decided to take the measurement yourself: first you need to free access to the window, open at least one sash. Window measurements should be taken from the street side and monitored from the room side. An experienced surveyor may not open the windows (especially in panel houses).
First of all, let's define what a “PVC window measurement sheet” is. Take a pen and make a small sign:
- Dimensions of the window itself (width and height), mm
- Window sill dimensions (width and length), mm
- Drainage dimensions (width and length), mm
- Dimensions of sandwich panels (or PVC, MDF panels, etc.) for finishing window slopes (width and length), mm
As you have already noticed, when ordering and calculating plastic windows, all dimensions are taken in millimeters, unlike suspended ceilings (everything is in centimeters)
ATTENTION! In this article we will look at taking measurements of windows in panel, block and brick houses and a quarter!
So: First, open the window and take measurements of the window opening from the outside (from the street side). You need to measure the width of the opening from slope to slope. For a more accurate result, measure the width of the opening at the bottom and top of the window. (see Figure 3). Write down the lowest result. Then measure the height of the opening (to the right and left of the window) and also write down the smallest size.
Figure 3. We take measurements outside.
Next, to the resulting width you need to add 20-30mm (for a panel house), 40-50mm (for a brick house). This is the so-called distance for “overlapping” the new window by a quarter. But you don’t need to add anything to the height! The “overlap” on the upper quarter will be achieved due to the so-called installation profile (stand profile). We will write down the resulting dimensions in our “measurement sheet”.
Next, we will measure the drainage.
Length of the ebb = distance between the right and left quarters + ~50 mm (the excess can always be cut off during installation)
Drainage width: measure the distance from the window to the end of the quarter and add 20-30 mm to it. We will obtain the required width of the ebb.
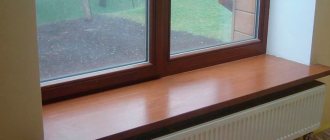
Now the window can be closed, or rather, the first part of the frame can be covered. After all, we still need to measure the width of the window sill and sandwich panels (see Fig. 4). You need to know that the new plastic window will be narrower than the old one (from 10mm to ~50-60mm), respectively, both the window sill and the internal slopes will become wider! Measure the width and length of the window sill, the dimensions of the finishing panels and write down this data on the “measurement sheet”. Remember that more is better than less. Because excess can always be removed during installation, and this will have virtually no effect on the cost. So always leave a small margin:
Figure 4. Measurement of window sill and sandwich panels.
Finally, I would like to remind you that this article is intended for a general superficial acquaintance with the measurement procedure. Again and again I advise you to contact professionals to measure and install PVC windows!
Sincerely,
Sokolov Igor.
07/12/2013
Next article
Best time for installation
When the decision comes to change windows in the house, people wonder when is the best time to do it, at what time of year? There has long been an opinion that the installation of structures begins in early spring and ends in autumn. However, today this rule is no longer relevant, and here’s why.
Of course, those who know how to measure a window opening for a plastic window, or have already had practical experience in this, will say that it is most comfortable to do the work when it is warm. In addition, most building materials are not adapted to work in minus Celsius. For example, foam for installation.
Its features include changes in state depending on temperature and humidity. Foam was the most common material when installing windows.
This is where we can finish talking about the benefits of summer work. One of the significant disadvantages is high demand, and therefore higher costs for products and services.
It is due to this that, with the arrival of spring, a “hot” period begins in all companies specializing in PVC structures, and either a decrease in quality or an increase in prices occurs.
In addition, in the summer it is not possible to check how well the windows were installed, whether there is penetration of cold air currents, or whether condensation or frost is forming. While in winter all these shortcomings can be noticed almost immediately.
And if you want to return to construction foam again, we will tell you that this issue is no longer relevant, because science does not stand still. The market saw a product that allows you to work even at sub-zero temperatures. Winter foam kits and special thermal barriers will help you comfortably replace windows whenever you wish.
After studying the information in detail, you should clearly understand how to correctly measure a plastic window. If you do this thoughtfully, without haste, the results will be correct.
And yet, if you have doubts about how to measure a plastic window, and you don’t really believe in your abilities, you should entrust the work to a professional who will take full responsibility for the result.
Insertion methods
There are vents planned in advance and installed after the fact. When a customer immediately buys plastic windows with a window, he deprives himself of problems.
It happens that a window has been standing for 10 years and then they decide to put a window in there. Many people think that this is a simple operation. In reality it is difficult - we do not do this. And that's why.
Let's say there is a window with two sashes. There was a desire to embed the micro-sash. This means that a piece of the profile is needed for the new impost (future partition).
Let's say you forgot what kind of profile you have and there are no markings on it. There are about 40 profiles on the market and they are all similar. Your profile may have been discontinued. Already difficult.
Now, you need to order 2 double-glazed windows from production. The old one cannot be cut in half. Although, it is possible, but in this case you will lose the seal and the inert gas will escape into the atmosphere.
You also need a piece of profile for the sashes, a machine that welds profiles, a machine for inserting handles and two sets of fittings.
I have a lot of questions for those who write that you can embed a window into finished windows. A product with a window is easier to order new from the factory.
Types of opening
The windows have three opening modes. These are rotary, tilt-and-turn and transom.
Rotary - when it swings open, for example, from left to right. Tilt and turn - when the upper part of the sash can also move away from the frame by 8 - 12 cm.
A fanlight opening is similar to a folding one. It differs in that the transom has full hinges along the bottom edge. Opens in one way and can open all the way.
What rooms are they needed for?
Windows with windows are more needed in the bedroom and kitchen.
In the bedroom we constantly need fresh air. Many people like to open the windows at night. Often a mosquito net is placed on the microwindow. During the summer this door is constantly open.
In the kitchen, a window with a window is needed to remove odors from the stove. Everyone knows that warm air rises. A door under the ceiling helps warm air flow out while keeping cold air out of the kitchen.
Both in the kitchen and in the rooms, we like to make the most of the window sill. There are a lot of flowers and boxes on it, cats love to sit here. The door under the ceiling gets along well with everyone.
Dimensions of vents for plastic windows
Dimensions are limited by the type of profile and fittings. In simple terms, the larger the size, the easier it is to make.
We make products in different sizes. The smallest folds have an overall size of 400*450 mm. In this case, the opening with an open sash is 350*400 mm. These products have swivel fittings. The minimum dimensions of sashes with tilt-and-turn fittings are 450*450 mm, while the opening with an open sashes is 400*400 mm.
Prices
The window is visually small. In this case, the window will cost an order of magnitude more. It's all about complexity.
For example, let’s take an ordinary double-hung window; both sashes open. If you add a window to it, there will be three sashes. This means three double-glazed windows, three sets of fittings, and the worker will spend time on the small mechanism as on an ordinary one.
Double-glazed windows in PVC frames quickly took the top lines of popularity ratings among building structures. But the belief that the window is a relic of the past turned out to be a myth. Models of plastic windows divided into large, medium-sized sashes and vents are still relevant. Experience shows that plastic windows with a window can expand the possibilities of ventilation of rooms.