Many people want to make a loggia an additional corner of comfort. Moreover, given the small size of the apartment “extension”, they strive to do it themselves. One of the most pressing questions is usually how to level the floor on the balcony, since this part of the room, especially in Khrushchev-era buildings, initially looks deplorable and is located at different levels with the floors of the apartment. You will learn how to level a balcony floor, from classic cement screed to technologies that have appeared recently, by reading the article.
Floor leveling methods
On a loggia that is glazed and effectively isolated from the external environment, the same methods for preparing the subfloor as inside the apartment are applicable, namely:
- cement-sand (concrete) screed;
- pouring and leveling mortars prepared from ready-made building mixtures;
- options for floor substructures on wooden logs;
- use of gypsum fiber boards (dry screed).
All these methods have disadvantages and advantages. The main advantage that unites these technologies is the ease of doing it yourself. Next, we will consider the features of each method of leveling the floor on loggias and balconies, which are applicable in “Khrushchev” and new buildings.
Advantages and disadvantages of wooden floors
Owners of apartments in a multi-storey building have only two options for covering a loggia: a lightweight concrete screed with expanded clay or a wooden floor. The total weight of the future structure and its pressure on the floor should be taken into account.
Unlike concrete screed, flooring on joists has its advantages:
- It’s pleasant to walk on the finished floor barefoot;
- service life up to 20 years;
- quick installation;
- possibility of laying electrical wiring under the flooring;
- good sound and heat insulation;
- light weight.
It is easier to level the floor using joists; it can also be raised to any height. Compared to a concrete screed, the installation of such a covering does not leave a huge amount of dust in the living space.
But wood floors have their drawbacks. The material is not resistant to fungi, mold, rotting, and burns well. It expands and contracts due to changes in temperature and humidity. Deformation spoils the balcony structure. If installed incorrectly, the timber frame can become loose and make squeaks.
Methods for determining floor level
Before leveling the floor, it is necessary to determine in advance its future level and affix the appropriate marks. There are three main measurement methods that are most popular.
Water level. Two people are required to use this level. To begin with, we visually determine the future floor level minus the finishing coating and make a mark on the wall. We apply one water level flask to this mark so that the water level is approximately in the middle of the flask and is clearly aligned with the mark. Then the second person with the second flask goes to the opposite side of the balcony and places the second flask against the wall. Next, the second person adjusts the height of the flask so that the level in the first flask coincides with the preliminary mark on the wall. When the marks in the first flask coincide with the mark on the wall, the second person draws a mark on the opposite wall according to the level in the second flask. It is important that at this moment both flasks are open to air and that there are no air bubbles in the hose itself.
Laser level. The laser device is much simpler and more accurate; it is installed at the highest point on the floor surface, the laser is turned on, and marks are made on the wall with a pencil according to the readings of the laser beam. If the floor needs to be raised, then first draw a mark on the wall for the future floor level by eye. Then we install a laser level in the center of the room and adjust its height so that the beam coincides with the mark on the wall. Next, along the beam, we mark the height of the floor along the entire perimeter of the room.
A bubble level is rarely used to measure floor level due to its large error. For this level, you will additionally need a long and even rule. The rule is laid diagonally across the balcony and a level is placed on it. According to the indications of the bubble, one of the sides of the rule is raised or lowered until the bubble shows the horizon. You can go along the wall, applying the level with one end to the starting point. In this case, the error depends on the length of the level; the longer the device, the smaller the error.
Fill
For mortar, you can use a ready-made mixture in bags or make it yourself (ratio of sand and cement 3:1).
The solution is stretched along the beacons in the direction from the corners to the center.
Important: in dry, hot weather, the screed must be periodically watered with water to avoid cracking. In rainy weather, it is better to cover the new floor with film. After a couple of days, the surface is leveled with a grater.
The formwork is removed on the 3rd day, the uneven edges are covered with thick cement mortar. You can walk on the floor within a week, but the final drying of the screed depends on weather conditions. But, just in case, you should not place heavy objects on the balcony.
The surface will be ready for finishing in 3 weeks. For cold balconies and loggias, ceramic tiles or linoleum are suitable. For insulated or glazed - any materials used for interior work. From laminate to carpet.
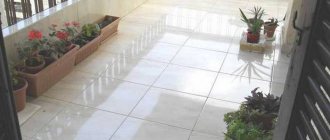
Leveling the floor on the balcony with ceramic tiles
If the original floor surface is relatively flat, then small differences can be leveled by laying tiles using tile adhesive. Cracks and chips on the concrete surface must be opened, treated with a primer and sealed with cement mortar. On the balcony it is better to use tile adhesive intended for outdoor use and resistant to frost.
Next, the entire floor surface must be cleaned of dust and covered with a deep penetration primer in several layers. Each subsequent layer is applied after the previous one has completely dried. Next, tile adhesive is applied to the concrete base with a larger dosage than required by the technology and the tiles are laid. For smooth and beautiful installation, it is recommended to use a special tile leveling system (SVP) which is shown in the photo.
This system will allow you to lay the coating as accurately as possible and at the same time maintain the width of the seam. Before applying joint grout, the plastic elements must be knocked down with a mallet or rubber hammer for leveling. The grout must have increased moisture resistance and frost resistance if the balcony is not insulated.
Video: leveling the floor on the balcony with tiles
The difference between floor leveling on a closed and open balcony
The procedure for leveling floors on open and closed balconies is practically the same, but there is a difference in the materials used. For example, an open and unglazed balcony requires materials with high strength characteristics, such as moisture resistance, frost resistance and resistance to temperature changes. It is better not to use wooden floors in open spaces due to the low durability of the material. It is better to lay cement screed or ceramic tiles.
Important. On open balconies, only materials for outdoor use should be used. It is necessary to slope the floor away from the wall to drain water or melted snow. If the outer wall of the balcony is solid, then you need to provide holes for water drainage. The floor covering should not be slippery when wet.
Flooring installation
After fixing the sheets, you can theoretically begin laying the flooring. But you can proceed to this stage of work only if you have already done all the other work on renovating the room. That is, the walls and parapet were insulated, the walls and ceiling were finished, and double-glazed windows were installed.
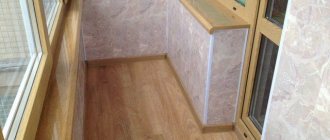
On the flat and hard floor of a glazed balcony (it doesn’t matter whether it’s concrete or plywood/OSB), you can lay absolutely any floor covering: parquet, laminate, linoleum. Naturally, the choice is yours, but I would recommend using semi-commercial or household linoleum on a foam base. The protective layer of semi-commercial coating ranges from 0.4 mm to 0.6 mm. Accordingly, for household - from 0.1 to 0.3 mm. I assume that the floor on the balcony will not be subjected to frequent and intense mechanical loads, so a coating with a protective layer of 0.2–0.3 mm will be quite sufficient.
On our website there are separate articles devoted to the topics of how to lay linoleum on a wooden floor and how to lay linoleum on a concrete floor. I recommend that you familiarize yourself with these materials to avoid mistakes during installation. And now we will find out how to level the floor if you decide not to install double-glazed windows on the balcony.
Screed on the balcony with cement-sand mixtures
How to make a subfloor for a loggia or balcony with your own hands?
You can level the floor on the loggia with a solution prepared using sand and cement using two technologies:
- with insulation;
- without insulation.
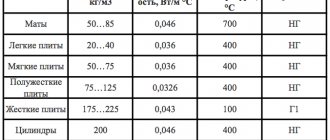
In closed, insulated balconies, it is advisable to insulate the floor, especially if the level of the slab relative to the floors in the apartment allows this to be done. Extruded polystyrene foam or dense foam plastic (at least 30 kg/m3) is used as a heat insulator.
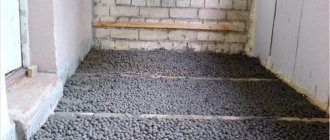
If insulation is not provided, the base is poured directly onto a slab or bedding made of crushed stone or expanded clay. Let's look at each floor leveling option in more detail.
Insulation screed
First, the thickness of the thermal insulation material is determined. To do this, the thickness of the screed (for cement-sand mixtures - 4-5 cm) and the proposed floor covering is subtracted from the distance between the balcony slab and the level of the future floor. With the specified distance, for example, 14 cm, and the finishing coating is laminate, the thickness of the insulation will be 14-5-1 = 9 cm. Alternatively, you can make a leveling bedding (sand, small crushed stone, expanded clay) at 4 cm before laying polystyrene with a thickness of 5 cm.
The work is performed in the following sequence:
- bedding and its leveling according to the rule;
- laying thermal insulation boards;
- waterproofing device (a continuous polyethylene film with a thickness of at least 80 microns is sufficient);
- installation of beacons;
- pouring cement-sand mortar and leveling it along the beacons;
- excavating the horizontal guides (when the surface can be walked on carefully), sealing the resulting grooves and grinding the screed.
Making a subfloor without insulation
This method is used if there is already an insulated balcony (loggia) below and the leveling layer is more than 5 cm. In this case, the sequence of work processes is as follows:
- arrangement of a sprinkled layer;
- rough screed;
- waterproofing (polyethylene film or bitumen mastic);
- installation of horizontal guides;
- filling the finishing screed.
Using cement-sand mortar, leveled along the beacons, a high-quality floor base is created, suitable for laying laminate, ceramic tiles, linoleum, and carpet on loggias.
To successfully level the floor on the balcony with your own hands and make a strong screed with a flat surface, use the following recommendations when working:
- to prepare the working solution, use river or washed quarry sand;
- prepare the sand/cement mixture in a ratio of 4-5:1 (when using M-400 binder);
- the thickness of the finishing screed should not exceed 5 cm;
- do not neglect installing a damper tape around the perimeter of the loggia before pouring the base of the floor, despite the fact that the area is small;
- after the solution has set, it is advisable to moisten the surface daily, especially in the hot season for better hydration and ultimate strength of the subfloor;
- as beacons with a layer thickness of 3 cm or more, use (conveniently) a guide profile (UD) or a profiled pipe with a square cross-section.
If the thickness of the leveling layer is insignificant (up to 3-4 cm), it is advisable to use ready-made packaged mixtures (levelers) for leveling.
Video: leveling the floor with liquid screed
Tools and materials for cement screed
For laying cement-sand screed you will need:
- Deep penetration primer,
- River sand and cement,
- Aluminum or metal beacons,
- Rule for leveling cement screed,
- Bubble level for installing beacons,
- Trowel and grater for smoothing the top layer,
- Brush and roller for applying primer,
- Mixer or puncher with an attachment for mixing the solution.
Important! When mixing cement at home, it is recommended to use a hammer drill or a construction mixer. It is not recommended to use a conventional drill for kneading, since a large load can damage the tool.
Leveling with extruded polystyrene foam
Extruded polystyrene foam has a high density (about 45 kg/m³), so it can be used to level the surface of the balcony floor.
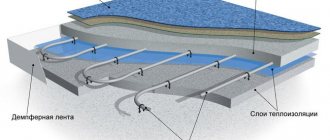
Approximate diagram of a screed device for extruded polystyrene foam
- Expanded polystyrene mats of selected thickness are laid on the prepared waterproofed surface.
- Along the perimeter, the gaps between the insulation and the walls are sealed with polyurethane foam to create an almost airtight layer.
- It is advisable to lay another layer of waterproofing made of polyethylene film or roofing felt on top of the insulation. The second material is preferable, since it is more dense and is more difficult to damage with reinforcing material.
- A reinforcing mesh with cells from 50 to 100 mm is laid on the waterproofing material.
- If the balcony has a traditional rectangular shape, then metal guides - beacons - are installed along its length, along the walls. They must be installed at the same height and to the thickness of the future screed, which can be from 30 to 50 mm.
- Next, a concrete mixture is placed on a section of the surface 20 -30 mm above the beacons. The solution for it should have a thick consistency.
- As a rule, the solution is leveled and slightly compacted, since it should occupy the entire thickness from the reinforcement to the height of the beacons.
- The leveled screed is left to harden and mature. Starting from day 2, it is regularly moistened with water - thanks to this procedure, the screed will gain the proper strength and will not crack.
- Any decorative coating can be laid on the finished frozen screed.
- If the surface of the screed turns out to be too porous, it can be refined with a self-leveling floor, and the desired coating can be placed on top.
It is easy to lay any decorative coating on an insulated screed.
Installation of screed using ready-made polymer-cement mixtures
Nowadays there are several types of floor levelers on sale. In terms of composition, scope and method of application, similar products are approximately similar, regardless of who produced them. Taking into account the small area of the balcony room, here the use of ready-made mixtures with a small thickness of the screed is preferable. It turns out to be only a little more expensive, but levelers are much more convenient to use due to the following features:
- the solution is prepared using a construction mixer, the mixture/water proportions are always indicated by the manufacturer on the packaging;
- the resulting solution is plastic, which greatly simplifies the leveling process (the filler does not settle, so there is no need to rush);
- it is possible to form a thin layer (from 1 cm) if necessary;
- the finished surface gains operational strength faster (7-10 days);
- there is no need to maintain humidity during the maturation period of the solution.
The technology for using ready-made mixtures to level the floor is practically no different from that for cement-sand mixtures prepared by yourself. The difference is that with a small fill thickness, it is enough to treat the base with a primer and not waterproof it, even in Khrushchev-era buildings.
Tools and materials for self-leveling mixture
To fill the self-leveling mixture you will need:
- Ready mixture in the right quantity,
- Deep penetration primer,
- A metal or plastic needle roller for rolling out the mixture and removing air bubbles,
- Mixer for mixing the mixture,
- Brush and roller for applying primer,
- Damper tape is glued around the perimeter of the room to compensate for the expansion of the self-leveling layer when drying,
- Spatula for preliminary leveling of the solution.
Important. Before applying the self-leveling mixture, it is strongly recommended to coat the surface with a waterproofing primer in several layers. The primer will prevent the cement screed from absorbing moisture from the filling mortar and ensure uniform drying.
Materials used
To work you will need:
- cement M250 and higher;
- fine sand;
- primer composition;
- waterproofing coating (roll or coating composition);
- finishing material (chipboard or plywood);
- beacons for screeding;
- rule;
- building level;
- roulette;
- Master OK;
- grater;
- bars;
- wood fasteners;
- construction mixer;
- container for preparing the solution;
- brush;
- roller
Alignment by lags
Creating a flat surface based on a frame made of wooden blocks has many advantages, such as:
How to make a wooden floor on a balcony with your own hands
- the “dry” method, so the created base is immediately ready for further laying of flooring materials (no need to wait for setting, maturing, drying). This option is suitable for those who are looking for an option on how to level the floor on a balcony without a screed;
- It is convenient to insulate the space between the joists with your own hands, and the choice of materials for thermal insulation is much wider (in addition to polystyrene, varieties of mineral wool, ecowool, and polyurethane foam are used);
- by selecting the appropriate section of the bars, the floor easily rises to the expected level;
- installing logs does not require special skills, so any home craftsman can level the floor on the loggia in this way.
This method of creating a floor base also has disadvantages. The created surface is not suitable for laying tiles. The durability of the logs directly depends on the quality of the wood, which is sometimes low. In addition, the lumber must be well dried and impregnated with protective compounds. These are additional time and material costs.
The method, among other things, is good because various materials can be used as cladding for the joists, such as:
- floor board;
- chipboard and OSB boards;
- plywood
Recently, preference has been given to OSB boards and plywood, as they are a universal base for laying most finishing flooring materials. You can even lay tiles on some types of OSB. Watch the video for the technology for creating a plywood floor base on a loggia using joists.
Tools and materials for floor joists
Leveling the floor with joists is recommended only on closed balconies and loggias. The method allows you to reduce the load on the slab, significantly increase the height of the floor and efficiently insulate the balcony. To fill dry screed you will need:
- Wooden blocks 50x50 mm,
- Waterproofing film,
- Insulating material if required
- Dowels for attaching the joist to the base,
- Wood screws,
- Material for finishing base.
Important! Before laying wooden logs, it is recommended to additionally treat them with protective compounds against moisture. In the absence of insulation material, it is necessary to ensure ventilation of the space under the joists.
Video - how to level the floor on a balcony along the joists
Important! When using varieties of mineral wool as a thermal insulation material, double-sided waterproofing of the insulation is required. A special film is used that allows steam to pass through while retaining condensed moisture. This rule applies not only to loggias and balconies, but also to covered terraces and other premises.
Finishing Instructions
Below are step-by-step instructions for finishing the floor on a balcony or loggia with your own hands using the most popular materials.
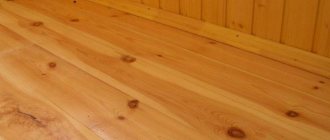
Laminate
- The first step is to measure the distance between the walls of the balcony and mark the required distance on the laminate sheets. You need to make a small gap between the wall and the floor covering. This is done if the size of the laminate changes due to moisture and temperature changes. The laminate should be cut at a right angle, otherwise it will not be possible to lay the slats evenly along the walls. In this case, an electric jigsaw is used to cut the laminate. You need to cut at a low speed to avoid the appearance of jagged edges, and when approaching the edge, the jigsaw needs to be moved even more slowly to avoid chipping.
- The next step is to lay a backing on the surface of chipboard or plywood. The underlay is laid on the floor cleared of construction debris.
- We fix the substrate to the wooden base using staples and a construction stapler. This is necessary so that the substrate does not fidget or move while laying the laminate. Alternatively, you can use double-sided tape.
- After fixing the substrate, we install the first part of the laminate. In this example, one piece of laminate covers the entire surface of the balcony; as a result, the seams are located perpendicular to the long walls of the balcony.
There are other ways to lay laminate: diagonally, longitudinally, herringbone or squares. In these cases, more finishing material will be required and there will be more undercuts. - Next, we move on to installing subsequent elements. The connection technology depends on the method of processing the ends of the products. In this example, there was a lock that snaps into place with a slight pressure on the lamella.
- Difficulties may arise in the area of the balcony door threshold. At this point it is necessary to cut the lamella into a recess. We measure the length and width of the recess, transfer it to the lamella and cut it out.
- The last element of the laminate is laid after preliminary cutting. On the last lamella, the cut must be made lengthwise. It’s okay if it turns out a little uneven, as this area will be covered with a plinth, and small defects will not be noticeable.
- The floor is ready.
Dry screed
The recently developed technology of laying a subfloor using gypsum fiber boards is increasingly becoming the choice when it is necessary to level the surface for laying finishing flooring materials. The essence of the technique is as follows:
- along the exposed horizontal guides, a flat surface is arranged from fine (fraction 1-5 mm) expanded clay;
- the guides are removed, gypsum fiber boards are laid on the bedding, joining with specially made grooves;
- joining occurs using glue, after which the locks are additionally tightened with self-tapping screws.
The result is a dry, even base suitable for laying most floor materials (carpet, laminate, linoleum). The advantages of the technology are:
- the work is done quickly, it is easy to do it yourself;
- the surface is durable, ready for further installation of finishing materials immediately after assembly;
- The use of expanded clay as a bedding gives a good soundproofing effect and insulation.
However, gypsum fiber board is not resistant to moisture, which imposes restrictions on the installation of dry screed in some rooms, such as:
- bathroom;
- kitchen;
- loggias, terraces, balconies insufficiently isolated from external influences.
Tools and materials for dry screed
To lay dry screed on the balcony you will need:
- Dry mixture for screed (slag or expanded clay),
- Edge tape for installation around the perimeter of the room,
- Film to ensure waterproofing of the screed from the bottom,
- U-shaped profiles as beacons,
- Rule for leveling the mixture along the beacons.
It is recommended to use CBPB, plywood or OSB as a finishing coating. Some recommend laying additional waterproofing film over the screed before installing the base slabs.
Video: laying dry screed on the floor
The final choice of the appropriate flooring technology will depend on specific conditions and individual preferences.
Rules for insulating a balcony
In the process of insulating a balcony, the selection of high-quality materials and the professional work of the builder are important. The basic work plan looks like this:
Preparatory work includes:
Then a waterproofing layer is applied. This can be done in several ways - for example, by choosing roofing felt or penetrating compounds (the latter are needed for concrete surfaces). This layer is covered with liquid rubber, thickly rubbed oil paint or a waterproof plaster mixture. The final stage is laying polyethylene film, which forms a kind of container for the insulation.
Ceiling insulation
Before starting work, it is necessary to apply an antiseptic solution to the ceiling to protect against mold. There are two types of insulation:
Floor insulation
Logs are installed on the floor - beams or bars 10–15 cm high. The spaces between them must correspond to the size of the insulation. The cracks must be sealed with polyurethane foam, the remnants of which are cut off after drying. Then the master makes a layer of vapor barrier to protect the surface from condensation. A layer of plywood, chipboard or boards is laid on the tops of the joists. The final finishing - the final floor - is already done on them. This could be carpet, linoleum or laminate.
Wall insulation
On the walls under the windows, the master makes lathing with wooden beams, taking into account the size of the insulation. Material is placed in these cells, filling the cracks with polyurethane foam. On top is a vapor barrier film, after which you can begin finishing. The wall adjacent to the living space can be insulated in one layer, and the external sides that face the street can be insulated in two.
Window insulation
For good thermal insulation, plastic windows are best suited. If you want to spend time on the balcony in winter in your usual home clothes, you should choose five-chamber PVC windows with hinged sashes and energy-saving double-glazed windows (the tightness features and functionality of specific models can be checked with the manufacturer or seller). Window structures are heavy - it is important that the balcony is strong enough for them.
A budget option for old glazed balconies is to use foam rubber or polyurethane foam to fill the voids. This method will not help maintain good thermal insulation for a long time, but will provide warmth at the beginning of the cold season, at slightly sub-zero temperatures.
Finishing work
The finishing layer of materials begins to be laid out from the ceiling. Then the floor is finished, switches and sockets are installed. The walls can be decorated to your taste. Designers often offer PVC panels, wallpaper or paint for balconies. The latter option is suitable if, in the process of rough work and insulation, it was possible to achieve smooth, even walls.
Summary table of floor leveling methods by rating
| Material | Price | Installation time | pros | Minuses | Rating |
| Concrete screed | From 2 to 5 thousand rubles/m2 (without materials). | Complete drying time is from 30 to 45 days. | Long service life, high strength, environmental friendliness, ease of maintenance, versatility, beautiful design. | Heavy weight, dirty and wet processes, likelihood of shrinkage, long drying time, high thermal conductivity. | 6 out of 10 |
| Self-leveling floors | From 1.5 to 8.5 thousand rubles/m2 (price depends on the type of self-leveling floor). | Complete drying time up to 7 days | Seamless surface, versatility, aesthetics, wear resistance, impact resistance, maintainability, environmental friendliness, moisture resistance, durability, fast curing speed, | Labor-intensive process of preparing the base floor, vapor permeability, mandatory floor insulation, high cost. | 10 of 10 |
| Semi-dry screed | About 450 rub./m2. | In one day up to 250 m2. | Small volume of water, leakage is eliminated, a perfectly flat surface is achieved, shrinkage is eliminated, cracks are eliminated, resistance to mechanical stress, light weight, after 12 hours, put into operation, dust and dirt are eliminated. | The need to use special equipment, it is afraid of moisture, due to poor-quality sealing, partial destruction is possible. | 9 out of 10 |
| Dry screed | Around 500–900 rubles/m2. | Installation is possible in 2 days (depending on the quality of the base). | Light screed weight, minimal labor costs, the possibility of laying communications, floor insulation, sound insulation, the ability to level the floor at sub-zero temperatures, eliminating dust and dirt. | It is afraid of moisture, it is impossible to install heated floors, it is unstable to mechanical loads, and rodents are possible. | 8 out of 10 |
| Plywood | From 150 to 350 rubles/m2 (depending on the installation method). | From 1 to 7 days (depending on the readiness of the base). | You can install it yourself, quick leveling, durable and even coating, thermal insulation, sound insulation, cheap source material. | If chosen incorrectly, plywood will creak, may swell and deform due to exposure to moisture, and be sensitive to temperature changes. | 6 out of 10 |
| GVL | In the area about 1300 rubles/m2. | From 1 to 7 days (depending on the readiness of the base). | Resistance to moisture, coating density, environmental friendliness, sound insulation, thermal insulation, does not burn, does not deform when temperature fluctuates, simple installation. | High fragility of the material, high cost, cannot withstand large static loads. | 5 out of 10 |
| OSB | About 800 rub./m2. | From 1 to 7 days (depending on the readiness of the base). | High strength, low weight, elasticity of the floor, homogeneous structure, does not collapse during operation, thermal insulation, sound insulation, resistance to chemical compounds. | The presence of phenol, a harmful substance. Therefore, you need to make your choice carefully. Low resistance to moisture. | 5 out of 10 |
| Green Board panels | About 300 rub./m2. | From 1 to 7 days (depending on the readiness of the base). | Durability, environmental friendliness, fire resistance, sound insulation, structural strength. | Large weight, installation of counter-lattice, very dusty when cutting, requires a finishing coat. | 7 out of 10 |
We hope the answer to the question of how to level the floor on a balcony is fully illuminated. The final choice of the appropriate technology for installing a floor base on a loggia or terrace with your own hands will depend on specific conditions and individual preferences. The main thing is that the methods exist, they are not complicated and effective, even if we are talking about a Khrushchev-era balcony.
Leveling the floor with concrete screed
The method is labor-intensive, but reliable. It is used mainly for open balconies, when there is no need to raise (more details in the article “How to raise the floor on a balcony”) or insulate the floor on the balcony. Suitable for leveling surfaces with a height difference of 3 to 6 cm. A layer that is too thin (up to 2cm) will crack over time. And too thick (more than 6 cm) will create additional load on the balcony slab.
The main advantages of using mortars are cheap materials. Strength and durability of the coating. A concrete screed can correct significant damage to the top layer.
The disadvantage is that it takes a long time to dry. Depending on the thickness of the layer, the concrete screed will be ready for finishing only after 15 - 25 days. So, if you plan to make repairs quickly, you should avoid leveling the floor with cement-sand mortar.
Self-leveling floor mortar
If it is necessary to level a concrete floor by less than 3 cm, then a cement screed is not suitable (it will crack). The best option in this case would be to use a self-leveling solution. Such ties can have a thickness of 3 mm - 3 cm.
To make a self-leveling screed you will need the following materials:
- self-leveling mixture;
- primer.
And also the following tools:
- needle roller (to remove air bubbles from the screed);
- mixer;
- putty knife;
- brush or roller.
Let's look at how to make a screed on a balcony using a self-leveling solution. The surface must be cleaned of paint, various stains, and concrete fragments. All existing cracks are sealed. All dust is removed from the surface using a vacuum cleaner. Then you need to prime the floor. You should wait the time specified in the instructions for the primer to dry completely, and then proceed to the next step. Read also: “How to fill a self-leveling floor on a balcony with your own hands.”
The leveling mixture is poured with water and mixed well with a mixer until it has a liquid consistency. The floor is filled with the mixture as evenly as possible, then leveled with a spatula. It is necessary to walk over the liquid floor with a needle roller to remove all air bubbles.
It will be possible to walk on such a screed in a few days, but the manufacturers of various mixtures recommend completing the final finishing after 1-2 weeks.