When purchasing a small home - a one-room apartment or a studio - the owners try to rationally use every free centimeter of space. Modern transformable furniture greatly simplifies interior planning. A folding sofa easily turns into a bed, and a compact table into a wide dining table.
The balconies also did not go unnoticed. Designers propose converting free square meters into a study, a relaxation area, but most often into a kitchen. The balcony or loggia is first glazed and insulated.
Pros of using a loggia
Expanding the boundaries of the kitchen area through the use of a balcony has many advantages:
- Additional area. Not all kitchen utensils and household appliances can be placed in this area, but only some (for example, a sink, cabinets for storing dishes, towels and other accessories).
- Visual impact and nice decor. The transition point between the kitchen and the adjacent area can be made in the form of a beautiful arch with built-in spotlights.
- On the balcony you can equip a dining area, separated from the main room by a bar counter.
- The design of a kitchen with a balcony can be developed either by a specialist or by the apartment owner himself, using his own imagination and creativity.
For small apartments, combining a loggia with a kitchen area is a real godsend, allowing you to significantly change the style of the interior.
Which option to choose
Setting up a separate kitchen on the balcony is difficult, since regulatory authorities will not allow you to move the gas stove. For apartments above the first floor, the issue of sewer line connections is not resolved. It is unacceptable to install heavy household appliances on the balcony slab.
For these reasons, it is advisable to equip a living area on the balcony in order to expand the kitchen.
After preparing the room, you can install a dining set here, and use a window sill to create a bar counter on the balcony. If size allows, a functional corner for afternoon relaxation will be located comfortably on one side. In order for the soft corner items to fit organically into the allocated area, their configuration is ordered individually from manufacturers.
Disadvantages of kitchen expansion
Despite all the advantages, moving the work area to the loggia also has a number of disadvantages:
- The need for additional strengthening and insulation of the balcony. In most cases, these actions must be pre-coordinated with municipal services to avoid problems in the future.
- When carrying out repair work, it is imperative to take into account the maximum possible weight on the supporting structures.
- The presence of wide window openings with folding sections and vents is dangerous for families with young children.
Complete refurbishment of a kitchen with access to a balcony is quite an expensive undertaking that requires significant financial investments.
Architectural features
When starting a kitchen remodel, it is worth remembering several important points regarding the loggia.
First, contact the management organization and find out whether the technical characteristics of the loggia allow you to place heavy objects on it, such as a refrigerator or a gas stove. In most cases, the balcony slab is a “sprout” of the main floor slab and it cannot withstand the same load as the entire floor of the apartment.
Secondly, when planning, remember that the wall between the kitchen and the loggia is almost always load-bearing and demolishing it to enlarge the kitchen will not work. The partition will still remain. If it can be demolished, then you will need to apply to several authorities at once for permission.
Thirdly, even if the floor of the loggia can withstand such a load, there will be very little space left on the balcony after installing the furniture. Fourthly, moving water supply, gas pipes and sewerage to the balcony will be very expensive and not always possible.
Therefore, when planning to combine the kitchen and balcony, think about moving the refrigerator or dining area there, rather than the entire work surface.
You should start re-equipping a balcony by glazing it or replacing the old double-glazed window with a new, warmer and more economical one. After all, the heat that will now penetrate from the kitchen will easily blow out through low-quality windows.
Kitchen remodeling options
A kitchen on a balcony can be presented in two main variations:
- In the form of a separate room.
- Kitchen combined with balcony.
Under these two types of planning there is a mass of various subtypes, each of which differs in a number of parameters. The layout can change the type of lighting, the placement of furniture, and storage sections.
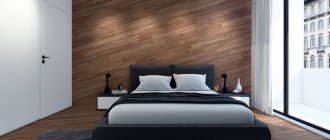
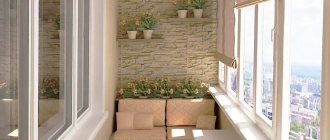
Home coffee shop
On the former balcony, which is insulated and heated, it becomes an excellent area for drinking tea. The balcony partition serves as a coffee table; an electric kettle, coffee maker and dishes can be placed on a cabinet or table, and an easy chair or small sofa can be placed under the large windows. This area is especially effective on balconies with floor-length panoramic windows.
Whatever the functional purpose of the balcony after combining it with the kitchen, this will definitely add free square meters in your apartment and give room for design imagination.
Combining a kitchen with a balcony
More often there is another layout option, in which the kitchen and dining area is combined with an insulated loggia. This approach allows apartment owners to have a larger space for cooking and eating. There are several types of placement of working and dining areas.
The table can be located on the balcony, and the hob and sink on a standard kitchen area. There may also be a layout with completely opposite placement of furniture and areas.
Arrangement of the work area
The situation is more complicated with how to make a kitchen on a loggia, meaning:
- removal of communications outside the premises;
- location of the sink and hob on the loggia;
- arrangement of hoods and ventilation ducts above the stove.
Photo of the implementation of a full-fledged kitchen project on the loggia
Transfer of communications
The most correct option for transferring communications is considered to be their location along the wall, similar to the previously existing option (see also the article Kitchen on the balcony - reality or illusion).
In other words:
- The sewer pipe, by increasing its length in additional sections, is carried out onto the loggia;
- Using metal-plastic pipes, hot and cold water is supplied to the installation site of the sink in the kitchen;
- When using a gas stove, it is best to connect it using a flexible hose;
- When using an electric hob, route the electrical cable to the installation site and ensure that the entire device is grounded to protect against electric shock.
Communications supply to the loggia
Tip: You can use flexible hoses to route the sewage system under the sink. With their help it is easy to select the desired angle of inclination.
Stove location
The kitchen stove places the highest demands on the reconstruction of the loggia.
The fact is that its location must comply with the rules of SNiP, namely:
- There must be a shut-off valve on the supply pipe;
- The stove itself must be equipped with a device for turning off the burners;
- In the area where it is located, adjacent walls must be plastered;
- The distance of gas burners from the window should be at least 30 cm (so that gusts of wind do not extinguish the flame).
Installation of a gas stove requires compliance with SNiP
For reference: the factory instructions will inform you about all the features of the gas stove. True, this only applies to those stoves that were purchased recently.
Hood equipment
This stage of turning a loggia into a kitchen is mistakenly ignored by many homeowners. The reason for this is excessive self-confidence that the increased volume of the room due to the addition of a loggia will contribute to better air circulation.
In fact, this is not the case, because:
- The construction materials of the walls and ceiling of the kitchen differ from the materials used for the insulation of the loggia during the reconstruction;
- They have different thermal conductivity and vapor permeability.
That is why it is necessary to equip the space above the hob with a modern hood.
Moreover, the price of the issue is low, all you need is:
- Buy a hood;
- Bring the ventilation duct to the street;
- Equip it with a protective dome to protect it from precipitation.
The check valve will allow you to control the operation of the ventilation duct
Tip: it would also be appropriate to have a check valve on the hood to prevent the uncontrolled flow of outside air.
Expanding the loggia space
After agreeing on the project plan with the BTI and demolishing part of the wall, you can begin interior finishing work. Old coatings are removed from walls, floors and ceilings, all surfaces are leveled, and they are coated with antiseptic and antifungal compounds.
Existing construction defects must be restored. You can increase the free space by moving the window glass to the maximum possible distance from the internal frames.
With this approach, the surface of the window sill expands, which can also be used for practical purposes. All communications required in a classic kitchen fail precisely at this stage of repair work (lighting, water supply, drainage, gas to the hob, ventilation).
For the interior decoration of wall panels, floors and ceilings, materials with the minimum possible weight are chosen so as not to increase the load on external structures. To decorate the interior of a kitchen with a balcony, wood, chipboard panels, and veneer for wall decoration can be used.
The flooring can be made in the form of artificial stone masonry. It is enough to cover the ceiling with liquid wallpaper to give the room a stylish design.
Transfer stages
Moving part of the kitchen or the entire kitchen space to another location begins with preparing a new area.
Enlarging a loggia or balcony
This stage is recommended for small balconies and loggias. Increase the area in two ways:
- The glazing is placed along the parapet at a distance of up to 30 cm. The option is simple to implement and does not require approvals.
- Expand the base of the balcony slab. This is a labor-intensive and expensive method, the safety of which is assessed by experts.
Insulation and glazing
The next stage is insulation and glazing of the additional room. Insulation begins with sealing gaps, cracks and irregularities in the walls and ceiling. Mineral wool, polystyrene foam, polystyrene foam, penofol or a combination of these materials are used as insulation. Work begins with insulating the floor, then moves on to the ceiling and walls.
Important! High-quality insulation reduces the size of the balcony by 10-15 cm on each side. Therefore, if its area is small, there is no point in undertaking such work.
The glazing must also be of high quality, otherwise the whole point of insulating the floors and walls will be lost. If you are planning to make a balcony a living room, choose 2-3-chamber plastic windows with hinged sashes. They are more airtight than sliding window systems and have better heat and sound insulation properties.
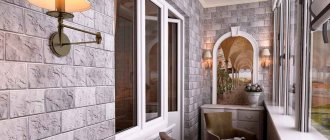
Finishing
Finishing the attached premises is the final stage of reconstruction. Finishing is carried out both externally (for better heat retention) and internally. When choosing interior decoration options, they are guided by the design of the remaining rooms in the apartment.
A good choice for finishing the floor would be tile, laminate or linoleum. To visually expand the space of the loggia, tiles or laminate are laid diagonally.
To decorate the walls, use wall panels, plywood or sheets of plasterboard, followed by painting and wallpapering. If a sink and stove are placed on the loggia, the apron is finished with a material that has thermal and water-resistant properties.
Window sill decoration
Having freed up the window sill and increased its area, you can start planning it well. The wide cornice is cleaned of construction dust and debris, sharp corners and cuts are sanded, and they are masked with plastic inserts. A window sill of sufficient area can be used in several variations:
- A table with high-backed chairs or stools underneath. The advantage is the opportunity to have meals with a beautiful panoramic view.
- Storage area under the eaves. It can be presented in the form of shelves, closed drawers, racks with drawers.
- Dish drying rack, also located under the window sill.
There are plans for a kitchen on a balcony, in which the surface of the window sill is reduced to the minimum possible values. In such cases, all represented zones are located at other points.
Decorating a kitchen apron
An obligatory part of the renovation work is the design of the kitchen apron. After determining the future location of the hob, we begin finishing the wall panel. The wall surface can be additionally coated with an antipyretic agent, which will prevent fire.
For interior decoration, you should use materials that are resistant to fire, temperature changes, moisture and synthetic detergents. The surface of finishing materials should not be too corrugated, otherwise dirt, soot, and greasy deposits will get into the cracks and crevices.
Today in construction and finishing materials stores you can purchase:
- Ceramic tiles.
- Glass modules.
- Mosaic tiles.
It can also be an artificial stone, which has a lower weight compared to natural stone, but the same quality and decor.
Organization of storage area
An important step for any housewife is organizing a storage area in the kitchen combined with a balcony. The new freed up space is great for storing dishes, food, kitchen utensils and household appliances.
An excellent finishing and layout option would be to place the unit (hob and sink) at one end of the loggia, and the shelves at the other end. The available space between the window frame and the wall can be filled with open shelves, a rack, or a small cabinet.
Also, a storage area can be placed under the bar counter, which is used as a partition for combined kitchens.
Sewerage
Laying sewerage on a loggia is the most labor-intensive. A kitchen-loggia cannot do without a drain, and it may be located far from the sewer riser, so you will have to drain it through the entire apartment.
The main problem and feature of laying sewer pipes is the mandatory requirement to maintain their uniform slope. If you hide this pipe in a box, it should be quite high, so that, moving away from the sink in the highest position, the pipe gradually drops to the level of the entrance to the sewer riser, being in the box throughout its entire length.
When laying a sewer system during a major overhaul, you can make grooves in the walls for laying the pipe or mask it with plasterboard.
For a kitchen drain, a 50 mm pipe is considered optimal. As it should be when laying a sewer system, sharp turns should be avoided here, trying to make them smoother, and where this is not possible, it is necessary to install an inspection through which blockages are removed. In this case, the slope of the sewer pipe per meter of length should be within 1-2 cm.
Organization of high-quality lighting
In a new kitchen you can use all known types of lighting: chandeliers, built-in lamps, wall lamps. Main principles: a combination of natural and artificial lighting of sufficient intensity in the room.
Wide window openings on the glazed loggia allow a sufficient amount of daylight to enter the room, and therefore in practice only wall lamps for the evening and built-in modular lamps for the kitchen apron are used. The same spotlights can be used to decorate a kitchen with access to a balcony.
Curtains for the kitchen on the balcony
An important task is the optimal choice of curtains for windows in a kitchen with a balcony. The presence of wide window openings provides for the organization of protection from bright daylight, street noise, and insects.
For the kitchen and dining area, you should carefully select textiles, which can be natural, synthetic and combined fabrics: linen, satin, cotton fabric, fabrics with the addition of acrylic threads.
Curtains for kitchen windows must meet a number of requirements:
- Resistant to moisture, shrinkage due to frequent washing, and synthetic detergents.
- Resistance to paint fading under the influence of sunlight.
- Before purchasing, the porosity of the material and its ability to maintain natural air circulation in the room are also assessed.
- An important criterion for evaluation is the ability of textiles to diffuse sunlight.
Most combined canvases fully meet the presented requirements. However, Roman blinds and roller blinds, the length of which is regulated by the residents themselves, are even more popular today.
Incorrect solutions
Let's consider the main restrictions that it is better to know about before work:
- Communications to the loggia cannot be carried out spontaneously. To do this, you must obtain permission;
- Placing a gas stove is unacceptable. Illegal installation will be a reason for paying a fine, and administrative liability will be imposed on the owner of the apartment;
- A sewer pipe can only be installed if your apartment is located on the ground floor, or if the drain is equipped with a special pump. In any case, on the eve of work you must obtain official permission. It is better to opt for the electric version of the stove;
- The hood must have safety valves;
- Additional central heating radiators cannot be installed indoors.
This interior is an example of incorrect renovation. Here is an additional heating device in the loggia space.
As an additional source of heating, you can install a heated floor or an electrical appliance to heat the room.
Headset placement options
Not all known types of kitchen layout are used for balcony space. This is due to limited space and a reduced threshold for the maximum possible load on supporting structures. In a limited area, you can use the following types of furniture layout:
- U-shaped arrangement of the headset. All furniture elements are installed along three wall panels.
- A corner kitchen on the balcony looks very effective, but also has limitations.
For fully combined kitchen spaces, an island layout is also used, which fits original into any interior style.