Dryer outside. Everything ingenious is simple!
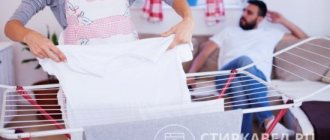
Summer, cottage, fresh air and sun. It would be a shame not to use this if you have a big wash to do. After washing your clothes, hang them in the yard - this way you will save on electricity, forget about the humidity in the house and can enjoy the aroma of freshness that your clothes will smell of.
According to statistics, about 90% of city residents dry their clothes at home: on balconies, radiators, and in dryers. Having gone to the country, they cannot get rid of old habits. Meanwhile, home drying not only wears things out, but also entails significant costs.
If you live in a private house or go to the country, dry your laundry in the open air! This is good for both your belongings and your health.
5 REASONS TO DRY OUTSIDE:
1. Natural freshness . No air conditioning needed. The sun and wind will do their job. Any odors remaining after washing will disappear within a few hours. And if it’s spring outside, and the air is filled with the aromas of flowering trees, you won’t be able to part with them even at home!
2. Immaculate cleanliness. Ultraviolet light is a natural antiseptic that kills bacteria and protects against mold and linen mites. Sunlight brightens things, which means white things will simply shine!
3. Durability of things. Rapid heating and spinning in the dryer will wear out the fabric. Even 100% cotton sheets tear quickly. What can we say about delicate fabrics - silk, synthetics, brocade? Natural drying preserves things for a long time. Don't believe me? Think about the wardrobes of your grandmothers and great-grandmothers, in which clothes were stored for years.
4. Energy saving . Sun and wind don't cost you a penny. But you will have to pay for electricity - for a dryer or radiator. Save money - it's easy at the dacha!
5. Harmless to health. When laundry is dried in the fresh air, under the influence of wind and sun, it undergoes additional processing, which is so lacking in closed city apartments. Natural sunlight contains an ultraviolet part, which disinfects laundry from all types of biological components.
In a city (and especially a big one) it is difficult to dry things outside. In some places this is completely prohibited. But if you live in the country or in your house with a large yard, take out the dryer - and take advantage of the gifts of nature!
WHAT SHOULD AN OUTDOOR DRYER BE?
Of course, reliable and compact. The capacity of the dryer is also of great importance. For example, Brabantia, a well-known European manufacturer of household goods, offers its practical solution for drying clothes in the fresh air - umbrella-type outdoor dryers .
The first thing worth noting about Brabantia outdoor dryers is their compactness and ease of installation. In order to bring the dryer into working position, you just need to insert the dryer into a special base (for soil or concrete) and open it.
The easy-to-use “umbrella” folding mechanism ensures that the ropes are always taut; moreover, there are several rope tension positions with locking.
High quality UV resistant ropes with a non-slip profile will last for ages. If, nevertheless, the need for replacement arises, then there are no problems here either - the ropes are easily and simply replaced individually.
After use, the dryer folds compactly and is covered with a weather-resistant cover. It is done! Leave the dryer in the yard or bring it into the house or onto the veranda - your choice.
We can only give a few tips to housewives:
— Before washing things, study the label: it will tell you exactly how to care for the fabric, what you can do and what you can’t do. Pay special attention to clothing and items made from synthetic materials.
— Hang bedding so that no wrinkles form. If there is not enough rope, fold the sheet or duvet cover in half - and you won’t have to iron the linen.
— To prevent the dress from losing its shape, hang it on hangers. The same can be done with a jacket, blouse and any similar clothing.
— Hang T-shirts by the hem, neck down. This way, marks from clothespins can be easily smoothed out or hidden by tucking a T-shirt into jeans or pants. But it is better to hang trousers and shorts by the belt so that they retain their shape.
Everything ingenious is simple! If you want to save electricity and avoid high humidity at home, keep things for a long time and make them fresh and pleasant to the touch, dry them outside. All you need is an outdoor drying rack and a few clothespins.
Source
Indoor dryers for balconies
This group of products includes several types, each of them has its own characteristics, so I will consider them separately. If desired, you can use two types of structures, it all depends on a number of conditions - sometimes one option may be more convenient, and sometimes another.
The second option is wall structures
This group of products, in turn, is divided into several options; I will tell you about the most popular of them, which have proven themselves best among users.
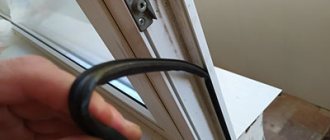
First of all, we need to talk about inertial wall dryers, which consist of two components:
The spring-loaded drum pulls the cord inward, and when folded the design is very compact
- A housing with a spring-loaded drum that tensions the cord and allows it to be quickly retracted into the housing if necessary . It is important here that the system is tight enough and provides good tension;
- Hooks or a special strip are attached on the other side; the structure clings to them when it is needed.
This option can withstand a load of up to 6 kg . Judging by the reviews, after about a year of use the ropes begin to sag. If the design has a function for tensioning the drum spring, then you can make a good tension again, if not, then you will have to install a new system.
As for manufacturers, the products of the German brand “Leifheit”, as well as Italian and “Gimi” deserve attention . The cost all depends on the model, design and manufacturer, for example, the popular model “Gimi Rotor 6” will cost you about 1,300 rubles.
This modification is very popular due to its attractiveness and reliability.
The second option is compact console designs; this is an excellent solution for small spaces when you need to remove the system when not in use. When the dryer is unfolded, 5 rows of tubes extend, which are used for hanging things, look at the photo below and you will understand all the features of this type of product.
This option is good for its compactness
Another type of such structures is a system in which the crossbars do not fold inward, but move together according to the principle of a telescopic design. Again, you can understand the features of the system by looking at the photo: everything is simple and clear.
This option is more reliable due to the rigidity of the structure
As for the cost, these options will cost you from 1000 to 2000 rubles, depending on the size and manufacturer. The design may include a towel holder at the bottom, but this option is more suitable for bathrooms than for balconies, although on the other hand it provides additional drying space.
Console options can withstand a load of about 5 kg, so it’s unlikely that you’ll be able to dry a lot of things on them, keep this in mind.
The third type of wall-mounted dryers are sliding systems; they are made of metal pipes, so they can withstand loads of up to 10 kg. When folded, this dryer takes up little space; it can be safely placed even on a small balcony.
When folded, the design does not create any interference
In terms of cost, they do not stand out from the general range and cost about 1000 rubles, so if you are thinking about which option to choose, then you can only be guided by personal preferences, although this option outperforms the two described above in terms of reliability.
You can hang two of these drying racks, then there will be much more space for laundry
Wall-mounted clothes dryers are attached using dowels or self-tapping screws, it all depends on the basis on which the installation is made. The most important thing is to ensure reliable fixation of the structure.
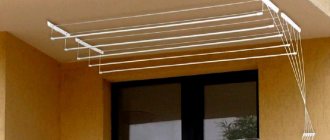
The third option is ceiling systems
This is the most popular type of product today, which is not surprising, because the designs have a number of advantages:
- They do not take up useful space either on the floor or on the walls : the ceiling is usually always free, and in this case it will perform a useful function, which is important;
- They are not conspicuous: if nothing hangs on them, then the drying marks are almost invisible. They do not interfere with the opening of doors, which is also important;
- The laundry rises up and creates minimal interference when drying.
Ceiling-type drying when folded is almost invisible
Of course, there are certain disadvantages that also need to be considered:
- Hanging small items on thick crossbars is not very convenient;
- Installation can cause some difficulties, especially if the ceiling on the balcony is not durable.
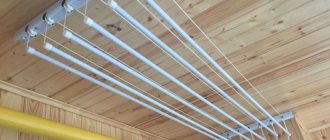
And this type of product is divided into separate types, I will start the review with the classic suspended version, it is quite simple: a structure of several crossbars is lowered and raised by a rope that passes through two blocks at the mounting points on the ceiling.
This solution, despite its simplicity, looks best and can become a unique decoration for your balcony. And the cost is very attractive: from 600 rubles and above.
A simple but very reliable option
Retractable systems or, as they are also called, accordion dryers, are distinguished by the fact that the system is lowered and raised due to a simple design, which is shown in the photo below . To lower, you need to pull the rope on one side, to raise, use the rope on the other side, everything is simple and clear.
This type of dryer is also quite common.
This type of structure can withstand about 5 kg on average; I do not recommend hanging more, since the sliding structure deforms under load and quickly fails. The cost starts from 900 rubles and may vary depending on the size and brand.
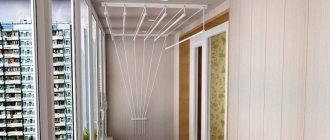
Finally, the most popular and frequently used solution today is the “liana” type design; its main feature is that you can separately adjust the height of each of the crossbars . This is very convenient when drying things of different sizes, but the design is much more complicated.
This option is the most practical of all.
As for the features, they are as follows:
- Most often, the design contains 5 or 7 rods for drying;
- The drying length can be different - from 100 to 250 cm, so you can choose the best option for any space;
- The design goes down very low, which increases the convenience of placing laundry on it.
The bars can be lowered to make work easier
The price range varies widely - from 600 rubles and above. When choosing, pay attention to the material of manufacture; it is better if it is steel with a polymer coating.
Now let's look at the installation, if with the first two options everything is quite simple (you need to attach brackets to the ceiling, after which you can use the system), then the last type is more difficult to install.
The process looks like this:
- First of all, the rods are attached to the desired width, this is done using anchors;
- Next, you need to pass the cord through the system and attach special caps to it; before tying the knots, you need to precisely adjust the position of the rod;
- A locking bar is placed at the bottom, which will hold the cords in the required position.
The kit should always include instructions telling you how to pull a clothesline on the balcony
The fourth option is floor systems
If a regular clothesline for a balcony or ceiling and wall structures do not suit you for some reason, then floor drying is the best solution; it has many advantages:
- Mobility - the structure can be placed not only on the balcony, but in any other room or even on the street;
- Wide range of sizes – you can find dryers of any size;
- You can fold the system and store it at any time;
- There is no need to secure anything - you simply place the drying rack on the floor and unfold it.
This is without a doubt the simplest solution of all.
When purchasing, pay attention to the strength of the tubes and the reliability of the design; cheap Chinese options can bend even from 5 kg of laundry. It's better to buy something more expensive and stronger. As for the cost, high-quality products will cost you from one to five thousand, depending on the size and manufacturer.
If you have children and have to dry a lot of laundry, then I advise you to pay attention to multi-tiered structures.
This option is very practical and convenient
Option five - electric dryers
Designs of this type come in different designs - floor, wall or ceiling. As for modification, there are two main options:
- Traditional models that dry clothes using heated rods or fan heaters that blow from top to bottom. Their price varies from 2000 rubles and above;
This option allows you to dry clothes much faster
- The cover design allows you to dry things on a hanger, which saves you from having to iron out folds for a long time . This option can dry up to 10 kg of laundry; the height of the cover is approximately 150 cm, which allows you to fit any clothes there. The cost is about 3500 and above.
Dryer cover is an interesting solution for those who save time
Among the disadvantages, it should be noted that such structures, like all electrical appliances, require careful handling . And the energy consumption will be quite large - about 1 kW per hour of operation.
Electric dryers can be used just like regular dryers without being plugged in, so you can save electricity when drying time is not an issue.
The most traditional, or it couldn’t be simpler
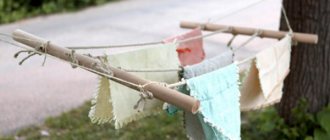
I think everyone imagines this design: T-shaped supports installed at some distance from each other; A clothesline in several rows is stretched between the upper crossbars. There were probably similar dryers in all the yards before.
Such structures used to be seen in almost every yard.
Everything is in order here with durability and convenience - it has been tested by generations. But with ease of manufacture it’s already more difficult... To make a metal - the most durable - support, you need the skills of a welder. Although you can build a wooden one, of course:
In principle, making simple wooden supports is not at all difficult.
But it also needs to be installed securely - deeply buried, strengthened so that it does not collapse under the weight of the laundry. And we also have strong winds - the load on the support will be considerable... Well, somehow the beauty here didn’t work out. We will continue to search.
The best clotheslines over 10 meters
Vetta 453-022
This cord has a metal core, which is enclosed in a silicone case. Thanks to this, the product is highly durable and will not sag under the weight of wet laundry. The silicone braid will prevent the metal from rusting, which will subsequently not leave dirty stains on clean clothes. It is also worth noting that thanks to the silicone case, it is easy to remove dirt and dust from the product. You just need to use a damp sponge or cloth. In addition, silicone will withstand any weather conditions; it will not lose its properties from exposure to moisture or sunlight. For this reason, “Vetta 453-022” can be installed both indoors and outdoors.
"Vetta 453-022" has a length of 15, 20 and 30 meters, and the cord diameter is 2 mm.
The average cost is 100 rubles.
Vetta 453-022
Advantages:
- Does not deform or stretch;
- Easy to care for;
- Withstands high loads;
- High quality braid;
- Affordable price.
Flaws:
- Not detected.
York plastic cord
This cord from the famous one is available in five colors: white, red, blue, green and yellow. The cord has a steel core, which is enclosed in a plastic braid. Due to this, the product will withstand high loads, while not bending or stretching under the weight of wet clothes. The braid does not deteriorate when exposed to sunlight, and is also resistant to low and high temperatures. This quality will allow you to use the cord outdoors. It is worth noting that the coating is very tear-resistant. Thanks to this, the steel core will not undergo the corrosion process, which will protect washed items from the appearance of rust stains.
"York plastic cord" has a length of 20 meters.
The average cost is 95 rubles.
York plastic cord
Advantages:
- Durable cord;
- Does not stretch;
- Several color options;
- Optimal length;
- Durable braid;
- Verified manufacturer.
Flaws:
- Not detected.
Elfe 93703
To produce this version of the clothes cord, the manufacturer used synthetic stabilized threads, and for greater strength, reinforced the product with steel wire and coated it with SHHA. The ShHA polymer coating will provide protection from getting wet and will also simplify the cleaning process. It is also worth noting that this coating will protect polypropylene threads from exposure to oxygen and sunlight, which will extend the life of the clothes cord. Due to the fact that there is a steel wire at the base, it will be possible to increase the load on the product. For this reason, the cord will not stretch and deform under the weight of wet laundry.
The length of “Elfe 93703” is 20 meters, and the diameter is 3 mm.
The average cost is 75 rubles.
Elfe 93703
Advantages:
- Withstands heavy loads;
- Does not deteriorate from direct sunlight;
- Easy to clean;
- Does not give color to linen;
- Affordable price.
Flaws:
- Not detected.
Miracle tree... for drying clothes
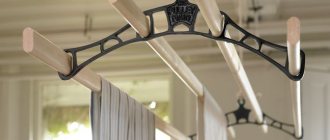
I couldn’t ignore the creative development of the idea of simple supports. The same two pillars with ropes stretched between them - but the hands of craftsmen turned these pillars-supports into miracle trees:
This “miracle tree” is a job for real masters
Original, unusual, effective - no doubt about it. And it’s convenient: thanks to the “branches”, you can pull the ropes at different heights. But this idea is definitely not for amateurs - the skills to implement it require quite professional ones. I think such supports will be appreciated by those who are friends with metal or know how to make all kinds of beauty out of wood. And I continue my search.
Variations on the theme of a trellis or garden screen
This idea captivated me with its practicality. In essence, it turns out to be “three in one”: a convenient, durable, reliable clothes dryer, an element of garden design, and a support for plants:
It’s convenient, beautiful, and very practical - this design combines several functions at once.
Moreover, the design of such supports varies, as do the methods of their practical use. Depending on the available free space and your own construction skills, you can build a variety of structures:
Multifunctional designs of varying degrees of complexity
We answer questions
Answers on questions
- Why don't you make detailed estimates for finishing the loggias?
Sometimes it really happens that clients ask for detailed estimates to be prepared for them. In particular, such requests for the preparation of estimates often occur when ordering insulation of a loggia or connecting a loggia to a room.
The requests look like this: “Make me a detailed estimate indicating the cost of each job and all materials separately.” How can we respond to such requests? The fact is that drawing up estimates is a separate area in the construction and design business. The estimate has a very broad purpose. An estimate is needed, for example, in order to avoid corruption at construction sites and allows you to monitor that the cost of certain works or materials is not inflated. After all, there are standards that specify all the coefficients, including the cost of materials and work.
But we are engaged in insulating loggias. Our product is a ready-made, insulated balcony. We spell out absolutely everything in the contract, and indicate in the annex to the contract all the work that will be performed.
But how do you imagine separating the cost of one job from another? Where possible, we do this (for example, we determine the cost of electrical installation by the number of electrical points), and insulation and finishing work is determined by the overall square footage of the object. But all this is one set of works.
And if someone does give you an estimate, you should know that this is profanation. For example, at what cost should we include insulation in the estimate if it was purchased a year ago and stored in a warehouse? Its value has increased significantly. We use a warehouse to store more than half of the finishing materials.
What if you really need an estimate?
For example, we recently tried to calculate an estimate for a client at market prices when insulating a loggia in Zelenograd (we used Leroy Merlin prices as a basis). After calculating the work with the material for insulating the loggia, the price according to this estimate turned out to be 20% more expensive for the client than the cost that we initially announced and at which we are ready to work. Who needs such an estimate? And we were forced to adjust the estimate to the real, lower cost. Those. showing market prices for the material, significantly underestimate the cost of the work.
As a result, according to this estimate, almost all the work is carried out by us free of charge. Or we had to set the real cost of the work, but underestimate the cost of materials in the estimate. Try asking for an estimate from the company that calculates the installation of your wardrobe. Ask for a separate price for all fittings, furniture panels, rails and casters; for each job: cutting and fitting furniture panels, installing a cabinet frame, installing rails, adjusting rails, installing stop corners, etc. But no, they tell you the cost of installing EVERYTHING, i.e. the whole cabinet, and as an appendix to the contract you sign your agreement with the sketch of the cabinet, color, dimensions, etc. So we offer the service of insulation and finishing of the loggia. It’s just physically not always possible to single out and evaluate this or that work from the entire range of insulation and finishing works. Believe me, no one is trying to deceive you. And if you still need an estimate, of course, we will prepare it for you.
Indeed, plane routes sometimes change. As we managed to find out, flights over Zelenograd have become more frequent since 2013. This happened due to an increase in airport capacity based on the order of the Ministry of Transport of the Russian Federation dated January 24, 2013 No. 11 from May 2, 2013. Those. This order lifted all previously existing restrictions on passenger aircraft flights over Zelenograd. And complaining to the Zelenograd prefecture is really useless, since regulating the end-to-end transit of aircraft is not within their competence.
As for glazing, we would offer you a special series of windows from the manufacturer REHAU. These windows are made of a special noise-absorbing profile. High noise insulation of REHAU windows is achieved not only due to a specially designed profile, but also due to a tighter fit of the window sashes in the closed position, a wider glass unit and enhanced sealing of window joints. Believe me, this is not your only question. And for several years now we have been recommending that residents of Zelenograd, especially those areas where aircraft celestial maneuvers can actually be heard, purchase these particular window models.
Teplozel company specialists will help you choose and install windows that will protect the silence of your apartment not only from low-flying airplanes, but also from frenzied car alarms, howling police sirens or even loud songs on the adjacent open balcony. And this does happen. Depending on the noise level, we will select windows of the appropriate noise insulation class for you. Below we provide a table of noise insulation classes.
Noise Source
Sound pressure level, dB
"House" for drying clothes
And whatever they come up with! I was especially impressed by the design in the photo on the left - the one on wheels... I can’t reproduce it exactly, but I appreciated the idea. In hot weather, the laundry in such a “house” should dry instantly, and if it rains, you don’t have to worry that everything will get wet:
The fantasy of summer residents knows no bounds!
Using a small pergola as a place for drying clothes is a non-standard and ambiguous idea, you must agree... On the other hand, it’s not every day that you do laundry at the dacha, but such a structure will constantly decorate the landscape.
Umbrella dryer: convenient and practical
This idea is successfully exploited by dryer manufacturers, but homemade craftsmen are not far behind. Moreover, the design of the “umbrella” may involve different ways of hanging laundry: either along radii (like the knitting needles of an umbrella) or along a circle (spiral):
Or maybe you'll like an umbrella?
On the one hand, I like this dryer: you can place a lot of laundry quite compactly, and again, there is a roof... But on the other hand, the design must be heavy... And there is only one support... Well, how thoroughly should it be installed and fixed? You need it to not fall over when you load it with wet laundry. Maybe it's better then without a roof?
Also an umbrella, but lighter - without a roof
The photo shows factory products, but you can make a similar dryer with your own hands - for example, Vera talked about a neighbor who made this: Once again about the clothes dryer. However, I don’t have welding skills, so I’m looking for ideas further.
Folding wooden ladder
That's what I like! The design is simple, stable and reliable; It does not take up a separate area: you can display it when needed, and then fold it again and put it away. In principle, it’s not too difficult to do, but judging by the photo, it should be convenient to use:
Ladder dryer - a simple mobile design
For children's clothes, T-shirts, towels and other small linen, in my opinion, this structure is perfect. But I suspect that I’ll quickly get tired of folding and putting away, and then re-arranging this “ladder” every time... Then, perhaps, it’s worth doing something similar, but stationary?
Warm floor on the loggia.
Good afternoon, please tell us how to properly and what materials to use to make a warm electric floor on a loggia under tiles. Loggia. There is a tile at the bottom (I wouldn’t want to remove it). It is necessary to install a warm floor. The difference is about 3 cm. Should I screed first? What to fill with? Should the warm floor be laid on the tiles, then poured along the beacons? Do I need to put penofol under a heated floor? Should I lay the tiles on top of the screed using tile adhesive? Approximately how many bags of fill material are needed? and tile adhesive?
Cover the tiles with concrete contact. Set up beacons. Fill in the CPS. Lay heated floors. You can fill the heated floor with self-leveling floor and lay the tiles. You need a bag of glue. Penofol is not needed. Dry mix “SAND CONCRETE” 4 bags. Self-leveling floor 2 bags.
Masters online: 65 Orders per week: 2,302 Offers per day: 1,257
Alexander, are you ready to pay?
700 watts per hour with a working electric floor, my advice is to make a wooden floor or put in laminate.
1.Remove the old tiles.2.Prime them.3.fill the central heating system along the beacons.4.lay the warm floor.5.lay the tiles.
Hello, Alexander! Such issues are usually resolved on the spot with the master.
What kind of questions Dmitry??) If a person wants a warm floor, it means he is counting on something... especially since this is a practical question)
Hello, Alexander, it is possible to install underfloor heating if the loggia is insulated on all five sides! If “yes”, then leveling, laying cables, screeding with a mixture for heated floors, laying tiles. Good luck!
Cover the tiles with concrete contact. Set up beacons. Fill in the CPS. Lay heated floors. You can fill the heated floor with self-leveling floor and lay the tiles. You need a bag of glue. Penofol is not needed. Dry mix “SAND CONCRETE” 4 bags. Self-leveling floor 2 bags.
“Cover the tiles with concrete contact. Set up beacons. Fill in the CPS. Lay a warm floor...” and heat the street. In order to have at least some effect from heated floors of this design, it is necessary to install at least 200 W per m2. And the electricity consumption will no longer be 700, but almost 1.5 kW per hour. I think. that without additional insulation of floors with polystyrene foam, install electric. floors don't make sense. Therefore, it is necessary to dismantle the tiles and screeds, lay 3-5 cm of Penoplex, and foil on it. Next is a reinforced screed with el. cable heated floors and tiles.
Drying ladder made of PVC pipes
It looks, frankly, cumbersome - that is what it is. But it is certainly stable and reliable, but at the same time mobile: you can rearrange it, if necessary, without any problems. And the material is affordable (it’s not for nothing that all sorts of homemade products made from such pipes have become very popular lately):
All kinds of designs made from PVC pipes have become very popular
The size and configuration of the dryer can be selected to suit your taste - whatever is required can be designed. It looks neat, is easy to clean... But the question is: what to do with it for the winter? It won't be so easy to remove it from the street, but will it survive the winter outdoors?
How to secure a clothesline
Apartment owners can install a drying structure both indoors and outdoors. If we talk about internal installation, we can offer several options. The simplest option is to mount it on bars. To do this you will need small bars. They should be fixed on opposite walls; nails or screws can be used for fixation. The rope will be pulled onto these fixing parts. Instead of bars, you can use metal corners.
If we talk about external fastening, then you will need metal brackets and corners. It is important that these parts can withstand the load and not deform under the weight of wet clothes.
In this case, the rope must also be secured correctly. You should not cut separate ropes for each hole, but rather stretch it, passing it through each hole. This option will be more reliable and durable.
Wall-mounted outdoor dryers
Of all that I was able to find, these are the options that seem to be the most successful (although this is purely my personal opinion - someone will probably like other ideas better). The absolute favorite is the wall-mounted dryer with a polycarbonate roof:
This dryer is my absolute favorite. Convenient wall-mounted dryers can also be made from wood.
I like both! The one on the right is foldable, so it doesn't take up extra space when not in use. And the monumental design in the photo on the left is very practical and convenient. I would like to add a roof to it - and that’s it, I’ve found my ideal!
Which dryer did you like? Or maybe you already have a dryer at your dacha that suits you in every way? Tell us, share a photo - your opinion will be very useful not only for me!
Source
Principles of dryer manufacturing
Dryer with rain cover
The product consists of two vertically standing pillars (pipes), which are shaped like the letter “T” and “hold” between them several (as much as the width of the top crossbar, which is also called a traverse, allows) special strong clotheslines.
Usually these racks are located at a distance of four to five meters from each other.
Before you start arranging this element of the household, you need to familiarize yourself with the following rules:
To make an outdoor clothes dryer, you need some metal, concrete and rope.
Several options for homemade clothes dryers
How to make a clothes dryer with your own hands? Below you will find instructions for making stationary structures that even those who do not have much experience in this matter can handle. Materials for work: wood and aluminum.
The simplest stationary driver
For manufacturing you will need the following materials:
- clothesline or rope;
- two wooden planks;
- screws with a ring instead of a head;
- impact drill with drills;
- wood hacksaw;
- screwdrivers;
- roulette;
- file or sandpaper;
- long screws and dowels.
The table provides step-by-step manufacturing instructions:
| Illustration | Description |
| Cut one of the wooden planks to fit the structure. Treat the surface and ends with a file or sandpaper. Drill holes in the plank, attach it to the wall and, through these holes, mark with a drill the places where you need to drill larger diameter holes for dowels. Attach the plank to the wall with long screws, screwing them into dowels | |
| Using a tape measure, mark equal intervals on the plank and screw in the screws with rings along the marks. In order for them to fit firmly into the tree, for the entire length of the thread, use wood 30-40 mm thick. Perform all the above operations with the second plank, placing it on the opposite wall, opposite the first | |
| If you don’t want to use wood, you can skip the planks. In this case, make holes in the wall for the dowels and tighten the screws with rings, having first put decorative washers on them | |
| Thread and pull the clothesline or rope tightly as shown in the photo. This completes the work on making the dryer. In the manufacturing option shown in the photo, both methods of fastening screws with rings are used - with and without a wooden plank |
Clothes dryer for a balcony made of aluminum
To make the design you will need:
- drill with drills;
- hacksaw for metal;
- screwdrivers;
- screws.
Procedure:
| Illustration | Description |
| For manufacturing you will need an aluminum tube with a diameter of 8 mm and a U-shaped profile, the internal width of which is 10 mm | |
| The finished drying structure should look as shown in the photo. The profile is cut to length and attached to the walls in any convenient way. The main condition is the reliability of the fastening. It is best to use screws after pre-drilling holes in the profile | |
| The tubes are measured with a tape measure and cut, and they must move freely inside the profile. For a softer glide, you can crimp the ends of the tubes with heat shrink tubing. When folded, the dryer does not occupy the space of the balcony |
Readers can learn more about the manufacturing process of this design from the video:
Wall folding drayer
We present to your attention a wooden drying structure that takes up very little space when folded and is well suited for small spaces.
For production you will need:
- dowels, screws, bracket hinges;
- lock;
- 2 pin loops;
- 3 porcelain handles;
- 4 bars for the frame, preferably made of birch, as well as 4-5 wooden rods and a base made of fiberboard, thick plywood or other natural material;
- two colors of paint and epoxy glue.
To manufacture the structure you will need pin loops, dowels, screws, and bracket hinges
. Manufacturing instructions:
| Illustration | Description |
| Cut the wooden rods so that their length is slightly less than the length of the cross bars | |
| Drill holes at the ends of the longitudinal bars according to the number of rods, at an equal distance from each other | |
| Assemble the frame structure by fitting the rods into the holes using epoxy glue | |
| Secure all the bars with epoxy glue and screws or nails. Remember that the dimensions of the frame should be slightly smaller than the dimensions of the base (rectangle made of fiberboard or thick plywood) that will be mounted on the wall | |
| Paint the frame in two layers, for example white. For the base, choose a darker one, for example, dark green. | |
| After the parts of the structure are dry, connect the frame to the base with two door hinges at the bottom | |
| Drill holes in the bottom of the base and attach three porcelain handles to self-tapping screws, additionally using epoxy glue | |
| Install a locking lock on the upper parts of the frame and base | |
| On the left side, attach a swing-out lock or a strong cord to the frame, securing its other end to the base. This way the frame will not fall, hanging in an inclined state. Attach the base to the wall with screws and dowels. This completes the assembly of the dryer. |
In conclusion, I would like to note that there are many types of clothes dryers. You can come up with a design yourself, make a sketch and make your own version of the drayer, which is ideal for your apartment.
Additional requirements and clarifications
Do it yourself outdoor clothes dryer (dimensions of its component parts):
Outdoor clothes dryer
It is important to pay enough attention to the strings on which wet things will hang.
Let the clothesline be covered in plastic so that any dust that gets on it can be easily removed.
Cotton fabric can take a long time to dry and accumulate dirt.
The best and most durable way to secure clotheslines is to install (weld or screw) hooks or rings on the crossbars.
The role of such an additional element can be played by a thick metal wire.
To secure the ropes to the installed racks, it is not necessary to buy or look for special devices; it is enough to simply tie them in the right places on the horizontal slats, but it is advisable to at least make holes in them so that the ropes do not move.
You can also make an umbrella dryer with your own hands, although this is much more difficult than the first option. In this case, only one support will be needed - for the leg.
Next, you will need to adhere to the design of the umbrella, and the “spokes” will serve as clotheslines.
What material is suitable for manufacturing
Before you start making a clothes dryer, you need to decide on the material of the product. The choice is quite large:
- Aluminum is the lightest of metals, but it is also quite fragile. This means that a drying device designed for a large amount of clothes and linen should not be made of aluminum parts. In addition, making a frame from aluminum pipes is quite problematic.
- Stainless steel is the optimal choice for powerful drying products designed for large families. The only drawback of this metal is its heavy weight. The structure must be mounted on a wall or ceiling very securely, since standard hooks may not be able to support the large mass of clothing along with the frame. It is better for beginners to refrain from using this material for making ceiling dryers themselves.
- Plastic (PVC) is a lightweight and easy-to-process material, but it is also quite fragile. Suitable only for those dryers on which few things will be dried (up to 5 kg). Another positive feature is that it does not corrode when exposed to moisture.
- Wood is an easy-to-work natural material that is also very affordable. Since wooden products are destroyed by moisture, it is necessary to coat the product with a double layer of water-repellent paint or varnish before use.
Profiles made of aluminum, stainless steel, plastic and wooden blocks from which dryers can be made
Before you design the structure and start manufacturing it, decide on the size and weight of the things you are going to dry. Count on approximately 5-6 kg of wet items per family member. Accordingly, for a family of three people you will need a device that can withstand up to 18 kg of weight.
Metal lifting structure for drying things installed on the balcony
The optimal places to place dreyers are bathrooms, balconies and loggias. Do not forget that water can drain from wet things onto the floor, so it is impractical to install drying structures in residential areas.
What are the benefits of drying clothes outside?
The sun (especially if it shines brightly) can not only evaporate all the moisture from wet things, but also disinfect them.
Wind and open air do not contribute to the formation of wrinkles, which are then so difficult to iron out.
Drying takes much less time.
The sun and wind have a much better effect on fabrics than an electric dryer.
Do-it-yourself outdoor clothes dryer made from pipes or slats? There is nothing easier than doing it if you think through everything first and purchase the necessary materials.
How to choose a clothes dryer - shown in the video:
Noticed a mistake? Select it and press Ctrl+Enter to let us know.
Source
Making a clothes dryer outdoors with your own hands
An outdoor clothes dryer is relevant for almost all categories of users. In a country cottage, it is used to give linen natural, rather than chemical, freshness. Property owners in apartment buildings use this method to solve the problem of small bathrooms in Khrushchev and Brezhnev buildings, and the lack of a balcony in the apartment.
For do-it-yourself construction, stationary type structures are optimal - a traverse on one post or a crossbar between two jays. They are installed at a distance of 2 - 3 m from each other, a cord is stretched between them in several rows. Less often, a home master uses original circuits.
Household goods stores for outdoor use offer a rather meager assortment of dryers. These are, first of all, a folding “umbrella” with 50 m of cord, a wall-mounted “spider” of a similar design, folding “trests”, stepladders, transformable tables.
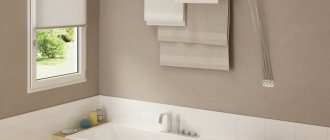
Where and how to dry clothes
Previously, clothes were most often dried outside, stretched on a rope between two poles or trees. Many still remember similar pictures from childhood. The main inconvenience of this method is the inability to dry things in cold or rainy weather. Nowadays, apartment residents no longer hang laundry in the yard, but use a variety of devices to dry things at home.
This is how our ancestors, as well as grandparents, dried clothes
In the retail chain you can find many portable folding models of dryers (hereinafter also referred to as dryers, from the English d ryer - dryer) . In most cases, such structures are bulky and inconvenient to use. More practical are hand-made drying products, mounted on the wall or ceiling in the bathroom.
A simple drying device that attaches to a battery
Homemade homemade drayers can be attached to batteries. In this case, the laundry dries much faster after washing than on a standard dryer, and the design itself takes up very little space (see photo above). A loggia or balcony can also be used to install modern structures.
Review of designs and materials
By default, an outdoor structure for hanging laundry after washing should be made of more durable materials compared to models for indoor use. Heavy, damp items have high windage, and absolutely windless weather is extremely rare. Therefore, tables, trestles, and other mobile structures without reliable attachment to the ground are not recommended for suburban areas. They can be knocked over by a random gust of wind.
Mobile dryers are poorly suited for outdoor use.
On the other hand, outdoors you can use wall and ceiling models for bathrooms and balconies. It is enough to fix them on the terrace, inside the gazebo in the usual way to the existing load-bearing structures. Manufacturers produce a limited range of outdoor dryers. We usually build our own devices for drying clothes according to simple drawings, either to save budget or to provide a margin of safety.
Homemade
The most common types of clothes dryers for outdoor use are:
Homemade tumbleweed clothes dryer.
The first two options are used in pairs, installed opposite each other at an arbitrary distance of 2 - 5 m. The last design has a closed loop and is operated in free-standing mode.
To make the crossbar you will need three pieces of round or profile pipe:
Lanyard for stretching clothesline lines.
If you make the posts longer, they can be driven into the soil with a sledgehammer without concreting. In practice, a combined option is used:
To increase the service life of the metal, the pipes are coated with a paint and varnish composition with decorative, anti-corrosion properties (primer paint, Kuzbass varnish).
A similar scheme is used in the manufacture of traverses. But, the upper horizontal crossbar is shorter here - within 1 m sideways from the pillar in each direction. For a thin-walled pipe, you can use braces that support the ends of the traverse in the middle, with the second edge welded to the stand. Instead of a metal pipe, a wooden block with a cross-section of 50x50 mm or more is often used.
For more comfortable operation, a canopy is made over these dryers, usually from transparent, colored cellular polycarbonate. In this case, it is better to use a profile pipe into which a roofing screw with a hex head can be easily screwed without pre-drilling. The rubber gasket ensures the tightness of the canopy in the places where the translucent material is attached.
To form a semicircular configuration of the canopy, arcs from a 20x20 mm square pipe are used. The design is similar to the power frame of a greenhouse, but the arcs are much shorter. The recommended pitch of the arcs is 1 - 1.2 m; to install them at this distance, additional veins from the pipe are pulled along the edges of the traverses or crossbars.
A wooden dryer for a summer residence is made in the following way:
The result is a “ring accordion” design, the slats of which have a single degree of freedom in one spatial plane.
Round moldings can be glued inside the holes to the planks or the structural elements can be tightened together with studs of the appropriate length. Instead of plywood, you can use lumber of a suitable cross-section.
Less commonly used are mobile, stationary home-made structures that can be installed on an area near the house to hang washed clothes on:
Instead of boards and bars, polymer materials can be used. For example, if you have a welding machine for polypropylene, the table and trestles can be made from plastic pipes, elbows and other fittings for them.
Conventionally, a dryer for items wet from a washing machine for a loggia/balcony can be considered an outdoor one.
These are two consoles or brackets protruding beyond the facade of the building with 3 - 5 rows of wire, PVC insulated cable, linen cord:
Options for attaching a clothesline.
There are original designs of dryers with a pulley system. One roller block of the traveling system is attached to the balcony or wall of the building near the window. The second rotating element of the equipment is fixed on a tree or a pole specially installed for this purpose.
As the laundry is hung, the string stretches, making room for the next item of clothing.
Ready-made designs
Several types of outdoor clothes dryers are available in gardening and household goods stores:
Balcony clothes dryer.
Umbrellas can be equipped with awnings, mosquito nets, and other accessories.
Umbrella with mosquito net and awning.
Almost every factory model of dryer can be made with your own hands from scrap materials. Conversely, most industrially manufactured structures are copied from homemade drawings.
When operating outdoors, it is advisable to secure all mobile dryers into the ground. For example, drive a peg and tie it to it.
The top rank in the ranking is occupied by the umbrella folding clothes dryer. It is produced by several manufacturers:
Manufacturer Artmoon positions the Long exhaust system as an outdoor system for drying washed clothes.
This is an analogue of a plaster lace or a construction tape. The body is attached to a wall, tree, post, the string is pulled out and fixed on another stable base.
Recently, sliding accordions have become an alternative to outdoor balcony brackets. Instead of a cord, U-shaped tubular arcs with an anti-corrosion decorative coating (powder coating) are used here.
Warm floor on the balcony - comfort in a big city
Author: Bedrin N. A. Updated: August 16, 2017
It is not known for certain who came up with the idea of converting balconies into winter gardens, mini-gyms, and work rooms. But this man probably didn’t rack his brains for long about where to place an exercise bike, pots of ficus trees and a computer. A small piece of the apartment, taken outside its boundaries, may well become a favorite place, warm, cozy, comfortable. If you decide to radically change the functional purpose of your balcony, then you will have to spend a lot of effort to turn this island of cold into a warm oasis. By installing reliable double-glazed windows and insulating the walls and roof, you will, of course, achieve certain results, however, the floor under your feet will still be cold. The only solution to the problem will be to install a heating element, which is ideal for convectors and radiators, and an additionally installed heated floor system on the balcony will create a comfortable and cozy atmosphere.
Warm floors on the balcony - an incentive for original ideas
↑ Warm floor on the balcony: pros and cons
We can talk endlessly about the advantages of heated floors on the balcony. This is the ability to use the system as the main heating, and saving space on an already small balcony, and ease of installation (for a film floor), and a bunch of other pleasant moments. However, even such a seemingly positive heating system from all sides has several disadvantages.
- Expensive. It is much cheaper to buy an oil radiator or a “breeze” type heater, but calculate the electricity costs, which with the onset of the first autumn frosts will increase by about two to three times and instead of the usual 300-500 rubles, you will pay 1000-1200 to utilities. Now attention! The heated floor system consumes approximately 3-4 rubles per day of electricity. In total, in a month your meter will wind up only 100-120 rubles more than usual. The savings are obvious!
- Difficult to install. This point applies to the cable system of underfloor heating, however, with a competent approach and skillful hands growing from the right place, installing the structure will not be difficult. True, it will still take quite a lot of time, because you will also have to do the screed, and this will already take more than one day out of your life.
↑ Features of installing heated floors on the balcony
The process of installing a heated floor system on a balcony is slightly different from installing it in other rooms of the apartment. The thing is that the walls of the balcony do not have the same characteristics of strength and thermal conductivity that are inherent in the walls of the house, so before installing a heated floor, you will have to insulate the balcony.
To do this, you need to lay insulation not only on the side walls, but also on that part of the wall that is adjacent to the balcony, as well as on the floor, and it is advisable to cover the base of the floor with a vapor barrier material, and glue all the joints between the walls and the surface of the vapor barrier with metallized tape. Thus, your balcony will turn into a real “thermos”, retaining heat and preventing its leakage.
Before installing a heated floor, you need to insulate the walls and concrete base
And now let’s talk in more detail about the features of installing different types of electric heated floors (this is what should be used to insulate the balcony).
↑ Installation of cable heating system
Cable heating sections are used in the presence of a screed with a mandatory layer of insulation and waterproofing, otherwise the main part of the heat generated by the heated floor system will go down and actively heat your neighbor’s ceiling.
The cement-sand screed must have a thickness of at least 45 mm, and the heating cable in it must be located at a depth of about 30-35 mm from the top edge. It is best to complete the work with tiles - they have high thermal conductivity, which means they will instantly heat up, giving off their heat to your feet. True, you will be able to take advantage of all the possibilities and delights of a cable floor heating system only after three to four weeks - this is exactly how long it will take for the screed to completely dry out.
Cable heated floor - long and expensive
↑ Installation of a system based on heating mats
This system is advisable to use if the use of cement-sand screed is not possible.
Heating mats can be placed directly on the adhesive composition intended for laying tiles. The substrate here will be a leveling layer, old ceramic coating, concrete, etc. After laying the last tiles, the floor is ready for use - you don’t have to wait a day, but you can immediately enjoy the warmth and comfort.
True, the system has a couple of drawbacks - it cannot accumulate heat, which means it can only be used as an additional source of heating and has a fairly high price if you compare its cost with the cost of a cable floor heating system.
Tiles can be laid directly on heating mats
↑ Installation of infrared film floors
Film heated floors are the easiest to install. Lay the sheets down, secure them with tape and you're done. The basis of such a system are heating elements that emit heat rays. They are able to warm up the floor, walls and objects, and they, in turn, release heat to the environment without heating the air. Thus, not only a comfortable temperature is created inside the room for a person to stay in it, but also ideal conditions in terms of air purity and humidity.