Polyurethane foam is a popular building material. All types of work require a stage where this material is used. For example, this is the installation of plastic windows or doors, installation of partitions, and so on.
Polyurethane foam has a lot of positive properties - it glues surfaces and adheres to most other materials. Due to expansion, even a small volume fills any hole, gap or crack. With its help, a high-quality fastening is created and the element is fixed at the desired point.
Polyurethane foam is also relevant for working with penoplex.
Preparing the surface for installation
Penoplex panels are attached only to treated and smooth surfaces.
The preparatory stage includes the following operations:
- The surface is carefully inspected, after which all dirt, remnants of the old destroyed coating, and peelings that will not withstand the load of the insulation are removed.
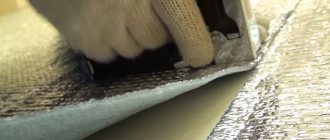
Cleaning the walls with a wire brush
- Particular attention is paid to surface damage by mold and mildew. The damaged area is cleaned with a stiff brush and then treated with a special composition, which is made at home using copper sulfate or purchased in a retail chain.
Ready-made compositions against fungus and mold
- To eliminate irregularities, a map of problem areas is drawn up. After this, alignment is performed using any of the following methods:
- plastering is a simple and reliable method. The solution is selected individually for the surface material. The insulation can be attached when the plaster has dried;
Anti-corrosion composition WEICON Zinc Spray
- Brackets are mounted for equipment that will be hung in the future, for example, an air conditioner.
Preparing the wall surface
First of all, we clean the concrete and brick from possible dirt, dust, old paint, any random oil stains, etc. If the walls are not smooth, then you will have to work with putty and try to bring them into a plane. We proceed with wood and plaster by analogy (except for putty).
For this dirty work, sandpaper or mesh, spatulas, scrapers, and brushes are used. In a word, whatever tool we have, that’s what we work with.
Cleaned walls should be primed. Conventional deep penetration primers are appropriate here. It often happens that the basement of a building “works” in harsh, damp conditions. Therefore, fungus, moss or other unnecessary vegetation forms on it. A simple method to get rid of it is to treat these parts with a solution of copper sulfate. A proven “old-fashioned” method. But you can also use more modern antiseptics, they are much more effective.
If there are efflorescences on a brick wall, they must be removed. You can read how and how to do this in this article - link. This is done in order to prevent the destruction of the material, which we will not see behind the layer of insulation and final finishing.
Next, along the entire perimeter of the building, strictly along the horizon, we attach the starting plinth. It can be in the form of a wooden block or a special perforated metal profile. The goal is to make it easier and faster to attach the penoplex: it does not accidentally move down and is positioned evenly relative to the walls.
Rules for installing insulation
To effectively perform thermal insulation with penoplex, it is very important to know the installation rules. They look like this.
At the initial stage of work, a starting bar is set. This is a wooden strip or perforated corner. The plank is designed to keep the slabs from sliding and also indicates the direction of laying. It is selected according to the thickness of the penoplex.
It is possible to buy a ready-made set, including strips, external and internal mounting angles for joints.
The choice of method of fastening the slabs depends, firstly, on the coating material, and secondly, on the operating conditions. Insulation is installed on concrete and brick using the following adhesives and fasteners.
Using a bitumen-polymer thick sticky composition is a simple and cheap way to glue insulation. Due to its special properties, mastic is used on buildings located in special conditions.
The material is packaged in tubes. To work you need to have a special gun.
When laying, the edges and center of the slab are coated with mastic. After this, the insulation is applied to the base and held in place for up to an hour. If necessary, the slab can be moved at this time.
The main binding element of dry mixtures for insulation is cement.
Before use, the adhesive solution is mixed in water according to the instructions indicated on the package. For high-quality adhesion, after mixing, the solution is allowed to settle for two hours to obtain a homogeneous composition without water.
Applying glue to penoplex with a notched trowel
Before laying, the adhesive is applied to the foam plastic with a notched trowel, and then the insulation is applied to the base and held for several minutes. With this type of fastening, additional reinforcement with dowels is not required.
- Glue.
Mixing glue for penoplex
Adhesives with the addition of cement are very common due to their ability to level the surface. With such glue, as a rule, additional fasteners are used.
The composition is applied to the slab in a continuous or dotted manner up to 200 mm wide.
Technology of fastening with adhesive mixture and dowels:
Polyurethane foam has become widespread. However, it is not suitable for fastening foam boards, as it collapses over time and does not hold the load well.
A special material for external fastening of insulation is adhesive foam in the form of a polyurethane foam binder. It has improved adhesion and good grip. Penoplex slabs installed with such an adhesive composition reliably adhere to concrete and stone walls.
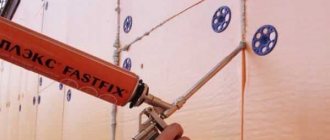
During installation, adhesive foam is applied from a gun along the perimeter of the slab and in the center. Then the insulation is pressed against the base for a few seconds. After 20 minutes, the slab is firmly set, but further work can only be done after two hours.
Adhesive foam fastening technology:
- Glue "liquid nails".
This is a well-known adhesive composition that is widely used in everyday life. It glues quickly and reliably. When insulating, it is used in small and hard-to-reach areas. To apply such glue to a large area of coverage will require significant costs.
Glue has strict requirements for the condition of the surface. It should be smooth and coated with primer.
Priming the surface before gluing
“Liquid nails” are packaged in tubes, so they are applied pointwise with a special gun: in the center and along the edges of the slab. The glue dries quickly, so the insulation is applied to the base and then held in place for about a minute.
- Disc dowels.
To improve strength, fastening the insulation with dowels is combined with gluing. Unfortunately, drilling holes for dowels breaks the seal of the slab, which means there is a passage for the cold.
The widely used mushroom-shaped fastening dowel has a core, a sleeve and a wide head. It can be solid plastic and hollow for use with a screw or nail. The spacer zone prevents the dowel from being removed from the hole and also ensures reliable fastening.
The core can be made of plastic or metal
Before installation, a hole is drilled in the insulation. The dowel is installed so that the cap does not protrude beyond the surface of the insulation. After this, the spacer element is screwed in or hammered in.
Each slab is secured with five dowels: four at the edges and one in the center. For adjacent slabs, the common fasteners are located inside the seam.
- Self-tapping screws.
Most often, self-tapping screws are used to strengthen the fastening of plates made by other methods. They are used when there is a wooden sheathing on the surface.
At least five dowels are used to fasten each slab. For them, holes are drilled in the insulation. To prevent the self-tapping screw from pushing through the slab, a washer is placed under its head.
ADVICE!
Penoplex boards have a smooth surface, so for better adhesion before gluing, you need to treat them with a needle roller or scratch the surface with a hacksaw.
Polyurethane foam adhesive for extruded polystyrene foam - how to glue the boards together?
Extruded polystyrene foam, unlike molded polystyrene foam, has a uniform structure and smooth surface. Therefore, gluing it together or mounting it to walls causes certain problems due to low adhesion. To solve this problem, manufacturers of construction chemicals have come up with a special polyurethane foam adhesive foam. We invite you to familiarize yourself with it in detail, and also consider the technology of gluing extruded polystyrene foam.
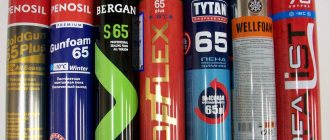
Kleypena is a one-component composition that is sold in cans . In terms of consistency and method of application, it resembles the well-known polyurethane foam - it is applied to the surface with a special gun. After some time, the composition slightly increases in volume and hardens.
Since both materials are similar, many beginners are interested in the possibility of using polyurethane foam instead of glue, which is cheaper. glue extruded polystyrene or penoplex with the latter. Slabs secured in this way will even be able to withstand some pull-out load. But you should not use polyurethane foam instead of glue for the following reasons:
- The adhesive composition contains special additives that improve adhesion. Therefore, foam glue glues the slabs several times more reliably.
- Polyurethane foam greatly increases in volume. When installing penoplex, such quality is unacceptable.
Therefore, you should not try to save on glue when insulating houses with extruded polystyrene foam. All attempts to use polyurethane foam for these purposes eventually lead to peeling of the insulation or other problems.
Polyurethane foam is the only adhesive intended for the installation of penoplex. It reliably glues extruded polystyrene foam to any surface. Before the appearance of this composition, it was believed that this material was not suitable for installation using the adhesive method. True, folk craftsmen came up with technologies for gluing penoplex to walls, but its installation had to be done only at your own peril and risk. Foam glue is recommended for installation of this insulation by the manufacturers themselves; this is why it was developed.
The possibility of reliable gluing of penoplex is associated with the ability of liquid polyurethane foam to adhere well to any surface, including the smoothest. In addition, thanks to the additives, the composition has high technical characteristics:
The table shows that glue foam has not only good adhesion, but also a number of other advantages, such as:
- Low thermal conductivity - thanks to this quality, the composition is used for insulating seams. In this way, you can get rid of not only cold bridges, but also glue the polystyrene foam together. As a result, the likelihood of cracks forming in the plaster is reduced.
- High hardening speed - already two hours after installing the slabs, you can begin the next stages of work - grouting and reinforcement.
- Ability to perform installation at sub-zero temperatures. But not all types of glue have this property. Therefore, before purchasing a composition for winter, carefully read the instructions.
Adhesive foam has other advantages:
- Increases the speed of work - unlike a cement-based mixture, the foam does not need to be dissolved with water and brought to a homogeneous consistency with a mixer. It is applied simply and quickly. Therefore, the process of attaching slabs to the wall is performed five times faster than when using a liquid solution.
- It is light in weight, which simplifies the transportation of material and reduces the load on the foundation. If the liquid solution increases the weight of the slab by
3 kg, foam has practically no effect on this indicator.
Therefore, it makes sense to use such glue not only for polystyrene foam, but also for ordinary polystyrene foam, especially if it is necessary to perform installation work quickly. True, its big disadvantage is its high cost.
Foam can be used as an addition to liquid glue for thermal insulation and gluing seams.
To install extruded polystyrene foam using foam adhesive, you will need some additional materials and tools:
- façade primer;
- dowel-nails;
- façade paint roller;
- perforator;
- hammer.
Before proceeding with the installation of insulation, it is necessary to prepare the surface of the walls. If there are peeling and crumbling areas of plaster, you must definitely get rid of them. Otherwise, the slabs will fall off along with the old finish, and no glue will help.
Next, the walls need to be cleaned of dirt and dust. They can be wiped with a damp cloth or even washed with a hose. But after that they must be dried. The surface is then primed to improve adhesion and strengthen the wall. Apply the primer in a thin, even layer using a roller or brush. After the first layer has dried, it is primed again.
Now you can start gluing. A can of glue is prepared as follows: shake it thoroughly and screw a gun onto it. The composition is applied to the insulation along the perimeter in a continuous strip and in the center along the slab. Within ten minutes after applying the foam, it is necessary to attach the slab to the wall, lightly press it down and level it in all planes.
Already two hours after gluing, you can begin installing the dowels. They are necessary for additional fixation of the insulation. To install a nail, you need to drill a hole through the slab and hammer the fastener into it. The dowel caps should be slightly recessed. Each slab is fixed with at least five “umbrellas”.
If insulation is carried out in two layers, the second layer of slabs is glued to the first in the same way. The only thing is that the insulation of the second layer should be positioned offset to cover the seams of the first.
That's all you need to know about adhesive foam when installing extruded polystyrene foam. The main thing is to remember that you can apply any glue, including polyurethane foam, only to clean surfaces. Therefore, prepare the walls well and wipe the slabs themselves if there is dust on them. Feel free to get to work, we wish you success!
Sources:
https://art-pol58.ru/bez-rubriki/mozhno-li-penopleks-kleit-na-montazhnuyu-penu.html
Features of installing insulation on the foundation
As a rule, the foundation needs insulation in the same way as the walls. Various methods of insulating the base of a building with penoplex are used.
- Vertical method.
- Along the entire foundation there is a lower level for laying insulation.
- The slab is covered with adhesive and pressed in the right place.
- The entire foundation is covered with insulation using the same method. An exception may be places that are in the ground. The slabs in this place are pressed tightly against the foundation with soil.
- Horizontal method.
In this way, the foundation from below is protected from freezing. The work is carried out at the initial stage of construction, when the foundation is just being laid.
- The slabs are tightly placed on the concrete base of the formwork.
- Waterproofing is laid on the insulation, and then the foundation is poured and reinforced.
- After removing the formwork, the sides of the foundation are insulated.
- Thermal protection around the house.
In this case, the foundation and the surrounding area are simultaneously insulated.
- First of all, the foundation is insulated vertically.
- Then formwork is made around the foundations with an indentation of 100 mm, and the blind area is prepared.
- Insulation is laid in a dense layer on the compacted surface between the foundation and the formwork.
- A waterproofing film is installed on top of the insulation, overlapping the foundation, after which the formwork is filled with concrete.
Protective covering
In order for the insulation surface to look beautiful and be durable, it must be protected. The simplest and cheapest way to protect insulation is plastering, which is carried out in stages.
- Selection of plaster mortar.
- Selection of reinforcing mesh for plaster mortar.
- Fastening the reinforcing mesh using a certain technology.
- Laying the mortar, leveling the surface, grouting with a plastic float.
- Primer the surface for the finishing coat.
- Finish plaster. After drying, painting is done or a transparent protective layer is applied.
Video instruction:
In general, attaching penoplex to concrete and brick walls, as well as insulating the foundation of a building, is not difficult. It is enough to follow the installation technology and carry out the work carefully to ensure that the insulation is attractive and durable.
Self-tapping screws: cheap and cheerful
Fastening with self-tapping screws using a screwdriver is permissible when insulating a wooden wall over a previously installed sheathing. In this case, it is recommended to install a washer under the screw head to avoid surface destruction and increase the reliability of fastening.
The most widely used method of fastening is the use of bitumen (adhesive) compounds and disc dowels. [flat_ab >
The resulting insulation layer is airtight, able to withstand large mechanical loads and has an increased insulation coefficient.
After installing the insulation, a reinforcing mesh is installed followed by cladding.
Now you don’t have to think: “How to glue penoplex? How to mount it correctly? The use of materials specifically designed for penoplex to the walls will allow you to avoid unnecessary waste of effort, money, time and get a durable layer of thermal insulation made by yourself.
Hello to all readers!
With you, as always, Sergey Zlobin, the author of this blog. Today I want to consider a small but relevant topic for many: how to attach penoplex to the wall. I think there is no need to explain what penoplex is, what properties it has and what it is used for. By the way, it is also called extruded polystyrene foam, abbreviated as EPS.
Let's get straight to the point: let's talk about all the methods of fastening to various wall surfaces. The most common, of course, are concrete and brick. After all, the technology for installing penoplex involves, first of all, insulating the stone facade of the building. For wooden and plaster walls, such insulation is used much less frequently. So, let's start from the very beginning...
From this article you will learn:
Polyurethane foam as glue?
Greetings! Dear experts, tell me, is it possible to “glue” 50mm polystyrene foam boards onto bare concrete? The foam itself is very good. it weighs little, it is necessary to sheathe the loggia for insulation, as far as I noticed, the foam “grabs” wetted and clean concrete very well... it seems like a logical solution, but I don’t know much about construction matters.
Easily. Is it difficult to check for yourself?
Just today I did this, only on a crooked ceiling. Polyurethane foam glues everything, except perhaps glass and cellophane. The smaller the gap, the stronger the gluing, but for foam plastic this is not relevant. But if there are built-in lamps in the suspended ceiling, the foam plastic may leak.
Recently we insulated the balcony using special foam: polystyrene foam (Sturodur), it is specially designed for insulation. And for gluing we used special adhesive cement for insulation Ceresit CT85, and Polymin P22. But you can just glue it with cement.
Actually, polyurethane foam melts polystyrene foam, but not so criminally. There may also be problems with different thicknesses of the foam layer. It's better to put it on glue.
problemnet wrote: polyurethane foam melts polystyrene foam
It is there. But this is the key to the strength of the connection.
2problems 2Mals I glued the EPS onto the polyurethane foam, I didn’t notice any melting. Maybe you had winter foam?
Foam is cheap (if I remember correctly - repair+), polystyrene - which is cheaper (well, the task was “budget”, hence the materials). The penetration layer of foam into PP was up to 5 mm. But, again, I repeat, it was very beneficial.
2robot himself insulated his loggia in this way. glued 50mm polystyrene foam onto a concrete slab.
To check, I cut off a piece of polystyrene foam 20x5 cm, put foam there and glued it to the inside of the slab. After 24 hours, my sister (21 years old) couldn’t tear it off, I tore it off with very great effort.
and now the subtleties:
- buy a gun: precise dosage, rational use, greasy secondary expansion of foam, larger cans of foam (take a gun canister and an ordinary one in your hands, which is heavier?), much more convenient to work with, foam can be stored in the gun for up to a month. In short, in 20 cylinders it will pay for itself. A caveat when buying a pistol is to press the trigger and you should hear the sound of air escaping (it's like a zilch), which indicates the tightness of the pistol; if this is not the case, take another one (maybe from another company).
- Apply the foam to the foam using a point method (or serpentine), over the entire area, so that these points do not intersect when flattened. then place the foam plastic to the base and press it to the base with medium force using vibrating movements, then tear it off (yes, tear it off), apply more foam to the foam plastic (about half as much) wait about 2-4 minutes and press again with the same movements, and so on hold for a few minutes (2-4). What tearing will do is that it will slightly dry the layer of foam on the base and foam, thereby improving its adhesive ability. As you glue the next sheets, keep an eye on the old ones; they may move away a little (5mm) using the same vibrating movements, return them back.
- apply foam equally to all sheets of foam so that there are no uneven joints,
- I also foamed the foam joints between the cracks and the walls slightly.
- Well, then the usual technology, mesh glue for polystyrene foam.
PS I really liked gluing with foam. since before this I used foam glue with my father to glue the foam to the ceiling in the room (the top floor, and the slabs were placed painfully unevenly (up to 5 cm))
ZZY: each method has its own application, you shouldn’t get hung up on one. you need to realistically evaluate the advantages and disadvantages of each method
What are the advantages of polyurethane foam for penoplex, how to use it
Polyurethane foam is a popular building material. All types of work require a stage where this material is used. For example, this is the installation of plastic windows or doors, installation of partitions, and so on.
Polyurethane foam has a lot of positive properties - it glues surfaces and adheres to most other materials. Due to expansion, even a small volume fills any hole, gap or crack. With its help, a high-quality fastening is created and the element is fixed at the desired point.
Polyurethane foam is also relevant for working with penoplex.
What are the advantages of using foam in the case of penoplex?
Penoplex is used as a soundproofing material, and polyurethane foam is used to blow in the seams between the plates. At the same time, it qualitatively seals the seam. Another useful function offered by foam is gluing the foam board to surfaces, even vertical ones.
Even an inexperienced builder can do this kind of work. The slabs are glued unnoticed, however, the penoplex is securely fixed and they proceed to the next stage.
Application of foam with penoplex
Using this product instead of glue will help save money, applying the foam is much easier and requires less time to dry completely than glue. The use of foam is in no way inferior to specialized glue in terms of adhesive properties. Why do they buy it to simultaneously use it both for gluing penoplex and for blowing in seams and joints.
Liquid nails: will be a bit expensive
Liquid nails can be used to attach thermal insulation to a well-leveled and primed base. Glue is applied using a sealant gun pointwise around the perimeter and center of the sheet. Fastening is done by briefly pressing it to the surface.
Expensive adhesive significantly increases installation costs. Even with high-quality bonding to the surface and ease of use, the technology of using “liquid nails” is economically feasible for small areas of insulation.
How to choose foam for work according to method of application
The polyurethane foams that are offered in markets and stores today are no different. They are easily used in working with penoplex. The difference lies in ease of use, as well as temperature conditions.
First of all, foam is divided according to the type of operation:
- Pistol. This foam offers high efficiency and low cost. However, to use such cylinders, you need a specialized gun - a tool into which the cylinder is installed. Using a gun is much more convenient than a regular household cylinder, since the flow rate is controlled and regulated. With a gun it is easy to blow out points that are located inconveniently or in hard-to-reach places;
- Household foam will not require the user to purchase additional devices - after purchase they are immediately used. This foam is distinguished by its lower cost than professional foam, but the volume of work that is performed with its help is smaller.
Simply put, the same volume of professional foam will require much less than household foam (number of cylinders), which leads to savings.
In addition, if you plan to attach penoplex using polyurethane foam, then it is better to use a professional option. For gluing, use a smaller layer than for sealing seams. The professional version involves adjusting the flow of the substance, while the household version does not have such a function.
There is a definite difference in this material depending on the manufacturer - cylinders are produced in different sizes, so it is worth paying attention to this. The difference in price is 10%, and the difference in materials is 20%.
Foam selection by season
It is necessary to take into account what time of year they work, or in what room. If there is a large temperature difference with the street, this is also taken into account. The difference is in the foam - some types are purchased if work is to be done in summer, others are suitable for work to be done in winter.
If you glue penoplex in the summer season, then purchase appropriate foam, which works at temperatures from 5 to 35 degrees above zero. The advantage of this choice is that summer foam does not contain toluene, which destroys foamed polystyrene.
Winter foam is used at temperatures no lower than 10 degrees below zero and no higher than 35 degrees above zero. Work is carried out even when it is frosty outside, or the room itself is cold (when working on the balcony).
They work with off-season (universal) foam at any time of the year, but it contains toluene, with which penoplex is incompatible. Such foam cannot be used.
Pay attention to the presence of this substance in the composition of the material - toluene. If it is, choose another foam, otherwise it will lead to disastrous consequences.
The degree of expansion also deserves special attention. Foams increase in volume by 60%, or are used at lower rates. For sealing seams, as well as for better fixation, they prefer the first option, characterized by a higher expansion rate.
Pay attention to the information on the packaging - it indicates the pressure inside the cylinder, the mass and yield of the foam, i.e. its efficiency and supply volume.
The choice of glue and what is better not to use
Before purchasing, you need to consider the following points:
- acceptable price;
- suitability for indoor or outdoor use;
- adhesion strength;
- consumption;
- harmlessness (for interior decoration).
Typically, any polyurethane or polymer adhesives are purchased for interior work. It is prohibited to use waterproofing products indoors; they can be harmful to health. Cement-based mineral mixtures are often used outside the house. For exterior work - balconies and plinths - acrylic mixtures are ideal.
Compositions containing benzene, toluene, acetone, formaldehyde, and xylene should not be used for penoplex. Kerosene and gasoline, coal tar and polyesters, and formaldehyde will also spoil the material. Otherwise, you can easily glue the material with your own hands without extra costs.
Reasons for choosing polyurethane sealant
When purchasing foam, it is once again checked for the presence of toluene, a substance that leads to permanent damage to the penoplex.
Even if it is not indicated on the cylinder whether it is present in the composition, they give preference to another option, where the composition is detailed and you can make sure that there is no toluene in it.
The best solution and choice is polyurethane sealant. This type of foam is better combined with penoplex and does not harm it in any way.
The advantages include high-quality sealing of gaps and cracks that invariably arise during the cutting of penoplex slabs.
The same substance will not lead to even partial damage to the foam boards, and gluing with its help is easy and simple. It will be more expensive than if you use specialized glue.
It is not worth saving on the purchase of foam, which is used to seal cracks, otherwise it will not lead to positive results. If the first sealed seam does not give the desired results, the foam is changed. They choose well-known and well-established brands - cylinders from popular manufacturers, whose quality you cannot doubt. In this case, calculate:
- For good adhesion between various materials, including foam boards;
- For high levels of thermal insulation and sound insulation;
- Using a gun, applying foam is convenient and precise, which will lead to less consumption of the substance.
Applying foam with a gun
High-quality foam prevents the penetration of moisture, moisture, mold or mildew. Provided that the seams are insulated from exposure to ultraviolet rays, which lead to the destruction of the polyurethane foam.
How to apply foam and how to work with penoplex
To fix penoplex sheets to the surface, using polyurethane foam as glue, apply it around the perimeter of the sheet and in the center. If a pistol is used in the work, it is better to minimize the supply of the substance. If you use a regular household cylinder, then apply foam quickly. Next, the penoplex is pressed against the surface and held in this position for several minutes. Then start attaching the next sheet. Pre-prepare the sheets - trim them for ease of installation.
The installation of the slabs is carried out in a checkerboard pattern, from bottom to top - this minimizes the gaps between them.
Next, start filling the gaps. If the distance between the sheets is large, then fill it with small wedges from the foam itself. If you use foam, it will cause cracks. Carefully blow out small cracks, not forgetting to hold the already fixed sheets. Do not overdo it; excess moves the sheet and disrupts its fixation. Remove what comes out.
Finished work
It is better to use foam when laying penoplex on the floor. When sheets are attached to the wall, glue is preferred. A specialized substance will provide more guarantees of high-quality fixation, although there have been no obvious complaints from builders regarding the foam. Many people use polyurethane foam instead of glue and no negative consequences have been noticed.
At what temperature can you glue?
By default, interior work is carried out at room temperature, and exterior work is prohibited if the air temperature is less than 10 ° C. Bitumen mastic is suitable for work even in severe frost, and in the heat, and even under the scorching sun, each material will harden longer than usual if will not deteriorate while waiting.
In any case, before construction, you need to familiarize yourself with the operating requirements and storage conditions - indoor solutions are not always universal and reliable.
Rules for use in case of fixing penoplex and blowing seams
The crucial moment is the choice of foam. The presence of toluene in it will lead to damage to the building material and the need to purchase a new batch - and this is a serious expense. Therefore, it is better to spend a little more time in the store to choose the right option.
Before starting work, perform some manipulations with the cylinder.
Heat it up, no matter what season - winter or summer.
To heat, take a small container and fill it with warm water. Do not use hot under any circumstances. The cylinder is placed in a container - a low saucepan or a small ladle, so that the warm liquid reaches no more than the middle. This heating is sufficient for 5-10 minutes.
Then the same amount of time is needed to thoroughly shake the contents of the container. In this case, it is guaranteed that all the material is used. Moreover, this procedure is relevant not only for professional cylinders, but also for ordinary household ones.
The next stage is a small check. More often, a special substance is used in the cylinder, which is squeezed out before starting work. If everything is fine, start using it.
The new cylinder gives greater efficiency at the beginning of work, it decreases as the material is consumed (pressure drops). Therefore, at the beginning of a new cylinder, the substance is consumed sparingly and in small doses.
If you take a break, rinse the tube through which the mixture is supplied, or the nose of the gun, to remove any remaining substance so that it does not harden. Otherwise, the nozzle will have to be cleaned, and this is a waste of time that is avoided.
Types of adhesives
The key indicator for the adhesive composition is adhesion (reliability of adhesion of dissimilar planes), which helps maintain tightness and, as a consequence, the level of thermal insulation. However, construction work with polystyrene differs not only in climatic conditions, but also in the place of insulation - walls, floor or ceiling - where an increased force of attraction will act on the material, requiring the most durable connection of materials. Therefore, the following types are found on the market:
Polyurethane
To use such a composition, special equipment is required, since the entire substance is contained in a cylinder in a compressed state. This approach allows you to take your time and not use the entire resource at once, although long-term storage of the started container leads to drying out and unsuitability of the adhesive composition.
When working, it is recommended to apply the raw material in zigzags, without stopping in one place. To set with the base, it is enough to wait one and a half minutes, but the elasticity of the polyurethane substance itself will remain for another fifteen minutes. Therefore, this glue is convenient when the construction project involves the question of how to glue penoplex before the onset of bad weather or the end of the working day.
Polymer adhesives
The weakest representative of the genre, if we talk about adhesion, nevertheless, it is in demand on the market due to its low cost and availability. It is not recommended to use it when working with the ceiling, since the substance may not withstand the weight of the insulation.
Also, you should not give it to beginners - the substance begins to dry out within a few seconds after application, which will require a quick reaction to maintain adhesion properties. The most reliable option is to use it together with another solution if mineral, polyurethane or other suitable substance is not enough.
Mineral
If mineral adhesives harden quickly, then with mineral substances this process proceeds even faster. Largely due to the composition: cement, gypsum and alabaster. Therefore, in the labor process, it is recommended to knead small portions in order to immediately consume them and not transfer the resource into a meaningless hardened mass. This approach is compensated by the increased strength that appears after the substance has completely dried.
Mineral representatives are divided into two categories: with a predominance of gypsum and with a high content of cement. The first group is relevant for interior finishing work, the second is usually used when insulating the outside of a house.
Waterproofing compounds
If wood or metal is used as the base to which the foam boards will be attached, then gluing is most reliably carried out using a waterproofing compound. However, you should not use it for interior repairs, since the solution contains oil, which is harmful to the human body over a long period of time.
Communities › Do It Yourself › Blog › Penoplex on polyurethane foam
Good day everyone! Comrades! Has anyone glued such penoplex to such mounting foam? Need feedback on how it's doing after a few years?
Comments 90
Buy glue and don’t worry, it’s not expensive. It is glued in such a way that you cannot tear off the penoplex without damaging it. a zigzag or a strip along the contour and a cross in the middle is enough - it depends on how and where the penoplex will work.
I glued the gypsum panels with foam, they couldn’t be torn off, I glued the boards together, very tightly, soudal winter foam
Today I glued Eps on the base using macroflex foam glue. Better than TechnoNIKOL and others. Glues in 5 minutes. Epps first scrubbed with a metal brush
There is a special foam. Which will not expand much. But it will stick tightly. Sold in the same cylinders
This is how the garage was insulated for my father-in-law. It's been 3 years already
There is glue for foam plastic in such cans and the price is almost the same. And so I glued it to the concrete wall and attached it with umbrellas. It’s worth it.
Polyurethane glue is better.
The flight has been normal for about 10 years, we still use the leftovers when we need to put them under our knees to prevent them from freezing, well, in the repair area :)))
The entire garage is insulated with Penoplex and polystyrene foam. Everything is on polyurethane foam. Just not this one, but one that fits a pistol. And the top of the garage floor is plasterboard, on foam, and the garage floor is OSB, everything is on foam. I didn’t spray anything rough. It's holding on and you'll tear it off.
Sprinkle with water, then there is such a thing as foam cement. I did a ceiling in the garage and it's holding up well. The first row went a little to the side, I had to redo it, so I had to cut off the glue with a hacksaw so as not to break the sheet.
Gate in the garage. The penoplex was passed through with a card brush from the reverse side for better adhesion.
And what is the result? Do the doors now reflect warm air?
Penoplex glued to liquid nails
just not ordinary foam, but green glue. If it’s outside, then it’s worth taking some fungi.
Polyurethane foam and expanded polystyrene are not friends... There is POLYNOR spray insulation. Here it is, friends or adhesive foam for polystyrene foam.
Here's a video
I glued it on the balcony. 2 years - normal flight.
Kleil, i.e. I tried to glue it. Did not work out
I bought special glue from Leroy. It sticks tightly. Also for a foam pistol. Dries very quickly.
Ordinary polystyrene foam in a damp garage has been living on the ceiling for 9 years and has not fallen off, the contour has foamed and the middle is pressed.
I insulated my entire house with polystyrene and foam adhesive. It stood open for two years until it was plastered. Everything will be OK.
I glued it. All is good.
I think the previous comments are enough. But let me remind you that for gluing you need not foam but glue (the same balloon, but it goes on a gun) this glue is used to glue walls from aerated blocks and holds them forever. If you have already purchased foam, you can glue it on it, just not right away, but as Dimka-26 wrote. And there is no need to sand anything there. But you can wet it.
I tried to wet it but it came off. It’s better to go through with a hacksaw, it won’t take long
Glue it calmly. I applied foam three years ago and feel great. It takes a long time to use liquid glue and the bricks on my walls are not laid very evenly, so I had to first level the wall and then glue it. I solved two problems with foam. Although everyone told me that it would disappear after winter. I went to my neighbor and glued a brick to his wall with foam and said when it disappears, let him tell the whole street about it. The street is silent, the foam holds up, I'm happy
And if you glue it to a foam block wall inside the house. In winter, the wall will freeze from the outside. How will the foam behave? Or is there something else for this case? I’m also thinking about covering the inside of the extension with penoplex.
A strip is glued around the perimeter and in the middle. Condensation will form in the cavities, be absorbed into the foam block, and then freeze... the question is how long will the foam block last in this mode.
And if you glue it to a foam block wall inside the house. In winter, the wall will freeze from the outside. How will the foam behave? Or is there something else for this case? I’m also thinking about covering the inside of the extension with penoplex.
Glue them on the outside! You don't need it inside. Outside with penoplex, inside with plasterboard. 2 years and everything is fine
And if you glue it to a foam block wall inside the house. In winter, the wall will freeze from the outside. How will the foam behave? Or is there something else for this case? I’m also thinking about covering the inside of the extension with penoplex.
Honestly, I don’t know how it will be from the inside. I don't have such experience.
Mastic: the basics
Bitumen-polymer mastics are one of the most common materials due to their price and ease of use. This technology has found wide application in insulating the plinths of buildings operating in extremely unfavorable conditions of constant humidity, the presence of reagents, and mechanical stress. They provide quick and reliable installation of penoplex with stable resistance to harmful external factors. Mastics are sold in tubes, ready for use. The tube is installed in the sealant gun.
The composition is applied around the perimeter and pointwise to the center (when laying the second one and then next to it, it is also applied to the grooves). Then the installed insulation is pressed for a short time. The glued insulation can be repositioned within one hour.
What type of foam should be used for penoplex?
It is difficult to imagine modern construction without the use of polyurethane foam, which is used as an excellent insulating material that fills cracks and has adhesive, moisture-proof and dielectric properties. It is necessary when installing windows and doors, where its ability to glue and increase in volume allows you to securely fix the installed structure. Polyurethane foam for penoplex is also necessary when performing a complex of works, including when soundproofing walls made of penoplex is performed. Polyurethane sealant in aerosol cans has already become a necessary element in most construction and repair work, and its ease of use allows you to “blow out” foam boards, literally gluing them to vertical surfaces.
Choosing a “installation” for penoplex
The mounting foams offered in stores can be roughly classified according to:
- professional (pistol) - characterized by a large yield of active substance from one cylinder and the need to use a special device (a mounting gun). The latter is very convenient, since “gun” polyurethane foam for penoplex can be used in the most difficult to reach places. Large areas of insulated surface require an appropriate amount of penoplex and polyurethane foam, which is typical for professional “installation”;
- semi-professional (household) - does not require additional devices, but also has a smaller working environment.
- By temperature of use: summer – intended for operation at temperatures from 5 to 35 degrees Celsius. In all respects, summer polyurethane foam is optimal for penoplex, since it does not contain toluene, which destroys extruded polystyrene foam;
- winter - allows you to perform work at temperatures from 10 below zero to 35 degrees above zero;
- all-season (universal) - this option may contain toluene, therefore, penoplex and polyurethane foam of this type (if toluene is present) are incompatible.
Based on the recommendations of PENOPLEX SPb LLC, the installation of insulation boards should be carried out using any polyurethane sealant that does not contain toluene. The best way to reliably and efficiently fix penoplex is one-component polyurethane foam. But it is also possible to use other fasteners for polystyrene foam to the wall.
Glue consumption
This parameter varies depending on the composition. Therefore, manufacturers immediately indicate the indicator on the packaging so that the buyer can calculate and determine the required quantity in advance.
But if we start from arithmetic averages, then a layer of mineral substance with an area of 1 m2 takes 4 kilograms, and if the substance is used from a cylinder, then one vessel is enough for 10 m2. Accordingly, dry mixtures are cheaper, but require more time and effort to prepare.
| Glue brand | The basis | Consumption per 1 m2 | Price |
| ATLAS STOPTER K-20 kley | Mineral | 4.5 kg | 1 bag of dry mixture – 310 rub. |
| Polyurethane adhesive "TITAN" | Concrete products | 0.75 l | tube – 405 rub. |
| "CERESIT" (ST83) | Any | 5 kg | 1 bag 25 kg – 375 rub. |
| "T-Avangard-K" | Needs waterproofing | 5 kg | Packaging 25 kg – 270 rub. |
| ALLFIX | Any | 0.5-0.8 kg | 1 kg – 230 rub. |
Why does penoplex need polyurethane sealant?
In the process of laying insulation, polyurethane foam for Penoplex boards is required, which is used to process the gaps formed during the creation of the heat-saving structure. Based on the fact that the answer to the question: “Which mounting foam is suitable for Penoplex?” is contained in the manufacturer’s recommendations, then when purchasing a “mounter” in a store, you should once again check whether toluene is listed as one of the ingredients. Such a frequent mention of this chemical substance, which is a colorless liquid with a characteristic odor, is due to the fact that installing penoplex with such foam will inevitably lead to its destruction, and this will require additional costs for the purchase of new insulation boards.
The excellent compatibility of penoplex and polyurethane foam allows you to eliminate all the gaps that arise as a result of cutting insulation boards. The joint along the L-shaped edge does not require the use of “installation”, but is sealed with the most ordinary tape.
Gluing Penoplex insulation boards with polyurethane foam is a very real thing. But this case is rather an exception to the rule, since the cost of such installation work will increase tenfold. It is optimal to use special adhesive mixtures or, judging by consumer reviews, to use Insta-Stik polyurethane adhesive.
For high-quality sealing of joints, the combination of Titanium polyurethane foam and Penoplex has proven itself to be effective, which makes it possible to create a reliable thermal insulation layer that will provide thermal protection and sound insulation of the room for a long time. Selena Co. products SA has built a reputation among the masses for its reliability, efficiency and quality. Installation products in aerosol packaging under the Tytan trademark demonstrate the following advantages when used:
- excellent adhesion (setting) with various building materials;
- high level of heat and sound insulation;
- high accuracy and efficiency (with minimal use skills);
- resistance to moisture and mold microorganisms;
- short hardening time, which allows you to start processing the filling site no later than an hour;
- environmental Safety.
Stamps
Purchasing glue for polystyrene is not a common procedure for those who only carry out repairs in their home or apartment. Therefore, it is better not to waste time (and money) trying to choose the most effective option, but to immediately choose from the highest-rated ones.
Tytan
A universal adhesive, also suitable for improving the exterior, because it is resistant to precipitation and does not allow heat to pass through. It is most rational to purchase the Professional Styro 753 subtype, which provides maximum adhesion of the insulation to the surface.
Ceresit
This product comes in two versions: foam and bulk. The first can be used to insulate the ceiling. The foam hardens quickly and can withstand a wide temperature range - from -10°C to +40°C. And the prepared solution well answers the question “how to glue penoplex to concrete?”, however, two hours should pass between mixing and use.
Moment
The most practical option among those presented, which is even used to create a reinforced mesh, but, as a result, the most expensive. It does not require shrinkage and is also characterized by good elasticity.
Master termol
Due to its high frost resistance, it is purchased for winter work. Recommended for working with limestone materials - reinforced concrete or plaster.
Profline 3k 45
This copy is suitable for those for whom the construction process is a meditative activity that requires prudence and not haste; due to the elasticity and low rate of hardening and setting, the worker will always have the opportunity to check the quality and effectiveness of his work.