The desire to make a large number of summer preparations for the winter provokes the issue of storing finished products. A basement or cellar is required, which becomes a difficult undertaking for residents of an apartment building. But the cellar under the first floor balcony becomes the only correct solution to solve the problem. This is used by residents of the first floors who have a loggia or balcony - they differ in their design, so the work is carried out in compliance with all the features.
From a legal point of view
Any work involving the destruction of walls or ceilings in apartment buildings, according to the Housing Code, is considered redevelopment. Therefore, permission must be obtained to carry them out.
To design a cellar under the balcony, you also need to obtain permission, which occurs in the following sequence:
- To begin with, the apartment owner must assess his capabilities - financial and physical - whether he can build a basement under the balcony. If you live on the ground floor, under any circumstances, you will need to create additional space around the perimeter or along the extreme side of the loggia.
- The cellar under the first floor balcony requires the installation of a floor - this means the destruction of a concrete slab, for which a permit must be obtained. To do this, you need to contact the BTI or other authorized body of the locality where there is an architectural department.
- Write an application for redevelopment. Along with it, submit copies of the documents of the technical plan of the living space and a graphically displayed new layout.
- Within a few days, employees of the architectural department will consider the submitted application and the possibility of implementing the plan in terms of technical characteristics.
- Then a commission from the architectural department visits the apartment and inspects the place where the work will be carried out. It is important to compare the technical specifications indicated in the documents with the available data.
- If the ceilings allow, the architectural department employees give permission to carry out the work.
With permission received, they begin their plan. After completing all the steps, they again contact the architectural department for the final legalization of the redevelopment. Employees again come to the applicant and inspect the compliance of the work performed with those presented in the application. If there are no discrepancies, the legality of the redevelopment is recorded.
Pre-authorization
Before you start building a cellar under the first floor balcony, you need not only to select building materials and tools, but also to coordinate the work with the relevant authorities.
From a legal point of view, creating a cellar under the balcony is considered a redevelopment of the apartment, so it is necessary to obtain permission to carry out the work. That is why it is important to contact the housing office or other body responsible for redevelopment in your area.
Usually a small commission goes to the site to determine the possibility or impossibility of building a cellar under the balcony. Of course, you will have to wait for the commission to arrive and receive its conclusion (from several weeks to several months).
Which cellar to choose for a balcony
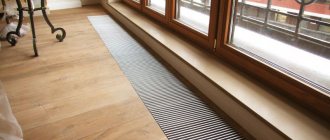
The type of cellar for storing vegetables depends on the floor on which it will be built. On balconies above the first floor it is better to equip a thermal container for seams and products. This can be a mobile or desktop device.
Residents of the first floors of high-rise buildings are luckier: they can build a full-fledged underground cellar under the balcony - storage for the harvested crops. You must first obtain the appropriate permission, since the cellar under the balcony requires redevelopment and dismantling of the concrete slab.
Construction of a cellar under the balcony of the first floor of an apartment building
One of the advantages of living in the lowest apartment in an apartment building is the possibility of creating a cellar under the first floor balcony.
The space under the balcony of an apartment on the first floor will become a very convenient place for storing provisions and various things. Many people are afraid of the labor intensity of the work, because they will have to dig a pit, finish it, create thermal insulation and waterproofing layers. But in practice, the devil is not as scary as he is painted.
Naturally, you will have to work hard, but in the end you will get a convenient cellar located under your balcony, which will be an excellent place to store products of any type. And you don’t need to go to the garage or go to the village to pick up a few jars of jam or cucumbers. It should be noted that the cost of an apartment on the ground floor increases significantly, and that there is a cellar under its loggia.
What else relates to common property that I might have problems with?
— When carrying out major repairs in an apartment building, it is necessary to replace the building's utility networks. Simply put, the risers need to be changed. That is, everything that is outside the meter and the “first tap” is common property, including risers. Responsibility for their maintenance and maintenance in proper condition lies with the management company, which very often ignores its function. For example, for many years, employees of the management company have never come to my home to inspect the condition of the risers. But residents regularly pay for this virtually impossible work.
So, for many apartment owners, the risers are not just covered with plasterboard or plastic boxes, but are often tightly walled up with mortar and bricks. On the one hand, residents close them because protruding pipes look terrible. This is ugly and inconvenient (here the question should be asked to the designers who did not include niches for utilities in the project). When we come to apartments and see that the risers are walled up in the wall, the question arises, how to change them? Residents, naturally, say: if you want to replace it, dismantle it, and then restore it at your own expense. But according to the Housing Code, the owner is obliged to provide unhindered access to common property, including to employees of the management company for maintenance or replacement, as well as to employees of other organizations in cases provided for by law. We have to get out. But in some houses you can’t even get close to the risers. There have been cases when apartment owners wrote a receipt stating that they assume full responsibility for maintaining the section of the common building network within their apartment and the floors of the apartments above and below them, as well as for possible damage caused to neighbors. If a pipe breaks inside his box and floods his neighbors, then he will pay.
Another interesting issue is air conditioners. In a good way, the places and rules for placing air conditioners should be regulated. Let's say that during a major renovation we need to insulate the facade and to ensure that the work can be done, we need to move the air conditioner away from the wall. Who will pay for the transfer? Our estimates do not include this work. Air conditioners are private property. On the other hand, they are located on the common facade and interfere with work on common property. What to do? Nobody knows the answer. Again, in new houses it is a little simpler: the design provides special places for placing air conditioners. And even then, in several places in the city I saw how they hung an air conditioner next to this box.
Requirements for a cellar on the balcony
The main purpose of a balcony cellar is to preserve the harvested crops and seams. It is important to keep products only at a certain temperature: from + 1 to + 5 ᵒC. In this case, air humidity is determined within the range of 85-90%. In such a microclimate, vegetables and fruits do not rot, dry out or germinate.
The cellars of apartment owners on the first floors must comply with safety rules. The construction project must be approved by the BTI: the stability of the entire apartment building depends on the strength of the foundation.
The cellar under the balcony must be well ventilated, which is quite difficult to ensure.
In the cellar built under the first floor balcony, you will need to install a special pipe through which air will circulate.
How to make a cellar under the balcony
You can make a cellar under the balcony yourself if the apartment owner has the appropriate repair skills. Before work, you need to analyze all the details and create step-by-step instructions.
What materials will be needed
First, you should make a list of materials that may be required to build a cellar under the balcony. The presented issue is resolved in accordance with the selected type of basement. This could be a pantry for storing food and canned goods, or you could set up a wine cellar.
The general list of materials and tools includes:
- bricks or foam blocks for laying out walls under the balcony;
- roofing felt - necessary for installing waterproofing on the floor and walls;
- crushed stone, cement and sand - required for making mortar to create a screed on the floor;
- steel rods for reinforcement in the floor screed;
- materials for interior decoration of walls, floors and ceilings;
- a hammer drill and a grinder, a bayonet shovel and a pick - necessary for installing a hole in the balcony floor;
- construction tools for masonry and plastering walls - spatula, etc.;
- wooden slats, boards and metal corners for making a hatch in the loggia floor;
- wooden beams, nails, metal corners for making stairs;
- pipe made of plastic or metal for exhaust.
This is a general list for making a basement under the first floor loggia. Depending on the circumstances, materials and tools may differ from those stated.
How to dig a basement under a loggia
The construction of a cellar under the loggia begins with the formation of a pit. To do this, follow the following sequence of actions:
- It is necessary to use several people to dig a pit. One will do the digging, and the second will carry out the soil. This is required if an additional layer of soil needs to be removed under the balcony - the height of the cellar should be in accordance with the height of the person, so that he stands on straight legs and does not touch the ceiling with his head.
- Next, use a grinder with a wheel to cut the stone. They outline the outline of the future hatch.
- They begin to cut a hole in the floor, for which they use a hammer drill. During the work process, a grinder is used to cut off the existing reinforcement, which is located in the thickness of the concrete.
- A hammer drill breaks the concrete in the balcony floor, carefully forming a square hatch. Its dimensions depend on the body parameters of the residents (it is recommended to make a spacious hole so that a person can go down into it and get food without touching the walls of the hole) and technical characteristics. The recommended dimensions are 50*50 cm, but BTI staff may not approve the presented parameters or allow even larger ones.
The hole obtained in the floor of the loggia will later help in finishing the cellar. It is recommended to start cutting the hatch after erecting the walls under the balcony. Thus, making a pantry will not provoke robbers and scammers to enter the apartment through the hatch in the floor of the loggia. But the correct sequence of actions seems different.
How to make a cellar under a loggia
If you follow all the rules, a balcony with a cellar can be made in 3 days. People who take up work for the first time and do not have proper experience spend no more than a week on it. During the specified period, the following work is required.
Dig a hole
First, dig a hole. Here, in most cases, you have to make a dig in the ground, since the height of the balcony from ground level does not always allow a person to stand up to his full height. To dig a hole, you may need to break up the asphalt or concrete that is available under the loggia and is done by the developer.
When asked whether it is possible to ignore the groundwater level, the answer is yes. So, it is not necessary to specify the indicators, since the hole will have to be dug no more than a meter deep. This is not much, considering the depth to which the foundation of an apartment building is dug.
The width and shape of the pit completely matches the balcony floor slab.
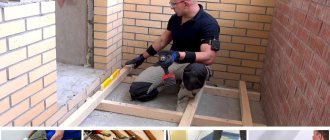
Basement floor installation
The basement on the balcony at the initial stage appears only as a hole in the ground and the absence of walls. At this stage, you can start pouring the floor of the resulting cellar. For work, sand is used, which is poured into the bottom of the hole and compacted as hard as possible. You can pour crushed stone on top. The total layer will be 10 cm, no more.
Then you need to lay a reinforced lattice on top of the resulting layer and fill it with prepared concrete. Cement, crushed stone and sand are used to make it. Allow the concrete layer to dry and proceed to the next step.
If desired and necessary, the concrete floor can be additionally insulated. To do this, sheathing is done with beams, and foam plastic or glass wool is laid out in the resulting cavities. Afterwards you need to lay the boards across the resulting floor. Floor insulation is carried out after laying a brick wall under the loggia.
Punching through the hatch
Once the floor is ready, you can begin to break through the hatch. For this, a grinder and a hammer drill are used. First they work with a grinder, which is used to outline the contours of the hatch, and then they break up the concrete with a hammer drill. The result is a neat hatch, and you can lay out the walls.
The cellar hatch can be made from boards or metal sheets.
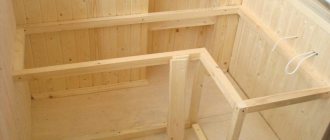
Walling
The walls for the future cellar can be made of brick or foam blocks. Blocks are rarely used, since they also require additional insulation of the walls, and its thickness will be greater than when laying bricks. This use of foam blocks is impractical, since the loggia is narrow, and the wall should not extend beyond the partition.
But the foam block can be used for insulation and neglect accuracy. For this, brick is used - they lay out half-brick walls using cement. Afterwards, a foam block wall is erected around it, which is not placed directly under the loggia, but extends beyond the perimeter.
Such a double wall will not be able to provide the necessary cold, but will comfortably maintain a cool temperature in the winter.
As a result, the weather in the region is taken into consideration before deciding to build walls. If this is the northern part of Russia, it is better to make two walls in order to spend less money on insulation. If it is a warm region, one wall made of foam block or brick is enough.
The walls are laid out from the floor screed to the loggia slab. When laying out the walls, a hole should be left in one of them for subsequent ventilation. It is often installed using a simple ventilation pipe. It is additionally protected from above from sedimentary moisture and the penetration of rodents - a cornice is mounted on the street side and a grill is installed.
Waterproofing
Waterproofing is important to prevent the penetration of groundwater, which should not enter the room due to a shallow hole in the ground. To create a waterproofing layer, it is enough to use roofing felt, the sheets of which are connected using a gas burner. It is enough to retain sedimentary water.
After laying out the waterproofing layer, it is necessary to lay out a layer of brick.
Thermal insulation of walls and floors: how to properly insulate
Next they work on thermal insulation, the availability of which depends on the temperature in the region. It is also important to consider the purpose of the cellar. If this is a room for storing food and canned goods, it is better to refuse thermal insulation in a warm region.
The temperature in the cellar should not fall below 0.
Optimal indicators for the room are +3-+5. Therefore, it is recommended to dig a cellar under the loggia in the autumn, when you can measure the temperature and determine how much the readings will drop in winter.
If thermal insulation is needed, you need to purchase polystyrene foam or any thermal insulation layer. Next, wooden beams are nailed to the walls at a distance of 50-70 cm from each other. Thermal insulation is laid between them. Sheets of plywood or other material are nailed on top of the walls to make the room visually aesthetic.
Apartment residents prefer to improve their space, so they paint the walls or cover them with clapboard. Linoleum and even laminate are laid on the floor - leftovers from indoor varieties are used. The walls can simply be plastered. And if they are upholstered, they give preference to laminated chipboard. Then there will be no need to carry out additional actions for upgrading.
When using simple chipboard, you can cover the walls with wallpaper. This is not a long-term renovation, but if you want to make the room attractive inside, wallpaper will do.
Wiring
Lighting is a must in a homemade cellar, so you can do it yourself or hire a craftsman.
Independent work occurs in the following sequence:
- First, determine where the wires will lead from. It is undesirable to place a separate electrical panel in the cellar under the loggia, since it cannot withstand humidity and can cause a short circuit. The electrical panel is hung in a separate and dry room - it can be placed in a room with access to a balcony.
- Next, select wires with a cross-section of 2.5 mm - they will be enough, since there is no need to install high-quality and complex lighting in the room.
- Wires in waterproofing protection are carried along the wall and floor, and then lowered into the cellar. Here in the basement they are placed under the ceiling - at a distance of 1.5-2 m from the floor.
- Switches are installed, which are also located at a distance of 1 m from the floor, which is necessary to protect the wiring from flooding with groundwater.
- Finally, connect the wires to the electrical panel.
You can use a special transformer with a waterproofing cover. Then you can place it in the basement and not be afraid of moisture penetration.
Ladder and hatch
Finally, they make a ladder, a hatch and shelves for storing food, for which wooden beams and boards are used. To make a hatch, a door is made from boards. It is secured using dowels, screws and hinges, which are placed on the floor and on the hatch door. It should open outward - that is, go up, ending up on the balcony.
Next they make the stairs. To do this, two boards are nailed together with transverse boards - they act as steps of the staircase. As a rule, a cellar under a loggia does not make it possible to create a large and convenient structure.
Some apartment owners opt for metal. With its help, a frame is formed, and the steps are made of wooden boards. This design takes up less space. It is easier to “weld” a metal staircase to a concrete floor slab, onto the corners of which metal corners are attached with dowels.
Depending on the design of the staircase, shelves are placed in the room. It is better to make them on narrow walls of the cellar so that there are no obstacles when climbing the stairs.
Methods for eliminating dampness
Obviously, the choice of method for eliminating dampness is based solely on the reason for the appearance of moisture, therefore eliminating cracks and holes in pipelines and plastic supply pipes is the first thing that needs to be done. Construction adhesive, special nozzles that can be pushed to the leak site, and special patches can help here.
Advice: to avoid such incidents, you should always pay attention to the quality of the main pipes and the bending of the pipes in order to avoid serious angles of inclination. If it is impossible to eliminate a sharp turn, you can additionally wrap the water supply in electrical tape or tape; at first, this may help to cope with the problem.
Modern methods
A popular method of dealing with high humidity today is the installation of additional heating devices that promote direct rapid drying of the air. A properly installed thermal system will contribute to the gradual death of bacteria, but there is one note here: serious temperature changes in the room are unacceptable, as this can lead to breakage of individual components.
This is due to the fact that when the thermal regime is set, the system will strive to do everything to maintain it, and if you leave a window open in the room, especially in winter, it will work to the limit and, as a result, will soon break down. In warm months, the temperature is usually maintained both with the help of sunlight and with the help of air conditioning and climate systems.
Important: drying a large amount of laundry not on the balcony, but at home, for example, on folding devices, can partially contribute to the appearance of dampness. Therefore, it is recommended to reduce the number of wet things hanging on them at the same time.
The modern household market offers a more optimal option for owners of small apartments in which installing a system is not possible, namely a dehumidifier. This small device is equipped with many sensors that allow the electronics to monitor the state of humidity, pressure and temperature. Analyzing the data obtained, the device is either at rest or takes excess moisture from the air.
If the source of penetration is found in the bathroom, then a heated towel rail, which is a double-bent metal pipe through which supplied hot water flows, will very quickly solve the problem. In fact, in this case, this device will be an alternative to a dehumidifier, and will help get rid of moisture due to the small size of the room.
Additional methods
Additional methods of combating dampness include those that can be used in combination with those described above, but not as the main ones. These methods can help, for example, prevent the area spread of moisture, blocking all growth paths, or remove a small temporary loss of moisture on the walls.
So, these methods include:
- Using salt or sugar. If you apply a significant amount of one or another powder to a rag, which is then applied to the affected area, you will notice that the crystals will be able to absorb some of the moisture. The method is suitable for eliminating small damp manifestations with a diameter of up to 3-5 centimeters.
- Using a weak solution of potassium permanganate. They need to wipe all potential places where large amounts of moisture accumulate.
- Frequent ventilation of the room. This facilitates the penetration of fresh air into the room, thus ensuring natural circulation and removing some of the moisture from the apartment or house.
- Dry cleaning of a room, which differs from classical cleaning in that all floors and other surfaces covered with a damp cloth are additionally wiped with a soft dry cloth, which eliminates the possibility of liquid accumulation.
Many builders recommend that residents of the first and last floors, as well as owners of private houses, regularly check all walls, seams, baseboards and other elements for moisture when cleaning the premises. This vigilance will help prevent mold and other problems early.
The principle of operation of the cellar thermostat
For general information, you need to understand that the thermostat in everyday life is used in different devices: from a refrigerator to an iron and a soldering iron. The process of operation of the thermostat itself is very simple, the setup of the work is primitive, and as a conclusion there is a simple electrical circuit.
The most complex and time-consuming process in creating “simple” thermostats is bringing them to the required temperature.
To determine the characteristics of the temperature points on the scale, you must first immerse the sensor with ice that melts (this is approximately zero degrees Celsius), and then sharply into boiling water (this is 100 degrees).
After this check, you need to adjust the required temperature so that the trial and error method using a voltmeter and thermometer works.
Video:
Nowadays, different factories produce many temperature sensors, which are already correctly calibrated at the time of their creation.
These are sensors that are found in microcontrollers. The output information of these sensors is digital; it can be transmitted via a bidirectional single-wire 1-wire interface, which facilitates the creation of an entire network based on similar devices.
In other words, it is very easy to create such thermometers and also control the temperature (for example, on the balcony and outside the window, and even in different rooms).
Construction of brick walls
After the walls and floor have been completely waterproofed, construction of the internal side fence begins. It is better to use red brick to build cellar walls. Wall thickness – 125 mm or half a brick. The base for the brick walls is a concrete floor slab, poured in advance.
Brick has high thermal conductivity, so brick walls in the cellar must be insulated. Mineral wool roll materials, polystyrene foam or polystyrene foam boards are used as insulation. The insulation is fixed between vertical guides made of wooden blocks, with a thickness equal to the thickness of the heat insulator. The thickness of the insulation should be no more than 50 mm, so as not to reduce the internal space of the cellar.
The final finishing of the walls ends with the installation of painted fiberboard sheets, which are attached to the insulation sheathing.
How to make a cellar or mini-cellar on the balcony in an apartment with your own hands
On a closed balcony you can build a container cellar from plywood or wooden lining. First, the location for the future storage is determined. It’s convenient to make it in a corner, blocking off part of the space.
At its core, a balcony cellar is a wooden box, the thermal insulation of which is made like a thermos
Process:
- To keep the temperature inside the storage facility at a certain level, two wooden boxes are knocked together - a large one and a smaller one. The space between it is laid out with a layer of insulation.
- The frame of the structure is made of boards 50 mm thick. The sheathing is made of 10 mm plywood.
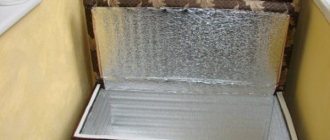
- The inside of the frame is covered with polystyrene foam or foil-clad polyethylene, folded in several layers.
Foil material holds a certain temperature level inside the cellar well
The parameters of the inner box should be 2-3 cm less than the outer frame: the air gap serves as additional insulation.
Ventilation holes are made in the walls of the internal storage.
A hinged wooden lid is attached to the rear partition of the storage facility.
The balcony chest is designed for storing root vegetables; the temperature inside the storage is kept within 3-7 ᵒC
We do it ourselves
Many home craftsmen are interested in how to make a cellar on the balcony.
Before starting work, the floor should be insulated. For this, foam sheets, polystyrene or mineral wool slabs are suitable. The top is covered with fiberboard, chipboard, thin board or plywood. When the base of the balcony floor is prepared, the construction of the thermal container begins.
You will need:
- sheet of chipboard or plywood;
- wooden slats and bars;
- insulation material;
- temperature regulating sensor;
- two 20 W lamps;
- cables;
- glue;
- tools - electric drill, hammer and nails.
Step-by-step instruction:
- We build a box or box from boards or chipboard. We attach bars to the floor that will serve as the base. Vertical strut strips will be screwed to them, and rectangular frames will be installed.
- Using plywood and chipboard we make a box for the balcony (the distance between the double walls is about 10 cm). We put a heat insulator there.
- Inside the box we arrange shelves made of plywood and slats, and insulate the lid of the thermal container. The box needs holes for the wires.
- The plywood latch should move along the guides along the box lid. You need to make several holes in it (their diameter is 5 cm). The damper regulates the temperature by its movement.
- The heating function is performed by light bulbs. You can install a thermostat and thermometer inside the box to record the temperature. If electricity is needed, you need to connect the outlet to the balcony.
The thermal cellar is ready. The main disadvantage of such a homemade box is exposure to moisture, and, as a result, the formation of mold and mildew. There is a risk of fire if the rules for installing heating elements are violated.
The thickness of the layer determines the reliability of protection of vegetables. This model without electricity for a balcony is suitable for regions with mild winters and well-insulated balconies.
If you don’t have enough time to make a balcony box yourself, you can buy a factory-made version.
There is a special prospect for ground floor apartments. Their residents don’t have to think about how to make a cellar on the balcony. They have a chance to build underground storage for canned food and vegetables. But the labor costs here are considerable.
Builders will have to:
- undergo approval and obtain an expert opinion that the construction of the cellar is safe for the building;
- cut a round or square hole in the balcony slab for the hatch, remove part of the concrete slab underneath, and remove a lot of soil;
- place a sand cushion under the screed, and then perform the screed itself;
- build side walls of brick, lay insulation, waterproofing material and install a ventilation pipe going outside;
- make the box itself, a staircase leading to the cellar and equip a hatch (sliding or folding), as well as lighting. Installing shelves is a matter of course.
The financial costs will also be significant, but a large family is interested in such a balcony subfloor, and the costs will pay off in a few years.
Final work from the outside
When the work on constructing the cellar comes to an end, it is necessary to compact the earth around the walls of the cellar, and also lay a cement layer so that the surface around the house looks attractive. After digging a pit, you will probably have a lot of earth left near the balcony. It can be taken out or distributed evenly across the site.
As a rule, the service life of such a cellar is quite long. It can last exactly as long as the entire building. But you need to take care of it: dry it periodically, monitor the integrity of the walls, etc. If there is high humidity and dampness in the cellar, then most likely there are problems with moisture penetration, so you will have to additionally install a waterproofing layer. Also, do not forget about the ventilation system, without which the functioning of vegetable storage facilities is impossible.
Website editor-in-chief, civil engineer. He graduated from SibSTRIN in 1994, since then he worked for more than 14 years in construction companies, after which he started his own business. Owner of a company engaged in suburban construction.
Source
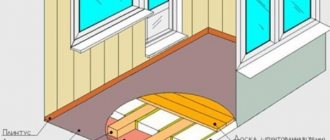
How to make a floor on a balcony with a cellar
The floor on a balcony with a cellar does not require special installation. Since the slab is first broken to form a hatch, the top layer of the loggia field is opened. Next, there is a need for secondary improvement of the room to give it an aesthetic appearance.
Craftsmen recommend additional insulation of the loggia floor to ensure a comfortable temperature in the room below. But this is not necessary, since the glazed loggia maintains the temperature in the space.
It is better to decorate the floor with laminate or chipboard sheets. To do this, first lay out the “sheathing” in the form of wooden beams, which are nailed to the concrete slab across and at a distance of 15-20 cm from each other. Afterwards, the “facing” material is laid out on the floor.
These can be sheets of chipboard, on which new linoleum is subsequently laid. You can use the laminate left over from the renovation of the room. Some owners opt for chipboard sheets, which are then simply painted in the desired color.
An important criterion in installation is the manufacture of the hatch. It will be represented by a double-layer structure - you will get a massive door, the depth of which will coincide with the thickness of the slab and the floor made on the balcony. It will be difficult to lift it.
But the problem can be avoided if you make the door in accordance with the materials used to improve the floor on the loggia.
The lack of depth is compensated for with a piece of foam plastic - it is attached to the inside of the door. It turns out that there will be foam plastic on the basement side. This design provides additional thermal insulation to the door.
Today you won’t surprise anyone with a cellar under the balcony. It can also be found in modern houses in the new microdistrict. An important condition is to carry out work after obtaining permission and in accordance with the instructions presented above.
Did you like the article? Tell your friends:
Making storage boxes
Usually vegetables that require certain conditions are stored for storage. The required temperature is not lower than zero and not higher than five degrees Celsius and air humidity of about eighty-five percent.
Rice. 2 Vegetable box on the balcony
There are three main options for storage boxes.
- A container that is placed on an insulated heated balcony.
- A cellar with the characteristics of a thermos without heating. It is placed on balconies, where the temperature is maintained above zero all year round.
- Container with thermal insulation and heating. Can be used on cold loggias and balconies.
Container for heated balcony
If the loggia maintains above-zero temperatures all the time, then any container is suitable for storing vegetables. Of course, it should be comfortable and provide protection from light. Otherwise, all the vegetables will begin to sprout and the potatoes will turn green.
The most convenient option is a chest for storing vegetables on the balcony. It is made from wooden beams, plywood or chipboard.
Rice. 3 Arranging a mini cellar on the balcony
A design drawing is first made. Then the frame of the box is arranged. Chipboard or plywood are attached to the frame, which become the walls. The top of the box is closed with a lid. For convenience, it is secured on hinges.
The inside of the chest is divided by partitions. The location below, on the floor, allows you to maintain a fairly cool temperature inside, optimal for storing vegetables.
Thermally insulated container
A cellar in the form of an ordinary box is not always optimal for use on a balcony. However, it is highly dependent on the ambient temperature, which negatively affects the storage process. A thermally insulated cellar will help reduce the impact of temperature changes.
Rice. 4 Exterior view of a thermally insulated cellar for storing vegetables on the balcony
Making a thermal box for storing vegetables is not difficult. It will require the same materials as the previous one, but will additionally need insulation. Foam plastic is best suited for insulation. After assembling the box, foam is attached to all surfaces. It is necessary to ensure that there are no cracks. It is better to glue the joints with special tape. A layer of insulation is also glued to the lid. The result is a structure that will withstand short-term night frosts and prevent vegetables from overheating in the spring, when the sun begins to get hot.
Heated cellar
If the balcony is cold, then in winter the temperature on it will remain below zero. In a regular box or in an insulated version, vegetables will freeze. To create optimal storage conditions, heated cellar boxes are used.
Rice. 5 Thermal cabinet balcony cellar year-round
Now you can buy a thermal container for a household balcony cellar. There are many models. They are vertical and horizontal, of different volumes. When choosing a thermal cabinet, balcony cellar 3 gets a two-hundred-liter model, and there are 300-liter balcony cellars. But it’s also easy to make a heated storage for vegetables with your own hands.
The basis is a thermal cabinet for storing vegetables. Thermal insulation will help maintain a constant temperature. To keep it warm inside, heating devices are installed. The simplest heating option is incandescent lamps.
Rice. 6 Thermal container balcony cellar
The lamps are placed inside the pipe. This will protect the vegetables from light. The pipe is placed on supports so that there is a gap at the bottom through which warm air will escape.
In addition, the equipment of the electric thermal container must include a thermometer and thermostat. A thermometer is needed to monitor temperature. A thermostat is a device with a relay that turns on heating when the temperature drops to a certain value. If you purchase a compact heater with a thermostat, you will not need light bulbs.
Rice. 7 Homemade box for storing vegetables on the balcony: device and diagram
When creating a heated thermal box, you will need to assemble a structure consisting of external and internal parts. The outer part is insulated, and the inner part is for storing vegetables with holes. There must be a ventilation space between them.
Uninvited guests and protection from them
Product odors in the basement can attract uninvited guests such as mice, rats and insects. The appearance of such living creatures can cause significant damage to the farm's reserves.
The first thing you need to do to protect yourself from pests is to carefully check the integrity of the inner surface of the basement. The holes and cracks that appear are sealed with cement mortar and crushed glass. Rodents don't like this very much.
Then the ventilation hole must be covered with a fine mesh. Mousetraps are placed on the floor of the cellar and poison is laid out for rodents. All this will help keep food supplies safe and sound.
Space under the first floor loggia
dygilev
New member
Good afternoon. I searched for a long time, but could not find the answer to a simple question: Who owns the space under the first floor loggia?
The situation is this: - There is an apartment five-story panel building.
— Under the loggias of the first floors there are spaces/niches
that are surrounded on three sides by walls/panels of the house, and on one side they face the street.
— The house is managed by an HOA.
Many people have these same spaces
under the loggias of the first floors they are sealed tightly with bricks (most likely there are cellars there), a couple of these
spaces/niches
have not yet been sealed.
The questions are: 1) Who owns these very spaces under the loggias of the first floors? 2) Is it possible to arrange similar cellars under loggias? 3) Who can occupy these spaces - only the residents under whose loggias these spaces are located or any other resident of this house? 4) How can this space be occupied? 5) Can a resident of this house, when moving to another apartment (purchase/sale), who previously used this space/niche
(covered with metal sheets from the street, with a door) sell this
space/niche
? 6) What should the residents of the first floor apartment under the loggia which has this type of “mini garage/shed” do (this space was occupied by a tenant from the 2nd floor) if there is constant noise (when opening/closing this mini garage) and all sorts of things are stored there “ junk"?
I ask you to answer these questions and, if possible, indicate the codes/laws/articles on the basis of which you will give your answer.
Yuri Nikolaevich
Lawyer
1) Who owns these very spaces under the loggias of the first floors? - To an indefinite (both in quantity and quality) group of people and the state, with a ratio absolutely unknown to anyone.
(Many people think that there is certainty... and they declare about some group of “house owners”, but no one ever knows anything about this group..)
2) Is it possible to arrange similar cellars under the loggias?
- No.
(and under no circumstances.). 3) Who can occupy these spaces - only the residents under whose loggias these spaces are located or any other resident of this house?
- any plot is COMMON property: therefore no one, separate and specific, can.
4) How can this space be occupied?
- The first condition should be to obtain permission from ALL OWNERS - but due to the uncertainty of this concept - the condition is impossible to fulfill,
5) Can the tenant of this house, when moving to another apartment (purchase / sale), who previously used this space / niche (sealed with metal sheets with streets, with a door) sell this space/niche to the buyer (new tenant)?
— Just like the hole from the steering wheel..
6) What should the residents of the first floor apartment under the loggia which has this type of “mini garage/shed” do (this space was occupied by a tenant from the 2nd floor) if there is constant noise (when opening/closing this mini garage) and all kinds of “junk” are stored there?
— Throw the junk in the nearest trash heap (or a neighboring one)
Most of the answers are contained in the Civil and Housing Codes. But these issues (the special regime for common property in apartment buildings) are revealed crookedly and obliquely. Therefore, disputes have been going on for many years, but things are still there.
There is a burden of maintenance, but no "right of ownership"
"on common property (only fiction).
Source
Summary
1. I am the owner of an apartment on the 1st floor in an apartment building.
The management company is holding a vote on the construction of a canopy over the entrance to the basement, i.e. right under my windows and balcony. If I vote “no,” will that be a sufficient obstacle to building the canopy, or do I need to do something else? 1.1. In this case, you have the right to challenge the decision of the general meeting. To invalidate a decision of a general meeting, it is necessary that such a decision was made in violation of the requirements of the Housing Code of the Russian Federation, that the owner did not take part in the relevant meeting or voted against the decision, and that the decision violated his rights and legitimate interests.
2. I live in the city of Ozery, I live in a 5-story building on the 1st floor. There is a constant smell from the basement in my apartment, and in the entrance too. There are vents under my balcony, they are opened so that the basement can be ventilated. The balcony cannot be opened, the smell comes into the apartment. I call repeatedly. They will come, dump the blockage on the ground and that’s it. who is responsible for this anyway? I pay my rent on time, but I have to breathe through the sewer, thanks.
2.1. Write a complaint to the Criminal Code outlining your requirements, notifying the Criminal Code that if this issue is not resolved within 10 days, you reserve the right to file a complaint with the prosecutor's office, sanitary and epidemiological station, Rospotrebnadzor and the housing inspectorate, with subsequent appeal to the court.
3. The apartment is on the 1st floor, there is no balcony, under the windows there is an entrance to the basement of the house, is it possible to add a balcony.
3.1. Only with PERMISSION from the city administration and the provision of an Architectural Project.
Otherwise, your building will be forced to be dismantled at your expense.
4. Please, we have a 3-storey apartment building without balconies! There is a basement, but the basement does not apply to the residents; it does not apply to the developer who rents it out as a store! In the basement there are pipes for meters for the residents of the house! Is the basement legally appropriated by the developer?
4.1. Illegal. Submitted - the property of the owners of apartments in the house. (Article 36 of the Housing Code of the Russian Federation)
4.2. If according to the project there was a store or non-residential premises, then yes. If not, then get an extract on the rights to the basements and challenge the ownership.
5. I bought an apartment on the first floor. The neighbors on the third floor made themselves a basement under my balcony. It is legal? What rights do I have, given that I live on the first floor? Can I plant flowers on a plot of land near the balcony (the apartment does not face the courtyard)?
5.1. If you have a fenced-off area under your balcony for a front garden, plant flowers. If neighbors do not have documentary evidence to use the basement, then they are doing it illegally. The basement is the common property of all owners and residents of the house. To use any part of it personally, the consent of all co-owners and the management company is required.
6. I have a high 1st floor. There is a balcony. Can I make myself something like a basement or cellar by creating space under the balcony?
6.1. Yes you can. To do this you will need permission
6.2. You can if you get permission from the architecture department of your settlement administration.
7. Is it possible to redo the roof of the entrance to the basement under the windows of an apartment in Khrushchev? Or make a canopy, or build a balcony on the roof?
7.1. These issues are resolved on MKD OS
7.2. not allowed without the consent of the homeowners in your home
Legal aspect
Unfortunately, building codes and laws do not regulate such construction. If you wish, you can prove that this is allowed by referring to some documents, and you can also easily prohibit it, because other regulations do not allow this. Therefore, the best option would be to coordinate this issue with the board of the house or with the head of the housing and communal services department. If your construction does not interfere with the laid communications, does not protrude beyond the walls of the house (this happens when half of the basement is underground, and the rest is in a built-up niche under the balcony), then you should not be refused.
So, the storage room that, say, my neighbor made is illegal?
- Absolutely. Unfortunately, residents often do not know this. If such a storage room bothers you, and your neighbor doesn’t want to remove it, then just call the housing authority. They will come and issue an order. Your neighbor still hasn't cleaned out the pantry? Then the bailiffs come and dismantle it. We have had such cases (the company where Koshkin works is engaged in construction and renovation, including major renovations of multi-storey buildings - approx. F)
. We were doing major renovations in the house, it was necessary to replace the windows in the entrance, and part of the window was located in this illegal storage room, which they also did not want to let us into. We turned to the supervisory authorities for help, and then it happened exactly as I described above. There are those who peacefully make contact, they provide us with access, and we carry out the necessary work. And then people continue to store their things in closets.