When starting to renovate a balcony or loggia, many plan to arrange this room in such a way that it can store things that are used quite rarely (like gardening tools or sports equipment). And the easiest way to arrange this is to make a cabinet out of clapboard on the balcony with your own hands.
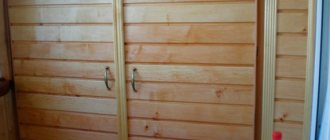
Wardrobe lined with clapboard
Where to begin
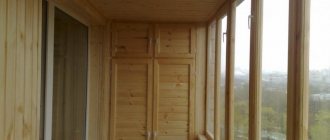
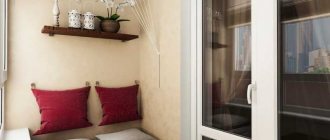
Wardrobe with shelves in the balcony niche.
Often, balconies have niches for installing cabinets (example in the photo), but before you begin installing a modernized pantry, you should know:
- Glazing the balcony will preserve the attractiveness of the wooden finish for a long time, protect it from dampness and direct moisture;
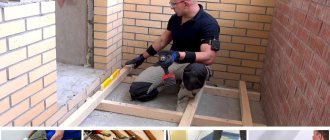
- Installation should begin with repairing the floor, if not the entire balcony, then certainly the part where the bottom of the cabinet will be located;
- Elimination of all cracks and cracks, as well as additional insulation of walls and floors will protect against drafts and sudden changes in temperature conditions.
Such simple introductory instructions help preserve the wood paneling so that it will delight you with its natural beauty for many years.
Useful tips
In order for the wardrobe on the balcony to be of good quality, and for the lining doors to perform their functions properly and look decent, take into account a number of requirements:
- Products made from lining must be placed only on a closed, glazed balcony, because precipitation negatively affects wood materials.
- Before installing the cabinet in the balcony niche, you need to repair the flooring of the balcony. Pay special attention to the area where the lower base of the structure will be located. A level base will ensure firm installation, the doors will not “play” when closing/opening.
- To avoid exposure to temperature changes, carefully fill all the cracks on the balcony and provide high-quality insulation.
Cabinet installation
What you will need
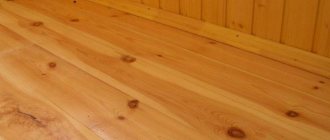
Pine timber
In order to install a cabinet on a balcony made of lining, you will need the following materials:
- pine beams 40x40 mm are suitable for making the frame of the future “storage”. Please ensure that the wood is dry and free of rot;
- beams of smaller thickness will be needed to create a door frame (can be replaced with non-wide boards);
- metal corner - for connecting wooden elements;
- For shelves, both boards and chipboard sheets of appropriate thickness are suitable;
- cabinet handles, hinges, latches, locks must be made of corrosion-resistant metal (so as not to spoil the appearance of the product);
- to connect lining strips together, it is better to use clamps, but wood screws and traditional nails are also suitable;
- and of course, the lining itself (for cabinets and doors, you can take strips of different widths, textures and colors).
Important! The lining cabinet on the balcony, built into a finished niche, consists of two concrete walls, and long anchors will be required to attach the frame to them.
Before work, stock up on the necessary tools and furniture fittings.
For ease of work, I use the following tools:
- mounting level, tape measure, pencil;
- hammer, hacksaw, screwdriver;
- hammer drill
Calculation and selection of lining
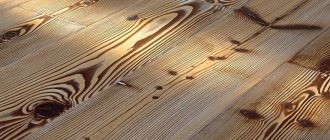
When choosing a material, it is recommended to focus on lining made from deciduous trees (when heated by the sun, coniferous trees “flow” resin, which can slightly spoil the appearance of the product as a whole).
But everyone has their own preferences here, as well as financial capabilities. It should be noted that the price of the lining depends on its class and quality.
Division by class of linden lining
Important! Class C for lining is the lowest and is not suitable for insulating a balcony, or for making a cabinet or any other furniture.
To avoid unnecessary waste of both money and time (on additional trips to the hardware store), we offer an example of calculating all materials.
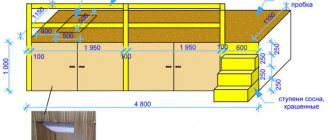
Let's say your closet has the following dimensions:
- Bottom frame: 2x0.5 + 2x1.5 = 4 m/linear;
- Upper frame: 2x0.5 + 2x1.5 = 4 m/linear;
- Vertical posts: 4x1.8 = 7.2 m/linear.
Optimally, you will need 8 pieces of two-meter pine beams: 4 for the vertical posts, and 2 each for the upper and lower frames.
Based on the size of the selected lining, as well as the design of the cabinet, the required number of panels is purchased (calculate in advance the area of all surfaces covered with lining).
Important! Fix a sheet of laminated fiberboard as the back wall of the cabinet. The water resistance and density of this material will serve as additional protection against moisture, guaranteeing the durability of the structure.
Varnishing rules
Buy only high-quality varnish; low-quality varnish raises lint as it dries. You will have to grind it, but doing this on lining is long and difficult, it has an uneven surface. Every groove and protrusion must be carefully sanded. Some profile turns have a small radius, which requires the manufacture of special grinding devices. Before applying varnish, surfaces should be thoroughly cleaned of dust and, if necessary, dried. You can varnish on both sides or only on the front.
Apply a protective compound
Apply varnish or protective impregnation to the wood of the frame
Work with a brush, making sure that no drips appear on vertical surfaces. If traces remain from the brush, the varnish should be diluted a little. You need to cover it at least twice. If there is no practical experience in applying varnish compositions to wooden surfaces, then it would not be superfluous to apply three layers. Each subsequent one is applied only after the previous one has completely dried. If desired, the lining can be impregnated with stain before varnishing.
Can be applied with a brush or soft roller
It is recommended to place the doors on a horizontal surface before varnishing; this will greatly simplify the work and make it possible to cover with a thicker layer of varnish. Just don’t get too carried away, the varnish can accumulate in the recesses of the lining. If the balcony is cold, then you should purchase varnish for external work; it can withstand sub-zero temperatures and does not react to condensation.
Beginning of work
Before you start building a cabinet on the balcony from clapboard, watch this training video, and then proceed to attach the frame to the walls of the balcony.
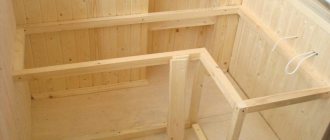
The first step is to assemble the back and front frames of the cabinet, connecting the corresponding beams with metal corners. We recommend making the flooring (bottom of the cabinet) from OSB sheet, chipboard or moisture-resistant plywood.
Beginning of work
Attention! The photo shows that a metal corner is not used to connect the timber. The connection is made with wood screws 60-75 mm long.
- As mentioned above, for the back wall it is better to use a sheet of laminated chipboard, which is pre-attached with a construction stapler or self-tapping screws to the rear frame;
- We fix the entire structure with anchors on the end wall of the balcony, in accordance with the markings made earlier (for this we use a mounting level);
- 0.5 mm beams are attached to the frame and fixed with anchors;
- We first attach the front frame to the ends of the beams, then (to give rigidity) we attach it to the floor, ceiling and walls with anchors;
- The guides inside the cabinet also serve as a base for the shelves.
This is the kind of cabinet you should get for your balcony using clapboard.
The inside of the cabinet is ready. Now let's move on to finishing the entire structure with clapboard.
DIY clapboard cabinet on the balcony - detailed instructions
This page is based on the video below. This is for your convenience. If you don't want to read the text, watch the video. Note that everything did not fit in the video - the text describes the process in more detail.
We have at our disposal a balcony covered with clapboard. You need to put a cabinet at the end.
First of all, inspect the corners. Our angles are close to 90° - this is good. If you have one of the corners of a curve, then mark the façade part based on the flat side. If both corners are crooked, then mark them so that everything appears even to the eye.
Take a tape measure and mark the depth of the cabinet along one of the walls. Then, look for the corresponding size on another wall. We take a laser level, first place it on one mark, then turn around and place it on another mark. At this time we put down the touches.
Thus, we mark the front of the cabinet using a laser level.
We sew the strip along the resulting points. You can read about what kind of rail we use here.
In our case, we need to make a wall on the left side of the cabinet. Therefore, the frame has a complex shape.
Strictly using the laser level, we raise the additional wall, starting from the mark on the floor.
If the rail is loose at the joint, it should be secured with an additional screw. It must be rotated at 45°, and the cap must be recessed.
It is important to correctly position the frame. A smooth frame will save you from many problems.
The frame of the front part and the additional wall should look like this.
Then we cut the lining and sew up the side wall. At this moment, it is important that the ends of the lining do not protrude beyond the plane of the cabinet.
Then you should mark the shelves. When marking, it is convenient to use a laser level. Of course, you can use the regular one, it's just a matter of speed.
Several slats have already been put on, the top shelf and vertical edge are emerging.
To make the process easier, we use a universal miter saw. But you can do it with a regular jigsaw. The cut from the saw is better and smoother.
To ensure there are fewer holes inside the cabinet, the lining should be cut as tightly as possible.
We have made the frame, prepared the dies and are starting to raise the vertical rib.
In this case, the pattern takes the most time. Cutting and screwing the lining takes much less time.
After the rib is ready, we begin to assemble the top shelf.
The shelf has the shape of a trapezoid. In order to speed up, we cut the lining a little longer than the required length. Then, with a pencil, mark the required size in place. At this time, the lining is not yet screwed on.
Then, remove the lining and cut each strip at the mark. Put it back in its place.
This allows you to quickly and, most importantly, accurately trim the sticks.
We figured out the edge and the top shelf. We need to make a frame for the remaining shelves. The frame can be made in different ways. But I advise you to choose the simplest, yet reliable one.
Each rail should be set as level as possible. This saves a lot of time. Although many people think differently :)
The remaining shelves are made in the same way. In the video, we skip this moment.
The next step is to make the insert. Inserts come in different types and designs. Here we sew on a clapboard insert.
We put the laser level on the edge, mark each die separately and screw it on the back side. This is the picture we get.
Excess parts should be cut off. Let's do it locally.
The end parts of the lining should be covered. I advise you to do this either with corners or wooden planks.
On top, we also make an insert. The top insert is rarely needed. In our case, it is needed to lower the doors. There will be a vine hanging on the ceiling. The doors should open under the hanger.
Here we placed a laser level on the edge of the right façade batten. Looking at the level, we see that the wall of the balcony has collapsed greatly. This is scary, but not for our design.
We will make overlay doors, and all the irregularities will be covered.
Using a butt cutter we cut a series of short dies. They all have the same length. May differ by no more than 0.5 mm.
How to calculate door sizes is a separate topic. If you're interested, I'll make a video about it.
The lining is cut, it's time to assemble the doors. This should be done on a flat, wide surface.
We connect the dies and lay them face down. We align the edge of the dies with a surface, for example, a building level.
Then, on top of the lining we lay pre-cut slats to size. We press and screw along the edges of the slats to the lining.
Then, we screw each lining separately. For this purpose, special screws are needed. Which ones you can see on our website.
We repeat this operation on the other side of the door.
If everything is done correctly, the screws will not stick out from the front side.
The next step will be cutting and installing the end rails. They perform a decorative role.
As a rule, part of the lining sticks out beyond the edge of the slats. It needs to be cut in place with a jigsaw.
Then, we will cut decorative corners. At the corners they should be 45°. This is the only task for those who do not have a miter saw. You can solve it with a jigsaw.
Working with lining
The appearance of the entire balcony largely depends on how to make a lining door onto a cabinet.
Therefore, we will consider the entire plating process step by step:
- To create doors, we assemble a frame of appropriate dimensions from boards or thin timber. Doors should be both light and strong, for which we recommend choosing thinner lining;
- To add rigidity, a diagonal jumper is installed in the door frame;
- Having placed the finished door frame on a flat horizontal surface using nails or clamps, we secure the lining. The nails are driven “into the secret place”;
- We complete the finished door leaf with trim (optional), handles, locks and hinges.
Decorative trims in door decoration
We place the finished door (or doors) on hinges previously fixed in the frame. After the do-it-yourself balcony cabinet made from clapboard is finally assembled, clean the entire room. Vacuum all wooden surfaces and perform the final operation - coat the product with a protective varnish.
When purchasing varnish, pay attention to the manufacturer's instructions:
- for which premises the use of this product is permitted;
- the varnish can be either colorless or contain coloring pigments;
- Observe the recommended temperature conditions when working.
All technical parameters are indicated on the label
Do-it-yourself sliding wardrobe doors made from clapboard. Do it, do it. Manufacturing, assembly.
Beautiful do-it-yourself sliding wardrobe doors made from clapboard. Look great in a room decorated in a rustic style. (10+)
Do-it-yourself wardrobe doors from lining
In a room decorated with clapboard, I have a wardrobe. The question arose about how to make the sliding doors of this closet so that they were light, comfortable and harmonized with the decoration of the room. The option with standard chipboard doors was out of the question right away, because it didn’t fit into the design of the room at all (like a village hut).
In the end, I decided to make the cabinet doors with my own hands from clapboard , fortunately I had some good dry clapboard on hand. The result eclipsed all my expectations (see photo).
Materials
- Chipboard
is famous for its cheapness and practicality. Chipboard shelves are made very simply; the material, easy to process, allows you to create from the simplest designs to interesting collages with storage space. It’s easy to create a real wardrobe on the loggia thanks to the shelves: you can buy a ready-made structure or make it yourself. Chipboard is often used to create furniture for storage and especially in loggia settings. It is important that the material has a special coating against moisture and swelling, provided that the humidity on the balcony is high or there is a sudden change in temperature.
Wall-mounted pieces of furniture on a balcony made of chipboard are suitable for arranging any balcony in any style. If you do not pay tribute to the interior design of this space, then install simple structures in light wood color, and it will become not only a practical piece of furniture, but also a modern and sleek feature of your loggia.
- Metal is also used to create hanging shelves on the balcony. The main thing is to choose a strong and lightweight base for creating shelves on the loggia or purchase a ready-made structure. For open balconies, choose stainless steel or aluminum; These materials are difficult to weather and do not deform from moisture, unlike wood or chipboard. However, metal products can change shape due to too heavy items that are stored on the shelves; this determines the selection of a certain thickness of the structure and the material used to create it.
- Wood is used to make furniture, and balcony shelves are no exception. Natural wood is capricious, so you should not install any furniture made from it on open loggias or those that are not insulated.
- Glass as a basis for hanging shelves is used no less frequently than the materials listed above. Glass shelves serve more as a decorative element than as a functional storage system.
- Plastic is an inexpensive and practical material that is superior in quality to chipboard. The plastic shelves included in the rack perfectly withstand dampness, moisture, and temperature changes, so they are useful for arranging an open loggia. However, plastic cannot withstand too heavy a load and does not always look stylish.
Required Tools
To organize a closet with your own hands, you need a minimum list of tools and knowledge in carpentry. For the construction event you will need:
- perforator;
- anchor type bolts;
- hammer;
- roulette;
- screwdriver;
- level;
- marker for notes;
- metal corners for connection.
Don't forget about the accessories, which are purchased separately. These are handles, fasteners (wood screws), hinges, latches.
Peculiarities
Owners of small homes try to make the most efficient use of every centimeter of space, including the balcony. It is very convenient to place a sofa, a table and a spacious corner cabinet on it. You can put kitchen utensils, small appliances (vacuum cleaner, iron), household chemicals, and tools in it.
If the loggia is large, then it can easily be turned into a full-fledged library or office with a cabinet for books and documents. The functional product will complement the design of the balcony, which will turn into a room that is an extension of the apartment. The furniture is compact, because it only occupies a corner and does not look bulky. The corner configuration looks interesting and creative.
Corner
It’s easy to create a corner shelving unit in a loggia; you can use wood or metal depending on your preferences and climatic conditions in the space. The corner design is incredibly functional and is especially useful on a closed balcony and even an open loggia, if you approach the issue wisely. With an open loggia, leave open those sections of the rack that are not exposed to direct sunlight and where the wind is unlikely to blow; the same recommendation will be useful when making a structure in a closed area.
Corner structures on the balcony do not necessarily form a rack; it is enough to place the finished elements on top of each other and secure them with an original carved or strictly designed bracket.
Plans, drawings
The design of a built-in wardrobe should be carried out taking into account the type of balcony on which it is planned to be installed. For example, on a loggia with a small niche on one side, you can either install a full-size wardrobe, or divide this niche into separate sections and fill only one of them from top to bottom, and in the other place a cabinet at the level of the window sill.
Common types of structures
If the width of the room allows, the interior space can be divided into 2-3 sections.
If natural wood is used for manufacturing, then such furniture can be installed even in non-insulated rooms, for example, in a country house. It will not be damaged by changes in temperature and humidity, but minimal protection from external precipitation will not be superfluous and will significantly extend its service life. For the interior decoration of doors, it is better to use moisture-resistant sheet material (OSB is optimal). It costs significantly less than wooden eurolining and also gives the opening elements additional rigidity, preventing the door frame from sagging over time. To simplify manufacturing and save some material, instead of four doors, you can make only two at full height.
Installation of hinges and fittings
Remember that hinged hinges can be left or right; choose the appropriate pair for each door. In order for the doors to close tightly, the metal plates of the hinges need to be recessed. You will have to make markings first.
Practical advice. It is much easier to first install the hinges on the doors, and then make markings on the vertical posts.
Along the marked lines, slightly cut through the wood with a chisel, using a chisel, carefully remove the wood over the entire area. The chisel must be held in such a position that the part sharpened at an angle is directed towards the wood being removed. If this is not done, then the edges of the recess will be wrinkled, and this is a cosmetic defect indicating a low qualification of the craftsman. The depth of the notch should correspond to the thickness of the loop. Constantly check the depth, do not go too deep, otherwise opening/closing the doors will be difficult.
Installing and adjusting hinges on cabinet doors
Loop installation diagram
Installation design
Fastening loop diagram
The handles are attached according to the instructions supplied by the manufacturer. If you wish, you can install a lock; it should only be a surface lock; a mortise lock cannot be installed due to the thickness of the lining. The fittings are fixed on the already installed doors. Today there are many different decorative elements made of plastic and wood on sale. You can use them to give a corner cabinet a completely exclusive appearance.
Furniture fittings
Making wooden handles for cabinets
Result of work
Video - Corner cabinet. Tips for beginners
Similar articles
- Do-it-yourself toilet for a summer house: step-by-step instructions
The first building that appears on any site is a toilet. We can somehow manage without a house and a shower, but we can’t do without this building. For many… - Imitating a brick wall with your own hands - step-by-step instructions!
Brickwork brings a unique charm and that “zest” to the interior. And if the external cladding of the building can still be done using... - Growing geraniums from seeds at home - detailed instructions!
Pelargonium, or simply geranium, is one of the most popular among lovers of home and garden plants. And this is not at all surprising, because growing it is...