High-quality window units installed in the external walls of residential and public buildings greatly affect the comfort during the operation of residential and public premises.
To achieve the required degree of energy efficiency, as well as to create a reliable barrier from atmospheric moisture, it is necessary to correctly fill the installation joint.
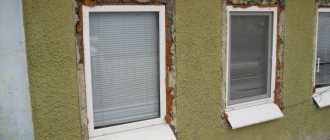
Any thermal insulation material has low mechanical strength, and, in many cases, it must be covered with protective structures.
Installing slopes outside the window opening allows you to achieve an attractive appearance of the building facade, as well as ensure complete impermeability of the installation gap after installing the translucent element.
What it is?
The outer slope on the windows is part of the frame of the translucent structure on the side of the building facade , which is designed in the form of a quarter, facing stone, or is a galvanized metal sheet with stiffening ribs, installed on mechanical fasteners, wooden, composite or plastic strips.
Slopes installed on the outside of the building must also fully comply with the architectural and color scheme of the facade, have increased weather resistance, and not be destroyed by temperature changes, rain, snow or intense ultraviolet radiation.
What are they needed for?
External slopes on windows play an important architectural, structural and functional role and are intended for the following purposes :
Improving the view characteristics of the facade.- Adding expressiveness to the window opening.
- If there are protruding framing elements, this will prevent the end of the opening from getting wet.
- Additional insulation of the installation gap, which prevents cold from penetrating into the room.
- Additional waterproofing of the installation gap.
- Increasing the service life of the installation joint filling material, protecting it from precipitation and ultraviolet radiation.
- Increasing the mechanical strength of the end of the opening, which eliminates local peeling of the cladding elements.
Note. As a rule, external slopes are arranged in such a way that voids are formed between the element of the decorative coating and the structure of the external wall, which are subsequently filled with heat-insulating and sealing compounds.
Design of plastic and wooden windows outside the house, schematic diagrams.
The first type is the design of a window with a molded uniform frame. We cover the entire perimeter of the window with plinth. Although it is worth noting that the term “plinth” does not refer to names that describe window trim, but since nowadays in everyday life it has become synonymous with the word “profile” and the expression “architectural bummer” and the article was not written for students of an architectural institute, we will make this assumption .
The window is decorated according to the same principle as a painting, with a baguette, a molded profile, and a plinth that is the same around the entire perimeter.
The impression varies greatly depending on the width and pattern of the profile.
Even the same profile looks different when the size changes. Any profile will change beyond recognition if the proportional ratio of the length and width of its section is not maintained. This must be remembered when ordering modified profiles.
Be sure to ask for samples!
What can external window elements be made of?
In practice, construction and installation organizations, as well as designers, use various design solutions and materials to design slopes on the outside of the building envelope.
Brickwork
It is installed as part of the outer wall cladding, performed with the organization of a quarter, before installing the window block. When sealing, vapor barrier self-adhesive tape PSUL is used, as well as silicone sealant. The masonry around the opening can be made from the same or different facing brick from the main plane, in accordance with design solutions.
Scope of application:
- private residential buildings;
- multi-apartment buildings with a monolithic frame;
- premium buildings built of brick.
Advantages:
- high strength and reliability;
- density of connection of the window block to building structures.
Flaws:
- Cold bridges may form if the gap is not filled correctly;
- there is no place for foam insulation;
- high cost of the material and the complexity of its installation.
Galvanized curved sheet with powder coating
The finished product is ordered at the factory, in accordance with preliminary measurements of window openings. The sheet is equipped with stiffening ribs and is also coated with polymer paint under production conditions.
Note. It is attached to a steel subsystem made of light profiles, according to the KMD project.
Scope of application:
- office centers;
- shopping complexes;
- any buildings with a suspended ventilated facade.
Advantages:
- low dead weight;
- do not require adhesive fastenings;
- are perfectly filled with polyurethane foam, providing increased thermal performance.
Flaws:
- are easily subjected to shock and deformation;
- scratched when cutting;
- The galvanized layer may peel off locally, which leads to the development of corrosion.
Wooden planks and boards
As a rule, hard wood species are used to frame slopes - oak, larch, teak, beech or cedar.
Note. The planks are cut out according to the markings, after which they are attached to the end of the opening and along the perimeter of its facade using pre-arranged wooden plugs, or using liquid nails and polyurethane foam.
Scope of application:
- wooden houses made of wood, rounded logs, logs;
- built using frame-panel technology.
Advantages:
- natural, environmentally friendly material;
- looks great on the facade;
- easy to process and install.
Flaws:
- in the absence of a protective paint coating, it rots quickly;
- is destroyed under the influence of moisture and ultraviolet radiation.
Composite products
They are manufactured in special factories, are distinguished by the highest strength index, are fixed to powerful subsystems, the transverse profile of the elements is determined by the working design and visualization of the facades. They can be flat, L-shaped or have a complex cross-section.
Scope of application:
- buildings built in the Empire style with stucco;
- historical buildings in the central parts of large cities are combined with hinged ventilated facades made of composite materials.
Advantages:
- high strength;
- does not break when deformed;
- does not require finishing work;
- can be colored in bulk;
- manufactured in any shape, according to the placed order.
Flaws:
- long production period;
- high dead weight;
- increased cost, which entails an increase in price;
- requires a reliable subsystem, which also affects the cost of products and their installation.
Plastic textured
The simplest and most affordable solution - lightweight polymer strips are fixed with adhesive mixtures or with polyurethane foam, suitable for joint use in economy-class apartment buildings, combined with PVC windows, and can have a textured lamination to resemble wood or other materials.
Scope of application:
- inexpensive country houses;
- goes well with PVC siding, plastic lining;
- framing slopes in construction sheds and technical structures;
- free-standing warehouse complexes.
Advantages:
- the cheapest material in the category under consideration;
- low density;
- ease of installation;
- reliability;
- corrosion and weather resistance.
Flaws:
- breaks easily when pressed;
- may peel off during use;
- reduces the visual characteristics of the facade.
Plaster with facade paint
A complex capital solution, the material is characterized by increased moisture resistance and is not destroyed by temperature changes.
Note. Polystyrene beads can be incorporated into the plaster structure to achieve the desired degree of energy efficiency.
As a rule, after polymerization, it is subject to painting with façade pigment compositions.
Scope of application:
- stone houses with wet facades;
- multi-storey buildings faced with brick or blocks;
- individual cottages built according to our own designs.
The advantage is the ability to specify any decorative surface, rustication or special stucco molding.
Flaws:
- require the involvement of professionals for application;
- high installation cost.
Sandwich panels
Lightweight but reliable products, have a flat front surface, designed for a modern home. Between the steel or plastic slats there is an effective insulation material, most often extruded polystyrene. Attached to mounting foam or liquid nails.
Scope of application:
- economy class office and shopping centers;
- public buildings;
- individual auxiliary buildings.
Advantages:
- the highest energy efficiency;
- weather resistance;
- there is no need for finishing.
Flaws:
- when attached to liquid nails, it may delaminate over time;
- increased hygroscopicity;
- Over the years, the front plane begins to fade.
Before choosing a material for a slope in an apartment building, it is necessary to develop a project in advance, and then obtain approval from the management company or local government.
Important. It should be remembered that incorrectly selected facade slope material can affect the architectural appearance of the building.
Advantages of artificial stone
Finishing stones can be natural or artificial. First:
- beautiful;
- durable;
- heavy in weight, which increases the load on the load-bearing elements of the building;
- require qualified finishers to realize their advantages.
The combination of these properties gives natural finishing stones a niche in the design of public buildings.
Artificial stone, which has the same positive properties, is devoid of the disadvantages inherent in natural materials. Being just as beautiful and quite durable, it is much lighter in specific weight and is not so demanding on the skill of the craftsman. Even a novice tiler can cope with finishing the slopes of the front door with artificial decorative stone.
Necessary materials
After the installation of slopes, some materials do not have a factory decorative coating, which leads to the need for their external finishing in accordance with the architectural solutions of the facades.
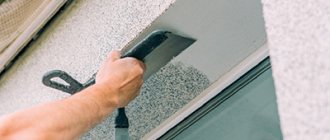
Decorative plaster composition
An excellent solution for buildings made of brick or other types of stone materials , it is applied around the perimeter of the opening, as well as in places where the façade part of the translucent structure is framed. It can have a thickness from 30 to 60 mm, can be easily dressed, rusticated, fluted, and can have a figured surface of “bark beetle”, “fur coat”, “shagreen” and other types.
Scope of application: all types of stone private and multi-apartment buildings, with rough framing of slopes made of building bricks, foam blocks or monolithic reinforced concrete.
Advantages:
- additional insulation;
- excellent visual characteristics;
- increased strength and reliability.
Flaws:
- high cost of materials for their installation;
- increased complexity of the work package.
Pigment substances
Weather-resistant pigment compositions designed to set the desired shade of the rough surface of the slope, as well as to protect it from aggressive environmental influences.
Note. Apply on a primed and prepared surface, in 2 - 3 passes, according to the instructions.
Scope of application: any building and structure for which cement-sand plaster was used as the primary finishing of the frame of the openings.
Advantages:
- ease of application;
- wide variety of shades and surface types.
Flaws:
- over time it begins to fade and peel off;
- requires periodic care and restoration.
Exterior strips
Designed to cover elements of rough finishing and insulation, they can have any shape, texture and shade of the front edge, are characterized by low dead weight, ease of installation - they are attached to adhesives or mechanical hardware.
Scope of application:
- office and shopping centers;
- auxiliary buildings;
- technical structures.
Advantages:
- low cost;
- attractive appearance;
- ease of installation.
Flaws:
- significantly reduce the cost of the façade;
- not suitable for stone materials;
- practically not used in residential buildings;
- are easily subject to deformation.
Important. When choosing finishing materials, it is recommended to pay attention only to weather-resistant compounds from trusted manufacturers, whose products have many positive reviews on independent forums on the Internet.
Decorative window decoration with textiles
A beautifully designed window opening can act as the accent of a room, on which the interior of the room will largely depend. Such designs should not be hidden behind massive curtains; it is enough to use tulle and organza. If this option is not suitable, you can hang roller curtains. They are attached to the frame, leaving all the details of the opening visible.
When choosing the right type of curtains, you should consider the following points:
- Room area. For small rooms it is better to use light blinds and roller blinds; for spacious rooms, massive models in darker shades are suitable.
- Location relative to cardinal directions. If the windows face north, then use pastel, beige, peach tones; to add coolness to the house - gray, blue.
- Illumination of the room. It is better to hang reflective textiles on windows located on the sunny side.
- Seasonality. In summer, you can use chintz, satin, in winter - velor, velvet.
- General design style. For example, for a country style, the color of the curtains should be combined with the color of the furniture and tablecloth; it is advisable to choose cotton or linen. In minimalism they use Roman and Japanese curtains that do not have bright colors.
Basic Rules
When installing external slopes on window blocks, it is necessary to take into account a number of nuances and follow certain installation rules :
- Considering that the building structure may have an uneven plane, it is necessary to take measurements of all three planes to be framed.
- Before making a hole for installing dowels, you need to make sure that the end of the opening has sufficient strength and load-bearing capacity.
- When installing slope elements in construction, it is necessary to think in advance about the type and technology of the finishing coating.
- All framing elements must be treated with soft elastic sealants after installation.
- If there is a possibility and a cavity forms between the decorative element and the end of the opening, it is necessary to fill it with polyurethane foam.
- For each type of frame element, it is necessary to choose its own type of fastening to achieve maximum strength and reliability.
If the recommendations listed above are violated, the window slopes may not meet the requirements for ensuring reliability for the elements of filling the installation seam, which will lead to its rapid failure.
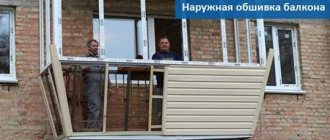
Instructions for finishing with metal sheets
The process of installing metal slopes is not complicated, but it requires care and precision. To properly insulate a room from the street, it is practiced to place thermal insulation under the sheets.
The work is performed in the following sequence.
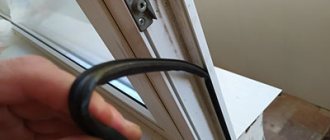
- The window opening is measured, and the sheets of metal are cut into strips. The strip for the lower part of the opening is cut with a small margin to form a water drain.
Measuring and adjusting the tide
This is what the edge of the low tide should look like
- The first part to be installed is the lower part - the ebb. It is screwed to the frame and has small overhangs on the side sections of the window opening. It is important that the ebb is diverted from the window.
- Side stripes are installed. They are pressed tightly against the surface of the opening and cover the curved parts of the ebb.
- At the final stage, the top strip is installed.
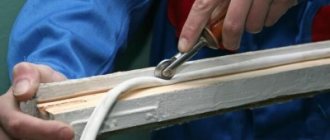
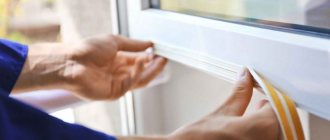
- To improve the insulating characteristics of the structure, sealant is applied to the joints of the strips.
Video instruction:
Consumables and components
To install external slopes, the master will need the following materials, consumables and components (in addition to the framing elements of the façade edge of the window opening):
Polyurethane foam for filling the space between the flashings and the end of the opening.- Adhesive compositions for fixing sandwich panels.
- Silicone or acrylic weatherproof sealants.
- Blind rivets with powder-coated head.
- Self-tapping screws with drilling tips.
- PSUL tape with self-adhesive back side.
- Plastic or wooden dowels for arranging seats for self-tapping screws.
- Decorative plaster and facade paint.
Important. All materials must meet their shelf life and meet the requirements for slopes to ensure durability, which will be no less than that of the translucent structure itself.
Tools
When installing external slopes, owners of residential properties also need to stock up on the following set of tools :
- For measuring the opening and marking:
- Laser rangefinder, or mechanical tape measure with a steel blade.
- Joiner's angle for controlling the orthogonality of the opening.
- Laser or bubble level to check the mounting plane.
- When installing slopes on a panoramic window, use a plumb line with a weight to ensure the verticality of the plane.
- Marker for marking before cutting.
- To prepare the opening plane for installation slope:
- Container for mixing plaster.
- Drill with mixer attachment for mixing ingredients.
- Galvanized steel profile for temporarily setting the perimeter of applying plaster.
- Spatula for basting the finished mixture.
- Rule or trowel board for smoothing the material.
- For cutting slopes:
- Hand saw with fine teeth and miter box.
- Grinder with abrasive disc.
- Circular saw with locking frame.
- Electric jigsaw for cutting wood frame elements.
- A construction knife with a retractable blade or utility scissors, if necessary, for trimming plastic slopes.
- For applying structural elements of plaster frames:
- Trowel, spatulas with different blade widths.
- Trowel with replaceable abrasives.
- Textural rule, if it is necessary to specify rustication during the application and finishing of plaster.
- For installation factory-made slopes:
- Draw gun with a set of rivets.
- Drill with a set of drills for making holes.
- A screwdriver with different bits for fixing screws.
- Phillips or slotted screwdriver for tightening hardware.
- A hammer with a rubber striker for adjusting the position of framing elements.
- Pliers for bending corners, if minor adjustments are necessary for galvanized parts or subsystems.
- For finishing slopes:
- A set of brushes, rollers, pallets and other tools for finishing painting of slopes.
- Sponge for applying penetrating primer.
- Grinding disk attachment for drill.
- Gun for polyurethane foam, as well as for silicone or acrylic frost-resistant sealant.
- Rags for cleaning slopes upon completion of their installation.
Important. All tools listed above must be of high quality, in good working order, sharpened, cleaned of old dirt and ready for use.
Covering a wall with plasterboard
With drywall
There are two options for installing drywall: using glue and on the frame. You will need gypsum board with a thickness of 12.5 cm. For cladding we choose moisture-resistant material.
For the frame mounting option, we purchase UD and CD profiles and screws with dowels. If you plan to glue drywall, we buy an adhesive composition for gypsum boards at the rate of 5 kg of glue per 1 sq. m.
It is necessary to level the surface of the window vault; for this we use a plaster solution. Next, we take measurements, make a pattern and use it to cut out sheets of the required format. It is convenient to cut the panels with a hacksaw or knife. It is recommended to make the blanks a little larger, then cut off the excess. Before starting work, the base is impregnated with an antifungal compound (antiseptic primer).
When using the frame cladding method, we perform the following steps:
- We secure the guides and UD profile in the corners of the opening with self-tapping screws or dowels. The fastening step is 40-50 cm. We attach it to the wall or directly to the window frame.
- We attach the CD guide perpendicularly to the UD profile.
- We fasten the gypsum boards to the guides using self-tapping screws. The upper ceiling part is sewn up in a similar way. If the opening is wide enough, we fasten it on three sides: on the frame and to the side elements.
- We fill the remaining gaps between the sheets and the wall with glue.
- The final finishing is done with putty of the finest grain.
The adhesive method of lining a gypsum board window opening is simpler. Work begins with securing the upper ceiling part. The glue is applied to the workpieces in a continuous layer, the glued sheets are leveled using a building level. During drying, in order to avoid distortions and deformation of the structure, spacers are installed between the panels. You can find out the drying time of the glue on the packaging.
Finishing work remains. All recesses are sealed with finishing putty, including panel joints. Dried vaults are treated twice with a primer. The final stage is painting. It is advisable to choose water-based materials for these purposes. Painting is done with a roller, and in the corners with a brush. If the technology is followed, plasterboard vaults look quite aesthetically pleasing.
How to install from the outside?
Installation of external slopes around the window opening filling element is a responsible procedure, during which it is recommended to turn to professionals. If this is not possible, then the work on constructing these structural elements can be done with your own hands, provided that all points of the following algorithm are observed :
The plane of the window opening located outside the translucent structure is measured.- Based on the measurements obtained, a sketch is drawn up.
- Before applying decorative plaster, the mounting surface is cleaned of dirt and dust, after which it is moistened with a penetrating primer.
- After applying the plaster, the installation plane is maintained until the composition polymerizes, sanded, re-primed and painted with facade paints in 2 - 3 passes.
- If it is necessary to mount ready-made frame elements, markings are applied to them, after which each part is cut to the required size.
- Along the perimeter of the opening, holes of the required diameter are made for dowel-nails.
- The plastic elements of the anchors are driven into the resulting holes.
- A metal subsystem of profile elements is fixed to the building structure.
- Frame parts are applied to the subsystem, the accuracy of their installation and mounting position are checked.
- Galvanized slopes are attached using self-drilling screws or blind rivets.
- If it is necessary to fasten composite elements, they are drilled through and then attached to the profile with classic self-tapping screws using washers.
- Before fixing the last screw on each of the 3 frame elements, it is necessary to fill the space with polyurethane foam and, before it polymerizes, tighten the hardware.
- After all the slopes are plastered or mounted on 3 sides, a galvanized or plastic flashing is installed on the bottom of the opening with the joints sealed with a silicone compound.
Note. Immediately after installation, during the cold season, it is recommended to order an inspection of the object with a thermal imager. The device will allow you to identify places with thermal inhomogeneity and carry out urgent repair work to prevent energy leakage from the operated space.
Difficulties and errors
When installing external slopes with their own hands, property owners may encounter a number of difficulties that will lead to unpredictable consequences :
Blowing from the place where the profile interfaces with the opening structure. Before installing a structural element, you must ensure that the gap is filled effectively and uniformly.- Peeling of a slope made of galvanized steel or plastic. All adhesive compositions must be selected to ensure the required frost resistance of the finished structure.
- The void under the decorative coating - all cavities between the slopes and the end of the opening must be filled with polyurethane foam to the full depth and height.
- Uneven protrusion of a decorative element beyond the plane of the facade - before manufacturing, cutting and installing finished parts, it is necessary to measure the entire perimeter of the opening along the perimeter, since the distances from the edge of the facade to the profile of the window block may differ.
- Unreliable fastening of slopes to the end of the outer wall - before installation, it is necessary to accurately calculate the number and dimensions of hardware, and then arrange mounting holes in the building structure.
To prevent the errors listed above, as well as not to incur unexpected expenses, before starting installation, you must read the recommendations of experts on independent forums on the Internet, and also watch several videos with master classes.
Why are slopes needed?
In addition to decorative design, slopes perform other important functions:
- provide protection from drafts;
- prevent moisture from reaching the walls of the house; during precipitation, all water is drained along the slopes to the low tide and down to the ground;
- protect metal fasteners of window structures from corrosion;
- have heat and sound insulation properties;
- hide installation seams and irregularities;
- strengthen the window structure.
The purpose of the repair work is to restore the wall near the window, as well as create additional sound and heat insulation.
Average prices in the Russian Federation for specialist services
There are many installation organizations on the market in every region of the country offering services for installing external slopes on translucent elements. These enterprises are actively competing with each other, which leads to the equalization of average prices for their work (in rubles, based on 1 m.p.):
- Construction of slopes made of facing bricks – from 450 – 600.
- Installation of framing elements made of building bricks with subsequent plastering - from 550 - 750.
- Slope installations made of decorative plaster with painting – from 600 – 900.
- Installation of ready-made factory-made parts made of galvanized steel according to the subsystem - from 500 - 700.
- Construction of slopes made of plastic or composite materials – from 250 – 450.
Note. To determine the final cost of installation, it is necessary to draw up an estimate that will take into account not only basic prices, but also decreasing or increasing factors, depending on various factors.
Characteristics of slopes
To finish window frames, building materials of different quality characteristics are used: plastic panels, plasterboard, plaster mixtures. These products, to a greater or lesser extent, have:
- long service life;
- decorative qualities (they hide installation seams);
- protection from freezing, drafts, and moisture getting on the walls.
Plastic, plasterboard and plaster are used to cover the window opening on the sides, top, including arched structures.