Dampness, flows and deformation of part of the roof most often occur on the balconies of the highest floors, because they are most open to all precipitation. And the longer you delay solving such problems, the more difficult the restoration work will be later. But what to do if just the thought of having to climb onto the canopy makes you dizzy? No matter how skilled you are, don’t even try this! When it is necessary to repair the roof of a balcony on the top floor of a house, you should turn to professionals, and nothing else.
Today, many companies provide services such as industrial mountaineering. These are climber repairmen who can easily cope with such tasks and use professional insurance. But, given the considerable cost of such services, it is better to monitor their work. Therefore, we will help you learn some of the intricacies of roof restoration in such conditions - you will be interested!
Why do roofs on balconies leak?
On the balconies of the top floors, leaks may occur, especially after heavy rains.
Builders attribute this to the following factors:
- Violation of the integrity of the roof. This often occurs on new material, which is softer and more fragile. The main reason for such damage is weather conditions. Squally winds, heavy rain and snow can cause corrosion on the roofing material. Tree branches also cause mechanical damage. A visual inspection of the roof, finding violations and their subsequent repair will help determine the cause of leaks on the balcony.
- Wear due to long service life. Violation of the integrity of the roof covering can occur several years after laying the material. According to builders, after 15 years the roof begins to lose its performance characteristics. The material is exposed to unfavorable weather conditions, sunlight, and other external factors, as a result of which microcracks appear on the roof. They continue to increase under heavy rainfall and wind, and leaks begin to appear on the balconies.
- Poor installation. Errors in the installation of team workers affect the quality of the work performed - incorrectly applied coating and damaged materials will lead to roof leaks, and in severe cases - to destruction.
- No sealed materials. These materials protect the roof from moisture and prevent it from penetrating onto the balcony.
To effectively get rid of moisture intrusion, you need to do more than just internal repairs and try to find the cause of the problem with constant leakage.
Interesting fact: loggias, unlike balconies, do not leak because they have a special ceiling.
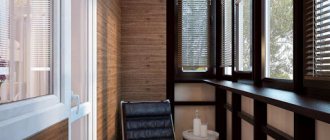
We do soundproofing
This point is relevant for residents of the top floors, since they are expected to be directly hit by all the raindrops and the non-stop movement of birds during the warm season. This is, of course, unpleasant, but there is a way out.
How to make a balcony silent must be decided immediately during installation, because later this will bring enormous discomfort in the form of dismantling everything that was built previously. You also cannot do without the help of construction climbers.
But! Even from this situation there is a way out. It's not exactly cheap, but still. A small life hack is the use of foil materials used in soundproofing cars, which also suffer from noise when driving.
Some enthusiasts decide to improvise and cover the roof with a foam layer. It does not tolerate moisture well, so the solution is not the most adequate. However, if you lay linoleum or artificial turf on top of the foam, you can get out of the situation. Ordinary rubber can also serve as a replacement.
This is extremely unaesthetic, but many who have done this are satisfied with the result. Suggest your options in the comments and send us photos of your buildings!
We are looking for someone responsible for repairing balconies
Not all residents of upper floors know what to do when their balcony roof leaks. Such external work should be done by employees of the management companies to which the house is assigned. First, you need to contact the housing office or management company and write a statement about the roof leaking and a request to carry out repairs on the roof of the house. After this, the department’s employees visit the apartment at the place of contact and assess the scale of the upcoming work.
Residents can repair the roof at their own expense, and then reimburse all costs by contacting the management company.
Repairs are carried out at the expense of the apartment owner only in cases where his careless and unprofessional actions during the repair caused a leak, for example, the integrity of the concrete floors was damaged.
In this case, you can also call housing office workers or hire a team of workers, but the costs will no longer be reimbursed.
The canopies and frame coverings that were installed by the residents are repaired by them. Management companies repair concrete slabs in privatized apartments. In cases where residents did not cause leaks, but the housing office or management company flatly refuse to carry out repairs or compensate for funds already spent on repairs, issues should be resolved through the court.
The easiest way is to independently choose a company that would repair the balcony roof on the top floor, and then apply for compensation. Prices for waterproofing work in Moscow start from 18,000 rubles, roof installation - from 32,000 rubles.
Additional services may be included:
- window insulation;
- metal roof repair;
- installation of water ebbs and canopies;
- fusing of coating with waterproofing;
- low tide sealing, etc.
Fighting roof leaks
A loggia or balcony can leak both on the upper floors and from neighbors.
The appearance of leaks from above is a sign of a violation of the sealing of the seams. This problem is solved with the use of sealant. The main thing is to choose a high-quality sealant that will retain its protective and waterproofing properties for a long time.
The main qualities of a good sealant:
- elasticity;
- no deformation due to environmental influences;
- high strength.
Types of sealant, its features and disadvantages:
- Silicone - designed for one-time work and not suitable for repairs because they do not withstand high loads and are not elastic.
- Thiokol - have a two-component base, but are much less durable than silicone sealants.
- Acrylics are not able to withstand temperature changes and are not plastic. Under these conditions, they will not perform a waterproofing function - after some time, moisture will appear on the sealed seam again.
- Polyurethane is the most suitable type of sealant. They have good elasticity. Please note that some brands of polyurethane sealants are susceptible to destruction by ultraviolet radiation. This is problematic because... Waterproofing of seams occurs in places where direct sunlight hits. But most sealants can withstand temperatures up to +90 degrees Celsius.
All seams on the balcony or loggia are treated with the purchased sealant. Particular attention should be paid to the joints on the roof, as well as between the building itself and the balcony. These are the places through which moisture most often leaks.
How to seal cracks on a balcony step by step:
- The first step is the mandatory cleaning of all seams from dirt and dust in order to apply the material to an even and clean layer.
- The second step is priming. Editors do not recommend skipping this step, because it provides better adhesion of the composition to the surface.
- The third step is the final one, this is applying the sealant.
You can seal seams with sealant in any season. It is recommended to additionally seal large seams with polyurethane foam or insulating materials.
Sealing cracks with sealant
Waterproofing is another, more extensive way to avoid roof leaks. Waterproofing work includes the stages of covering the roof and insulating the floor slabs. Applicable in cases where the neighbors’ loggia above is not glazed, and water leaks out of it.
Installers distinguish 2 methods with which you can seal cracks on the balcony:
- Use of bitumen or polyurethane mastic.
- Use of roll materials based on bitumen or polyurethane.
It should be noted that the joints of roll-type materials should not have gaps, but fit tightly to each other, otherwise moisture will still leak through small cracks.
Installing a roof requires knowledge and patience because it is a very labor-intensive process.
In order not to suffer for a long time with rolled materials, you can use mastic for waterproofing. It should be made of polyurethane, because... this material is stronger and more durable. The composition treats joints, crevices, seams and cracks.
Repair of balcony canopies: silent options with insulation
Even if someone does not want to glaze their balcony, they still need simple and inexpensive protection from precipitation. As a rule, the role of “protector” is taken on by a simple, of course, only in words, balcony canopy. Maintaining such a spartan lifestyle is not an easy task, so at some point the canopy on the balcony will need repairs.
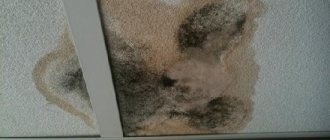
Repair of balcony canopies, as a rule, primarily concerns the elimination of sealing violations. The danger of depressurization lies not only in constant “flooding” and dampness, but also in the quite expected development of a colony of mold fungi, which is not only not aesthetically pleasing, but also fraught with quite serious diseases.
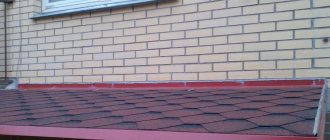
Balcony canopies leak most often in places where the waterproofing is damaged. They can form due to poor-quality bitumen roofing of the canopy or excessive wear of the roofing felt coating. Such defects can be easily eliminated with the help of euroroofing felt (soft roof) and other modern weldable materials, say, bicrost, uniflex, isobox.
Euroroofing felt is a roofing built-up roll material, which is made from a bitumen-polymer mixture. It is durable, elastic, does not rot, and allows reliable adhesion to concrete and bitumen.
Most often, two types of material are used:
- lining - as the bottom layer of a soft roof;
- roofing (it has a granular powder) - as the top one.
Cracks in the balcony ceiling - a solution to the problem
Due to installation errors, a large gap may form in the upper part through which moisture penetrates. The question arises of how to seal the cracks on the balcony. The problem is solved as follows:
- First of all, it is necessary to clean the gap from dirt and dust. A wire brush is best for this.
- Then you need to choose what to seal the gap with - it can be mastic or polyurethane foam. Mastic is a more effective means of combating moisture penetration, because has better insulating properties.
- The material is carefully applied using a brush or spatula.
- If the gap is being sealed with foam, you must first prime the gap. Installers also advise applying polyurethane foam from the side of the neighbor’s balcony. After the composition has hardened, remove excess to create a smooth surface.
- The sealed area is additionally covered with cement mortar, because this provides better waterproofing and prevents moisture from penetrating through small cracks.
If it is not possible to seal the hole on the side of the neighbors above, you need to use rolled materials or mastic to seal the gap.
Eliminating the reason for a plastic door
The problem of cold air entering from a plastic balcony door is familiar to many. To eliminate it, it is necessary to find out the cause of drafts.
First of all, you should check the condition of the rubber seal of the balcony door. If you find signs of wear on it, then it's time to change the sealing contour
Please note that there are no universal seals for plastic window and door units. They differ in size and cross-sectional shape
Therefore, when going to the store to buy a new sealing contour, take a piece of old tape with you. Before installing the seal, be sure to clean the inside of the groove from dust and dirt.
If the rubber band is not damaged, it is worth adjusting the fit of the sash to the frame. After all, poor pressure is another common reason why there is blowing from the balcony door. You can check the quality of fit of the sash to the frame using a simple test. Take a sheet of paper, clamp it between the canvas and the profile and close the sash. After this, start pulling out the sheet. If the paper is difficult to pull out, then everything is fine. Otherwise, you need to adjust the pressing force of the sash.
The locking elements are responsible for the tight fit of the door to the frame. The method for adjusting the degree of pressing of the canvas to the frame depends on the design of the fittings:
- Typically, adjustment is made by turning the eccentrics located at the end of the blade. A hex wrench is used for this.
- If the fittings include a trunnion, then the pressure is adjusted by installing the trunnion at the desired angle. This will require pliers. A right angle to the sash ensures maximum fit.
- A counter plate is also used to adjust the degree of pressure. It is moved by rotating a special screw using a hexagon.
A draft can occur due to the fact that the door to the balcony does not close well. Over time, the sash sags under its own weight and a gap forms on top through which cold air enters. If it is blowing from below, then you need to adjust the position of the lower corner of the canvas. These defects can be eliminated by tightening the axial screws.
A cold breeze may come from under the handle of a plastic door. This indicates that the mechanism has ceased to perform its functions. To correct the situation, you need to tighten and tighten all fasteners tightly.
In the process of eliminating the causes of the draft, it may turn out that:
- the fittings are worn out and need to be replaced;
- There was a defect in the manufacture of the sash;
- The installation of the balcony block was carried out with violations of technology.
Therefore, it is best to entrust the adjustment of the balcony door to the craftsmen of the company that installed the plastic glazing. They are required to fix these problems under warranty. If the warranty period has expired, you can contact any specialized company that provides such services. Well, if you have some skills and free time, you can try to adjust the fittings of the plastic structure yourself.
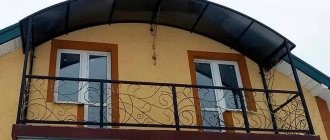
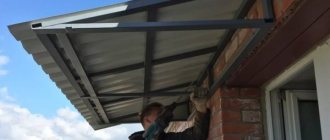
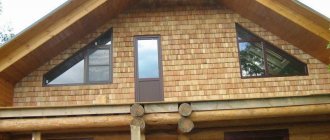
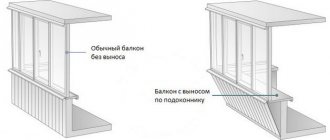
Balcony canopy on the top floor
Water can also get onto the balcony thanks to the canopy. A pitched roof can be installed on the roof of the upper floor. First, a wooden frame is installed, then roofing material is laid on it, and galvanized flashings must be installed to drain water. If the balcony requires additional insulation, insulation is placed under the canopy.
Insulation can also be done outside, but in cases where bay windows are insulated, as well as in cases of a common balcony between the kitchen and the room. All work of this type is performed by employees of construction companies; it is not recommended to do it yourself.
Materials from which visors are made:
- corrugated sheet;
- metal tiles;
- ondulin;
- corrugated sheeting;
- polycarbonate;
Canopies should be installed by professionals, but if residents do this themselves, it is necessary to determine the type of roof:
- Independent - a more inexpensive way to install a visor. In this case, the roof is attached to the facade of the house. The downside is that not all types of roofing materials are suitable here.
- Dependent – suitable for glazed loggias. Installation takes place on a supporting structure.
The canopy itself is installed on a steel frame on which the material is laid.
If the visor is leaking, take the following steps:
- Clean the visor from dust, dirt and old materials;
- The entire surface is treated with mastic;
- Using a burner, a lining layer of roofing felt is fused;
- Treat the joints of roofing felt with mastic;
- Canopies are installed at the joints to the wall.
If the question arises of how to seal the cracks on the balcony from the rain, then you can always use mastic, sealant or polyurethane foam.
Benefits of contacting us
I am always ready to repair balcony leaks (St. Petersburg ) at an affordable cost and with a guarantee of free elimination of any defects. There are 3 important reasons to contact us.
- Transparent pricing. You will receive a detailed estimate, from which you will find out exactly what you paid your money for.
- Fast completion of work. We do not accept paperwork for several days, and therefore we will begin working on your order within a couple of hours after your application.
- Strict compliance with all conditions. To do this, we draw up a formal agreement that sets out the obligations of the parties.
Related article: Balcony insulation, insulation thickness
Specialists will carry out work to eliminate balcony leaks in any area of St. Petersburg, and will also take on other complex tasks that require the help of industrial climbers . Contact us now to get answers to all your questions or leave a request to call the experts.
How to do roof repairs yourself
Repairing the roof on the balcony can be done using bitumen materials in a few steps:
- Removing excess material and debris from the repair site;
- Preliminary application of plaster to the slab, then application of mastic to the entire surface;
- Check the strengthening in a day.
Instead of mastic, you can use roofing felt, but this is a longer and more labor-intensive process.
Pitched roof on the balcony and its structure
A pitched roof is often used on upper floor balconies, and it is important to know what material to cover it with to avoid leaks.
Installers recommend the following materials:
- ondullin;
- metal tiles;
- corrugated sheeting
Metal tiles are sheets made from steel, copper or aluminum. Then a special polymer material is applied to the surface, which gives the coating its final appearance.
Types of roofing materials
Metal roofs have the following properties:
- Durable - operational period about 50 years;
- They are little exposed to the environment, which means they do not disturb their original appearance in heavy rain, snow, wind and heat;
- It weighs little - it is more convenient to install such a roof;
- Fireproof;
- A choice of colors to suit every taste.
However, it also has disadvantages:
- lack of sound insulation - the sound of rain will be very clearly audible;
- a lot of material is wasted;
- labor and materials are quite expensive.
Corrugated sheet is a galvanized steel sheet. On top of it, like metal tiles, a coloring polymer is applied.
Main advantages of the material:
- Weakly exposed to external mechanical influence, durable.
- Low material consumption, since there is no need to customize the design.
- Corrugated sheeting is suitable not only for repairing the roof, but also the fence.
- Long service life, but more than 2 times lower than metal tiles - 20 years.
- Large selection of colors.
Weaknesses of corrugated sheets:
- strong audibility during precipitation;
- growth of rust on damaged areas.
Ondullin is a sheet consisting of cellulose impregnated with bitumen, dyes and polymers. In appearance it is very similar to slate, but is of higher quality.
Pros of ondulin:
- Eco-friendly material – this can be important for people.
- Relatively long service life, but less than that of corrugated sheets and metal tiles - 15 years.
- Low audibility of precipitation, unlike other materials.
- Good resistance to sudden temperature changes.
- Easy installation.
The main disadvantage of ondulin is the likelihood of fire, so covering the roof with this material in hot climates is not recommended.
What materials to use
What you will need in any case is a metal profile. The frame of the canopy will be made from it, on which the covering you have chosen will already be laid. When purchasing, length matters just as much as thickness and width.
It is preferable to use a material based on a square with a side of fifteen millimeters, but not necessarily. If you have the opportunity to purchase something else, use it, but do not forget that all the weight will fall on the wall of the house. It is possible that you will have to install spacers to prevent the visor from falling.
When choosing the top flooring, you can go wild, because the modern market offers us a huge number of options:
- slate. The cheapest and most standard way out. It can be found not new, but used, but in good condition. However, it has a lot of disadvantages. The first is that it is heavy, and this will definitely require the installation of corner struts. Secondly, scientists have proven its carcinogenic properties, which contribute to the development of cancer cells in humans. This is why many people refuse it. Third, slate is not aesthetically pleasing. Especially if you are not buying new. It is quite possible that there will be leaves with blackening or fungus,
- corrugated sheeting This type of roofing has a huge number of advantages. It is lightweight, which is good, especially in our case. It is long-lasting, as it does not lose its characteristics and functions for fifty years. It cannot be said that it is much more expensive than the first option, and there is no waste left from it due to the fact that its versatility allows you to make anything with its help. And the most important advantage is the color palette, because appearance means a lot. I recommend using corrugated sheets, because the price/quality ratio is optimal,
- metal tiles. It has almost the same properties as the second option, but is an order of magnitude more expensive. Refers to elite types of roofing,
- alternative materials. These include copper coverings, ordinary sheets of tin or stainless metal, and maybe even wooden canopies covered with roofing felt. Nobody forbids you to show your imagination, but before you do something new, carefully consider whether it will cost you an extra penny and how long it will last you.
Ways to strengthen the structure of a balcony roof
The balcony frame can become very outdated, and when repairing the roof or other work, it must be strengthened. To do this, you don’t have to call a specialist; your own strength and knowledge will be enough. Here you will need metal pipes with a cross section of 4x4 mm or square profiles.
The fragments are connected using nuts, bolts or electric welding. The first option is not as reliable as the second, because... Fastening joints may be subject to corrosion and rust and will require special additional processing.
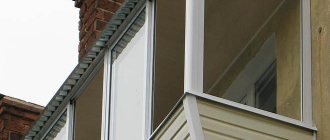
Glazing of a balcony - stages of preparation
On an unglazed balcony, especially on the upper floors, moisture often accumulates after heavy rainfall, which drains from the roof of the house. To get rid of this problem, residents glaze the loggia.
Before starting work, it is necessary to evaluate the balcony for:
- dilapidation;
- presence of damage;
- quality of material.
The balcony railing may simply not withstand the load of the double-glazed window and collapse, so it must be strengthened before glazing. This can be done using foam concrete blocks or metal, depending on the expected load.
Before starting work, it is necessary to remove all unnecessary things, and also carry out cleaning so that the material lies on a clean surface.
Then the surfaces are usually checked for cracks and holes - they are sealed with polyurethane foam or concrete mortar. If the balcony is insulated, then an insulated concrete screed is installed on the floor.
After completing the preparatory work, a team of glaziers is called in to install the double-glazed window. This stage is entrusted to the hands of builders who determine the rules for installing windows.
Also, everything inside can be covered with siding, wood or other materials, and cabinets can be installed for storing things.
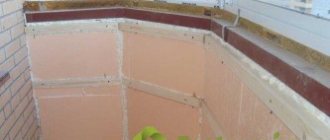
Floor waterproofing
Work begins with making a concrete screed. For an open balcony, it is necessary to make a screed with a slope of 2%. It is necessary for the free flow of water from the surface of the slab. The screed is reinforced with metal mesh.
When making a screed, three types of seams are required:
- Compensation – formed when laying the pressure layer. Another name is temperature.
- Forced - seams dividing the screed into squares.
- Wall-mounted – located at the junction of the balcony slab with the façade slab.
Subsequently, the seams are filled 50% with mastic for sealing, into which an elastic cord is pressed.
The screed is cleaned of dust and debris, and a primer is applied to it for better adhesion. One of the best is Primer WB.
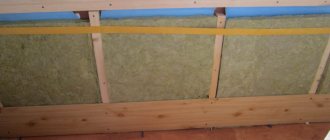
Apply several layers of polyurethane mastic (for example Hyperdesmo RV) to the moistened concrete. The final thickness of insulation on the floor of a balcony or loggia must be at least 20 mm.
In addition to the floor, the waterproofing layer should extend up to 150-200 mm onto the walls.
Application of polyurethane waterproofing to the floor of a balcony (loggia)
To insulate floors, foam sheets are laid between wooden joists on top of the applied mastic. OSB boards are fixed on top, which are the basis of the decorative coating.
We bring light to the balcony
Light can be safely placed on a balcony isolated from street moisture.
First, choose how the electrical wiring will be laid.
There are 2 options:
- Hollowing out the walls.
- Place the wires in plastic boxes.
The second option is more convenient and less expensive, because The first option is used only when completely replacing the wiring, because the wall decoration will be damaged.
Plastic channels are easy to use, easily mounted on the wall and do not require any disruption to the wall decoration. Installation of such wiring does not require much time and strong intervention in the interior of the balcony.
Next, you should select the lamps that will be connected on the balcony. The most common of them:
- LED strips;
- sconce;
- Spotlights.
There is no need to choose very powerful lamps, because... their installation will require a separate line to the panel, which is difficult and not entirely convenient. You should choose lamps that are protected from moisture penetration and dust accumulation.
Choose compact and neat light bulbs. If the space is large, then you can install functional zones and turn on the lights in different parts of the balcony.
If installing wiring is problematic, the best solution would be to buy battery-powered lights. This is especially convenient if residents do not often visit the balcony and use it only for storing things.
The final stage is choosing a connection point. There are only 3 of them:
- From the general panel of the apartment.
- From the junction box in the next room.
- From the socket in the next room.
The first option is very labor-intensive - you will have to run the connection wires through the entire apartment. This item is suitable for apartments at the stage of major repairs and general wiring replacement.
It is much easier to route electrical cables out of the room. To do this, you need to find a distribution box in the wall and draw a line from it to the balcony. It is very important to evaluate how powerful the appliances are in the room and whether there is enough energy to connect the lamps. This should be done independently, and if the current load reserve is small, use low-power lamps.
If the junction box is located very far from the balcony and you need to run a line through the entire wall, disturbing its finish, it is best to connect the cable to an outlet. This connection method is called “daisy chain connection”.
Natural ventilation of the loggia
For natural ventilation, supply ventilation valves are used. They are divided into window and wall.
- The window ventilation valve cuts into the upper part of the window profile. These valves come in various types. The simplest ones consist of a grille and a safety valve. Quite complex systems include filters and protective grilles in a single body and have control grilles for air direction. Installation can be done at home without removing the window or removing the glass unit. For simple valves, a number of holes are drilled, and the valve elements are screwed onto the outside and inside of the loggia with screws. For filters, you must use a router or dremmel to select a solid hole in the profile.
- wall valve for supply ventilation. As the name suggests, it is mounted in the wall. Creates additional air circulation in the room and has the ability to adjust the flow intensity. Its structure is quite simple:
- pipe for fastening other elements;
- external ventilation grille that protects from large debris;
- soundproofing pad;
- O-rings;
- fine filter;
- inner cover – regulator.
The installation process is simple - a hole of the required diameter is drilled, and the valve is assembled in it according to the manufacturer's instructions.
Regardless of the installation location, these ventilation systems have many advantages:
- active air exchange, up to 35 m/kV depending on the model;
- sharp changes in temperature and humidity in the room are smoothed out;
- drafts are not created;
- the flow of fresh air is regulated;
- thermal insulation and sound insulation do not deteriorate;
- ease of installation;
- does not require electricity;
- does not obscure the light opening;
- relieves stuffiness in a sealed room;
- eliminates excess moisture and mold.
Forced ventilation built into windows