Typically a balcony roof is required for upper floors. But there are exceptions, for example, a checkerboard arrangement on the facade of a building. If precipitation in the form of rain and snow gets there, it interferes with operation and destroys the concrete slab. Before starting to arrange the area, the owner faces many questions: what design to choose so that it does not eat up the already few meters, is reliable and at the same time does not put a large load on the slab. It is necessary to choose materials wisely and provide moisture insulation to prevent precipitation from penetrating.
One of the main questions is whether to carry out construction work yourself or with the help of specialists. Only by thinking through the process from start to finish and calculating the budget, you can get a high-quality solution for many years and not spend money on endless repairs.
Choosing a stylistic solution
You need to think about the style of the building before the design. If the balcony is in a Khrushchev building, this is not so important. When the apartment is located in an elite residential complex, organizing a balcony space is a matter of prestige.
Fortunately, you can use different materials, both expensive and cheap. The simplest technical solution would be to install wooden blocks fixed to the fence. Next, the frame will be fixed to them and the rafters will be installed. It is inexpensive, however, it can look handicraft - in the style of a village hut. But wood is affordable and can be easily processed on your own without the use of expensive machines and welding.
A practical option, relevant both for a Soviet five-story building and a modern housing complex, is a pitched roof over a balcony with a welded frame. A metal profiled pipe is suitable for making the base. The optimal roofing covering is metal tiles or corrugated sheets in a neutral color.
Shed roof over balcony with welded frame
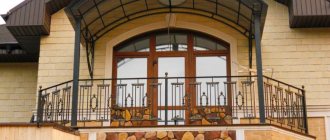
A stylish solution is to build a rounded roof for your balcony, in the form of part of a cone. Due to its geometric properties, such a structure will be resistant to wind and snow loads. Externally it will look like the top of a turret. But such complex designs are ordered from specialized companies and delivered ready-made. If the neighbors in a high-rise building have some kind of wooden towers, and the owner has a fashionable roof, this will be noticeable. It is better to implement such ideas in expensive housing complexes.
Ideally, the structure should match the style of the façade of the building.
If the balcony faces the courtyard, the construction of this structure does not require approval. But it is better that the future structure is combined with the design of the building. If the building is faced with yellow-brown brick, then the color of the roofing sheets is selected in the appropriate shade - yellowish, brown or dark red.
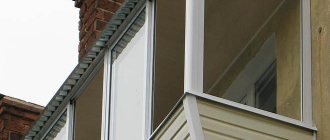
The roof over the glass balcony looks technologically and modern. This glass is made to order. It is durable, shock-resistant, and does not form sharp fragments if broken. Through the translucent coating you can see the sky and remain protected from precipitation. A glass roof will look good in a prestigious residential complex. But for installation you will have to invite specialists, since the glass is difficult to fix on your own.
Selection of materials
A welded frame as a structural basis is the most durable, although it is not cheap. A budget option would be a frame made of timber with trusses made from a metal corner. This design does not require welding and can be manufactured and installed in 2-3 days.
Ondulin and other types of soft slate for roofing look prestigious. Installation is not difficult, but experts advise that if the windows face south, do not use dark shades of the coating. Otherwise, the roof on such a balcony will get very hot in the heat.
The most economical type of roofing is roofing felt. Nowadays they use euroroofing felt more often, it looks better and will last longer. It is advisable to cover this material with special silver paint for roofs, otherwise it will quickly wear out. The disadvantage of euroroofing material is that it becomes covered with cracks when exposed to sunlight and breaks from the wind.
The profiled sheet is not only easy to process, but also combines with almost any architectural style of construction. You can cut it with metal scissors, a jigsaw, or a grinder. Working with polycarbonate is even easier due to its high flexibility. This material will not be conspicuous or create dissonance with the surrounding space. Polycarbonate transmits up to 80% of sunlight and does not corrode. Its only serious drawback is its fragility; such a roof can break under the weight of snow and ice.
Corrugated roof
Drawing up a roof project
One of the most critical moments is the choice of roofing shape. The roof can be made straight with a slope, semicircular, arched, gable, tri-slope and any intricate shape.
From a practical point of view, the design should be such that repairs are required as rarely as possible. Working at height is dangerous, and calling in industrial climbers every year is expensive. Therefore, they usually make a pitched roof as the most practical, and the angle of inclination is determined individually.
If people walk below or cars move, the roof on the balcony should not be too flat. An avalanche of snow or ice can damage someone's property, and the owner will be held accountable. Therefore, when there is heavy traffic under the windows, snow guards are installed.
The optimal slope of the rafters is 30 cm per meter. The recommended roof height is the height of the tallest person in the family plus 20 centimeters. The roof covering must protrude no less than 20 cm beyond the perimeter of the balcony, otherwise precipitation will flow onto the concrete slab. Based on these considerations, a project is drawn up.
Balcony roof waterproofing options
A glazed balcony requires waterproofing, for which different materials are used. The technology for protecting a frame roof from moisture differs from the arrangement of a concrete version. To waterproof a roof with a metal frame, PVC membranes are used, which are fixed to the sheathing with staples or slats.
PVC films are varied and differ in thickness, structure and color
You can treat a concrete slab with bitumen mastics, or lay roofing material or bitumen in rolls. In the first case, a bitumen composition is applied to the concrete surface with a brush or spatula. The use of roofing felt and other roll structures involves laying the material and fixing it by gluing it onto mastic or liquid bitumen.
Independent roof
The independence of the structure means that the roof above the balcony and its supporting elements are attached only to the wall. They are not associated with glazing, fences and other parts. This is convenient if the roof is made of lightweight materials and the wall is strong enough to withstand the fastenings.
With this design, the structure will look lightweight and elegant. As a result, the space is ventilated, and precipitation does not fall from above. But the heat will not linger either.
Design features
The conditional classification of all structures includes division by type of fastener. The roof of a balcony can be dependent or independent, so when installing it yourself, this factor plays a decisive role.
Independent type
The roof structure is attached directly to the wall of the building without the help of supports. At the same time, the permissible load on the surface is low, so the material for the roof is chosen as light as possible.
Fastenings are carried out using consoles; this is the simplest amount of work that can be done independently. At the same time, such a “canopy” cannot be used for roofs with a large surface area, because the structural strength will be low.
Dependent roof
The next option is a dependent structure, that is, based on other elements. For example, it can rest on glazing, which is often attached to the railing. Such a structure can be quite heavy. Before installation, it is advisable to obtain an expert’s opinion that the concrete slab will support the weight of the structural elements.
With this engineering solution, the balcony is completely closed, and in the summer months it can be stuffy. But the complete isolation of the room is guaranteed; if you wish, you can hang curtains and completely close yourself off from prying eyes.
Post-and-beam design
In this case, the roof does not rest on the glazing, but directly on the racks connected in some way to the slab of the balcony structure. A hole is drilled in the slab and a fastening element is inserted there. A wooden block or metal profile is attached to this element. And the profile already holds profiles and trusses for installing the roof.
Such a roof is not dependent on other structures, because it rests directly on the slab. The bars or metal profile rest directly on it. This can be done using anchors, or pour a layer of cement mortar onto the slab and strengthen the posts in it.
This construction technology is acceptable if the slab is new and strong enough.
Step-by-step instructions for balcony partitions
Waterproofing of balcony partitions is carried out using a technology that is no different from treating the floor and ceiling. Insulation using foil-clad polystyrene foam boards is considered optimal. The slab is glued to the partition using a building mixture with high moisture resistance. Reinforcing mesh is used for tile joints.
The following sequence of work is selected:
the coating waterproofing layer is applied with a brush to the moistened surface of the slabs;
no earlier than five hours later, another protective layer is applied perpendicular to the first layer;
The external cladding of the layers is done by painting or plaster.
So, if waterproofing work is carried out carefully without violating technology, then the safety of the balcony slab and a comfortable environment on the balcony are guaranteed. In addition, any owner with little construction skills can waterproof a balcony.
Roof over the top floor balcony - self-installation
When constructing a roofing covering, whether it is independent or dependent, it is better to immediately do everything to the maximum. Then you won’t have to work at heights at the risk of your life after each season. It is advisable to seal the joints using polyurethane foam, sealant or dry building mixtures. When building, it is important to take into account the direction of the prevailing wind. If strong winds constantly blow onto the balcony, the roof must be installed so that water does not flow between the sheets of covering.
Preparing for work
Before starting construction, you need to purchase high-quality materials. This is especially true for wood; it is better to buy first-grade bars - without cracks, knots, or chips. Otherwise, weather conditions will quickly render the building unusable. Drilling brick walls may not work with a conventional electric drill; you will need a powerful hammer drill.
If the necessary tools are not on the farm, you can rent them or from friends.
You will need a powerful cordless screwdriver, since working with a drill with a wire at a height is inconvenient. Metal trusses should be ordered from a specialized company. It is not recommended to weld them on site; this is a fire hazard. You will also need a wood saw with large teeth. It is necessary to purchase consumables - screws, dowels, anchors.
To create an independent balcony roof from corrugated sheets over a standard 2-meter-long balcony, the following materials will be required:
- triangular trusses made from steel angle – 3 pieces (placed at a distance of 80-100 cm);
- sheathing – timber 20-40 mm;
- anchor bolts 100 mm long;
- screws with sealing gaskets, standard self-tapping wood screws;
- anti-corrosion primer for metal;
- antiseptic impregnation for wood, for example, Pinotex;
- corrugated sheets;
- cement mortar.
Step-by-step instructions for installing an independent structure
The procedure for creating an independent roof on the balcony is as follows:
- Attach the prepared trusses to the wall using anchors. Deepen the anchors to a depth of 70-80 mm.
- Treat the timber with Pinotex and wait until it dries completely.
- Secure the wooden sheathing with screws. It is necessary to prevent the sheets from rattling in windy weather.
- Using metal scissors, cut the corrugated sheet into pieces of the required size.
- Using screws with seals, attach the metal sheets to the sheathing.
- There remains a small distance between the roof and the wall. This gap must be filled with foam. If necessary, after hardening, excess foam can be cut off with a knife.
- The joint treated with foam is covered with sealant on top.
Selection and installation of roofing
Corrugated sheeting, metal tiles, plastic slate, polycarbonate, soft roofing and galvanized sheets are excellent as roofing for a balcony:
Let's look at each type of roofing separately, taking into account its pros and cons specifically for the balcony.
Corrugated sheeting: ideal for a balcony
Just keep in mind that a metal roof will be annoying with noise from rain, but it can be soundproofed and at least use damper tapes.
And yet, the most typical roof for a top-floor balcony is a profiled galvanized sheet with a thickness of 0.55 mm and a wave height of 20 mm. The corrugated sheet itself is good for its ease of installation, wide choice of colors and light weight. But if it gets damaged during installation, it will begin to corrode.
So, to install corrugated board you will need the following materials: the corrugated sheet itself, the number of sheets of which you can easily calculate yourself, anchor bolts 10 cm long, antiseptic for the timber, screws with sealing gaskets, dry wood timber 20x40 or 40x40 mm for sheathing and pre-welded supporting triangular trusses from corner No. 6.
As soon as the farms are installed (we presented the technology above), follow these instructions:
- Step 1. Make a lattice from timber, take sheets of corrugated sheets and cut them with metal scissors.
- Step 2. Now, using screws with sealing gaskets, secure the corrugated sheeting to the wooden sheathing.
- Step 3. There will be a small gap between the corrugated sheeting and the wall - seal it with polyurethane foam. Just don't leave it open for several days.
- Step 4. Additionally, under the future low tide, lay foam rubber, which will help prevent snow from getting under the profiled sheet.
- Step 5. Install the tide itself. To do this, start by drilling holes with a hammer drill, and then secure the ebb using plastic dowels with 6x60 nails.
- Step 6. After this, fill the cracks on the outside with cement mortar and treat with a two-component sealant. To ensure that the sealant is laid evenly, use masking tape, which will then need to be removed.
- Step 7. Proceed with the glazing, and for convenience, mount a wooden beam along the edge of the roof, to which the frames will be attached.
Here's how the work goes:
When installing the sheets, it is important not to tighten the screws, otherwise the rubber will crack and allow moisture to pass through. Imagine how difficult it is to repair the roof at such a height. This is what the correct mount should look like:
To secure sheets on metal trusses, it is also good to use a special fastener:
Metal tiles: for beautiful projects
Beautiful and in demand metal tiles are similar in properties to corrugated sheets, but have a more aesthetic appearance. But all these reliefs can prevent snow from rolling off at a low roof angle. In this case, the snow itself will accumulate and fall down in an avalanche, which is bad.
Metal tiles are installed on the balcony according to the same principle as corrugated sheeting, the only important thing is that each wave has its own wooden base. Also mark the metal tiles in advance and drill holes for ropes that will hold the sheets at height. And all you need to take care of is that the edges of the sheets fit into the niche in the wall and are well protected from moisture.
Seam roofing: just like the old fashioned way
Let us also note such a practical and inexpensive roofing material for balconies as galvanized iron. It is characterized by low susceptibility to mechanical stress and can withstand quite severe loads.
Among the disadvantages is the complete lack of sound insulation. Those. when it rains, the roar will be incredible, so immediately think about insulating and soundproofing the ceiling of such a balcony:
Soft roofing: bitumen mastic, roofing felt and euroroofing felt
A less popular, but quite convenient option for arranging a balcony roof is a soft roof. It is valued for its noiselessness, integrity and water resistance. In other words, such a roof has no potential places for moisture to penetrate. It also fits easily on any angle or curve.
But keep in mind that the same euroroofing material does not tolerate direct sunlight and prolonged frost. Therefore, if the climate in your region is quite harsh, refuse a soft roof, otherwise, over time, cracks will appear on the roof of the balcony.
Heat also has a bad effect on it: the bitumen heats up and an unpleasant odor can penetrate into the apartment. If the weather is usually mild, then this option is quite suitable.
To install a soft roof, you will need to build a continuous flooring:
Transparent and cellular polycarbonate: plenty of light inside
Another good option is polycarbonate coating, which is expensive, but is compensated by excellent performance properties. Such a coating will be transparent enough so that you can set up a personal office or just a relaxation area, but at the same time it will be durable, heat-insulating and quite resistant to mechanical loads.
And not just resistant: stronger than glass, and at the same time 15 times lighter! And this is important: if your balcony is on the top floor, then it is at risk, because teenagers today love to spend their leisure time on roofs, throwing down everything they can.
In addition, polycarbonate is resistant to ultraviolet rays and does not lose its transparency even over time, and its operating temperature range is from -45°C to +80°C. Specifically for a balcony, take panels from 10 mm thick - this will be enough:
And the choice of color in the installation of a polycarbonate roof is simply pleasing to the eye:
To install a polycarbonate roof, you need the same trusses as for corrugated sheeting. It’s just important to properly equip the rear connection unit:
- Step 1. To do this, make a 40 mm deep slot in the wall.
- Step 2. Fill it with silicone sealant and insert the back of the polycarbonate there.
- Step 3. Any excess sealant that squeezes out of the groove should be spread along the seam. This sealed mount lasts a very long time.
- Step 4. After installing the roof, all that remains is to remove the protective film.
See how easy it really is to work with monolithic polycarbonate:
Polycarbonate is also good because it can easily be used to make balcony roofs of complex shapes:
The only unpleasant moment in the case of a polycarbonate roof is that it is not repaired, but is immediately replaced with a new one. After all, any traces of repairs spoil the entire appearance, while the same corrugated sheeting with the same damage can still be patched and patched.
Ondulin roofing: fashionable strength and durability
Also, one of the most beautiful roofing coverings for a balcony is ondulin, or euroslate. It is characterized by ease of installation, low weight (6 kg per 1 m2) and excellent sound insulation properties, which is important for the last floors.
But, unfortunately, because... Ondulin is just a multilayer sheet of ordinary paper impregnated with bitumen; it does not have the best impact resistance and resistance to mechanical damage.
Also, the surface of Euro slate is usually rough, which is why it retains snow and accumulates dust. As a result, such a coating on a balcony lasts no more than 10 years, simultaneously fading in the sun and twisting if rainwater gets into random cracks.
But it looks beautiful, there’s nothing to say:
To attach Euro slate to a balcony, the same special fasteners are used as in the case of installation on a regular house roof. Here's a great video tutorial on this topic:
Balcony roof and glazing
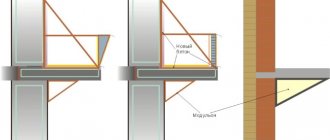
When installing dependent balcony roofs, it is necessary to provide for the possibility of further installation of glazing. To do this, after installing the roof, a wooden block is fixed along its edges. The frames can then be attached to it. If you plan to install double-glazed windows, you must use special metal fasteners instead of timber. Typically, this work is entrusted to the company’s specialists who install windows.
Laying a roof with metal tiles for a balcony with double-glazed windows
In this case, it is assumed that a dependent balcony roof will be installed. Trusses, sheathing and roofing are first attached to the frame. Only after this can you begin installing double-glazed windows, otherwise they may be damaged when installing the visor. The glazing is connected to a bar or profile that is pre-fixed around the perimeter of the roof.
A sheet of metal tiles can reach 7 meters in length; it will not be difficult to select it according to the size of the concrete slab. When joining, the sheets must overlap. Therefore, you need to take roofing material whose area is 15 percent larger than required. When fastening tiles, screws with seals are used. It is advisable to coat the fastening points with bitumen moisture insulation so that there is no leakage over time.
Installation of post-and-beam structure - step-by-step instructions
The first stage is to install the racks, using a level to check their verticality. Installation is carried out using anchors. The racks adjacent to the wall should be higher than those located at the maximum distance from it. Then the roof will have a slope. Typically, for every meter of roofing the difference is 30 cm in height.
Next, rafters are mounted on evenly trimmed bars using plates, corners or self-tapping screws. Then a sheathing of thinner bars or boards is installed. You can screw moisture-resistant plywood or OSB onto the sheathing so that the roof rests on a monolithic covering and does not vibrate in the wind. Now they install wind insulation and install the roofing directly, for example, corrugated sheets or metal tiles.
To prevent metal tiles from allowing water to pass through, a groove is made in the wall parallel to the sheet. The sheet is pushed into the resulting cavity. Next, the joint is sealed with silicone sealant or polyurethane foam. This trick will protect residents from leaks at the junction of the wall and roof.
The video will help you understand the intricacies of construction work. It discusses in detail how to make a balcony roof on the top floor in a Khrushchev building:
Fabrication and installation of the frame
Taking into account the impact of wind, snow load and other environmental factors, the best material for the frame of a balcony canopy is steel - angle steel, rectangular profile, strip. The connection of steel elements is carried out by welding.
To reduce the weight of the structure, it is made combined - the most critical parts are made of metal, and wooden elements are attached to them with self-tapping screws. The sheathing on which the roof will be laid is often made from wood.
In most cases, the frame is assembled at the bottom until ready, after which it is lifted and mounted in place. Sometimes installation is carried out in separate fragments, then connecting them together with lathing. The metal is pre-coated with anti-corrosion paint, and the wood is pre-coated with insecticidal and hydrophobic compounds.
The frame must be fastened to the wall with anchor bolts.
There is no universal technology for manufacturing and installing a frame - in each specific case, the structure is assembled according to an individual project, which takes into account all the nuances (components, coating and interior finishing materials, connection method).
Roof repair on the balcony
Repair work usually consists of replacing rotted or cracked timber, damaged sheets of roofing felt or slate. If moisture gets inside the insulation sheets, the insulation may need to be replaced.
The most common reasons for repairs:
- Cover sheets swaying in the wind.
- Loosening of the entire structure due to drying out of elements or poor-quality fastening.
- Damage after knocking down icicles or falling various objects.
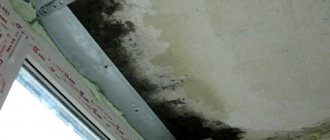
- Water entering the balcony area, destruction of the concrete slab.
- Condensation, drafts - installation of thermal insulation is necessary.
After winter, polycarbonate may crack or break under the weight of snow. If the balcony canopy is loose, you can install a new one. A frame of 40x40 cm timber is mounted, lathing, vapor and waterproofing are installed. Sheets of penoplex or expanded polystyrene are placed on top. Then install soft slate or metal tiles. Balcony roofs equipped in this way do not create noise or vibration during rain or hail.
For cracks in a bitumen or built-up roof, it is convenient to use special bitumen-based mastics. They can simply be applied to problem areas. If the balcony was not thermally insulated, the repair will consist of installing insulation. But in this case, the structure of the balcony roof will have to be redone. Materials such as penoplex, penofol, expanded polystyrene practically do not absorb water.
Ceiling finishing
To sheathe the ceiling, the strip is screwed with concrete anchors. Using a laser level and pads, it is easy to trace the plane of the ceiling. Any covering made of lining, plastic or plasterboard is mounted on the block.
The screws should not go all the way through the trim sheet or the lath. Putty, plaster or painting is applied over the finish. On an unheated balcony or loggia, only facade materials are used: putties, primers, paints.
It is convenient to prepare the ceiling for painting using a side spotlight; it allows you to detect even the most minor defects. The ceiling is painted several times to ensure an even layer without visual defects. Corrected by puttying and sanding.
The final painting of the ceiling is carried out after the subfloor has been completed.
When insulating from the inside, it is important to create the effect of a thermos. The ceiling, floor, walls must become a continuous heat insulator
https://youtube.com/watch?v=UMl80rEuJwM
This is one of the reliable and simple options for insulation in a standard apartment building. An insulated balcony keeps the house warm in winter and cool in summer, and pleases with its beautiful and durable finish. The apartment becomes warm and cozy.
Tips for insulating and waterproofing a balcony
The junction points of the elements must be coated with sealant. If there are parts susceptible to corrosion, it is necessary to purchase anti-corrosion paint or primer. It is advisable to use water-repellent impregnations for treating wooden parts, including the rafter system.
When insulating, it is important to take into account that such a light and comfortable material as mineral wool completely loses its valuable properties when exposed to moisture. In conditions of constant vibrations due to wind, it is better to insulate the roof on your own balcony with penoplex, polystyrene foam or expanded polystyrene. These materials do not absorb water.
Another possible sequence of work
In the version described above, there was the following sequence for insulating the ceiling of a balcony or loggia with your own hands: sheathing - laying insulation - cladding. But there is another option with the reverse sequence of insulation and installation of wooden sheathing or metal frame. Its essence is as follows. Even before installing the lathing/metal frame, a layer of penoplex/foam insulation is created over the entire area of the balcony ceiling. It is glued to the ceiling using a special glue, and is fixed with plastic dowels, often called “fungi”, at five points on the sheet - four in the corners of the sheet and the fifth in the center. The joints of the sheets should be foamed with foam for additional insulation.
We attach penoplex to the ceiling of the loggia
The same can be done by insulating the ceiling with mineral wool. Plastic “fungi” fix it well during insulation and press it tightly to the concrete surface. If the glued foam plastic/penoplex will not be subjected to additional finishing (plaster), then you can also stretch a layer of foil heat reflector (penofol, isolon) over the insulation. If mineral wool is chosen for insulation, then a heat reflector must be installed. It contains several important and useful properties: thermal insulation, sound insulation, waterproofing, vapor barrier and wind insulation. The joints of the heat reflector are glued together with the tape intended for it. And then you can install a sheathing made of beams or a frame made of metal profiles, which will additionally press the insulation.
Fixing the sheathing when insulating the ceiling with mineral wool
But you need to remember that this scheme is good when the plastic balcony frame is not installed close to the floor slab. Otherwise, there may be less than five centimeters from the top of the sash to the slab. And this is very little for the insulation layer, plus the thickness of the frame/sheathing, and the thickness of the facing material.