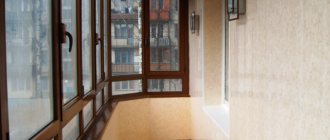
Balconies and loggias are several square meters of additional space in the apartment, which can be made as useful as a hall, kitchen or office. To do this, it is enough to free this space from unnecessary rubbish and work on its interior, but above all, insulate it. There are a sufficient number of insulation materials for walls, ceilings and ceilings on sale, with various properties, from domestic and foreign manufacturers. It's not easy to understand them. The editors of the Yanashla website suggest considering the best insulation for loggias and balconies for 2022.
Selecting a thermal insulator
Advantages and disadvantages are inherent to each type of thermal insulation.
In order to choose the most suitable insulation, you should compare the main characteristics of heat insulators. The most common thermal insulator options:
- Extruded polystyrene foam (penoplex);
- Foamed polyethylene (penofol);
- Polyurethane foam (PPU);
- Styrofoam;
- Mineral wool.
Mineral wool
The thickness of the sheets varies from 2 to 20 cm. Mineral wool is divided into three types, depending on the components of the raw material:
An example of installing mineral wool on a loggia. The material is placed into the prepared structure. The mounting frame can be made of metal profiles or wooden blocks.
Manufacturers produce cotton wool in the form of mats and soft rolls. In some cases, one side is covered with foil. Aluminum foil improves the level of thermal insulation.
The main disadvantage is that moisture is destructive; a vapor barrier is required.
Polymer-based insulation
Penoplex, polyurethane foam, foam plastic, foamed polyethylene are polymers treated with foam compounds.
Advantages:
- The presence of gas bubbles provides not only a good level of thermal insulation, but also light weight of the slabs;
- High degree of moisture resistance;
- The materials are durable;
- Antifungal resistance;
- Simplicity and convenience when laying slabs or sheets, as well as rolls (foamed polyethylene);
- An economical repair option, provided you choose polystyrene foam as insulation.
The main disadvantage: they support the spread of flame during a fire and release harmful substances during the combustion process.
When choosing polystyrene foam and other polymer-based materials, it is necessary to correctly select the thickness of the slabs and determine the density
1. Foam sheets
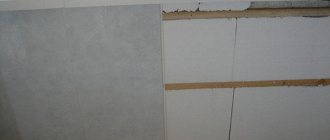
Insulator slabs (expanded polystyrene) during installation.
Polystyrene foam is a low-cost method of insulating a loggia, but it is considered a fairly fragile material, so lathing is required for installation. A worthy replacement is extruded polystyrene foam; its installation does not require the creation of a special frame.
2. Penoplex
Extruded polystyrene foam boards (50 mm thick) are used as insulation. The seams between the elements are sealed with polyurethane foam. Penoplex is attached using special disc-shaped dowels (“fungi”).
3. Penofol
The material is used as a separate heat insulator; foam polystyrene foam can also be used to provide vapor barrier. Due to the foil side, warm air is reflected and retained in the room.
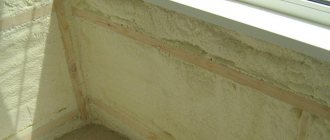
In order to speed up the insulation of the structure, you can use an alternative method of thermal insulation - spraying polyurethane foam (PPU).
4. Polyurethane foam
PPU is one of the most modern heat insulators. The cost of application services is considered high compared to other analogues, but many have managed to evaluate the performance properties of polyurethane foam. This insulation is characterized by high thermal insulation rates due to its fine-porous structure.
The best manufacturers
There are quite a lot of them:
- Rockwool. International group of companies. Production of thermal insulation and fire retardant materials based on basalt wool.
- Isover. The brand belongs to the French concern Saint-Gobain. At least 1000 companies produce thermal insulators around the world.
- Ursa. Spanish manufacturer of fiber insulation mats and rigid boards. Factories in Spain, France, Germany, Italy, Russia.
- Knauf, Germany. One of the world leaders in the production of insulation materials. Factories in the USA, Europe, Iran and China.
- Paroc. An international group of companies headquartered in Finland.
- Penoplex. Russian company. Produces the best-selling thermal insulation products on the domestic market.
- Izovol, Russia. Supplies environmentally friendly, inexpensive thermal insulators.
- Isoroc. Russian brand, with the participation of Austrian and French capital, German technology and equipment from Sweden, with production in Tambov.
These are not all popular companies that supply heat insulators of various price categories to the domestic market. The above descriptions and characteristics of the products will tell you how to choose a suitable heat insulator and what to pay attention to. It’s up to you to decide which company’s product is best to buy. The main thing is that they are water-repellent, lightweight, non-flammable, and have a low thermal conductivity coefficient.
Let's find out how to install insulation for a balcony indoors
After we have decided on the material for insulating the walls and the method of performing the work, we need to draw up a plan for subsequent actions. It should consist of construction stages and task completion periods. Once again, evaluate the capabilities of your balcony. If you are not yet equipped with energy-saving windows, now is the time to install them. You are doing a major overhaul of the casing, and later it will be difficult to return to it, and installing plastic windows will require strengthening the positions that support them.
Next, step by step, according to your own plan and studying reviews from experts, move forward. Immediately think about how you will decorate the walls of your balcony. The method of laying insulating material during further cladding of the balcony with clapboard or plastic differs from insulating a balcony without further cladding.
Step-by-step instructions for insulating a balcony:
- If you already have windows installed, then we start by sealing cracks, cracks and damage. Check wooden cladding for rotten boards and fungi. If they exist, then take measures to eliminate them. If there are no plastic windows, then you need to install them.
- If you will later cover the balcony with clapboard (which is done very often), then you need to start arranging the sheathing.
- Think about electrical wiring. Do the wiring in advance so you don’t have to mess up the repair later.
- We begin the insulation process. Place insulation in the space between the sheathing beams, attaching it in accordance with the type of material.
- Seal the gaps between the insulation if it is solid.
- Seal the joints with mounting tape.
- For greater thermal insulation, place a layer of foam foam on top.
- Level the surfaces.
- Cover the walls with finishing material.
When carrying out work on the balcony, one rule should be taken into account - to repair the balcony, choose the lightest finishing materials. The balcony is a special design and should not be overloaded.
Where to begin
You need to start mastering any balcony with an objective assessment of its condition. If the apartment is located in a new building that has recently been handed over to residents, then you need to pay attention to the material from which the balcony structure is made. Also, in new houses, you need to pay attention to what the neighbors’ balconies are decorated with. Often in such houses neighbors try to adhere to the same style.
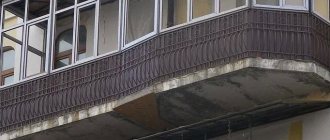
We make masonry from foam blocks
But if the balcony is in an apartment that is not new and has always been used as an open space, then work will have to begin with strengthening the balcony . Strengthening includes both the reconstruction of the concrete balcony platform and the strengthening of the metal handrail. Also, this process may include such an event as strengthening the lower part of the upper balcony; this must also be taken into account. After solving all these issues and choosing the material for the outer cladding of the loggia (balcony), you can move on to the interior decoration. To simplify this stage, you can lay a wall of bricks or foam blocks up to half of the balcony, directly to the double-glazed windows. This will save on insulation.
Advice: If all stages of insulation are carried out at the same time, then it is better to immediately install double glass in the windows, since one glass gives 70% more heat loss in cold weather.
Internal insulation of loggia walls, which material is more reliable?
The loggia, from a constructive point of view, is perfect for becoming a full-fledged room or an extension of the apartment. To make this possible, it is necessary to carry out a number of construction and installation works on insulation, glazing, and finishing. The result will be a cozy relaxation room, a spacious living room, and additional work space.
The result of insulation may differ from the desired one if several factors are not taken into account when choosing materials and technology for insulation work.
The first factor is the further purpose of the room:
if you plan to have a utility room, then use any single layer of insulation; Basically, only the part directly in contact with the street - the parapet - is thermally insulated; the desire to have a separate full-fledged room will require the use of different types of thermal insulation materials, which are laid in two layers over the entire surface of the loggia; the option of combining a loggia and a room will also require two-layer insulation, but in this case the main attention is paid to the parapet, and the walls are covered in one layer.
The second factor is the size of the loggia itself, since if it is small, then a type of insulation is selected that, despite its small thickness, has a fairly high thermal protection index. In this case, the usable area will be reduced slightly.
The third factor is taking into account the fact that any material from which the walls of the interior are made allows moisture accumulated inside to pass through. These water vapors, colliding with the colder air from the street, settle on the outside of the wall. If this wall is insulated, it means that the insulation becomes covered with moisture, which leads to its rotting and a decrease in thermal insulation properties. It is necessary that water vapor does not reach the insulation.
Izolon
Its composition is polyethylene foam with a foil layer. A lightweight universal material, most often produced in roll form and is an excellent choice for insulating a balcony:
- service life – more than 100 years;
- does not support combustion, upon contact with an open flame it breaks down into water and carbon dioxide;
- resistance to temperature changes without changing properties;
- high rates of heat and sound insulation;
- flexible roll material allows you to effectively and easily insulate the most inaccessible places;
- It is used not only as an insulating layer, but also as a protective layer against leaks when pouring floors.
Main disadvantages:
- high price;
- it is necessary to strictly follow the installation technology;
- thin material breaks easily, and damage to the structure leads to loss of characteristics.
Penofol
This material is foamed polyethylene covered with polished foil. Penofol is flexible, lightweight, water and vapor proof, and has good thermal insulation and sound insulation properties. Penofol can be foil-coated on one side or both sides, and some have a self-adhesive base. When insulating loggias, penofol is used together with other insulating materials such as polystyrene foam. To insulate a loggia with polystyrene foam without penofol, you will need to use very thick polystyrene foam, and in the combined version 40 mm thick.
Step-by-step insulation of a loggia with your own hands, step-by-step photo instructions
First, the loggia is insulated with penofol foil 5 mm thick with foil inside and secured to the bars using staples. Sheets of foam plastic are laid on top of it. It is necessary to foam all seams in the foam with polyurethane foam. 3 mm foam foil is placed on top of the foam inside the room and is also secured to the bars using staples. If a joint is formed between the sheets of penofol, it is foamed and then sealed with foil tape. After this, a sheathing is attached to the bars, which will create an air gap between the insulation and the finishing material. The sheathing can be made from wooden slats with a cross-section of 2 by 4 cm. The slats are nailed perpendicular to the bars every 40-50 cm. When insulating the floor on the loggia with your own hands, you do not need to make a sheathing. You can lay bars with a larger cross-section on the floor so that a gap of at least 1.5 cm is created between the insulation and the floor covering. Having laid the insulation on top, it is covered with plywood or boards on which you can then lay, for example, laminate.
https://youtube.com/watch?v=L0rEfJPSVFU
Expanded polystyrene
Insulating your loggia inside with polystyrene foam gives fairly good results. This material is produced by mixing polystyrene and special foaming components. The mixture is heated, subjected to high pressure, then foamed and carbon dioxide added.
To insulate a loggia with polystyrene foam, slabs 45-50 mm thick are perfect.
- They are fastened using dowels, double-sided tape and glue (which type of fastening to choose depends on the material of the walls). When insulating a loggia from the inside with polystyrene foam, it is best to place the material slabs in a checkerboard pattern so that they do not move under their own weight during operation.
- In order to prevent the occurrence of cold bridges, seams, gaps and joining areas must be filled with construction foam with your own hands (when insulating with expanded polystyrene and polystyrene foam, the problem of cold bridges is especially relevant).
- As soon as the polyurethane foam has dried, you need to cut off the excess with your own hands.
- To provide additional insulation, which is required when insulating with expanded polystyrene and polystyrene foam, it is imperative to lay a layer of special foamed polyethylene 5-8 mm thick. In this case, the layer with foil should be located inside the loggia. This approach will allow you to create a high-quality vapor barrier layer with your own hands and ensure heat reflection. The seams must be taped with construction tape yourself.
- You can attach a wooden sheathing to the heat-insulating layer (for this it is better to use small-sized bars that have been pre-treated with antiseptic compounds). In addition, instead of lathing from the inside, the loggia is often finished with plasterboard sheets.
- Any finishing materials can be applied to wooden lathing or plasterboard sheets with your own hands.
You can do without lathing and use mesh for reinforcement for finishing.
Production technology
Today, the question of insulating your living quarters is quite relevant, so every homeowner is faced with the question: what is better to choose for insulating a balcony - penoplex or polystyrene foam? The differences between these building materials lie in production technology.
Polystyrene foam is produced using polystyrene foam technology, without the use of pressure. The production technology provides for an increase in pentane and polystyrene granules by 50 times. The output is polystyrene foam consisting of 2% polymer and 98% air. Thanks to this production technology, the building material has high thermal insulation properties. Penoplex is a derivative of polystyrene foam, only the principle of its manufacture is slightly different. Penoplex is obtained as a result of the extrusion method. This method involves exposing polystyrene granules to pressure and high temperature. The result is a durable and solid material with a uniform consistency. It is also called expanded polystyrene. Compared to polystyrene foam, expanded polystyrene has a higher density and therefore has worse vapor permeability. But due to its high strength, such insulation can be subjected to various types of mechanical loads.
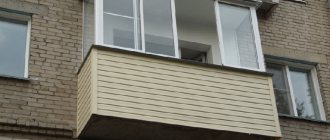
Warm loggia in a panel house
By design, panel houses are cooler than brick buildings. This is explained by the fact that the thermal insulation properties of concrete are worse than bricks; in addition, cracks often form between the panels over time, which will let the cold in from the outside.
When connecting a loggia to a living room in such houses, do not forget about this factor and use several layers of thermal insulation material to avoid the dew point, which destroys concrete. In this situation, it’s almost impossible to “overdo it,” but it’s easy to underdo it.
Izolon (foamed polyethylene with a reflector) is mounted on the main insulation with gluing of the seams.
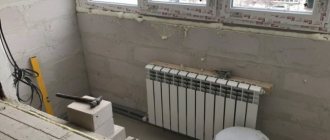
Installing a new radiator on the loggia or moving the old one
I want the new attached living space to be warm, and the solution seems to be moving the heating radiator from the living room or kitchen to the loggia. This is a gross mistake that you shouldn’t even think about: moving the heating radiator outside the external (load-bearing) wall is strictly prohibited. This is fraught with heat supply accidents (for example, freezing of pipes), and you will never receive permission for such arbitrariness. But if you do change it this way, then you will have to return the pipes and radiator to their original position at your own expense. Is there a way out? Of course, there is electric floor heating. Modern technology allows for efficient and safe floor heating by installing a special electrical cable. Moreover, for maximum heat transfer, the laying step can be varied depending on the planned heating temperature. I do not like? Instead of a water radiator, you can hang an oil electric heater in the same place, which will do the same job.
Sequence of work when insulating a loggia
It is necessary to clean the walls, floor and ceiling of the loggia from old facing materials. Large gaps in concrete loggias should be covered with concrete mixture.
Glazing
Installation of double-glazed windows, preferably double-chamber ones. These can be aluminum profiles, PVC profiles, natural wood windows. The installation of the window sill requires special attention, since the front wall is the coldest place. The width of the window sill must be calculated before ordering. To do this, you need to know the thickness of the insulation and the thickness of the facing material, and also add 10 mm for unevenness.
Preparing the loggia
If required, the old balcony door and window are dismantled if the loggia is combined with a room. For a wider opening, part of the wall is knocked out. We must remember that combining the loggia is a redevelopment, so all actions must be coordinated with the BTI.
- Check the walls and floor again. All holes must be filled with foam. After the foam has dried, lubricating waterproofing must be applied to the lower part of the walls.
- Leveling the floor. Cement-sand mixtures are used.
- Waterproofing to protect against moisture.
The floors, walls and ceiling are covered with waterproofing material, such as roofing felt or expanded polyethylene film. This is necessary to ensure that condensation does not accumulate on the thermal insulation material. The roofing material is laid overlapping, glued to the base, gluing the joints using a gas torch. Instead of roofing felt and film, penetrating waterproofing is used, which is a thick mixture. It is applied with a roller or brush. You can also use polyurethane painting mastics.
Floor insulation
The floor should be warm, durable and light. There are several insulation options:
- the floor surface can be covered with expanded clay and a screed can be made;
- instead of expanded clay, you can glue a thermal insulation material (pressed foam plastic, extruded polystyrene foam) to the floor, and glue a gypsum fiber sheet on top;
- place wooden logs, place the selected insulation in the empty space, then nail tongue-and-groove boards onto the logs;
Insulation of walls and ceilings
The choice of method for laying thermal insulation material depends on the subsequent finishing.
If the front finish is in the form of plaster and painting, then either gluing is used, or plastic fasteners are used when installing the insulation. If plasterboard or lining will be used in the front finishing, then installation takes place using fasteners. The foam board is applied to the wall from the corner, and a hole is drilled with an electric drill. Plastic fasteners are hammered into these holes, then the anchors are driven into the center of the caps. It is better to lay penoplex slabs in staggered order so that the slabs are staggered. This avoids movement and improves the insulation properties along the entire perimeter of the ceiling and walls. Covering with finishing material. For cladding, you can use moisture-resistant plasterboard, slatted or wooden lining, and wall panels. An air layer of 1.5 cm is left between the facing material and the insulation using an attached wooden sheathing, which is attached to the concrete wall with self-tapping screws. The selected cladding is fixed to this frame: plasterboard, lining. When facing with plasterboard, the joints between the slabs are sealed with putty. Painting fiberglass mesh with small cells is also used. The ceiling can be made suspended, under which the wiring can be hidden.
Flooring is laid on the floor. This can be a Euroboard up to 4 mm thick. Many people prefer to lay linoleum or carpet after laying wood flooring. When the option of floor insulation using a concrete screed is used, an electric floor heating system is installed. Turning off central heating is prohibited by building regulations. Or they use air heaters and electric fireplaces for heating. For individual heating in the room, you can install a radiator under the window sill on the loggia.
Installation of baseboards, sockets and switches.
Thus, the insulation of the loggia will depend on the goal being pursued and on the available budget.
Avoid These 5 Mistakes When Planning Your Loggia
And as a reminder, we want to provide a list of common mistakes that many people have made. We will help you find out exactly what mistakes are made and how to avoid them.
Mistake #1: redevelopment without permission
People often think about how best to insulate a loggia, but few people think about the fact that your decision to make one large room out of a loggia and a room must be registered by BTI representatives. This measure is necessary so that you do not have problems in the future with the sale of an apartment when inconsistencies are found with the real apartment and the technical passport.
Tip: you can glaze the balcony using sliding double-glazed windows on an aluminum profile and thus equip an unheated summer loggia. This measure will give you extra space, there will be fewer drafts, and you will not need to take permission for redevelopment.
Mistake #2: moving the radiator to the loggia
If you have permission to re-equipment, then you are unlikely to decide to take such a step, but just in case, it is worth warning that removing radiator pipes and heating equipment is unacceptable. There is too much heat loss on the loggia, and sometimes even with insulation the pipes freeze, which causes accidents. In addition, because of this you will have to pay extra for heating.
Tip: for heating, use a heated floor system or an oil radiator as an alternative - it can be hung on the wall or used as a regular radiator.
Mistake #3: dimensionless glass
This design solution looks great - when closed it is a smooth surface, and sometimes it is not disturbed even by edges. In addition, such sashes are convenient to assemble into an accordion, and this will not take up the space of the loggia. But for insulated rooms this is not an option - single glazing and cracks will not protect against the cold. In addition, dirt and dust quickly accumulate on them, as well as fingerprints, and there is no way to attach a mosquito net.
Advice: don’t stop at just this option - we advise you to take a closer look at the latest developments like thermally insulated lift-and-slide windows. But the ideal choice would be a PVC double-glazed window with hinged sashes. They do not take up as much space as they seem; it is possible to open them for ventilation, as well as open them to clean the glass surface from the outside.
Mistake #4: glazing on brackets
To increase the area, or more precisely, the volume of the loggia, apartment owners often want to build a frame for glazing (extended by a couple of tens of cm). This is how a canopy is made along the upper perimeter, on which snow will accumulate, and in bad weather the sound of rain will be heard. The main thing is that a glass build-up will form on the facade, which will spoil the appearance of the structure.
Advice: an alternative option is only available if the façade is uniform. If all the balconies in your house are open, you should discard this idea, or even simple glazing. You can also decorate your loggia with greenery.
Mistake #5: Overusing sealant
A real perfectionist's nightmare is seams with bubbling foam. They are unsightly, and they can also ruin the microclimate of your apartment - the fact is that the foam of polyurethane sealants cannot withstand exposure to sunlight and moisture, and without protection it will quickly collapse, thereby opening all sealed cracks and gaps to street noise and drafts.
Advice: you should carefully treat the “foamed” seams and cut off the excess, and then sand them with fine sandpaper and cover them with a layer of putty or acrylate paint (ideally, you should use both options). If you have neither paint nor putty on hand, use mounting tape, but then in the future paint will not adhere well to such seams.
Link to article
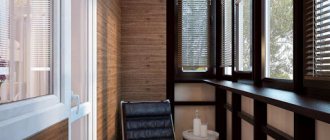
The loggia is often used as a study, a place to relax, a small gym, a winter garden and even a bedroom. Considering that this room was not originally intended for such needs, one cannot count on special warmth inside. The only way out is to insulate the loggia! Properly selected insulation will protect you from the cold in the winter, and will save you from the heat in the summer. For more information on how to choose insulation for a loggia, see our article.
Before discussing the choice of materials, let's say a few words about possible ways to insulate a loggia. It is advisable to carry out insulation outside, since in this case the dew point (the point of condensation formation) will be outside the room. The moisture will quickly evaporate, and the walls will be dry and warm. In addition, external insulation helps save the already small space of the loggia.
However, it is much more difficult to implement external insulation with your own hands than internal insulation, which is why most people choose the latter. This is exactly what we will talk about in this article.
With internal insulation, the dew point is inside the room, so there is a high risk of condensation and premature deterioration of the insulation, the appearance of wet spots on the walls and insufficient thermal insulation. To prevent this from happening, it is necessary to provide a vapor barrier during installation or use materials that do not absorb moisture (for example, penoplex).
The following materials are suitable for insulating a loggia:
- mineral wool,
- Styrofoam,
- penoplex,
- penofol or isolon,
- expanded polystyrene.
Each of the materials has both its pros and cons.
Mineral wool
There are only three options for mineral wool: basalt, slag and glass wool. It is sold both in rolls and briquettes. The properties of glass and basalt wool are approximately the same. Slag wool is made from low-quality raw material, but despite this it has good heat-insulating properties and is also low in price.
Styrofoam
The second insulation option is polystyrene foam. The sheet material is made of foamed polystyrene, is not afraid of water, fungi and bacteria; under normal conditions, the shelf life of polystyrene foam is about 50 years. A sheet of foam plastic can replace 40 cm of a wooden wall, a meter of expanded clay concrete and 4 meters of concrete. You can cover the floor, walls, and ceiling with foam plastic. After pasting, all that remains is to tighten the insulation with a reinforcing mesh, apply the facing mixture, putty, paint – and you’re done!
Penoplex
You can also insulate the loggia with penoplex. This is a modern material that is easily mounted with special glue. The functions of penoplex are similar to polystyrene foam, but there are a number of differences. Firstly, there will be significantly less waste left after working with the material. Secondly, penoplex has a higher density.
Izolon and penofol
These materials are polyethylene insulation covered with foil on one or both sides. Both penofol and isolon are used to insulate walls, floors and ceilings. Due to their heat-reflecting properties, insulation materials completely block heat loss from a heated room. Another visible advantage of the material is its small thickness. Izolon and penofol can be used as independent materials, but for the best thermal insulation they are usually used in combination with other insulation materials, for example, penoplex.
Expanded polystyrene
An excellent insulation material for a loggia is polystyrene foam. The material is excellent for floor insulation because it is highly durable and can withstand any load. If you do not plan to combine the loggia with the living room, you can get by with 30 mm thick polystyrene foam. If the loggia is combined with a room, you will need 50 mm thick insulation.
How to insulate
One of the optimal methods for laying insulation is layer-by-layer laying:
- First, the surface is waterproofed
- The next layer is the selected insulating material, which is also secured with appropriate fasteners. These can be nails, screws, plastic fasteners with wide heads.
- Then a vapor barrier is laid, which is secured with a construction stapler.
- At the final stage, finishing material is attached to the sheathing using special fastening materials.
Sheets of foam plastic are installed in the sheathing, and the joints are covered with polyurethane foam. The
result should be a layer approximately 60 - 70 mm thick, this is the distance from the outer layer to the finishing layer. Depending on climatic conditions, this size may vary. You must understand that any layer of insulation requires financial costs and labor, so it is better to immediately build a balcony conscientiously and not try to save on trifles.
In the situation with insulating the floor on the balcony, the sequence is also the same. If it is decided to fill the floor with concrete, then expanded clay is laid first and the solution is distributed on top of it. The concrete solution must be carefully distributed using a special rule and try to make the surface as smooth as possible. Then ceramic tiles or other finishing materials can be laid on such a surface. Rolled heated floors can be laid under the final finishing, and this will provide additional insulation of the room.
Find out more about how to raise the floor on a balcony with your own hands and what materials you can use to do this.
Read about how to choose an electric heated floor. Features of different models.
If you choose the option of a wooden floor, then guide logs are first laid, between which the insulation is laid. Then a finishing board or chipboard is laid on the logs. Laying chipboard is necessary if laminate or linoleum will be installed further. It is also worth noting that a special substrate , which will provide additional thermal insulation. When the finishing of the walls and floors is completed, skirting boards are installed to hide the joints of the finishing.
In the complex of works on insulating a balcony, it is necessary to pay attention to the ceiling. The insulation process is carried out according to the same scheme as walls and floors. The task will be complicated when the balcony or loggia is on the top floor and there is no ceiling. In this case, you need to take into account the additional costs of installing the ceiling and roof.
When working on insulating a balcony, you should not fuss and rush, this can lead to unreasonably high consumption of material. If you approach the matter carefully and carry out constant calculations, you can acquire a full-fledged additional room for little money.
Preparatory work
Before you start insulating the loggia with your own hands, you need to clearly plan the future scope of work, costs of materials, missing tools, etc.
If the insulation of the loggia has been detailed on paper, all materials have been calculated and prepared, then we proceed to the next important stage - preparation for installation
- We remove all unnecessary items and furniture from the premises.
- We carefully tidy up the ceiling and floor of the room (sweep away all the debris).
- We remove recesses and cracks in the ceiling; for this you can use polyurethane foam or sealant for interior work.
- Leave the treated surface until completely dry.
- We clean out all the rough edges.
- We provide steam and waterproofing of ceilings. To do this, we use a two-millimeter polyethylene film or a special membrane, connecting all joints using liquid nails or regular construction tape. The vapor barrier oilcloth must fit tightly to the ceiling.
- Take measurements, transfer the markings to the material and prepare the amount of insulation you need.
After high-quality preparation of the loggia ceiling for installation, we proceed to its thermal insulation.
First priority
Before you start insulating the balcony, you should glaze it
Why is glazing important? Old or low-quality windows will produce colossal heat losses, so it makes no sense to insulate the balcony if the windows will blow out. It is better to entrust the installation of windows to professionals who will carry out the installation using modern technologies.
After installing the windows, you should decide where it is best to install insulation. Of course, it is recommended to insulate the outer walls of the balcony, which will prevent the development of problems such as moisture settling on the walls and the appearance of fungal mold. But insulating a balcony if it is at a high altitude is not easy. To do this, you will need to call steeplejacks-builders, who will ask for a considerable amount of money for the services. And one more important point - in order to insulate a balcony from the outside, you will need approval from the authorities, since by your actions you plan to change the design of the facade of a residential building.
As a result, the last option remains - to insulate the balcony from the inside. Moreover, such work can be done independently if you have the necessary tools. Many apartment owners do not want to pay a lot of money for balcony insulation, so in order to save money, they decide to insulate the balcony themselves. This article will tell you how to insulate a balcony yourself, what material to choose for this, and what are the main steps to complete the work.
Advantages of an insulated loggia
By thermally insulating your loggia, you get a number of benefits:
- additional space is created - in such a room you can have breakfast, replacing the window sill with a bar counter, you can place cabinets, a refrigerator, and create a relaxation area;
- noise insulation is increased - a glazed or upholstered loggia perfectly allows various street noises to pass through, but if insulation is done and combined with the room, then sounds from the street will not penetrate into the room;
- the adjacent room will be warmer;
- By getting rid of the partition between the room and the loggia, you can modernize the apartment by changing the layout in such a way that the room will not be similar to any other.
The option with insulation has quite a lot of advantages; the only argument against it, if you do the math, is the price, but it will be only 5-10% higher than upholstery or glazing. At the same time, it is not at all necessary to pay a specialist; following the algorithm indicated below, you can completely do everything yourself.
How to choose the right insulation for a loggia or balcony
The balcony is a special structure, and it is not recommended to make it heavier. And if you consider that before insulation you will need to install double-glazed windows, which will entail strengthening the fence, then the insulation should be made of minimally lightweight materials.
To begin with, it must be said that all insulation materials have a different structure and installation method. Some, such as isolon, are sold in rolls, others - polystyrene foam and penoplex - have a hard, porous structure, while others are soft and elastic like cotton wool. It is easiest to work with those materials that are harder, but they do not fully meet the insulation requirements. For greater thermal insulation, they must be supplemented with isolon.
Basic requirements for insulation:
- Low thermal conductivity;
- Resistance to deformation from temperature changes;
- Environmental cleanliness;
- Strength under mechanical stress;
- Easy to install;
- Resistance to dampness, water, heat;
- Durability;
- Compatible with other materials.
When carrying out repair work, it is necessary to take into account that some materials, such as polystyrene foam, also have disadvantages. Almost all of them are destroyed when exposed to solvents and can crumble and break under load.
Penofol (foamed polyethylene with a foil layer)
0
Source:
The main advantages of the material are the ability to reflect heat and ease of use - it is available in rolls and mats. But it makes no sense to use penofol without other materials, because it does not provide the required level of thermal insulation. There are several varieties of it: “A” - with a one-sided layer of reflection, for combined insulation. “B” - with double-sided reflection, for heated floors, underlays for screeds. “C” is a self-adhesive type with minimal requirements for surfaces. In order for penofol to truly reflect heat flows, it must be laid with the foil (metalized) side towards the inside of the room.
Thermal insulation with penofol
Laying insulation on the ceiling is not always carried out as the final element of installing a loggia. Sometimes it is completely absent, which is why the owner of the room loses coziness, comfort and quality of heat.
The simplest method, which does not require much time for thermal insulation, is laying with penofol. This installation looks like this:
- We take accurate measurements of the length and width of the surface.
- We transfer the dimensions onto a roll of construction foam foam, and then cut off the required amount of material.
- We install the first layer of thermal insulation using transverse wooden slats (3-4 pieces are enough).
- We remove all recesses and joints with a special sealant or polyurethane foam.
- We wait until the surface is completely dry.
- We install the second layer of insulation using longitudinal slats. The finished ceiling structure must be connected without defects to the thermal insulation of the walls.
- The finish can be fixed using external slats that form a flat surface.
Thermal insulation of the loggia ceiling with penofol, including high-quality insulation of the floor and walls, will retain a significant part of the heat in your apartment in the winter. And installing loggia insulation yourself will save you a good amount of money, because... penofol is one of the easiest materials to process and relatively inexpensive.
Decorative finishing
Drywall will allow you to create multi-level surfaces.
After all the work on insulating the loggia has been completed, you can begin the final stage of work - decorative finishing. As a material for finishing a new warm room, you can choose exactly the same one that is used to finish the rest of the rooms of the apartment.
The most functional option is drywall. With its help, you can create any decorative surfaces and structures: from multi-level suspended ceilings to arched entrance groups and decorative niches.
Plastic wall panels and suspended ceilings made of polyvinyl chloride will also look good. Among the latest innovations, we can note the finishing with solid cork wood. Classic finishing options in the form of various types of wallpaper or wooden slats - lining - do not lose their relevance.
In general, there are a huge variety of decorative finishing options. Therefore, the choice of style, design and material can be left to the taste of the apartment owner. The main thing is that the design of the new room completely suits the owner, then this even small room can become a favorite corner for relaxation or work.
How best to insulate a balcony from the inside - tricks and tips from a professional
Practice shows that it is best to insulate balconies from the inside with penoplex and penofol. It is better not to use mineral wool for this. Although it is soft and comfortable, it does not like dampness. And temperature changes on the balcony are inevitable, therefore condensation is also inevitable.
Foam plastic, 4-5 cm thick, will be quite enough to insulate the walls of the balcony. Use liquid nails or special glue as an adhesive material. Do not use heavy mixtures for gluing. To ensure that the repair progresses in stages and the finishing materials do not interfere with each other, perform the work in a certain sequence.
Stages of work on insulating a balcony:
- Install plastic windows;
- It is best to start insulating a balcony from the ceiling;
- Having finished it, go to the floor.
- Lastly, the walls are insulated.
If you do everything correctly, then in the end your renovation will come together into one harmonious idea.
Additional insulation methods
If you live in an area with a cold climate, insulation alone on the balcony may not be enough. After all, even the highest quality heat insulators are sometimes unable to protect against severe frosts. Therefore, on cold winter days, you can organize additional insulation of the balcony.
For example, install an ordinary electric heater. For greater effect, it should be placed near the wall connecting the balcony and the apartment itself.
Important! Never place the heater near windows. The condensation that will be released during the process can greatly damage the glass unit.
If you do not want to install additional heating devices, and installing central heating on the balcony is strictly prohibited, you can install a “warm floor” system on the loggia. It will last for decades, creating a comfortable temperature even in the cold season. In addition, today many such systems are equipped with a special thermostat that helps you choose the most optimal mode.
Another option for additional insulation is air conditioning. In addition to the fact that it will heat the loggia in winter, it will also be able to cool the air on summer days. However, using an air conditioner has one rather important disadvantage - it will not be able to properly warm the floor on the balcony. Therefore, the warm floor still wins.
Tip: Installation of heated floors is another expense item. You should not rely only on your own strength, since installing the system is a rather complicated process. It is better to entrust the work to professionals.
When protecting the room from cold air and strong wind, do not forget that it is also important to organize good ventilation on the balcony. With hermetically sealed cracks this will be a little more difficult. Therefore, we recommend that you periodically ventilate the loggia for a more comfortable stay on it.
If you live in a cold climate, pay attention to the “breezer” type ventilation system, which supplies purified air from the street, preheating it to the temperature you need.
Breezer ventilation system operation process
Stages of thermal insulation work
Before insulating the loggia inside, a number of preparatory works are carried out:
- glazing and sealing of all gaps between the frames and the wall, parapet;
- surface preparation;
- waterproofing.
Double-glazed windows with frames made of any material are chosen as glazing. They must be functional, have a ventilation mode and be light enough so as not to create additional load on the floor slab.
The walls, ceiling, and floor are first cleaned of debris and other contamination, and the integrity of the surface is checked. If cracks and gaps between tiles are detected, they are filled with sealant. Level if necessary.
An important approach to properly and better insulating a loggia is to create a layer of waterproofing. To do this, use one or more materials, since it is necessary to waterproof the parapet and all external walls, floor, ceiling, frames.
Waterproofing materials include:
- roofing felt;
- penofol;
- various types of coating and painting substances;
- penetrating waterproofing;
- foilisolone.
Rolled waterproofing is glued overlapping to the base, and the seams are sealed with sealant, sealed with special tape or soldered, as is the case with roofing felt. When covered with foil isolone, an additional layer of thermal insulation is obtained. The use of coating, painting, and penetrating insulation is justified in hard-to-reach areas and in cases where the room size is very small.
After determining which insulation is best for the loggia and carrying out preliminary work, they proceed directly to the insulation itself. There are two ways:
- a continuous layer of heat-insulating material is created and any options for steam penetration into the insulation are minimized;
- laying insulation and covering it with a vapor barrier.
Insulation methods
First.
In this case, materials with low vapor permeability are used: polystyrene foam, expanded polystyrene. Their thickness must be such as to create the required resistance to the passage of steam and at the same time be sufficient for the necessary thermal insulation. In the case of using tile insulation, the sequence of work is as follows:
- tile adhesive is diluted;
- glue is applied to the corners of the slab and in the center;
- the plate is applied to the surface and holes up to 6 cm deep are drilled through it with a hammer drill for dowels;
- final fastening is carried out through the drilled holes using dowel mushrooms; a minimum of 5 dowels are used;
- the next slab is also laid after checking the surface with the rule;
- the seams between the plates are sealed with assembly adhesive or taped;
- it is possible to lay a second layer of insulation, for example, penofol;
- after laying all the sheets, reinforcement is carried out with fiberglass mesh;
- putty for leveling the texture of the mesh.
Reinforcement is carried out in four stages:
- treat the slabs with coarse sandpaper;
- cover the slabs with glue up to 3 mm thick;
- press a fiberglass mesh with cells measuring 5x5 mm into the glue;
- Apply a second layer of glue over the mesh.
You can also use rolled thermal insulation materials; the installation technology will not change. In this case, pieces of insulation of the required size are cut off. After such insulation, the resulting surfaces are completely ready for painting, decorative plaster, pasting with liquid wallpaper or any other decorative material.
Second.
For this method there are no restrictions on the choice of insulation, since the technology provides for the creation of a vapor barrier between it and the decorative finish. Such insulation is carried out with the help of arranging wooden sheathing or without it, but then the sheathing for fastening drywall, lining, PVC boards is made on top of the vapor barrier.
The sheathing is made from wooden beams or metal fasteners and profiles. In the case of metal parts, insulation must be laid under them.
The height and width of the sheathing depends on the type of insulation:
- for mineral wool, the beams are selected to be smaller in width than its mats, so that laying is carried out spaced apart;
- it is advisable to lay several layers of cotton wool to cover the beams, then they will not become conductors of cold;
- for foam plastic, all parameters of sheets and beams must match.
After laying the insulation into the sheathing, a vapor barrier material is attached to it with an overlap. It can be ordinary polyethylene or a membrane. All joints of the vapor barrier are taped with tape. If the cladding with insulation was carried out without sheathing, then profiles for installing the finishing are attached on top of the vapor barrier.
https://youtube.com/watch?v=H1se6Fl6Nms
Mineral wool
Insulation with mineral wool is the traditional and most common option.
This material can provide a fairly high level of thermal insulation and sound insulation.
At the same time, it is recommended to use mineral wool for insulation only if there is no load on the insulation. In addition, the insulation material must be protected as best as possible from exposure to moisture and the formation of condensation on it.
Mineral wool insulation work is carried out in the following sequence:
- First, all surfaces insulated from the inside are waterproofed. This stage is preliminary. To create a high-quality waterproofing layer before insulating the inside with mineral wool, it is best to use special insulating impregnations. They can be bitumen and polyurethane mastic, special paints and varnishes. In addition, rolled polyethylene materials (sold at any hardware store) are often used as an insulator. What kind of insulator will be used is not particularly important.
- Then you need to install the sheathing. The installation step of the wooden blocks should be approximately 1 cm less than the width of the mineral wool sheets. In addition, you need to select the bars so that their thickness is slightly greater than the thickness of the slab of heat-insulating material. The sheathing elements can be fastened to rough surfaces using dowels and self-tapping screws.
- To install mineral wool slabs, you need to select and dilute a suitable adhesive composition (which one is not important). It is applied to the surface of the slab from the inside, after which it is placed in the cell formed by the sheathing. The slabs need to be adjusted so that they are slightly larger in size than the dimensions of the cell. This will avoid unnecessary voids.
- As soon as the adhesive composition has dried, it is recommended to additionally secure the heat-insulating material with your own hands using mushroom dowels.
- Surface cladding can be done using any suitable materials. Any type of finishing that will not create a large load is suitable for this - plastic panels, plywood sheets, lining...
- Finally, surface finishing and decorative work are carried out. In this case, the work can be done with any finish.
ISOVER material gives good results and reviews.
The floor is not properly insulated
In order not to overload the floor slab (for example, with a concrete screed or leveling mixture), it is better to make the floor covering from lightweight modern materials. On top of the vapor barrier - foil or polyethylene film - mats made of penoplex or mineral wool are laid in two layers. On top is waterproofing, which can be used, for example, hydroglass insulation. The rolls are placed on top with an overlap of about 10-20 centimeters. Using a blowtorch, the mastic-based strips are fused together, and if the use of open fire is for some reason impractical or dangerous, then the sheets are fastened mechanically. Then a layer of plywood, and only then carpet or laminate.
Finally, the “classic” method of floor insulation is also not bad: wooden logs are laid on the slab, between which modern insulating materials are located.
Comparison table of characteristics
We have compiled a comparison table with the presented materials so that you can choose what is suitable for your renovation.
| Material | Thermal conductivity | Diameter, mm | Price, rub |
| Styrofoam | 0.052 W/mK | 20-500 | 1180 -3750 |
| Penoplex | 0.03 W/mK | 30-100 | 4555 – 4995 |
| Mineral wool | 0.034-0.093 W/mK | 90-120 | 332 – 1621 |
| Penofol | 0.037-0.052 W/mK | 3-10 | 38 – 355 |
| Izolon | 0.031 W/mK | 3 -10 | 1000 – 3000 |
Methods for attaching insulation
There are two ways to attach the insulation. The first way is to attach it directly to the wall surface using dowels or glue. The second method is to install insulation in a specially mounted wooden or metal niche.
How to insulate a loggia when combined with a room
To attach the insulation to the surface using dowels, you will need to make a small hole in the insulation, drill a hole in the wall and drive a plastic dowel into it. Then install the mushroom dowel into the insulation and tighten it to the wall using a self-tapping screw.
Insulating a loggia from the inside with your own hands, step-by-step instructions
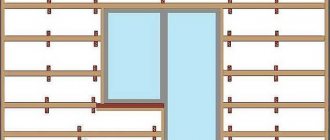
To make the frame, you will need to prepare wooden blocks with a thickness equal to the thickness of the insulation. The bars must be treated with a special anti-rotting solution. These bars must be secured to the entire perimeter on the floor and ceiling, as well as along the entire perimeter of the parapet. It is necessary to fix a block on the floor that will divide the floor along the balcony into two parts.
Preparing for insulation of the balcony
In any repair or construction process, everything begins with the preparation of surfaces and territory. Therefore, before you insulate the balcony with your own hands, you will have to get rid of all the rubbish that is there. By the way, things that you plan to leave later also need to be moved to another room.
After the balcony is completely cleared of unnecessary things, you need to completely inspect the room. Firstly, it is important to understand which parts of the loggia require more thorough insulation. In addition, you need to pay attention to cracks and chips that allow cold air to pass through.
Important! Some balconies have a rather small area. And the thermal insulation material takes up space in the room. In this case, it is better to immediately determine the so-called “cold” and “warm” zones of the loggia and insulate only those that are more susceptible to frost and wind.
The balcony parapet especially needs insulation.
Right now it is desirable to get rid of significant defects on the surfaces. Large cracks can be sealed with putty or foam.
At the same stage, you should decide on the type of insulation for the balcony and stock up on all the necessary tools. We'll talk about thermal insulation materials a little later. Now let's look at what tools you will need to insulate your balcony.
Tools for insulating a balcony:
Insulating a balcony with your own hands is a fairly simple and straightforward process. The main thing is to understand the sequence of work and stock up on the necessary tools. These include the following basic materials:
- Insulation in the required quantity (calculation takes place in accordance with the number of layers and the area of the balcony).
- Cladding material for exterior finishing.
- Polyurethane foam.
- Waterproofing materials.
- Adhesive mixtures.
- Wooden or metal beams (for the frame).
- Dowels, screws, nails of different sizes.
- Metallized tape for sealing seams.
In some specific cases you may also need:
- drill;
- perforator;
- knife;
- scissors;
- hammer;
- building level;
- rollers;
- spatulas, etc.
Here everything will depend on the finishing of the loggia.
Additional article: the better way to insulate a balcony.