A doorway is a place in the wall that is used for the purpose of installing the panel. It can be equipped externally or internally.
The door frame is a completely static part of the structure, which is fixed in the opening. It allows you to secure the fabric using loops.
When calculating the size of a standard interior door opening, you should know the size of the frame. Dimensions include parameters such as height, width and dimensions of the platbands. In addition, it is equally important to consider the thickness of the box and the presence of a threshold.
When performing calculations, do not forget to add the dimensions of the box on each side to the width of the canvas. It is also necessary to provide for a gap between the wall and the frame. Its size varies, as a rule, from 15 to 30 millimeters.
According to the GOST standard, the typical parameters of openings for interior doors are as follows: height - 2.07 meters; width - from 0.7 to 1.3 meters; Moreover, those whose width is no more than 1 meter are used for single-leaf panels, and the wider ones for double-leaf ones. There are also so-called one and a half pole structures. Their doors have different widths.
Content
- Moisture resistant bathroom door
- Dry bath doors
- Bathroom doors. Choice of color and decor
The degree of influence of high temperatures and moisture on bathroom doors depends on several factors: firstly, on the volume of the room, and secondly, on the layout of the room. For example, some bathrooms have stationary showers without separating partitions. In such cases, water will most likely constantly damage the surface of the bathroom door. A similar situation will occur if the bathroom is too close to the product. If the bathroom door gets wet regularly, you need to choose a moisture-resistant design.
If the bathroom is small, there is poor ventilation, and more than one person uses such a bathroom, then the door can naturally suffer from exposure to high humidity. If this is exactly the problem in your apartment, then it is better to choose a moisture-resistant door.
In other cases, the moisture resistance of the door
doesn't play a big role. In other words, if the bathroom area is not too small, and a good hood is installed in it, and the place for taking a shower and other hygiene procedures is closed so that splashes of water do not leave the shower area, then you can not pay special attention to the moisture-resistant properties of the product, but install it , which is more suitable for the intended interior style.
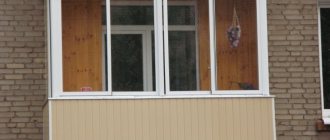
Window facing the street
Unlike the interior option, this window opening is located more successfully and makes it possible to obtain excellent natural light and ventilation in a private house or in a modern multi-story building.
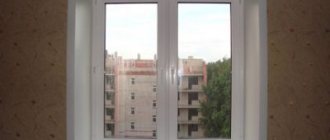
Bathroom window overlooking the garden
Various layout options are possible:
- bathtub opposite the window - any shape of bathtub from rectangular to asymmetrical will do;
- a window opposite the entrance - all plumbing can be placed along the free walls, installing a corner bath or shower stall, which will free up space for a washing machine, furniture, etc.;
- washbasin near the window - in this case, the mirror can be installed on the opposite wall;
- bath near the window - it is recommended to insulate the window opening and the adjacent wall so that there are no drafts and the temperature during water procedures always remains comfortable.
How to choose an interior door size
For a better understanding, let’s try to theoretically select an interior door according to the size of the opening. After taking measurements in accordance with the recommendations, we have an opening with dimensions of 91*205 cm. Offhand, this opening should be suitable for a door standard for rooms with a door leaf width of 80 cm. Let’s check the assumption by calculation:
- to the clean passage we add two thicknesses of the box 3 cm * 2 = 6 cm;
- let's provide a technological gap of 1.5 cm on each side, it turns out another + 3 cm;
- the total width of the door block will be: 80+6+3= 89 cm;
- to the standard leaf height of 200 cm, you need to add 3 cm of the door frame and 1.5 cm of the installation gap, you get 204.5 cm, but this is the size without a threshold.
If it is intended to install a threshold, then the total height of the block should be determined taking into account the thickness of this part. Using these simple measurements and calculations, you can correctly select the size of a standard interior door without a frame or with a frame.
It’s easy to “find out” the desired door block by markings:
- The first two letter designations indicate the appearance of the product: P - canvas without frame, D - door, O - glazed, G - blind.
- Next comes a couple of numbers - this is the height of the opening (but not the door) in decimeters.
- The next two signs are the width of the doorway.
- Another letter indicator is L or P, that is, the door is right or left.
- The marking ends with the designation of the current standard.
Cheap and easy way - finishing with PVC panels
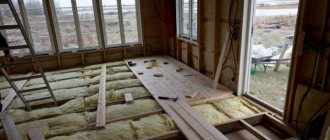
First, the installation of a wooden frame is required, which is made from beams with a cross-section of 2x4 cm. Four side planks are fixed on the wall slope perpendicular to each other. Nails are used as fastening. Three planks are attached at the top.
Prepare plastic panels, cut them slightly wider than the bevel, since the edges are bent inward. To give shape, the plastic edges are trimmed from the inside out with a sharp knife. The prepared profiles are applied to the bevels and secured with self-tapping screws.
Mounting is simple, but requires the following sequence:
- outline the proposed finishing boundary;
- make five holes in the wall;
- insert wooden plugs;
- attach the panel with self-tapping screws to the plugs.
Slopes in a plastic bathroom near the door are easy to install. They have a light, elegant design. The only drawback is its short service life.
Wooden models
These are popular due to their appearance and good performance. Installing them is not difficult. Wood panels must be the same in structure and thickness. The surface is pre-cleaned, primed, and plastered. Then the frame is prepared. Glue is applied to the planks, applied to the wall, and secured with self-tapping screws. Excess glue is immediately removed.
You are convinced that slopes are quite easy to make with your own hands. Which material to choose depends on your taste and financial capabilities. With little expense you can decorate everything beautifully. You can show your imagination by using combined materials. Do not forget about sealing, for which use polyurethane foam or mineral wool.
Drywall slopes
To make them, pieces of gypsum board of the required size are used, which are screwed to a profile frame or glued to the sides of the opening. Then the surface of the drywall is primed, puttied and painted. In the case of laminated gypsum board, no further finishing is required. The space between the wall and the new slopes is insulated with polyurethane foam and insulation.
Attaching gypsum boards is easier and faster than creating a flat surface with plaster. But we must not forget that after installation, finishing is required, which will take several days. If you use laminated gypsum board, then the installation of the slopes is carried out in one day.
USEFUL INFORMATION: Drywall slopes: do-it-yourself installation
Advantages of using drywall:
- Low cost.
- Easy to install. Requires very basic construction skills.
- The ability to easily create perfectly smooth surfaces.
- Additional insulation.
- If preparation for staining and painting was carried out, then a simple repair, suitable for repeated repainting.
- If you use a good semi-gloss and gloss paint, you can wash the slopes many times.
- During finishing preparation and painting, it does not require the installation of plastic corners.
We recommend
Roller blinds of closed type.
Attaches directly to the frame, no drilling required.
Excellent protection from the sun and heat.
They don't take up space.
Many colors and sizes.
Price from 1,700 rubles for a complete set. Delivery is free from 3 days.
Lots of positive feedback. Verified seller! Read more >>>
USEFUL INFORMATION: How to putty the slopes on windows?
Flaws:
- Inability to firmly bind the slope material and the PVC frame (as with the plaster version). This leads to the appearance of cracks at the joints.
- Fear of moisture. If the windows “cry”, under the influence of condensation the drywall, even moisture-resistant, gradually collapses and swells near the frame. Regardless of whether the plasterboard is laminated or painted. Judging by the reviews, this is the main reason for refusing to use gypsum boards in the manufacture of slopes.
- Risk of sagging, dents and crushing. Still, drywall is a fairly fragile material.
To avoid the finishing stage, you can take laminated gypsum board instead of the usual one. But in this case, you will have to use special corners to cover the ends of the sheets.
Expert opinion
Anton Tsugunov
Construction expert. Entrepreneur. 17 years of experience. More than 100 completed objects.
I use moisture-resistant Knauf plasterboard with dimensions 2500x1200x9.5 mm . It is important to use smooth and dry sheets.
Finishing a bathroom with tiles around the bathtub: nuances of the work
The biggest, but surmountable problem that craftsmen usually face when tiling a bathroom is the bath itself - its presence in the room affects the technology of laying tiles. If without it the tiles can be laid evenly on all walls, starting from the very bottom of the floor, then with it present the technology changes as follows.
- First of all, the part of the floor on which the bath will be installed is laid.
- They begin to lay the first row of tiles, resting it on the bathtub itself - this is where all the other problems arise. Firstly, a good third of the walls have to be tiled in the reverse order - from bottom to top, going down one row each time. Secondly, this is the cladding of the side areas under the bathtub - in most cases, no one solves this problem, and they leave it to chance. The maximum that the craftsmen bother to do is to place one, or even half a tile on each side under the bathtub. If you go this route, then the walls under the bathtub at a minimum need to be puttied with tile adhesive, even if the front part of the bathtub will be finished with tiles.
Bathroom tiled photo
In principle, finishing a bathroom with tiles in the presence of such a plumbing fixture as a bathtub causes difficulty only for beginners. Masters are familiar with this whole thing, and they don’t even ask such questions. Yes, in general, almost no one reads articles like this, so if you find yourself here, then draw the right conclusions and take all these nuances into account.
There is another approach to solving this problem, but it is not always possible to implement it - the room can be tiled first, and only then a bathtub can be installed. I will say right away that in small bathrooms, in which the bathtub fits from wall to wall, this option will not work - you simply will not put the bathtub in place without damaging the finish. The other side of the coin of this approach to business is the tightness of the joint between the wall and the bathtub - by installing tiles on top, you reliably protect the space under the bathtub from possible leaks. Otherwise, the sealing of this gap by any means will be compromised over time.
Finishing a bathroom with ceramic tiles photo
To minimize drying time, apply the paint in good light, being careful not to create a thick layer that takes longer to dry and can end up looking uneven. If using a brush, dip the bristles halfway into the paint, then lightly tap the edge of the tray to remove excess. When using a roller, place it in a special tray so that the paint is evenly distributed over the surface of the roller.
Tip: After painting, turn on a fan or open windows to increase air flow. In hot and humid climates, run a dehumidifier if possible.
Plastering
The slope is primed and pendulum profiles are installed along the opening.
Next, apply plaster from a cement-sand mortar. Alabaster can be added to improve adhesive properties. The prepared solution is applied to the surface with a trowel and leveled with a spatula, focusing on the beacons. If you plan to paint, the slope must be carefully prepared. To do this, plaster with large fractions is applied to a reinforcing mesh, followed by finishing. For strengthening, a perforated profile (corner) is installed. It is pressed into the wet plaster.
The plaster must be completely dry before it can be painted. Plastering is a cheap finishing method, but requires careful leveling of the surface.
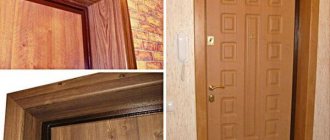
Extras
It is extremely convenient when such structures are installed in a hallway where there are several doors, for example, the entrance and doors to the bathroom and living room. This allows you to make boxes and slopes from the same type of material. In this case, installing doors will take less time, and the result will be a neat appearance of the hallway in any style. Installing the extensions is extremely simple. And the material from which they are made is much higher quality than chipboard, plastic or laminate, but its cost will also be higher.
The choice of material for creating slopes depends on many factors. In this case, you should take into account the type, size, weight and material of the doors, their installation location, humidity level and operating load. Materials for finishing slopes also vary in cost and complexity of work, so to bring the doorway into proper shape, it is better to turn to professional craftsmen.
vote
Article rating
Photo selection of bathroom interiors in various styles
In our selection of photos you will see how to decorate a bathroom with a window, adhering to completely different styles. You can use these ideas or their elements to make your bathroom comfortable and beautiful.
Plasterboard finishing
Holes are drilled along the perimeter of the door bevel at a distance of 20 cm from each other. Then insert the dowels and screw in the screws (not all the way).
Cut slats of the required sizes according to the dimensions of the opening. A guide strip is screwed along the width of the doorway with self-tapping screws.
Apply glue to the back side of the drywall strips, apply it to the wall, and press down. Excess glue is immediately wiped off.
The gaps between the wall and the bevel are sealed with excess glue. After complete drying, you should proceed to finishing work.