- Glass. You can immediately order glass cutting in a workshop, or you can cut it yourself. You should be especially careful with old glass that has been lying around for several years - various deformations will have already affected them and it will be difficult to cut them.
- Glass cutter.
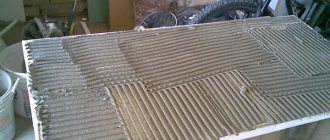
- Glass cutting table. The dimensions of its lid must be no less than the dimensions of the glass itself. It is very important that the surface is as flat as possible. Additionally, you can put an old blanket or cloth on the surface.
Zenzubel - a type of planer for cutting grooves
- Chisel. Will be used to dismantle the old bead. Width – 1.5-2 cm.
- Hacksaw for metal.
- Roulette.
- Nails 2-3 cm long. It is recommended to use copper-plated ones - they will last longer.
- Window sealant.
- Insulating tape.
- Pliers.
- Zenzubel.
- Marker or other marking tool.
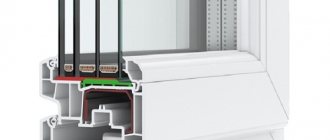
How to attach glass to metal
Creating structures made of glass and metal implies the need to fix dissimilar materials to each other. This can be done in several ways, but the most reliable of them is to use fittings, which must be of high quality, otherwise the structure will not last long. It is precisely these components that are produced by , which is the largest manufacturer of products in Russia, without which it is impossible to create a glass structure that is reliable, attractive, and durable.
Ready-made glass greenhouse options: tips for choosing + photo gallery
To make the right choice, you should decide on the shape, dimensions and purpose of the greenhouse, as well as select a suitable location for the construction.
Decorating greenhouse walls with decorative bricksAfter purchase, you must check the package for compliance with the parameters, as well as the presence of a drawing and installation instructions.
It is recommended to pay attention to the price, which is often an indirect indicator of the quality of materials.
How can glass be bonded to metal?
To fix the glass module, several methods are used, which are selected depending on the type and purpose of the finished product. Glass is a special material, and it cannot be nailed or fastened with self-tapping screws. Moreover, tempered glass cannot be drilled using conventional tools. If there is a need to carry out such a manipulation, then a special machine is used for these purposes, which is available to every serious company engaged in the manufacture and installation of glass structures.
From this fragile-looking material, you can make a huge number of products that perform both decorative and practical functions. These are not only windows, shelves, tables and other furniture, but also doors, shower enclosures, office partitions, display cases, kitchen aprons and much more. It is clear that the easiest way to make ordinary windows from glass in wooden frames, because in such cases the canvas is fixed in the frame using wooden glazing beads. But what if you need to create a more serious design? Use special fittings, which can always be found in the company’s online store.
Main stages of glazing
The main stages of glazing wooden frames are: • preparing the frame and removing old glass • installing new glass • finishing the window frame. Petrovich was a practical person in life, so he skipped two pages of text from the reference book without looking. “In order to install the glass, it is necessary to prepare the frame,” Petrovich slowly began to remove the window frame with the broken glass from its hinges. The old wooden frame, swollen from moisture, was difficult to give in, so Petrovich armed himself with a crowbar.
Creaking from the unexpected hard touch of the crowbar, the window frame suddenly came off its hinges. Having placed the frame on the floor, Petrovich began to carefully remove and quietly knock out the remaining glass in order to insert new glass into the frame.
Basic methods of fixing glass
- 1. Gluing with double-sided tape.
- 2. Gluing with ultraviolet glue.
- 3. Thermal bonding method.
- 4. Fastening using fittings, which include: clamping profiles, brackets, point connectors, hinges, shelf holders, etc.
- 5. “Embedding” into a wall panel using special solutions. This operation is carried out at the stage of finishing work.
The last method belongs to the category of “jewelry”. Since performing such work requires high precision and accuracy from the performer, since the glass module can easily be stained with the solution during the plastering process. This technique is applicable in cases where you need to decorate a wall with mirrors or glass elements. If the decorating area is small, then professional glue can easily cope with this task.
How to care for a glass greenhouse
Careful adherence to the rules of care is a guarantee of maintaining the aesthetic properties of the greenhouse for a long time:
- It is recommended to wash glass with the same products that are used to clean home windows.
- In places where condensation forms and favorable conditions are created for the growth of microflora (for example, in corners), it is recommended to use an antiseptic for disinfection.
- Carefully care for the wood, remove scratches, and do not forget to paint regularly.
- Closely monitor the tightness of the contacts of wooden and glass elements.
Proper operation of the structure will allow the latter to please the eye and bring benefits for decades.
Bonding surfaces using UV glue
This gluing method is gaining more and more popularity every day. UV glue is a transparent chemical composition endowed with the ability to polymerize under the influence of ultraviolet radiation. Using this product, you can restore the integrity of tempered glass and triplex, but provided that too much “responsibility” is not assigned to the product. For example, ultraviolet glue allows you to repair dishes, an aquarium or a piece of furniture; it is indispensable in the production of individual glass products, but when creating shower enclosures and other glass structures, it is better to use various accessories.
Technological features of UV glue include:
- 1. The need to use a UV radiation source.
- 2. One of the fixed surfaces must be endowed with high light transmittance, otherwise polarization will not occur and the bonded surfaces will not be properly connected.
- 3. The thinner the layer of glue, the more reliable the connection.
- 4. The gluing process only takes a few minutes.
- 5. There is a whole line of similar products that provide reliable fixation of glass with: wood, metals, plastics.
Glass as a material for a greenhouse - pros and cons
The advantages of glass coatings include:
- almost complete transparency and light transmission of the material; the ability to maintain optical properties for a long time (the transparency of polycarbonate is 10% lower than that of glass, in addition, every year due to microcracks it decreases by an average of 4%);
- chemical inertness;
- ease of maintenance, the ability to use a wide range of detergents;
- comparative resistance to abrasive influences;
- low coefficient of thermal expansion;
- the possibility of recycling old windows and doors with glass elements, which has a positive effect on construction costs;
- ease of replacing damaged glass elements;
- high aesthetic qualities and profitability of the structure - the greenhouse lasts on average 25-30 years, while the invested costs usually begin to pay off after 4-6 years of operation.
However, one cannot fail to note a number of vulnerabilities of the material:
- fragility - strong hail can damage the coating;
- higher thermal conductivity compared to other materials (for example, polycarbonate);
- relatively high weight (exceeds the weight of a polycarbonate sheet with similar parameters by 2-3 times), making it difficult to work with glass and requiring the installation of a strong frame and a reliable foundation.
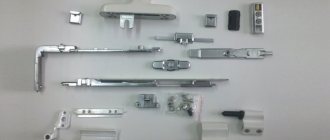
Accessories: their types and advantages
How to attach glass to metal? The easiest installation method involves using a clamping profile. Unfortunately, this type of fittings cannot be used in all cases, since there are types of glass structures, the creation of which involves the use of other components. For example, some types of shower enclosures are created using point connectors. In general, the use of a metal clamping profile made from aluminum alloys and stainless steel is quite justified. The materials from which such fittings are made have amazing properties, which significantly increases the service life of the finished glass product.
To fix glass modules to each other, as well as to connect them with other materials, metal auxiliary elements called fittings are used. Their range is simply huge, and the number of items reaches several hundred. It is noteworthy that the installation of a glass structure requires a certain set of fittings, which can be selected and formed without any difficulty, because in the catalog of the company’s online store you can find an incredible number of product items.
It is worth noting that the manufacturer regularly releases new types of components onto the market, and if the required element is not in the assortment, then the design bureau specialists can develop a project for the necessary accessories, which will be produced in the required quantity. What applies to mounting hardware:
- 1. clamping profiles;
- 2. brackets;
- 3. point connectors;
- 4. complex connectors;
- 5. spider systems;
- 6. loops.
Comparison of glass and polycarbonate greenhouses
Polycarbonate greenhouse
Comparative characteristics of two types of greenhouses are given in the table below:
| Comparison | Glass greenhouses | Greenhouses made of polycarbonate |
| Advantages | Low ignition rate, high fire safety | |
| Ability to maintain appearance for a long time | High strength | |
| Long service life (up to 50 years) | Good thermal insulation properties – 8 W/m2 * °C | |
| Chemical inertness | Low thermal conductivity – 0.14 W/m2 * °C | |
| Ease of maintenance | Light weight – 1.3 m2 | |
| Easy to replace if damaged or damaged | Ease of installation | |
| High transparency – 92% | Minimum time spent on maintenance | |
| If qualified, the material is easy to process and install | ||
| Low cost of material | ||
| Flexibility | ||
| Flaws | Relatively high weight - up to 10 kg per m2 | It is recommended to trust installation to professionals |
| Low thermal insulation properties – 185 W/m2 * °C | Flexibility becomes vulnerable when the snow cushion is heavy | |
| High thermal conductivity – 0.8-0.9 W/m2 * °C | Transparency is about 86% | |
| High price | Short service life (up to 10 years) | |
| Operation and installation require care | Low resistance to chemicals | |
Requirements for mounting hardware
When choosing the necessary elements, you need to understand that their functionality and reliability are not all the properties that such components should have. When choosing fittings, one should not forget that it is a full-fledged element of the interior, because glass is a transparent material, and after installing the same hinges or connector, not only their external part will be very clearly visible. The vast majority of such products are made of stainless steel and alloys of various metals, and a wide range of decorative coatings allows you to choose the option that you really need, which can fit into the existing interior to the maximum.
Considering that components often have to “work” in aggressive environments, they must be made of materials that are not prone to corrosion and can withstand temperature changes and constant exposure to high humidity. An example of such a design is a shower stall, which is regularly attacked by water splashes and other attributes of water procedures. Glass and metal are a worthy symbiosis that allows you to create durable, safe, beautiful and easy-to-use structures, and the quality of the main materials and components determines how long the glass product will last.
Selecting industrial adhesive for gluing glass
To select an adhesive, you should answer a number of questions:
Does the color of the glue make any difference? For gluing clear glass, clear (colorless) glue is preferred. If gluing occurs on dark surfaces, we can offer black or gray adhesive.
Flat glass bonding or vertical application – do you need a high-strength industrial adhesive? You need a low viscosity adhesive if you are gluing glass and trying to minimize the formation of air bubbles. A glass adhesive with a low viscosity index would be a smart choice.
What is the gluing speed, processing time - minutes or hours? The formula of neutral high-adhesive adhesives is such that the slower the adhesive cures naturally from moisture in the air, the better it adheres to the surface. For production purposes, in the practice of accelerating processes, 2K adhesives PURAFLEX 9270 are used.
What materials do you use? If you are gluing glass to metal, you need to take into account the values of differential thermal expansion and contraction - you should pay attention to the fact that the glass does not crack when the temperature changes and the adhesive composition must compensate for differences in deformation coefficients!
What are the dimensions of the glued surfaces - area, length, width? Another important factor when gluing dissimilar materials, depending on deformation due to thermal expansion or mechanical loads, is the relationship between surface area and loads on the glass. For example, a glass solar panel in a metal frame will experience large temperature fluctuations that will cause the frame to expand and contract extremely.
There are several types of holders. The choice depends on what work needs to be done and what material will be worked with. The following types of plexiglass holders are distinguished:
- Decorative (distance) holders. In most cases, they are made of metal and allow you to mount plexiglass products at a certain distance from the wall. In particular, these can be different signs and plates. On one side they are attached to the wall, and on the other there is the plexiglass holder itself.
Decorative holders for plexiglass allow you to mount plexiglass at a distance from the surface - Bolts. Since plexiglass can be easily drilled, this type of fastener is widely used. But when working with such fastening material, it is worth considering the fact that small scratches may form when drilling, and at high speeds of the drill there is a possibility that the edges of the hole will melt a little. In this case, before starting work, you need to thoroughly weigh the pros and cons.
- Glue for plexiglass. Most often this is an adhesive made on the basis of dichloroethane. It firmly fixes the product on different surfaces, is transparent and invisible. It is best to use this method of fixation for small amounts of work.
- Aluminum profiles are used for outdoor advertising and fixing various lighting devices. Their advantage lies not only in strength and reliability, but also in the fact that they have different colors that allow you to choose the optimal solution. Aluminum is strong, durable and resistant to negative environmental factors.
Aluminum glass profiles are lightweight, high strength and extremely durable - Plastic profile. Despite its lightness, ease of installation and low price, this material has one significant drawback, which is its short service life.
Of course, plexiglass is a practical, high-quality and reliable material from which products of any complexity are made, but the functionality of such products itself will be significantly lower if fastening materials are not used.
Today there is a large selection of different accessories for acrylic glass on the market, and everyone can choose the fastener that is suitable for a specific installation process.
Do-it-yourself replacement of glass in a metal frame
A crack in a window glass is synonymous with heat loss and can lead to injury. For safety, it is better to replace this glass. Anyone can replace cracked or broken glass, as long as they have the tools on hand.
Stage 1: Required Equipment
To replace glass in a metal frame, you will need the following equipment: gloves, bay leaf putty knife (curved and flat), can of putty, hammer, wide putty knife, brush and linseed oil.
Stage 2: Removing the broken glass
Before starting work, put on gloves. They are necessary to protect your hands from cuts. Here our window is inserted into a metal frame. That is why it is impossible to loosen the window, which is sometimes easier, especially if the window is high. This glass is not completely broken. Therefore, we must shoot down what remains in place. We also cover the floor in case the window opens inwards. It's easier than picking up the pieces later. To avoid splinters everywhere and protect yourself from them, we board up the window with cloth. Then, taking a hammer, we strike the fabric behind which the cracked glass is located.
Stage 3: Remove old putty
If there are traces of old putty on the frame, then it can be removed by taking a spatula and a hammer, if it is hard, of course. After we have removed the old putty, we again use the spatula to clean all the grooves of the window so that our future mixture can adhere perfectly.
Stage 4: Place new putty
We adjust the dimensions of the glass on both sides by removing 1 or 2 mm. On old windows, the glass is not always square in shape. It is important to ensure that the glass fits perfectly. To ensure that the new glass “sticks” well, add a little putty to the grooves before inserting the glass. To do this, we make a small “pudding” of putty, which we place on a spatula. We insert the glass into place, while supporting it on all sides. It should fit “as if it were original”, without rubbing or getting stuck anywhere. Then spread the “pudding” with a spatula. To ensure good edges, we use another spatula, a wide one, it also removes excess putty if necessary. In the corners we use another spatula, a curved one.
Tools and accessories
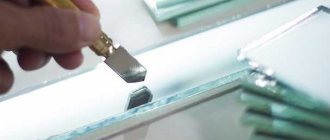
The cutting of the canvas is carried out with a specialized glass cutter. The principle of its operation is that first it makes a scratch on the glass with the required geometry, and then the performer breaks the sheet along the resulting line.
In the retail chain you can find two types of glass cutters :
- roller;
- diamond.
The first one is popular among home craftsmen. Its roller is made of carbide metal, which provides this design with a long service life. In terms of cutting technology, it differs from diamond cutting in that it does not actually scratch the surface of the blade, but squeezes out a shallow groove in it.
The second one, more popular among professional glaziers, has a small diamond in its design. It is not easy for non-professionals to work with it, since it is necessary to correctly select the desired angle of inclination. Otherwise, the performer will make a lot of defects during work.
The required angle of inclination of a diamond glass cutter can be determined by the following external signs. When working, you should get a barely visible line, and the process is accompanied by a subtle ringing sound.
For industrial purposes, a professional oil glass cutter is used for mass cutting of glass. In its design, it has a reservoir with oil, which is squeezed out during operation, thereby reducing the friction force, which ensures cutting quality.
will need to prepare the following tools and devices to replace the window :
- chisel and screwdriver for dismantling glazing beads;
- hacksaw for cutting glazing beads;
- hammer and small nails for fastening glazing beads;
- measuring instruments: meter, level, square and tape measure;
- marker for drawing a cut line on a window sheet;
- cutters for cleaning grooves from dirt;
- glazing beads, sealants, sealants and putty.
How to fix glass in a metal frame?
DISPLAY GLASS INSERT
Inserting display glass into metal frames with glazing beads
The rubber seal RP-1 (Fig. 77) has a U-shape. It is made from porous frost-resistant rubber. Used for inserting glass 6.5 mm thick. Seal height 12, thickness 3 mm. At the top, a distance of 2 mm remains between the lips of the seal so that the installed glass is tightly pressed by the seal. If, when inserting glass, the sealing jaws protrude from the glazing beads, they are cut off at the same level as the edges of the glazing beads.
Before inserting glass, remove all glazing beads from the frame.
3, measure the distance between the folds of the frame and determine the dimensions of the glass, taking into account the profile put on it. Having cut out the glass and cleaned its edges, try on the sealing gasket and cut out triangles in the right places so that when it is bent in the corners of the glass, the rubber fits tightly. Apply 88H glue to the groove of the rubber or the edge of the glass, put the rubber on the glass, butting it end to end at the top and securing it. After this, wedge-shaped pads 5 are placed in the required places of the frame (they will be located under the seal), the glass is brought to the frame, inserted and secured around the entire perimeter with glazing beads on screws 4. The edges of the protruding seal are cut off with a sharp knife or chisel and the top of the cut seal is filled with sealant 6 , leveling and smoothing it.
If rubber seals RC-1 and RC-5 are used (Fig. 78), the frames are made with one permanent and one removable glazing bead or with two removable glazing beads, which are attached to special fixing plates welded to the frames. Wedge-shaped pads must be placed under the seals.
The use of two seals at once simplifies the insertion of glass, its care and increases the sealing of the insertion points.
The arched rubber seal RC-1 (Fig. 78, a) in its shape resembles a crescent with a height of 14, a total width of 8.5 mm. On the outside, it has an oblique-shaped cutout or groove, with which it is put on and secured to the edge of the glazing bead. On the inside there are three sharp ends that fit more tightly to the table. This seal is put in place after inserting the glass, installing and securing the glazing beads.
The rubber seal RC-5 (Fig. 78, b) is a strip with sharp teeth 13 mm high and 3.5 mm wide. Sharp elastic teeth ensure a tight fit of the glass to them. This seal is installed and attached to the corner using 88H glue in advance, i.e. before installing the glass. The seals in the corners of the glass are cut to a “mustache”.
First of all, remove glazing beads 5 from the entire perimeter from the outside. Sealant 1 is glued onto the remaining glazing bead from the inside or to the protruding part of the frame along the entire perimeter. Then measure the dimensions of the showcase or stained glass window frame and prepare glass 3 of such a size that there is a gap of 3.4 mm is left between the frame and the glass and, moreover, so that the edges of the glass overlap the folds by at least 12 mm on all sides. The edges of the glass are cleaned with a block and wedge-shaped pads 6 are installed in the lower part of the frame in two places.
If required, the bottom of the frame is leveled with a 7 aluminum alloy pad with wedge-shaped support pads placed in two places. The prepared glass is inserted into the frame as tightly as possible to the glued RC-5 sealant. Holding the glass, install wedge-shaped pads in the right places along its perimeter. Then install the previously removed glazing beads.
An arched rubber seal 4, grade RC-1, is inserted into the space between the glazing beads and the glass, which should be secured with its groove to the protruding ridge of the glazing bead. The arched seal must enter the space between the glass and the bead with great effort and fit tightly with its sharp ends to the glass. It must be remembered that this seal is prohibited from joining at the bottom of the glass. Arched rubber joints are allowed one at a time on the sides or top. This seal fits snugly, and all places must be tight and sealed. For sealing, it is allowed to have gaps of no more than 1 mm.
The RC-5 seal in small-sized glass is sealed along the entire perimeter, and in large-sized glass only on three sides: the bottom and two vertical ones. All joints of the arch seal RC-1 must be sealed with sealant.
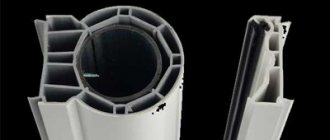
Inserting glass into metal frames without glazing beads. The rubber seal RU-1 (Fig. 79), made of hard rubber, is a load-bearing element. The glass is rigidly fixed in a rubber seal, which is previously placed on the ridges of the frame. The ridges have a curved shape and are attached to the frame by welding or rivets. The height of the rubber seal is 34, width is 24 mm. On the upper side it has two jaws 5 (right and left), which form a groove 11 mm deep, 7 mm wide at the bottom, and 3.4 mm wide at the top. Inside the rubber seal there are two closed channels 4, which give the seal the necessary elasticity during glass insertion. On the side of the right jaw there is a groove b for inserting locking rubber 7. The shape and dimensions of the groove are such that the locking rubber is inserted into it with great effort. If before reeving the right jaw is pressed down and the groove expands quite widely, then after reeving it is possible to press the jaws only with great force, since they are pressed tightly against the glass, creating the required tightness.
At the bottom of the profile there is a locking part 3 with two curved grooves up to 7 mm deep. With these grooves, the RU-1 seal is firmly placed on the ridges 2 of frame 1.
First of all, cut the rubber seal into pieces of the required size. The ends are cut into a “mustache” so
so that they come close to each other. The prepared pieces of sealant are put on the entire perimeter of the frame, carefully pressing it with hammer blows. To more securely hold the seal, glue it with glue, spreading it on the ridges of the frame. Use your left hand to guide the seal along the ridges of the frame, and use your right hand to put it on with hammer blows.
Rice. 79. Glass insert on a rubber seal RU-1: a—rubber seal, b—glass insert, c—clamps for securing the rubber seal, d—location diagram of the clamps on the frame for securing the rubber seal; 1—box trim, 2—ridges, 3—locking part of the profile, 4—closed channels, 5—jaws, 6—lock groove, 7—lock rubber, 8—wooden wedge, 9—glass, 10—tubular frame, 11— self-tapping screw, 12, 13—one-sided and double-sided fasteners, 14—fasteners on the frame
Glazier craft
One not-so-wonderful day, it may happen that one of your windows will be smashed to pieces by a poorly thrown ball or for some other reason. Often such an unfortunate incident turns into a fortunate opportunity to insert a sealed double glazed unit. If the window is glazed with regular single glass, well, you can cut the same and fit it into the frame. It's the owner's business. The only irreplaceable tool in such a delicate matter is a diamond or corundum glass cutter. It would be nice to have special pliers with flat jaws for biting off excess glass, but for this purpose you can use the cutouts in the handle of the glass cutter. To install glass into a wood frame, you will need linseed oil to set the glass in the rebate and wedge-shaped metal pieces called glass pins to secure the glass in the frame. Windows with metal frames can be glazed in the same way as wooden ones, only instead of oil putty (it does not stick to metal), you need to use one special for metal and special glass clips that are inserted into the holes on the frame rebate.
To determine the size of the glass that needs to be inserted, measure the internal size of the frame after removing the remaining glass and old putty. Subtract 3 mm from each dimension to account for thermal expansion. If the frame is deformed or has an irregular shape, then it is better to transfer this shape to cardboard or thick paper. If you need to cut a piece of glass more than a meter long, contact a professional; ruined glass of this size will cost you a tidy sum. Large sheets of glass are laid with wooden blocks during transportation. To cut glass cleanly, it's a good idea to practice on scraps of broken glass first. It is important to feel the force with which you need to press the glass cutter. Too much force and the glass will break. Too weak and it will only scratch. The grinding sound with which the glass cutter slides across the surface of the glass indicates the correct pressure force.
Helpful tips when working with glass
Working with glass will not be so dangerous if you take the following precautions:
- Wear thick leather gloves when handling broken glass or debris from broken glass.
- Wrap the broken glass in newspaper before throwing it in the trash.
- It is more reliable to work with an assistant if the glass dimensions exceed 1 square meter.
- It is better to transport glass in several layers of newspapers on a soft cushion; an old rag can also be useful for this purpose.
- Have the dealer deliver the glass to you if you cannot fit it flat in your vehicle.
- Before you stack the glass at home, mark it with a glassgraph so that it is clearly visible.
- Cut glass on a soft surface. Immediately use a brush to sweep away any remaining glass debris or debris from the work area.
- If the window is located in a hard-to-reach place, it is better to first remove the sash and insert the glass on a flat horizontal surface.
How to clean the frame
1. How to remove broken glass. Stick newspaper on the inside of the window frame to prevent glass shards from falling on the floor and window sill, then pull out the shards from the outside, after shaking them. If the glass is broken in an upstairs window, lay newspaper on the floor and work indoors.
2. How to remove putty. Scrape off the old putty with a knife. To remove hard, stubborn putty, gently tap the handle of the knife with a hammer. If the glass was fastened along its entire length with a bead, then remove the bead using an old screwdriver or chisel.
3. How to clean the frame. Use long-nosed pliers to remove the glass pins from the frame, and use a wire brush to remove any remaining glass and old putty. Smooth the area for the glass and remove any wood projections with a file.
How to cut rectangular glass
1. How to make an incision. Place the glass on a soft surface of old carpet or foam rubber. Lubricate the cut line with linseed oil and apply a ruler to the glass. Tilt the glass cutter towards you and hold it between your middle and index fingers. Run the glass cutter along the ruler to cut the surface of the glass in one smooth motion. Be careful, try not to deviate from the ruler, otherwise the glass will not break off evenly.
2. How to deepen the cut. An assistant lifts one edge of the glass, and you lightly tap the cut line from below with a ball on the handle of the glass cutter. Such blows deepen the cut. And immediately proceed to step 3.
3. How to break off glass. Place a thin round rod along the entire length of the cut on the work surface. The cut line should be exactly above the rod. Now press firmly and confidently on the glass on both sides of the rod. The glass should break in two very evenly. Use silicone corundum sandpaper or an emery stone to clean the edges.
Template for a curved cut
1. How to make an incision. Cut out a template of a given shape from hard cardboard and place it on the glass. Most often, one edge of the glass blank is straight. Therefore, the straight edge of the template can be placed on the straight edge of the glass blank. Press the template firmly against the glass and make a cut from one edge of the template to the other in one smooth motion.
2. How to make a curly edge. Make several radial cuts by hand from the curved line to the edge of the workpiece and tap from below along the cut lines. Then, aligning the cut line of the desired shape with the edge of the work table, bite off the cut segments with glass pliers. Clean the resulting edge with corundum sandpaper or an emery stone.
How to insert glass into a wooden sash
1. Laying putty in the fold. Mash a lump of putty in your hand (preferably one based on linseed oil). If the putty has hardened too much, add a little linseed oil. Hold the putty in your hand as shown in the picture and press it into a strip with your thumb, forming a strip of it into the fold of the frame. Fill out all the folds.
2. How to fix the glass. Press the piece of glass firmly against the putty, then secure the glass by driving the glass pins into the frame using a chisel blade or small hammer. Use two pins per crossbar for lengths up to 300mm, or one pin every 100mm for larger frame sizes. The pins must be inserted with the flat side facing the glass.
3. How to level the putty. Apply another layer of putty around the perimeter of the inserted glass. Then level the strip of putty with a spatula, try to make an even bevel from the front edge of the sash to the glass. Take care to create neat joints of putty strips in the corners, resembling a miter joint in shape. Wet the spatula with water from time to time to prevent the putty from sticking to it. Remove excess putty with a knife. When the putty is dry, prime it and paint it to match the frame color, taking 3mm of the glass surface to create a waterproof strip.
Links to other pages of the site on the topic “construction, home improvement”:
Glass fasteners
Fittings for glass are different from those used for other materials; The reason is the glass itself, which not only has an exceptionally smooth surface, but is also fragile and transparent.
Therefore, if you need to clamp it with screws, drill or stick something on it, you need to act very carefully. After all, one chip can damage the entire glass surface. It is extremely undesirable to expose glass to damage and impact, which is why they use fittings that can protect the surface from impact and point loads. In the 20s of the last century, constructivist designers tried to use glass in home interiors, since then glass furniture has gained the right to life. However, there are very serious obstacles to its widespread dissemination. The main one is the impossibility of cutting out a product from a single glass monolith with an ax or chisel. Therefore, it is used mainly in the form of sheet elements, which are connected using special fastening devices.
Interior arrangement of a glass greenhouse
Usually in a greenhouse I make 2-3 beds, between which paths 0.5 m wide are laid.
In this case, it is better to use a non-slip rubber coating. It is better if the beds are raised. Curbs are often used for these purposes.
Slate fencing
The drip irrigation system has proven itself well.
For heating, stoves or “warm beds” technology are used, which are grooves filled with leaves and soil. Their decay is accompanied by the formation of heat.
In order to maintain an optimal microclimate, many greenhouses are equipped with thermal drives.
Lighting
Glass transmits sunlight well, so only rare crops that require insolation in the evening require additional lighting. For these purposes, LED and fluorescent light sources or phytolamps are used. Lighting devices are often connected to a relay with an automatic switching function.
Heating of greenhouses
Glass greenhouses are among the permanent structures suitable for the installation of full-fledged heating systems. For these purposes, they use: heat guns, electric convectors, infrared heaters, potbelly stoves, boiler and radiator systems, as well as “warm floor” systems.
The selection of heating type is determined by:
- dimensions of the building;
- seasonality of greenhouse operation;
- availability of energy resources.
Serious restrictions
Glass furniture has a very distinctive appearance, often creates a feeling of cold and does not fit into every interior. However, glass often becomes the most important element of the design, providing an overview of the contents of the cabinet or even transparency of the product. Another problem is the fragility of glass. Once upon a time, every city house had a janitor with a broom, and children played football in the courtyards, whose main fear was to hit someone’s window with the ball. Those times are forgotten, but the sound of broken glass is familiar to everyone. That is why, when anyone sees glass furniture, the thought arises that it can easily break, and its fragments are simply dangerous.
The need to connect blanks cut from glass to each other, in turn, led to the use of fittings similar to those used in furniture made from panel parts made of wood and wood materials. Glass can be drilled, shaped cuts can be made in it, but a screw cannot be driven into it, threads cannot be cut into holes in glass, blind grooves cannot be milled in it, etc. But tempered glass cannot be processed at all: it immediately breaks into fragments, so all impacts must be carried out before it is tempered.
Unlike many materials, glass parts adhere well to each other to form a strong connection. But the surface of the metal part glued to the glass must not only be smooth, but also processed with high quality, and the elements themselves must have an aesthetic appearance, which is unattainable, for example, when using various types of screeds. Fittings used in glass products must be particularly decorative due to the transparency of this material.
To create exclusive designs, in addition to standard chrome, gold and polished stainless steel, they often use fittings finished with an aging effect in bronze, brass and copper in a matte or glossy finish.
Window putty recipes
Several recipes for ordinary putty that can be prepared at home:
- Recipe 1. To prepare the putty, take 0.5 liters of natural drying oil (preferably with natural linseed oil) and 75-125 g of finely ground chalk, dried at a temperature of 100-120 °C. Pour chalk onto a board, make a depression in the middle, pour drying oil into it and stir the mixture with a wooden spatula until it becomes plastic. Then knead the putty thoroughly with your hands. The putty prepared in this way is ready for use, it does not allow water to pass through, has good adhesion and, after drying, has high mechanical strength.
- Recipe 2. To prepare the putty, take the following components (by weight): bitumen - 1-1.5 parts, kerosene - 3 parts, Portland cement - 1 part, sand - 1 part, rosin - 1-2 parts, kerosene - 2-5 parts and finely ground, dried chalk - until the required putty viscosity is obtained.
- Recipe 3. Skim milk - 1 part, slaked lime powder - 4 parts, sifted wood ash - 1 part and water - until the required putty viscosity is obtained.
- Recipe 4. Petrolatum - 0.2-0.3 kg, drying oil "Oxol" - 0.1 kg and finely ground, dried chalk - 1 kg. Drying oil is poured into petrolatum heated in a water bath to 50 °C and, stirring, chalk is poured until the putty of the required viscosity is obtained.
Specifics of fittings
Inserting glass elements into wooden furniture began a long time ago. In this case, the main fastening elements were various elements made of wood, such as frames or layouts. Such products are still very popular. In this case, layouts and seals made of wood, plastic or special textile cords are used as fasteners. Corner joints, handles and hinges in this case can be attached to wooden elements, i.e. use regular furniture fittings. However, this does not always suit designers or manufacturers, and they are looking for ways to use independent glass elements, incl. creating all-glass structures.
Glazing fittings are used when it is not possible to use the conventional frame method. If you use metal fasteners with PVC or rubber clamps, the glass will not only be held in place, but will also be protected from cracks and vibration. The hardware kit may also contain stands, connectors and holders that will protect the glass from chips and impacts that are possible during operation. Furniture made today entirely from glass or using it includes shelving, coffee tables, stands for television and radio equipment, and various shelves. The components of fittings for fastening glass products are made using different materials: zinc alloy, stainless steel, aluminum, etc. To add shine, the surface of the finished product is usually polished, which harmonizes perfectly with the glass; however, matte surfaces are often used. The color scheme of the fittings can be very different and match the style of the surrounding interior decoration. As a rule, manufacturers anodize finishing surfaces to look like brass or gold; A uniform style is maintained when creating fasteners in one set. This technique makes it possible to equip not only one element with a beautiful, stylish fixation, but also all design solutions. For example, keep the fastenings of a door and a glass partition in one style solution. Thanks to the wide variety of accessories today, you can assemble anything from glass. A separate place is occupied by fittings for attaching mirrors. Glass parts as an independent element of furniture products are used in the form of hinged, sliding and curtain doors, as well as tabletops. Glass is practically not used in seating furniture, and in a few design developments it is replaced with unbreakable thermoplastic plastic (transparent or tinted).
Entrance doors with glass
Features of entrance doors with glass
Glass inserts have heat-saving properties, do not allow heat and cold to pass through, are durable and airtight. They allow you to increase the level of natural light, open up an overview of the area in front of the entrance and part of the yard. Glass lends itself well to artistic processing and is combined with various decorative elements, for example, forged grilles. Therefore, each model is distinguished by its beauty and exclusivity.
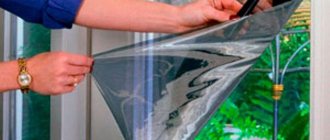
High-quality materials are used to make doors. Manufacturers offer many design options, shapes and sizes of glass elements, and colors. The outer side is covered with a protective PVC film, which resists mechanical stress, sunlight, precipitation and temperature fluctuations. The threshold in models for street use is made of stainless steel, which ensures resistance to corrosion, wear and mechanical stress. Door blocks have a noise resistance of at least 42 dB.
Where are entrance doors with glass and bars installed?
Entrance doors with glass and wrought iron bars look luxurious and attract attention with their original design. They are universal in choosing the installation location. This could be a residential property: a country house, a cottage, a dacha, an apartment, an entrance, a vestibule in a common corridor, or a public establishment: an office, a cafe, a store or a restaurant. To confirm your high status and attract customers, a stylish front door is a must.
Variety of glass entrance doors
Door designs are presented in a wide range of models with a different set of functions to satisfy any requirements. Toning and painting are performed in a wide range of colors to imitate the structure of natural materials. Classic doors with beautiful finishes are installed in all types of residential properties. Material is key to performance assessment.
Metal . The material is characterized by maximum reliability and is widely used. Externally, the doors are an iron sheet with stiffening ribs into which glass inserts are built. The thickness of the steel is 1.5–3 mm. An armored metal door with glass has a frame made of thick sheets of metal, equipped with reinforced glass and internal armored inserts.
Aluminum . Used in the production of frame and load-bearing structures for sliding doors. The shape of the profile affects the operating conditions; doors can be cold or warm.
Metal-plastic . It is used to produce a plastic profile reinforced with aluminum. The products are durable and wear-resistant.
Tree . Doors are made from solid wood of different species. Oak products look impressive, expensive and stylish. Door systems made of beech, maple, walnut and ash have an attractive appearance and are in demand. Several glass inserts are built into the paneled structures.
Depending on the design and external design of the door, transparent or frosted glass, colored or tinted, mirrored or stained glass, corrugated or engraved, decorated with carvings or photo printing are selected. Transparent inserts increase the illumination of the hallway. Frosted, colored and stained glass glazing hides the room from prying eyes and fits perfectly into a modern interior. Corrugated samples have a high sound insulation rate.
Varieties
Glass entrance doors are produced in a wide variety of design solutions, designs and colors, sizes and shapes of inserts.
Entrance door designs are divided into several categories:
- Single-leaf and double-leaf, which can be symmetrical or asymmetrical. Designed for installation in private homes and country houses. Due to their high throughput, they are the best option for offices and commercial premises with large spaces.
- One and a half and double depending on the width of the opening.
- Arched or semicircular with one and two doors for private properties and public institutions.
- With transoms located at the top or side of the entrance area.
Depending on the glass insert:
- A canvas with glass inserts of various shapes, which can occupy part of the surface or the entire area.
- Combined doors with a rectangular or oval window or half-glass.
- A solid glass panel in a steel frame, complemented by ornaments on the outside or inside.
- Stained glass windows made from pieces of multi-colored glass, complemented by forged decor.
What kind of double glazed windows are used?
Double-glazed windows for entrance doors must be safe, energy-efficient and sound-absorbing. For this purpose, shockproof triplex glass is used, which is located on both sides of the door. They minimize the possibility of injury and protect against burglary and vandalism. They are a multilayer structure with a layer of polymer film, compressed when heated. The canvas is difficult to break, and if damaged, it does not crumble into small pieces, but retains its shape. Tempered glass that has undergone heat treatment also has high strength and heat resistance. When broken, they crumble into pieces with blunt edges that are not traumatic. Their disadvantage is poor machinability.
For glazing door blocks, reinforced glass is also used, inside of which there is a metal mesh. The performance characteristics and safety indicators of such glass are comparable to triplex. They withstand mechanical loads, and when destroyed they become covered with a network of cracks.
Polycarbonate glass can be easily shaped and engraved. It is actively used by designers. In addition, it weighs little, has strength, low thermal conductivity and fire safety. It is made on the basis of polymers and is supplied in the form of sheets.
Heat is retained by glass with selective coating that reflects infrared waves. Their installation reduces heat loss by 30% and successfully replaces heavy double-glazed windows that overload the frame of the door block and fittings.
With an increased noise level, you still cannot do without double-glazed windows, which are the best barrier to sound waves. In places with cold climates, it is recommended to install additional heating of the glass block in order to reduce heat loss in severe frosts.
What determines the cost of structures?
The cost of a door unit with glass depends on the performance characteristics, the type of material and glass used for manufacturing, the type of double-glazed window, the complexity of the design, the category of the locking system, the quality of the fittings, the presence of additional mechanisms and decor, the level of burglary resistance, the finishing used and the color scheme.
Installation features
Correct installation ensures operability, convenient opening, preservation of the integrity of the glass unit, energy efficiency and reliability of the door structure. Installation of doors with glass inserts begins with preparing the opening and adjusting the dimensions. It is considered optimal to have a gap of 40–50 mm in width and height after installing the box. The frame is placed in place and adjusted horizontally and vertically using wedges. For fastening, anchor bolts or steel pins are used, depending on the wall material. There should be three holes on each side, which are then closed with plugs. It is recommended to insulate the cavities of the box with a U-shaped profile.
The door is hung into a firmly fixed frame, starting from the bottom hinge, and checked for opening and closing. The movement should be easy, without rubbing or jamming. In this case, the door does not open spontaneously. Possible distortions can be eliminated by loosening or tightening the nuts. The frame is covered with masking tape to protect it from damage, and the joints are covered with foam. After drying, remove excess with a knife. External and internal trims are mounted on the cleaned surface of the box.
Adjustment
The adjustment ensures flawless and long-lasting operation of the door unit, and also allows you to compensate for wear and deformation during operation.
The most loaded part of the structure are the hinges, which take the load from the weight. A signal about the need for adjustment is the distortion of the door leaf, the appearance of creaking and grinding noises caused by friction. Depending on which side the skew is on, adjust the hinges at the top or bottom using a hex wrench and a screwdriver. As a preventative measure, it is recommended to periodically lubricate door hinges with spindle oil or WD-40.
Tight closing of the door, tight or insufficient fit of the door leaf indicate problems with the vestibule. The reason may be a thick and hard seal or an inaccurate position of the locking plate on the box. You need to loosen the fastening and try to move the bar in the desired direction. Difficulties may be due to the fact that the door has not been in use and after some time the elements will wear in.
Tips and tricks for choosing
When purchasing a glazed door, you must consider the installation location and the size of the doorway. It must meet the requirements of reliability, safety and durability. To harmonize with the surrounding space, the interior of the hallway and front door, to be exclusive and beautiful. How to achieve this.
- A door for outdoor use must have an appropriate external coating that is resistant to precipitation, temperature changes and ultraviolet radiation. For such conditions, a metal sheet with a decorative coating, finishing made of natural wood, plastic, or composite materials is suitable.
- The most durable is considered to be a door made of a square profile with stiffening ribs and a frame in the form of a closed rectangle.
- It is necessary that the internal insulation of the door leaf, the type of glass and the design of the double-glazed window protect against cold and external noise.
- The budget option for insulation is polystyrene foam, then mineral wool, and in expensive models sprayed polyurethane foam is used.
- For natural conditions with harsh winters, you should choose doors with a thermal break, which will help avoid condensation and freezing.
- It is better if the door structure has two or more sealing contours that prevent drafts, the penetration of dust and odors.
- Fittings, locks and handles must be of high quality with a high level of security.
- The optimal distance between two different types of locks is 25–35 cm.
- If external hinges are installed, anti-removal bolts must be provided.
- The correct geometric shape of the frame and door leaf is important, affecting the smoothness of opening and closing and the presence of distortions. The surfaces must be flat and smooth, and the door must come off without distortions, squeaks or chafing.
- Entrance doors, regardless of installation location, in accordance with fire safety requirements, must open to the outside space, to the landing or to the street.
Leafing through the catalogs
If you carefully examine the contents of the thick catalogs of leading suppliers of furniture fittings, you will find that there are no more than ten out of a thousand pages devoted to fittings for furniture made entirely of glass. We can say that there are almost no fittings for glass furniture; rather, it is produced only for products using glass.
The first to appear (back in the 60s of the last century) were plastic runners with a W-shaped cross-section, installed in a body made of chipboard. They moved sliding doors made of a single sheet of glass that did not have any frame. It is curious that in the domestic furniture industry, drilling holes for the handle due to the lack of appropriate equipment at furniture factories, as a rule, was not carried out, and during its manufacture a vertical groove was made in the sheet, by which it was moved along the guides. Plastic corner connectors have become widespread for creating glass display cabinets in retail establishments.
Today, the design of glass door sliding mechanisms has become significantly more complicated: W-shaped guides have been abandoned almost completely. For example, hollow corners are placed on all corners of a rectangular sheet of glass that does not have any cutouts or drillings and secured with screws. Of these, the lower ones each have one roller with a groove that rolls along a guide, and the upper ones each have two smaller diameters, which move in the groove of the U-shaped upper guide. With double glass in the product, the depth of this design does not exceed 40 mm. There are also mechanisms for sliding glass doors with guides in the form of metal rolling pins, placed outside the body and having additional decorative value.
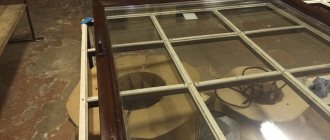
Glaze over metal frame
Given: a metal frame welded from 60x30 corrugated pipe, divided into window openings. It is necessary to glaze all openings into one glass (veranda), without resorting to purchasing expensive plastic (aluminum) windows. The question comes down to what to use to secure the glass to the frame so that it is durable, aesthetically pleasing, and does not require regular maintenance.
granden, Do you want to insert double-glazed windows into the opening (I hope so) or ordinary glass from a glazier? An alternative fastening option is to look for a corner and firmly attach it to the outer plane of the window openings around the perimeter. An external contour will be formed, then you insert a double-glazed window into the resulting opening and, by analogy, make an internal contour, although it will be more difficult to secure it. Place a seal between the corners and the glass
In general, I am engaged in the construction of websites and online stores.
granden wrote: It is necessary to glaze all openings into one glass
Therefore, not double glazing.
I won’t be original - what’s not to like about wooden frames? If you are still not satisfied, then you can look towards U-shaped aluminum furniture. profile (I saw and disassembled just such furniture profiles), which has one of the long sides with a latch along the entire length of the side. The idea is the same - install the profile, put the glass in it, click it from inside the veranda. Or you can use tempered glass with pre-drilled holes for fastening. Or fasten without holes - by the edge.
In general, I am engaged in the construction of websites and online stores.
granden wrote: The question comes down to what to use to secure the glass to the frame so that it is durable, aesthetically pleasing, and does not require regular maintenance.
using auto-tractor rubber, for example.
Mikael wrote: using auto-tractor tires, for example.
Intrigued. How's that? Cut the wheel into pieces and screw the resulting pieces into the frame?
In general, I am engaged in the construction of websites and online stores.
Pekkonen wrote: I won’t be original - what’s not to like about wooden frames?
To many. And because they cost extra money, and because they require regular maintenance, and without it, after 2-3 years they will have an unsightly appearance, and because they dry out and crack.
Pekkonen wrote: you can look towards furniture U-shaped aluminum. profile
I had already looked in this direction, and had already decided that an F-shaped profile would be enough for me (for one glass), but in a conversation one friend mentioned that the difference in temperature expansion temperatures between the aluminum profile and the steel of the corrugated pipe to which it will be attached, will lead to the fact that the lumen will lead with all the consequences. The difference is indeed almost twofold, but how real is the danger he describes?
Loops
In sliding wardrobes, it is sometimes undesirable to reduce the depth of the cabinet due to the use of large-format sliding systems. Quite a few designs of rotary (hinge) hinges have been developed for such frameless glass doors. Regardless of the design of the hinge mechanism itself, they primarily differ in the methods of attaching glass to them. There are hinges in which the glass is inserted into the gap between two plates of the body and secured with screws through an elastic gasket, and hinges that are secured in a hole or shaped groove selected in the glass. In the second case, the hinge body is secured on the front side with a nut covered with a decorative cover. This method almost completely eliminates the displacement and loss of glass during operation, but forces you to purchase quite expensive equipment for drilling glass or processing grooves in it. In addition, any holes, and especially grooves, are stress concentrators and weaken the glass. Tempered glass cannot be processed, and only a few can afford to temper it after all other influences in a furniture factory.
Glass fronts series X5
- door type – hinged;
- number of doors in the frame from 1 to 6;
- single-chamber double-glazed window (for medium-temperature conditions) 24 mm thick;
- The glass doors are framed with an anodized aluminum frame. Frame width 33 mm;
- handle made of aluminum profile along the entire height of the sash;
- vertical lighting of each door;
- hinges with torsion mechanism;
- system of automatic fixation of an open door.
Shelf supports
To install inset glass shelves, it is not advisable to use conventional shelf holders. As a rule, the body of the product is skewed, so it is simply impossible to place all the shelf holders perfectly in one plane. As a result, the glass experiences torsional stresses under load, which can eventually lead to its fracture and the fall of objects placed on it. Therefore, for installing glass inset shelves, special shelf holders have been developed, the working surface of which is equipped with an elastic suction cup that keeps them from moving in the horizontal direction. Such inserts also dampen vibrations generated, for example, from the movement of vehicles passing near the house. This prevents dishes from clanking on the shelf and prevents them from moving to the sides. As a last resort, conventional shelf holders in the form of a cylinder with a flange in the middle should be fitted with pieces of plastic tube supplied by the manufacturer along with them.
For attaching cantilever glass shelves to the wall, furniture fittings designers around the world have developed many holders that differ not so much in essence as in appearance, which have received the stable nickname “pelicans” in the jargon of furniture makers - after the name given to them by one of the first manufacturers. The holder itself is fixed to the wall of the room or to the wall of a piece of cabinet furniture with screws, and the glass is placed in its mouth, the width of which is adjusted with a screw. It is important that when installing glass, the consumer does not forget about the elastic gasket.
How to glue
- Even before starting repair or restoration work, it is important to prepare clean rags, detergents and degreasers.
- If UV glue is to be used, a UV lamp is checked.
- You will need a vice or a special press to fix the connected parts.
Preparing the base
To ensure high adhesion, absolutely clean surfaces without dust, grease and rust are needed.
If the metal is without decorative coatings, then it can be treated with white spirit or acetone (wipe with a rag soaked in solvent). Vodka or medical alcohol from a pharmacy is suitable as a solvent. If cleaning glass from greasy stains is carried out with a soap solution, then it is thoroughly washed off. The glass itself is additionally wiped with alcohol.
Painted parts are pre-treated with sandpaper. Before applying the adhesive layer, all parts are dried and wiped with a dry cloth.
Gluing
- The prepared glue is applied to both surfaces and spread to a minimum thickness.
- The edges of the joints must be processed.
- The parts are tightly folded together and compressed with maximum force.
- The interlocked bases are carefully placed in a vice or placed under a press so that the seam is horizontal.
- Excess drops of glue are removed immediately with a clean rag.
- The impact of the press should not be heavy, so as not to break the base of the objects.
Increased strength of the seam is achieved by additional heating (up to +30 °C – +40 °C).
A sharp change in temperature can cause cracks in the glass, so heating with an open fire is unacceptable.
Using a hairdryer will warm the surface and also remove unnoticeable condensation.
Using UV Lamp
A special UV glue is used. It contains urethane resin or methacrylate ester. The product is heat-resistant, transparent and does not transmit light. It has a strong unpleasant odor. Exposure to ultraviolet light can increase the strength of surface joints. Before this, the parts must be warmed up (up to +60 °C).
A thin, even layer of glue is applied, and then everything is connected and fixed. Irradiation with an ultraviolet lamp is carried out twice. The first time you can increase the reliability of the result to 70%, and after the second treatment - up to 100%.
The duration of irradiation depends on the power of the lamp itself. At the first stage, the process should last 10-120 seconds, and repeated processing should last 1-5 minutes. The finished joint will not only be strong, but will also tightly hold the parts together (it cannot be torn).
It is better to wear protective glasses when working with ultraviolet lamps. If drops of glue will be invisible on ordinary glass, then on matte surfaces the excess must be removed immediately.
Shelving and cabinets
The design of glass shelves and cabinets for television and radio equipment is based on the same principle. Threaded rods are passed through through holes drilled in the shelves, onto both ends of which nuts with blind threaded holes are screwed, the outer visible surface of which has a decorative treatment. The gaps between the shelves are filled with pieces of pipes of round, square or other cross-section, made of metal or plastic (with metallization or imitation of wood texture pattern). The lower ends of the pipes are equipped with stationary or roller supports. There are tubular profiles with a square cross-section that have grooves on one or two adjacent side surfaces into which sheets of glass or other material can be inserted. Let us remind you that if there are doors, a rack or cabinet turns into a cabinet product, closed on all sides.
Glue instead of screws
In recent years, glass fittings have been developed that are secured using UV-curable adhesives. The planes of the part on which the glue is applied have a smooth, decoratively treated surface. The glue is transparent, so that when viewed through glass, the adhesive seam formed by it becomes invisible. Today, in this way, table legs, button handles, hinges, locks, latches, magnetic locks, shelf holders, etc. are attached to glass. At the same time (and also subject to careful adherence to the technology), the strength of the resulting connections even exceeds the corresponding parameter for attaching similar fittings to products made of wood materials using screws.
Brief summary
There are many adhesive compositions; when making a purchase, you should carefully read the description of the product, and sometimes consult the seller, specifying the purpose of using the solution. As has already become clear, transparent specimens are very popular, the seam is invisible and will not spoil the interior of the home, the mixture is suitable for implementing decorative processes.
At the time of work, it is better not to deviate from the sequence specified in the instructions; only professionals use this algorithm of actions. Therefore, the technology of conventional fixation and the use of a UV lamp is considered effective; over the course of several years, specialists have achieved extremely positive results. By refusing to comply with at least one of the generally accepted rules, a person risks creating a connection of poor quality, which over time will simply disappoint the owner of the building.
Accessories
Interesting solutions in the development of components for furniture using glass. For example, there are mechanisms for extending tables, in which the tabletop is made up of individual glass plates, which are moved inside the table like blinds. The cabinets use rather complex mechanisms that specifically provide for the presence of narrow glass plates in the curtain doors that open in the vertical direction.
Furniture made entirely of glass is unlikely to ever be included in the list of essential goods - at least because of the established opinion about its fragility. In addition, cabinet furniture made of transparent glass, intended primarily for use as storage, like a display case, does not protect its contents from prying eyes, which makes it necessary to maintain ideal order inside and limit its contents, which is not always convenient. Therefore, preference will always be given to combined furniture, in which glass plays a mainly decorative role. Therefore, to use this amazing transparent material, more and more special fittings will be required.
Features of self-installation of glass products
When installing glass structures yourself, you must follow a number of rules to ensure that the product is functional and lasts a long time.
- They determine the location of the glass structure or object, where it will be located - in the bathroom or in the hallway.
- Choose a suitable fastening method (adhesive mounting or installation of special fittings).
- Having chosen the fastening method using fittings, select the appropriate fasteners.
- Depending on the fasteners, they are installed in the correct order.
- Check the reliability of the work performed.
Tips for installing mirrors yourself
When installing a mirror yourself, you should consider many factors. Each material requires a certain type of fastener.
The mirror is fixed to the concrete wall using glue. It is worth considering that glue is not always able to withstand a massive product, so you can use a combination of glue with double-sided tape.
The mirror sheet is fixed to the plasterboard wall using holders. It must be remembered that drywall can be deformed if there is a strong impact on it, so the weight of the mirror sheet should be taken into account.
Rules for installing glass shelves yourself
Attaching a glass shelf yourself is not difficult, if you consider the following:
- To secure a shelf no more than 50 cm long and 20-25 cm wide, only two holders are required, but if you intend to install a longer shelf, the number of holders increases.
- Before installing fittings for a glass shelf, you should mark its location (the holders must be attached so that the shelf is horizontal and level without distortion).
- When installing several shelves, it is better to start installation from the top row.
By following these tips, you can independently carry out a number of activities to install any glass element and structure.