It is not for nothing that people associate a house with a fortress. The building must have high reliability indicators in order to last for several decades, or even more. Building a house is not particularly difficult, especially in our time when people have modern technologies at their disposal. But preserving it in its original form will be a more serious matter. In this case, a significant role is played by the casing box in wooden houses.
Of course, building private real estate from other, much more durable materials has more advantages. However, wood has a special magic, because there are still admirers of the good old Russian construction technology.
Features of house shrinkage
Any wooden building is characterized by shrinkage, which is due to the natural property of wood to dry out due to a decrease in humidity levels. A little differently, this is called shrinkage. This process can be influenced by a number of factors, including the following:
- original dimensions of building materials;
- the type of wood used;
- wood processing technology (in particular drying);
- operating conditions of the building;
- overall dimensions of the house;
- construction season (winter or summer);
- construction technology;
- the experience of specialists, and, accordingly, the quality of the house’s assembly.
The need for a casing in a house is also due to the fact that different wood shrinks differently. That is, based on the height of the house per 1 meter, the following buildings are subject to shrinkage:
- from logs ≈ 150 mm;
- from timber (planed and unplaned) ≈ 60 mm;
- from profiled timber ≈ 40 mm;
- from laminated veneer lumber ≈ 20 mm.
More accurate data is contained in regulatory documents, but it is worth considering that theoretical information may differ from practical indicators.
DIY window frame: designs
The designs of window frames (casements) are very diverse. Basically, the choice of one design or another depends on the desire and taste of the owner of the future home, on traditions and on possibilities.
We invite you to read: Turkish bath hammam - what is it? Benefits and harms
Wood is a traditional natural material in manufacturing. It is possible to make wooden window frames with your own hands.
Of course, this process requires certain skills and knowledge, but anyone who has a great desire to do everything with their own hands can do any type of construction work, even making a window. A do-it-yourself window frame requires special care and precision from the craftsman during manufacturing.
Another important factor when choosing a window design is the size of the window, the location of the building and on what floor the future window will be located. By making window frames with your own hands, you guarantee the uniqueness and individuality of your windows.
Constructions
The design of window frames is divided into the following types:
- blind bindings;
- casement (opening) - there can be a different number of doors (from 1 to 3);
- lifting;
- sliding;
- with the additional installation of a transom or window (one or several).
The components of the window sashes and transoms are frames (top, bottom and side) and slabs (impost). For the corner connection of the strappings, a double tenon is used, and for connecting the slabs with the strappings, a single tenon with glue is used, using dowels for more reliable fastening.
The manufacturing process requires the craftsman to have certain skills and knowledge, as well as accuracy and precision. But anyone who has a great desire to do everything with their own hands can do any type of construction work.
Before you start manufacturing, prepare the necessary tools:
- thicknesser;
- chisel;
- construction knife;
- hacksaw;
- sandpaper (for cleaning);
- screwdriver or electric drill with drill attachments;
- plane;
- square;
- pencil or marker;
- ruler or tape measure.
In order to make wooden window frames, it is necessary to select bars (square or rectangular) of the appropriate quality. They should be dry and free of knots. The quality of the manufactured frames must be at a high level, since they are of great importance in maintaining heat in the house.
The first step is to properly process the block on one side.
Then, using a surface planer, mark the risks on the second and third sides.
Align the fourth side according to the intended risks, using planing.
After this, you can plan the second side. It is important to achieve right angles between the sides of the bar.
Next, using a thicknesser, you need to mark the first and fourth sides, and then plan the third side of the block.
Now that all the bars have been processed in this way, you can begin to create folds. The folds are arranged so that in the finished frame their location is in the same plane. Otherwise, the glass will not have the required degree of compaction.
Note!
The size of the folds directly depends on the type of seal and glass, or more precisely, its thickness. If glazing bead is used as a seal, then the folds must be made wider than when using putty as a seal.
Another factor influencing the size of the folds is the thickness of the strapping bars themselves, as well as the slabs. Do not forget that too narrow folds will easily allow the wind to pass through.
Connections in which spikes are used are subject to particularly careful execution, one that allows the parts to fit into each other with high density, avoiding gaps and distortions. To make (cut out) tenons, use a hacksaw with a small and narrow blade.
When assembling a window structure, special attention should be paid to the angles at which the parts are connected. The perpendicular position is checked using a square. External doors with a width of more than 700 mm are fastened with metal angles.
The connection can be made both from the space between the glasses and from the outside. If the bindings are of a summer nature, then the angles are placed on the inside.
During the manufacturing process, in those places where there is mutual abutment of the sashes and transoms, it is necessary to select quarters that make it difficult to blow through the porches. The sashes are treated with the help of strips that cover the gaps of the vestibules.
Window seal
To reduce air penetration into the house, a seal is placed in the frame along the entire perimeter of the vestibule. This could be foam rubber, sponge rubber, cord, and so on.
If the frame design contains shutters, vents or transoms of an external nature, the lower trim must be made with a groove and ebb, that is, a drip tray designed to collect drops flowing down the glass.
To reduce air penetration into the house, a seal is placed in the frame along the entire perimeter of the vestibule. This could be foam rubber, sponge rubber, cord, and so on. The main thing is that this seal has properties such as elasticity, durability and strength. For the same purposes, flashings are used.
Lattice frames are used for glazing verandas, balconies, and terraces.
One type of binding is lattice frames. They are used to glaze verandas, balconies, terraces and similar premises. They come with doors or with a window built into the frame.
One of the features of such frames is the use of small glass. The disadvantage is the small light area, since the design contains a large number of slabs.
Another type of window frames is paired sashes. Most often they are used in civil construction. Their design involves the presence of two bindings (internal and external), which are connected to each other using hinges and pressed using tie screws. Such bindings are hung on common hinges.
Helpful advice!
It also happens that internal bindings are made “deaf”. In the summer they are removed as unnecessary, and in the winter they are installed in place.
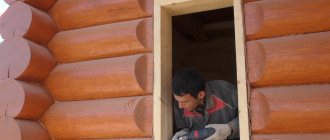
What is a casing box?
Such a necessary element is also called a casing, or, popularly, casing. Essentially, it is a wooden box that is placed in window or wooden openings before the windows or doors are installed. The entire structure consists of several components, which include tops, risers and a window sill.
At the same time, there are some features in the manufacture of the casing box:
- The width of all elements should not exceed 260 mm. Otherwise, the entire structure will become covered with cracks.
- Wood moisture content is also important and should be at least 7-9%. Otherwise, cracks cannot be avoided either.
- A simple casing is needed for simple wooden windows; for plastic structures, a complicated support with a carriage is required.
At the same time, the frame for windows and doors can be of different shapes. That is, in addition to a standard rectangle, it can be a trapezoid, a polygon, or it can be made in the form of balcony blocks.
Need for a box
Is a casing really necessary or can you do without it? Here it is important, first of all, to take into account the fact that shrinkage of a wooden house does not occur in one day or even a month. As a rule, this takes 2.5 years. Moreover, often in the first year the structure will shrink by only 20%, and the remaining 80% will fall in the next year and a half.
The importance of casing boxes for wooden houses is difficult to underestimate, since some undesirable processes occur due to shrinkage. In particular, the inevitable cracking of logs, the discs begin to shift. In the absence of a frame, the upper logs will press with force on the window or door frames, which will lead to distortions. As a result, windows and doors may stop opening altogether. This also has a negative effect on the wall cladding, which leads to the formation of cracks.
Ultimately, this can lead to more than just damage to the appearance. The entire structure, if no measures are taken, can literally completely collapse.
That is why casing is needed, which is good protection for windows and doors from distortions. In addition, its service life is usually unlimited.
What kind of pigtail is there?
According to the manufacturing technique, the casing box can be of several types:
- Set-up adhesive.
- In the form of a pine tree.
- Combined option.
For the glued-together frame, edged material with a moisture level of 7-9% is used, which is still acceptable. All existing defects must be cut out, be they resin pockets, knots or other types. After this, the material is spliced in length and width using a special adhesive. Finally, it is processed on machines and polished.
For the pine version, first the round tree trunk is sawn, and the resulting carriage is dried to a moisture content of 10-12%. At the next stage, trimming takes place into blanks of the required dimensions. Finally, the finished product undergoes special processing using a machine to form the required profile.
For a combined casing, the risers and top can be made of solid pine. While the glue-type technology is suitable for the window sill. This option for installing the casing is only suitable if there are no plans to carry out interior finishing of the windows in the future.
Preparation for production
It should be said that a high-quality box and frame can be made, first of all, by someone who knows how to handle carpentry tools and approaches the work with due responsibility.
Most novice home craftsmen will not be able to make a window frame with their own hands so that it is not inferior to the factory one, but at first you can make a window for a summer house or workshop, in other words, hone your skills on “minor” objects. Often the windows there are small, single-leaf or blind. If you don’t give up and approach the matter decisively, it will turn out that everything is very simple.
The main difficulty is that to create it you need:
- selection of suitable material;
- precise marking and high-quality processing of workpieces;
- neat assembly of the window.
Figure 1. L-shaped box profile.
If the pros outweigh the cons, then you can start making your first window frame with a frame.
To work you will need:
- pine board 150 x 50 mm;
- pine bars 50 x 50 mm;
- wooden dowels;
- drill;
- wood saw or circular saw;
- mallet;
- plane or its electric equivalent;
- hand milling machine or chisel;
- window corners;
- self-tapping screws;
- square, tape measure, pencil;
- wood glue.
The first priority is to purchase sufficiently dried and smooth wood. Choose pine, as it is an inexpensive and easy-to-work material. The boards and bars need to be dried for another 10-12 days without any acceleration of the drying process, but under a canopy to hide them from rain and sunlight. If the material requires modification, process it with a plane.
- wood;
- glass;
- fasteners;
- accessories.
The first priority is to acquire sufficiently dried and smooth wood. Choose pine, as it is an inexpensive and easy-to-work material. The boards and bars need to be dried for another 10-12 days without any acceleration of the drying process, but under a canopy to hide them from rain and sunlight. If the material requires modification, process it with a plane.
Self-production of casing
There is nothing complicated in the technology of making a pigtail, and any owner is able to cope with such work on his own. All that is required is some knowledge regarding the products themselves. It’s also simply impossible to do without a number of tools.
When preparing the necessary materials, you should also take care of personal safety - we are talking about a protective mask with a respirator. And with these assistants, the whole process will be significantly simplified and accelerated:
- drill;
- screwdriver;
- wood sanding machine;
- saw (circular or gasoline);
- jigsaw;
- drill;
- measuring instruments.
Any economical home owner always has them at hand, since they are stored nearby.
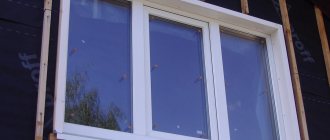
Box for plastic window openings
Many private property owners, when thinking about installing casing, choose mainly plastic windows. In this case, you cannot do without preliminary preparation.
First of all, you need to understand that the dimensions of the frame should be 15 cm smaller than the window opening. You also need to make a carriage with a groove at the end of the opening and cut out a ridge that will be the base. Thanks to this, during the shrinkage of the house, the wood will settle along the grooves directly in the carriage, which will avoid a lot of pressure on the windows.
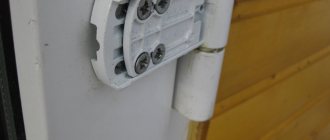
The carriage is made from a wooden block measuring 100 x 150 mm, and in its center it is necessary to make a groove, inside which the comb is placed. The upper part of the frame is made from boards 40 x 150 mm, on both sides of which you also need to make grooves for the ridge.
After this, the upper part of the casing is located on the crest of the window opening. And when the side carriages are installed, the crossbar is fixed with self-tapping screws. Only here it is necessary to be careful not to allow the screw to accidentally fall on the ridge. Otherwise, rigid adhesion may occur and the functionality of the casing for windows in a wooden house will be impaired.
At the end of all work, it is necessary to treat the gaps using tow or any other insulation. And the ridges with grooves need to be caulked.
Wood frame manufacturing technology
Of course, plastic windows have long won our hearts.
However, for a budget-friendly way to replace windows, a wooden frame is suitable. And if you decide to carry out such repair work at your dacha or on the veranda, then you can make wooden windows yourself. When I added a veranda to my house, I immediately decided to glaze it and the option with plastic windows was not suitable for me. Of course, production machines assemble window frames much better and faster, but you always want to do something with your own hands. But if you follow all the rules for processing wooden material and the technology for connecting parts, then it is quite possible to achieve good results. Today we will look at step-by-step instructions for making wooden windows.
We restore old windows with our own hands
I would like to raise another important question: how to update old wooden windows with your own hands? Despite all the defects that appear on wooden structures after many years, they remain very strong and durable. Therefore, there is not always a desire to change old window structures and spend a lot of money on it.
Typically, do-it-yourself restoration of wooden windows involves installing seals and painting the frames, but in some cases a more labor-intensive process is required. If gaps appear between the wooden frame and the frame, sealants should be used. You can use rubber, foam rubber or polyvinyl chloride.
But if a misalignment has formed, then closing or opening the sash on the windows becomes a real problem. In order to correct the situation, you can try 2 methods: first, check the hinges - perhaps they have settled and it’s enough to just find a new place for them or plan off the excess using a plane. The fact is that wood tends to swell and therefore there may be places that need to be corrected over time.
Using a chisel you need to cut out the damaged area; it would be better if you also grab some suitable material. Coat the recess that appears with epoxy or wood glue, then insert new material and secure it. When the adhesive solution dries, the entire surface is processed using a sander. The final solution will be to open the frame with varnish or paint it with paint and varnish.
We make wooden windows ourselves
As you can see, there is nothing wrong with making new wooden structures or updating old wooden windows. In order to carry out all the work yourself, it is enough to study the technology, as well as stock up on the necessary tools and wooden materials. By choosing the right wood, you will be able to build a window structure yourself and subsequently glaze your dacha or veranda, and possibly your summer kitchen.
There are no similar materials.
- Preparation for production
- How to make a box
- Frame making
Today, plastic windows have almost replaced wooden ones. Of course, the production of the latter has not stopped completely, it can even be stated that it is gradually expanding, and its renaissance can be expected in the very near future, however, wood windows have already moved into a higher price category.
Window frame drawing.
Products that are in no way inferior to plastic ones, but are significantly superior to them in terms of environmental friendliness, and cost much more. Based on reasons of economy, many are interested in how to make a window frame with their own hands and whether a self-made window can become a full-fledged replacement for a product manufactured using a production method.
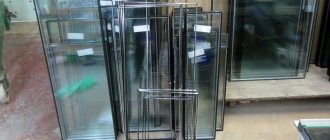
Modern windows are mostly double-glazed windows made up of prefabricated panels. These windows are easy to use, but also have some disadvantages. So, for example, if one of the glasses is accidentally broken, replacing it will not be easy, especially if it is of a non-standard size.
For those who are interested in how to make wooden windows themselves, the photos and detailed instructions posted on this page will be very useful. The photo shown below shows a real home-made double-glazed window, the manufacture of which does not require any special skills or significant financial investments.
Double-glazed windows that have an air gap not filled with any noble gas suffer significant convective losses due to the circulation of air flows between the panes. Noble gases have a large mass, which significantly slows down diffusion. But as the glass unit ages, gas tends to be lost, and in a bag filled with air, you can add a desiccant and change the sealant without special tools.
The most common material from which wooden window frames are made is pine, which today is considered the most practical, inexpensive and accessible wood. A reasonable substitute for pine wood is oak wood, but for craftsmen making wooden windows for the first time in their lives, it is still better to choose less expensive tree species.
Wooden beams for wooden windows must be dried according to all the rules, and in addition, they must not have any branches, cracks or other damage. It is important to remember that the boxes, when they are fixed in the window opening, take on the main mechanical load. If laminated timber is used for the manufacture of all elements, then its strength will be sufficient to withstand deforming loads.
Tools for work that will be needed
If, for example, a 150x50 mm board is used to make a box, then a 15 mm deep groove in the shape of the letter G will need to be made in the blanks for it. For the block, you will need to make four blanks and then connect them using glue (preferably carpentry glue) , and additionally drill holes in the right places and insert a three-centimeter wooden rod, which will provide the connection at a right angle with immobility and the necessary rigidity.
The finished box is fixedly fixed in the prepared window opening. To do this, you should drill holes in the wall, drive in dowels and secure the finished structure with self-tapping screws. If there are gaps between the finished block and the walls, they need to be sealed with construction foam. It should be remembered that when installing the box, the mobility that it can acquire due to temperature changes is not taken into account.
The main feature of the project presented here is the window frame, which pushes the glass apart and provides free space for the seal and wooden beads that hold the glass.
For those who are planning to make their own windows from wood, the drawings presented on this page show how to make a frame for ten-millimeter glazing beads that will securely hold four-millimeter glass. The gap between the glasses is about 1 cm, and no metal parts are used to push them apart.
Making a window box
The best sealant will be a material that does not suffer from exposure to sunlight. Often a silicone sealant is used for this, but it should be noted that it is not the best for such purposes, since it is difficult to remove from the surface of the glass. You can make a frame from pine wood, or you can use white oak wood or other materials. Before cutting the material for the window frame, you should carefully measure the perimeter of the window opening and increase the result by another 10%.
To assemble the binding shown here, you will need to saw the material at an angle. Joints consisting of grooves and tenons hold the structure more tightly, but continuous grooves are better suited for sealing. To connect frame parts together, it is best to use screws with a flat head and large threads. Screws with flat heads are best recessed into special holes.
Assembling a window frame with your own hands
Glass cutting.
The process of cutting glass is not inherently complicated, but it is important to take into account some of its nuances. First of all, you should take care of observing safety precautions: reliably protect your eyes and hands from possible surprises. The glass must be durable and completely intact. Before cutting, the glass is thoroughly cleaned and then lubricated with a small amount of fat.
Experienced craftsmen advise always cutting glass in one cut. When you press on the glass, a sound is heard, after which the glass is moved to the very edge of the working surface and pressed on it. To make such a double-glazed window as discussed here, you need to take measurements accurate to the millimeter.
After cutting, the edges of the glass are processed for polishing with sandpaper.
First, the glass for fitting is inserted into the frame, and then removed and sealant is placed in its place. The glass is placed back into the frame and wooden window beads are installed, and then the window is painted and equipped with handles.
When attaching glazing beads, the screws must be tightened slowly, starting from their middle. This is necessary so that too much pressure is not applied to the fragile corners of the frame.
Based on the fact that the window should be easy to repair if necessary, you should not paint over the heads of used screws, but many people prefer that they are not visible. The ideal way to hide screws has not yet been found, so everyone chooses what suits them best.
Box for wooden window openings
If wooden structures are placed in the window openings, then everything is not so complicated. Only first you need to cut grooves on the surface of the walls that will be adjacent to the window frame. Subsequently, casing beams will be installed in them.
To begin with, install the lower beam of the frame, which will avoid displacement of the side elements. And before installing them, you need to lay the inter-crown seal. For this purpose, you can use jute or flax tow.
The top casing element is installed last. A shrinkage gap should be made above it, which is also filled with jute or tow. Such a consistent assembly will provide the windows with good protection from deformation during shrinkage of the house.
There is only a little left - we insert the glass
Making wooden windows with your own hands
The most important thing in this process is the accurate selection of glass sizes. Thanks to this, cold bridges are not created, and the glass adheres well to the wooden window frame. Deviations of 1 mm can already have negative consequences - but we don’t need that.
Important! Don't forget about safety precautions when cutting glass. You must have gloves to protect your hands and glasses - protection from glass chips is a must.
You need to cut the glass with a diamond glass cutter, and fine-grained sandpaper is suitable for polishing the edge. The cutting technique is very simple. It is enough to stock up on a ruler that will be longer than the glass and guide it along it with a glass cutter. Before coating the edges with sealant, you need to attach the glass for fitting.
If everything is successful, then sealant is applied to the grooves, after which the glass is finally inserted into the frame. After this, we use a glazing bead - it should hook both the frame and the glass, and then fix it with thin nails. If the ties are wider, then fix them with self-tapping screws - choose thin fasteners.
At this point, making wooden windows with your own hands is completely completed and only one thing remains: placing wooden windows in prepared boxes. I didn’t need this action, but if you still decide to install, then:
- We insert the structure into the block and fix it in the grooves
- We fix the frame using self-tapping screws - the elements should pass through it directly into the wall
- All cracks are blown in using foam and wait for it to dry completely.
- In the future, you can design the slopes with your own hands in the most convenient way for you. But for wooden structures everyone is accustomed to using plaster, since plastic slopes will not look harmonious
Frame for doorways
Essentially, a door frame is almost identical to a window frame, with the exception of some minor differences. Only here there is one important point: the installation of the door frame should be carried out only after a year, or better yet 2 years, after the construction of the house. During this time, the main period of shrinkage must pass.
Otherwise, everything is done the same way. That is, if a wooden door is installed, then grooves must be made in the side surfaces of the opening. And for plastic or metal structures it is necessary to make a ridge on which a box with grooves is already installed. As the wooden house shrinks, the ridge will be inside the groove.
No additional fasteners are required to install the door frame. Only between the opening and the box should material be laid to provide heat and sound insulation. This can be done using both tow and jute.
Technological stages of casing installation
For successful installation of the pigtail, compliance with the technology will be a prerequisite:
- an opening is cut in the wall, which is located at a height of 80 cm from the floor;
- a groove or ridge is cut out - this depends on the type of casing chosen;
- all wooden elements are impregnated with an antiseptic solution;
- insulate the opening around the perimeter using thermal insulation materials.
The casing box is installed with mandatory compliance with the technology.
Measurements to order the manufacture of plastic frames must be taken after preparing the opening and installing the casing . This avoids incorrect sizes.
Public opinion
On the Internet you can find different reviews regarding the casing. Someone asks whether it is necessary to maintain the required period after the construction of a house (1-2 years). Some respond by advising to install the socket immediately, which is confirmed by many builders.
There is also an opinion that the window block can be installed without a casing box. However, hacks or incompetent “specialists” think so. But a window sill is a necessary measure, and the vast majority of owners of wooden houses think so!