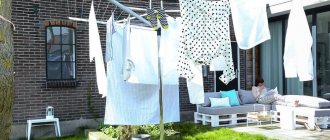
The casing in a wooden house is an important part of any structure. A wooden house is constantly changing its size. The wood either dries out, then becomes saturated with moisture from the rains, then loses it again. Changes in the geometry of the log house under the influence of seasonal factors affect windows and doors. To prevent the destruction of double-glazed windows, it is important to install them correctly. To prevent windows from being destroyed or deformed, it is necessary to strengthen the opening with a special structure. It will keep the logs from moving and the walls from distorting. This design is called casing. .The casing is designed to compensate for changes due to shrinkage and atmospheric factors.
If you decide to install windows yourself, then it is important to know how to install the casing correctly.
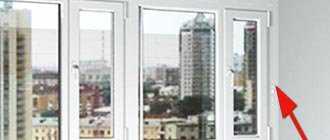
Casing box in a log house made of rounded logs
What is casing and how does it work
The casing is a frame installed in a log or timber house. It compensates for the expansion and drying of wood. prevents the impact of shrinkage on the opening. Another name for it is pigtail.
It is made from boards 20-25 cm wide. Using a tongue-and-groove connection, the structure slides along the end of the opening. A non-fixed connection helps the parts move depending on the expansion or contraction of the log house by 7cm. The casing compensates for the expansion or shrinkage of the wood.
A log in a wooden house has a humidity of 12% to avoid cracks in it. The casing for windows consists of 4 parts: top, bottom and sides. The top fixes the sidewalls in a static position. A shrinkage gap is formed above the top. Its height is 5-8 cm. It compensates for the processes occurring in the house during shrinkage. Mineral wool or tow is placed in this gap.
Some novice builders foam the shrinkage gap, not knowing that this should not be done.
The foam hardens and becomes rigid, putting pressure on the casing. The casing may become distorted under load. The adhesive properties of foam have an adverse effect on it. They firmly fix the components of the pigtail, preventing its mobility.
Violation of technology and its consequences
When installing a casing in a window opening, you can make mistakes that will affect the quality of the entire window structure. It is important to provide for these shortcomings in a timely manner so that subsequently there are no difficulties with operation. Firstly, it is considered a gross mistake to make the casing from wood with natural moisture. In this case, over time, the box dries out and gaps form: the window in a wooden house does not hold well, and the street begins to “blow” into the gaps. Secondly, sometimes they forget to impregnate the casing with protective compounds. This leads to deformation of the wood after a few years. The structure begins to collapse, let in heat, and become covered with cracks.
And finally, another violation of technology may be the use of polyurethane foam or mineral wool as a thermal insulation material for a window opening. Such insulation does not have the ability to compress, so shrinkage of the house can lead to deformation of the window. It is important to remember that the correct choice and competent installation of casing in a wooden house is the key to long-term and high-quality service of window structures.
So that there are no drafts in the rooms, and the windows in a wooden house do not have to be replaced a couple of years after their installation, it is better to immediately pay special attention to this stage of construction. Holz House employs specialists who have the knowledge and skills to manufacture and install casing structures at a high level. If you have any questions, you can contact our nearest office.
Types of pigtails
The casing of openings is classified according to the shape of the profile into U-shaped (“in the deck”) and T-shaped casing. In a log house they put a socket “in a log”, in a timber house - T-shaped or “in a tenon-monolith”.
According to processing methods, it is divided into rough and finishing. Finish casing includes arched, solid, euro casing.
Let's look at each type in more detail.
T-shaped pigtail
T-shaped
This type is used in timber houses. Its peculiarity is the absence of gaps after installation. The monolithic structure fits into the groove of the opening, giving the casing the necessary rigidity. A T-shaped section is obtained by sawing out a solid board (monolith tenon) or gluing a tenon into its body. The casing in a timber house has a thickness of 6.5 cm. This type of casing is simple and cheap. Even a beginner can handle it.
U-shaped pigtail
This is a classic type of casing in a wooden house. It's called "into the deck." This type of window frame is installed in log houses. The spike is installed at the end sides of the wall. It is sawed by cutting out excess wood. A groove is cut in the casing. The tenon moves along the vertical part of the casing. The groove and tenon are treated with an antistatic agent to prevent the occurrence of fungus and mold.
This is a rigid and reliable structure that can withstand loads. A milled lock installed in the casing helps secure the structure tightly. A quarter is cut from the outside of the casing for mounting the window and door frame.
Finishing casing
This window frame is intended for a house that will not have interior decoration. All parts of the finishing casing are polished. The corner joints are sawed off in such a way that no gaps are visible when they are joined. The casing parts fit perfectly, fitting tightly to each other. Locks are being made. They are connected using the tongue and groove method. The lock latches tightly. When installing finishing casing, no additions or slopes are required, because it looks beautiful and neat even without them.
Finishing casing
The surface of the finishing casing is smooth and pleasant to the touch. The casing is installed in a house made of laminated veneer lumber and solid wood. It is made with a quarter on the outside. Window frames are made from solid boards, firmly connected to each other with glue, which allows them to withstand significant loads.
Rough casing
Installed in a house in which exterior and interior decoration will be carried out. It is cheaper than other types. The rough frame of window openings is made from dry, planed boards no more than 20 cm wide and 2.5-4 cm thick. This is a low-quality material that can be purchased at a regular building materials store, in an online store or on the market. The rough casing usually has three parts: a top and two sides. The quarter on the outside is missing. The windows are recessed into the center of the opening. The windows are fixed to the frame with fastening plates or self-tapping screws, which are then closed with extensions. A platband is placed on the end.
The rough frame of the log house has many disadvantages. It freezes quickly, cannot withstand the load during shrinkage, and rots. After installing the windows, it is necessary to install the window sill, slopes and finish the opening.
Arch casing
Design of an arch
It is important to frame openings in the form of an arch with appropriate casing. This is the final look of the structure. The polished surface and the original shape of the top turn an ordinary casing box into a stylish and modern one. The decorative part of the arched casing gives it an expensive and solid look. The window attracts the attention of passers-by, acquaintances and friends with its exquisite and unique shape. The arched casing is assembled from 4 parts. The top has a rounded shape. It is made of laminated wood. Sometimes an arched frame is made from one curved beam. The manufacturing process of arched casing is labor-intensive. Due to the complexity of manufacturing, the arched top costs the same as the entire casing box as a whole.
Eurosurface
European window casing and door frames in a wooden house are glued together from dry bars. The Eurocasing has a slope. It is done without further finishing. The pigtail can be glued “into the face” and “into the microthorn”. The “in-plaster” method involves gluing the bars together on their sides. In this way the bars are connected to the knots. Short bars have no knots. They are glued together at their ends—“into a microspike.” Euro casing can be mounted with a T-shaped or U-shaped profile. A quarter can be cut out to install windows. In some designs the quarter is missing. Its availability depends on the desire of the homeowner.
Pit from an array
It is made from solid wood. This is a finished casing, so it must be perfect: aesthetically pleasing and with a flawlessly finished surface. To relieve the internal stress of the material, the wood is subjected to soft drying. This window frame for plastic windows is durable and reliable. But it is difficult to make. You will need special equipment: a circular or chain saw, a milling cutter. It is very difficult to fit all the parts, especially the notches and ridges.
Glued pigtail
Glued sash is made from small lamellas. A special glue is used to connect them. The material does not warp, there are no cracks or internal tension of wood fibers, because it dries quickly in drying chambers. The surface of the glued casing is durable and not exposed to external environmental conditions. It can withstand heavy bending and compression loads. She has no knots. The appearance of the product is stylish and modern, fits harmoniously into any wooden structure. It has ideal geometry and does not rot. Manufactured in a factory. Easy to clean. Quick installation allows you to save your family budget. The service life ranges from 35 to 45 years.
Pit when installing door frames
There are no fundamental differences between installing casing in window openings and making frames when installing doors.
Design features for doorways
- The required doorway is made with a saw and the grooves for the timber are cut out, located symmetrically.
- After preparing the opening, bars are placed in the resulting holes, which are made in advance. They should be shorter than the groove. This ensures that there are no distortions. The timber is not fastened, this may have a negative impact on the structure as a whole.
- Seal the upper part of the opening and install a box. If there is a gap, it is necessary to lay a sealant in it, and cover the gaps with platbands. After this, you can begin installing the door itself.
According to the principle of making the pigtail, there are the following types:
- Made from solid wood - all parts are made from solid wood.
- Glued casing - made from glued boards.
- Combined - the top and sides are made of solid pine, and the window sill is made of glued boards. Suitable for finishing masonry
A monolithic frame made from high-quality solid timber is the most reliable option for doorways with a heavy door leaf.
The manufacture and installation of the casing is carried out using the above technology, but instead of a window sill or embedded board, the bottom part is a threshold.
The casing of interior doorways may not have a lower horizontal element. Installation of this design begins with the installation of the sidewalls.
For doorways in interior partitions, it is allowed to use a simplified version of the casing.
This solution is suitable for lightweight door structures. In this case, the sidewalls of the pigtail are made of composite parts - a bar attached with self-tapping screws acts as a tenon.
Casing technologies for door and window structures do not have significant differences. However, when performing door casing, the following points are taken into account:
when installing a wooden door, a technological groove is made in the casing; if the door is metal, the groove is not removed.
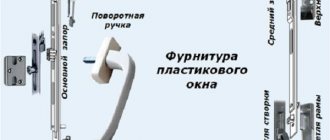
Differences between frames for wooden and PVC windows
Wooden windows can be installed in any type of casing. Plastic windows require power and finishing casing. The frame elements for wooden windows are secured to each other with self-tapping screws and nails, and when installing plastic windows, only with self-jamming locks. To insulate wooden windows, only natural materials are required: flax and jute. For plastic windows, not only natural insulation is used, but also mineral wool. When making casings for wooden windows, the same wood is used as in their manufacture. The installation technologies for plastic and wooden windows are similar.
Typical mistakes or how to avoid running into would-be craftsmen when installing a jug in your home?
Some builders stuck in the 17th century consider the frame to be the main strength element of the wall. They abandon the designed dowels in the walls and rely on the further installation of a massive frame that will “hold it.” Therefore, when installing the European, most common and technologically correct type, you may encounter a bunch of advisers with the main and only argument: “We’ve been doing this for 15 years now, and you don’t understand anything.”
Another obvious sign of such unfortunate builders: installing windows flush with the outer surface of the wall, they have only heard about the dew point, and generally consider SNiPs and GOSTs to be devilry. Be careful, you and your family live in this house, not would-be masters with good, but altered (damaged) technologies of the 17th century beyond recognition.
For large windows there is a power frame, which really is the strength element of the wall, for large logs there is a visually large (massive) one, even “in the log”, even on a tenon or using a beam (mortgage beam), for timber houses there is a finishing casing, etc. .d. The main task of the frame is to isolate the window from shrinkage processes in the house, and not to hold up a crookedly assembled wall.
Features of casing for an adjacent window opening with a balcony door
Combined opening
If there is a balcony door next to a window, then 2 casings should be installed. The opening where the balcony door is located is larger. And the opening for the window is much smaller. Therefore, the shrinkage of openings can therefore take place according to different scenarios. At the end of the window you can make a casing with a T-profile, and the balcony door with a U-shaped section. They will move relative to each other. The gaps above the top of the window and door will also vary. There is a larger gap above the balcony door than above the window. During the shrinkage process, the gaps will even out.
What to do if a casing of poor quality or not according to technology has already been installed?
If such problems arise, you can apply for a warranty to those who installed the windows for you. There is a chance, but, unfortunately, usually such “specialists” report that they have a lot of work to do at other sites and they don’t bother with such “trifles,” and then they stop picking up the phone altogether.
In this case, contact ALFA WOOD. Our experienced employees will diagnose the openings completely free of charge, give recommendations on further actions, and calculate the cost of the necessary work to ensure a guaranteed and expedient elimination of problems with the jamb. Call us, we will help.
Manufacturing of casing
The casing is manufactured by specialists in stages.
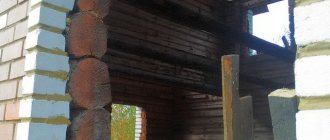
The first stage is cutting an opening in the log house. First, mark it using a level and plumb line. The distance from the floor to the opening is 80-90 cm. Cut out the opening. They saw the log under the window sill. align the structure first horizontally and then vertically.
Sectional diagram
The second stage is the production of tenons and grooves.
- on the sides of the opening, mark a tenon line using a construction ruler, if it is a P-casing;
- then they pass with a saw along the marking lines on the sides of the opening;
- make markings from the side of the wall;
- cut out excess wood from the log along the intended line;
- at the same distance from the side of the opening, pencil marks are placed on the side of the facade;
- connect them together using a ruler;
- cut off excess;
- the groove is made in the sides of the casing. Mark the location for the groove;
- make several cuts;
- use a chisel to break out and remove excess wood;
- When the groove is ready, it is cleaned with a chisel.
At stage 3, antiseptic and staining is performed. They brush off the dust. An antiseptic destroys pathogenic organisms and prevents their reappearance. Such wood does not rot, and insects do not breed in it.
Stage 4—installation of thermal insulation. To seal and eliminate cold bridges, jute tape is used, which is laid under the casing. It is secured with a construction stapler. A layer of jute is placed under the window sill, then a wind block is attached, and a layer of jute is placed on top again.
Stage 5. Installation of casing. All its parts are prepared. Align the edges of the boards with a miter saw. A one-third cut is made from the end of the board for the groove. The excess is chopped off with an ax. The second side casing is prepared in the same way. Align the groove with a cutter. Place the sidewalls, then the top into the spacer, having previously treated them with sealant. Sealant is necessary in order to avoid leakage and blowing. There is a shrinkage gap between the top and the top log. Place the top until it stops. The gap is insulated with tow.
Installing a socket requires a serious attitude to work and knowledge of the nuances of wood processing. Highly qualified specialists with extensive experience in construction work know how to make a socket in a wooden house.
How long does a log house or timber house shrink?
The question often arises: “what shrinkage gap should I use in a wooden house?” A professional specialist, when measuring the opening, will calculate the required size of the shrinkage gap.
Parameters taken into account: wall material, log diameter or beam cross-section, type of cuts, humidity, period of “standing” of the log house, type of window structures, load on the wall. To more easily calculate the size of the shrinkage gap, we provide an approximate calculation of wall shrinkage per 1 linear meter of opening (these dimensions are suitable in 90% of cases):
How to make a casing with your own hands
Making a joint with your own hands is a difficult task, but possible.
If you have a timber house, then it is best to make a frame from a T-shaped profile. Both easier and cheaper. No cutter needed. You can get by with a circular saw. To save material, the profile is not cut out, but a spike is glued into its body. But you can also cut monolithic T-shaped sidewalls. The tenon size is 5 x 5 cm. After marking and cutting the opening, the timber is carefully pulled out of it and carefully folded so that it does not interfere. Mark a line for the grooves in the sides of the opening in a timber house using a ruler. They saw through the lines. Excess wood is removed. Align the groove with a chisel.
A groove for the wind bar is cut out in the window sill. First they place the bottom, then the side parts and fasten everything with the top. The casing parts are fixed with a self-jamming lock, inserted into the grooves of the sidewalls, cut in advance. Don’t forget to treat the opening with an antiseptic and insert jute tape for insulation.
Prices for a joint with the cost of work
The casing is a very important element of the house; there is no such thing as a cheap casing. Having saved on materials, work or technology, sooner (when finishing) or later (in a year, when the cheap box is crushed or it starts to blow out and raise heating bills) you will have to spend additional money on remodeling.
Here are the approximate prices for the frame and the cost of work for a window opening of 1.5*1m:
| The frame of a log house or house made of rounded logs (in a log) | Timber house frame (rough) | House frame made of laminated veneer lumber (finished) | |
| Preparing the opening (sawing, forming a tenon or groove) | 4,500 rub. | 4,500 rub. | RUR 2,500 |
| Installation of casing with insulation and materials | 4,600 rub. | RUR 4,600 | RUB 9,500 |
| Production and installation of platbands on both sides, ebbs, window sills and slopes | RUB 10,800 | RUR 9,800 | 6,200 rub. |
| TOTAL: | RUB 19,900 | RUB 18,900 | RUB 18,200 |
This table shows the cost of premium casings and finishing (platbands, slopes, window sills). For some, platbands made from “inches painted with a brush” will be enough; in this case, the cost will need to be recalculated.
We hope the example of the price of a casing will help you decide on the appropriate type of casing boxes and their further decoration. Call us, we will make an accurate calculation, thanks to which you can accurately and economically plan your construction budget.
Installation of casing in a wooden house with your own hands
The casing is installed with your own hands by the owner of the house using technology that should be strictly followed. Proper installation of the frame will save you from problems associated with shrinkage at home.
Casing “in the deck” is considered reliable. U-shaped casing is used in log buildings.
- Before installing the casing in the opening, it must be prepared and the opening cut. To cut it, you need to mark it correctly, checking the aspect ratio several times. An important part of the installation work is preparing the tenon in the opening. From the edge of the opening, support points are marked, which should then be connected. Marking lines are made on 2 sides - inside the house and outside. The ruler and level constantly control the vertical and horizontal.
- cut down excess parts of logs;
- prepare a joint with a groove in the middle, a quarter and locks.
- adjust the parts to each other;
- the opening is treated with an antiseptic;
- the bottom is mounted, then the side parts, and the top;
- when jute tape is placed, the locks interlock tightly with each other;
- the jute is hammered tightly into the groove. The gap is caulked.
- the shrinkage gap above the top is closed with tow;
- PVC window is inserted.
Why do you need lining of window openings for houses?
The main purpose of the procedure is as follows:
- Protection of openings from possible deformation and loss of original shape.
- Mitigation of the consequences of log shrinkage.
- Strengthening weakened openings.
Before starting the procedure, the customer can take advantage of a free consultation with a specialist. This step will help you get answers to all your questions and clarify points that were not clear. Thanks to an individual approach, it is possible to find an answer to the needs of each client.
Possible errors and difficulties
When making pigtails on their own, beginners often make gross mistakes that lead to negative consequences. To prevent this from happening, professional installers recommend taking into account a number of features:
Vertical casing imposts do not have a common plane with the end of the opening - even if the bars protrude by several millimeters, chips must be removed until a single plane is achieved.- After installation, the window frame swings in the opening - the frame must be firmly fixed with self-tapping screws along the entire perimeter of the structure.
- When installing the frame, the boards protrude beyond the edge of the opening - it is necessary to bring the parts to the required geometric parameters.
- Wooden parts show signs of rot and mold - the boards must be treated with an antiseptic before installation.
- After installing the casing, the diagonals of the frame are not identical to each other - it is necessary to check the tension force of the elements after installation - the casing must be installed without causing deformations.
The main mistake is using available household tools when making cuts at the ends of the openings. When cutting a groove, it is recommended to purchase or rent a professional milling cutter or mortar cutter.
Consequences
If the casing installation rules are not followed, the following negative consequences may occur :
- Deformation of the window profile.
- Formation of cracks in the glass unit.
- The appearance of condensation on the glass.
- Blowing from the assembly seam.
- Violation of thermal insulation properties.
- Reduced sound insulation of the building envelope.
If malfunctions in the operation of the window sides are detected, it is necessary to take immediate action, since incorrect operation can lead to significant costs later.
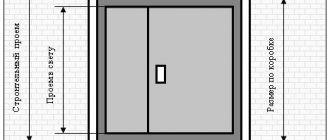
Measurements and project development
To correctly measure the window opening before making the frame, you must complete the following steps :
- Measurements are taken at a minimum of 3 points - at the corners and in the center of the side of the opening.
- For window dimensions greater than 1500 x 1500 mm, additional measurement points are required every 500 mm.
- Measurements are taken along both sides of the opening, as well as in the center of the wall thickness.
- If there are discrepancies at the measurement points of more than 1.5 mm per 1 m, the plane of the opening end should be modified.
Example project:
To draw up a preliminary design, as well as assignments for a woodworking enterprise, it is necessary to take into account a number of nuances :
- Only the actual dimensions of the openings obtained from the measurement results are transferred to the drawing.
- When sketching the casing itself, the depth of immersion of the bars or T-section wall into the body of the enclosing structure is taken into account.
- The overall dimensions of the casing must comply with the modular parameters of GOST 8486-86, which simplifies the search for materials.
- When designing a project, it is necessary to separately draw all the interface nodes of both the frame itself and its fastening in the opening.
When drawing up a sketch, it is necessary to take into account that an installation gap with a width of 15 to 25 mm around the entire perimeter must be formed between the future window block and the casing of the opening.