A frame is a protective wooden structure that prevents deformation of windows, doors during shrinkage of a house, bathhouse and any other wooden structure. Another name is house casing. This is an essential element of frame houses made from fresh logs. If you do not install the casing, then this will soon threaten to violate the correct geometry of window and door openings. Therefore, you should not save at this stage of construction.
Purpose of the pigtail
A pigtail in a wooden house allows you to simultaneously solve several problems, including:
- Strengthen the walls in the openings. Correct distortions.
- Protect from moisture, seal window and door openings.
- Thermal insulation. High-quality casing prevents heat from escaping outside and perfectly retains it in the room.
- Protect from shrinkage, squeezing, and deformation.
- Give the structure a beautiful look. Moreover, there are ready-made elements for casing doors and windows on sale.
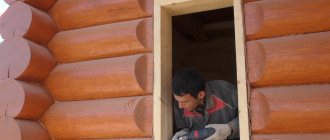
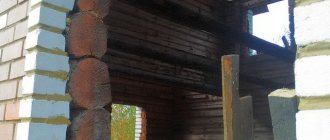
Photo: preparing window openings
In log and frame houses, casing is mandatory. You cannot save on it, otherwise the doors or windows will warp or bend.
What else you need to know:
- How to make a blind area correctly
- Gas holder for a private home
Standards for installing plastic windows
A distinctive feature of the technology is the introduction of polyurethane foam, which imparts rigidity to the frame-opening connection. The layer acquired as a result of polymerization of the foam immediately functions as insulation and additional fastening. In order for the designated element to maintain the required technical properties, the foam layer is surrounded by insulating layers.
When it is better to install a plastic window, the owner himself decides. Winter installation is often recommended due to the immediate appearance of all flaws. When choosing polyurethane foam, it is imperative to take into account at what atmospheric temperatures the composition will harden better. It is recommended to prefer professional foam, and to work with negative thermometer readings, you need to purchase a specialized nozzle.
How to do foaming is carefully described by the manufacturer in the instructions included with the product. Foaming usually begins from below, moving upward in a rotary and circular motion. To avoid overconsumption of expensive material, blow out the foam in several stages in sections of 25-30 cm.
Advice. In order to shift the dew point, foaming is done with unequal density. It is recommended to make the outward-facing layer of foam less dense than the inner one. The foam must be blown moderately around the perimeter, without voids or gaps.
Preparing the window opening
There should be no dust, no debris, no paint residues in the gap - this is an indispensable condition. For home craftsmen who want to know how to insert a plastic
window into a wooden structure, it is necessary to plan off the top “unreliable” layer if the installation will be carried out in
a box
. The foam will adhere tightly to the top layer. If there is a suspicion that it will peel off over time, it is better to remove it.
Advice. The gaps between the frame and the gap are filled only with foam if the distance does not exceed the limit of 4 cm. If the gaps are larger, it is better to partially fill them with cheaper material: plasterboard, pieces of timber, polystyrene foam, brick, etc.
Preparing a plastic window
- First, release the frame from the sash, then remove the pin inserted into the top hinge. You need to carefully pick it up from below with pliers and a screwdriver. Then, lifting it slightly, remove the sash from the lower hinge. Double-glazed windows are removed from fixed windows by first removing the longitudinal and then the transverse beads. To remove glazing beads, carefully insert a knife with the thick side or a spatula into the gap and slowly move it, trying not to destroy the glass.
Direct your attention. Stick in plastic
Small windows can be installed using mounting plates without removing the sashes or double-glazed windows. If possible, do not violate the integrity of the factory structure.
- Place the glass unit or sash at an angle against the wall, placing it on a flat surface covered with cardboard or any soft material.
Attention. You can't lay it flat! Place it skewed too. A small pebble under the base will cause a crack to appear.
- Remove the protective film from the outer surface of the frame. If you do not remove it now, it will be even more difficult to do so later and you will have to use a hair dryer.
- Regardless of the type of fastening chosen, places for its installation are marked. The step strongly recommended by builders is 40 cm (a little less is possible), the maximum allowed by GOST is 70 cm. The standard distance from corners and from the impost is 15 cm. If mounting plates are used, they are secured to the frame with screws in advance. Holes are made for anchor bolts or long screws by placing a metal drill on the outside of the frame.
Most of the video instructions teaching how to install a plastic window without the help of others dictate fixing the PSUL protective tape before installation. But craftsmen who have encountered its sticky “inconvenience” claim that it is wiser to attach it after installation.
Specifically the installation process
- Insert the frame into the gap, placing special plastic corners or small blocks around the perimeter to provide a technological gap. By slightly moving these spacer wedges, align the frame correctly horizontally and vertically with uniform side gaps.
Advice. It is better to place the spacer devices next to the point of attachment with a screw or anchor. They will protect the frame from deformation.
- Because installing PVC windows yourself can be done using various fasteners, differences arise at this step.
- Immediately screw a screw into the opening of the timber house through the holes in the frame. There is no need to screw it in all the way.
- On walls made of foam concrete or brick, mark points through the holes in the frame, then remove the frame, drill holes in a suitable material with a drill. Later, return the frame to its place, “attach” the fasteners.
- Double manipulations with the frame will not be necessary when installing on anchor plates. They should simply be bent so that they adjoin the place created for their fastening.
- The final fastening is done after checking the horizontal and vertical lines with a spirit level and a plumb line. You cannot persist with tightening, so that the frame does not begin to bend barrel-shaped. Finish screwing when the cap is level with the frame. Installers recommend leaving 1 mm above the surface.
- Return the dismantled parts to their place in the reverse order and check the functionality of the structure.
- Fill the gaps with foam. Cover the foam seams on the outside and inside with protective tapes. On the outside, the insulating tape must be “sinked” into
- Fill the gap under the drain with foam. Install it at an angle away from the window, attach it with screws to the bottom profile.
- After the foam has polymerized, you need to install the window sill. The plastic version fits 2 cm under the clover. To create a slight slope from the window, the area under the window sill can also be foamed.
- It is better to make the slopes on the day of installation. The longest break is 3 days after installation.
After completing all operations for 16 hours, it is not recommended to use windows so as not to damage the integrity of the installation seams. Knowing how to install a plastic window is necessary not only for skilled owners. If the owner of a suburban property decides to order the services of a little-known team of installers, he also needs
study the specifics of installation in advance.
Types of casing boxes
The casing material is wood, without defects and dry. Finished elements are treated with antiseptics and fire retardants in accordance with fire safety requirements. This will significantly extend the service life of the structure. The casing can be made from several types of lumber. Let's look at the features of each of them.
From the array
Photo: installation of casing in a house made of hewn logs
The solid is taken dry, without signs of damage by fungus or insects. There are four breeds most commonly available for sale:
- pine;
- Karelian pine;
- larch;
- cedar.
If pine is used, it should only be chamber dried. Profile type – U-shaped, with or without the option of choosing a quarter.
Solid wood frames are made in log houses and gun carriages and fit perfectly into the style of the house.
From laminated veneer lumber
A popular finishing option for casing for windows that does not require finishing of slopes. Obtained using the glue-type method. The basis is dry bars. The elements are glued together into a “layer” or into a “microspike”.
Profile shape – T-shaped or U-shaped. Type – straight or with expansion into the opening. It may be with or without a quarter.
Glued laminated timber casing is an excellent option for frame houses with exterior siding.
From the gun carriage
When building country cottages from logs, beams, large baths, the KELO carriage is often used to frame doorways and windows.
The advantage of the material is that there is no need to install platbands. The resulting seam between the wall and the window frame is caulked and then closed with a special decorative rope.
The outer part of the casing is aged by artificial brushing or firing.
The profile shape is U-shaped. Comes with an extension inside the house. Can be ordered with or without a quarter.
Combined casing
In recent years, a combined type of casing has begun to be supplied to our market, the main part of which is made of solid pine. The top of the frames is a glued board, where lumber from oak, beech, larch, and pine can be used. Does not require finishing. It looks beautiful. The price is affordable. The profile shape can be T- or U-shaped.
Design features for doorways
If it is necessary to install an external door in a log house, a monolithic frame made of high-quality solid timber is also used. This is the most reliable option for doorways with heavy door leaves. The manufacture and installation of the casing is carried out using the above technology, but instead of a window sill or embedded board, the bottom part is a threshold.
The casing of interior doorways may not have a lower horizontal element. Installation of this design begins with the installation of the sidewalls.
For doorways in interior partitions, it is allowed to use a simplified version of the casing. This solution is suitable for lightweight door structures and is easiest to implement with your own hands. In this case, the sidewalls of the pigtail are made of composite parts - a bar attached with self-tapping screws acts as a tenon.
In order for door and window systems to function correctly, it is necessary to make high-quality casings and follow installation technology.
Suitable wood species
Photo: box assembly
Only chamber-dried wood with a moisture content of 8 to 10% is suitable for casing. An ordinary board or timber is not suitable - it contains a lot of moisture and will quickly lead.
Suitable breeds:
- pine;
- Karelian pine;
- larch;
- cedar;
- spruce;
- beech or oak.
- KELO cracker.
For a T-shaped casing, a carriage with a thickness of 50 mm or more is used; for a U-shaped casing, a carriage of 90 mm or more is used. The width of the board for the jamb should be equal to the thickness of the wall.
Correct depth for window installation
The most important parameter that needs close attention from builders is the depth of installation of a plastic window in the structure of a frame house. The standard width of frame walls is 15-20 centimeters, while the average thickness of a window profile is 70 millimeters. Based on the figures given, you should determine the ideal depth for installing the window.
Here you need to take into account that the deeper the profile is installed inside the wall, the greater the likelihood that the wall around the window opening will freeze. This means that the closer the window is installed to the wall surface, the more the profile itself freezes, and the smaller the window. In the latter case, there is a high risk of condensation and frost during the cold season.
If you follow the general rule, then the optimal depth for installing window structures in a frame is 1/3 and 1/4 of the wall thickness from its outside surface.
How the casing works
Door or window casing consists of:
- threshold (lower part in the doorway);
- window sill (for a window opening);
- top;
- sidewalls
When constructing the casing, it is important to take into account that the lumber should be slightly smaller than the parameters of the openings. This is especially true for the height, which will decrease as the house shrinks.
It is customary to fasten the elements of the frame using grooves and ridges. Upon completion of installation, all gaps are filled with tow, which will serve as a reliable sealant. As soon as this stage of work is completed, you can begin installing windows, entrance and interior doors.
What affects the price of casing?
1. Wall thickness: wooden houses are built from logs and timber, so the wall thickness can be from 140 to 300 mm. The dimensions of the parts of the frame correspond in width to the walls of the house, or slightly exceed it. You also need to consider the width of the window sill.
2. Size of the opening: the larger the opening, the more material will be required to make the frame and the time to work. The shape of the opening also affects the price of the casing: a standard rectangular design or a complex polygonal one.
3. Quality of a wooden house: if the walls are assembled without connecting elements, the curvature of the walls occurs in the cut out openings. Then you have to additionally straighten the walls, which leads to additional costs.
Houses made of timber are assembled using nails that meet at 300 mm. Because of this, additional money and time are required to sharpen chainsaw chains or purchase new ones.
Source: sotdel.ru/okosyachka-obsada.html
Options for locking connections
Photo: types of box connections
The casing can be made and fastened in several ways. It is impossible to say that one of them is definitely better. Each has its own characteristics, which we will analyze in more detail.
Spike monolith
As soon as profiled timber with ready-made recesses (bowls) began to be sold on the construction market, tenon casing immediately became popular. Since the elements come ready-made and there is no need to cut anything additional.
Its other name is T-shaped. It is used in houses made of timber, where the wall thickness is from 100 to 150 mm, or from rounded logs (small diameter).
Let's take a step-by-step look at how to properly make such a lock:
- Align the opening with a hand or chainsaw.
- Perform markup. Draw vertical lines along the center of the ends. Retreat 3 cm on each side.
- According to the markings, cut niches for the tenon.
- Coat all wooden elements with antiseptic.
- Using a milling cutter, cut out a beam in the shape of the letter T of the required dimensions.
- Treat the side parts of the pigtail with antiseptic again. Secure them with self-tapping screws.
- Secure the top jumper. Leave a gap of up to 5 cm so that the insulation fits well, but there is still free movement during vertical shrinkage.
- Fix the window sill board.
- Caulk all cracks and joints.
- The side parts can be covered with special tape (optional).
In the production of finished elements, there are options when the tenon is simply glued into the body. But it is much better when the tenon and base come together in one piece.
If you are installing the casing yourself, then it is strictly not recommended to use polyurethane foam as a sealant. It prevents normal shrinkage and can cause deformation of openings.
Deck
Another name is U-shaped. Often used in the construction of log houses and rounded logs. The lock in the deck is characterized by increased reliability and durability.
This involves sawing out a tenon at the end of the wall where the vertical elements will be attached.
U-shaped casing helps reduce the load on door and window openings. Often a quarter is selected from the outside for mounting frames (for windows, doors).
Mortgage beam
Considered a quick, inexpensive installation option. Such a casing box can be manufactured and installed on your own.
A box is assembled from boards of small width, mounted in an opening of suitable dimensions, and fixed with self-tapping screws.
Despite the speed of assembly, experienced builders recommend using embedded timber only as a temporary option while the frame is being assembled. Upon completion of construction, an additional wide board should be attached to the beam, to which the frame should then be fixed.
There is no point in reducing costs by using conventional timber. This threatens to bend the pigtail and nullify all efforts to install it. You need to take only chamber-drying timber.
Studding of window and door openings
A finished log house (frame) cannot be left without ventilation. Therefore, at least one hole is cut for air access. The dimensions of the opening are taken taking into account the thickness of the casing. The opening is marked so that the cutout extends into whole logs by at least a third of the diameter. If you cut any crown, the rigidity of the entire structure will be disrupted.
- Vertical grooves are cut at the ends and grooves are driven in. During the shrinkage of the log house, they do not allow the logs, cut into two parts by openings, to move. The swarm must go up and down the ends of the recesses.
- After the house has settled, openings are cut out for all the windows. The cutting of grooves for the side tenons is called tenoning. First, draw vertical lines at the ends. Use a chainsaw to make cuts and remove any remaining wood between them.
- Workers can use a chainsaw to remove the wood inside the groove at an angle. Excess is removed with an ax. If the vertical cuts turn out to be too deep, the groove is not selected to the full depth, but only to the size of the saw.
- To align the groove, use chisels.
How to make a groove to the exact size? Well-equipped construction teams use a special tenoning cutter. A finishing socket is immediately placed into a smooth recess “into a spike”.
How to make a casing with your own hands, its dimensions and drawings
The design of door and window casing has similar stages, but there are also differences. Let's look at them in more detail.
Doorways
The casing in wooden houses is assembled not only for entrance or interior doors, but also in any other decorative openings in order to protect the internal parts of timber and logs from temperature changes.
Doorways may not have a threshold. In this situation, the lower part of the supports is bolted to the lower beam.
* the final dimensions of the doors are determined after measuring the finished casing
The top should stand 2-3 cm higher than the top log. Sidewalls ensure vertical sliding of logs. They do not need to be insulated if we are talking about interior doors.
The installation procedure itself is similar to the installation of window openings.
Windows
Installation of plastic windows also involves the installation of a frame. It is important to take the preparation of the opening responsibly. It should be at least 14 cm wider than the future window frame. To choose the right dimensions, you need to take into account the thickness of the frame boards and seams and do not forget about the shrinkage coefficient of the wooden structure.
There is no need to rush to order plastic windows in advance. There is a risk of size mismatch. It is better to do this after finishing the installation of the pigtail.
Photo: installation of a PVC window, opening of a house made of rounded logs
At the end of the opening you need to carefully cut out a ridge, which will serve as the basis for a carriage with a groove. This will relieve the window from additional load when logs and timber shrink. The material used is a timber with a cross section of 100*150 mm, in the middle of which there will be a groove. Its width should be 5 cm larger than the window. It is better to cut it with a chainsaw; if necessary, use a router. This way the accuracy will be at the required level.
It is recommended to take an edged board measuring 150*40 mm for the top. On each side you need to cut out grooves for the comb. As soon as the installation of the carriages is completed, the top is fixed on the sides of the opening with self-tapping screws. After installing the casing, the gaps must be sealed with jute tape and caulked.
Photo caption: lower assembly when installed with a stand-alone profile
In window openings, the lower part of the frame is always present. There are two varieties:
- In the rough cut the bottom is not visible. The window sill is made of plastic to match the color of the window frame.
- In the finishing window, the bottom serves as a window sill. The casing can be extended inside the room or to the sides of the opening.
The decision which option to choose is up to the owner.
This knowledge will definitely come in handy:
- How to properly heat the stove with wood in the house
- What stones are suitable for a steam bath?
Casing: prices, cost
Manufacturing costs can vary greatly: prices and costs depend on many factors; in every wooden building, the part is not just necessary, but simply irreplaceable!
What determine the prices and cost of casing?
It depends on the quality of the wood, the type of casing, the shape of the casing, the presence of decorative elements, the size of the opening, and also on where the part will be installed - in timber, logs or a log house.
The window frame is made of dry material with a humidity of 8-12%. It consists of a top, risers, an adhesive window sill or a window sill board in cases of installing a plastic window sill.
Several types of work:
Solid: all parts are made by processing solid wood while maintaining the correct wood texture.
Adhesive: parts of such casing are made from glued boards. It is glued into a microspike on all four sides. Knots and resin pockets in this case are completely cut out.
Combined is the most common type of casing. The top and risers are made of solid pine. And the window sill is made of glued boards. All of it has a clean appearance and after installation needs to be treated with paint and varnish.
It is important!
Window frames are made to fit each window or door individually. When placing an order, the customer must know which windows and doors will be installed in the future casing. It can be made either with a sample for a window - this option is used in cases where the house will not have exterior and interior decoration, the walls of timber or rounded logs remain untouched
It can be made as a sample for a window - this option is used in cases where the house will not have exterior or interior decoration; the walls of timber or rounded logs remain intact.
And without sampling - this option is used in cases where the house is planned for interior and exterior decoration in the future. This version of the frame can be finished or rough (if it is completely closed during future finishing).
The pigtail can be either a standard shape - a rectangle, or non-standard shapes. Trapezes, polygons, balcony blocks.
Helpful advice!
Non-standard forms have their disadvantages, but there are ways to avoid them. Such information is discussed with the surveyor at the site.
More about the process
After window openings are cut in a wooden house, the structure of the log house no longer has the same rigidity as if the log house were solid. First, let's answer the question, what is a window frame, or, as it is also called, casing (wooden frame).
After window openings are cut in a wooden house, the structure of the log house no longer has the same rigidity as if the log house were solid. This is especially true for the window opening itself. During the shrinkage process, the logs can move significantly horizontally, which will also lead to deformation of the windows.
All these unpleasant moments are prevented by the frame (casing, wooden frame), which looks like a wooden box. From all of the above, it is clear that installing a socket in a wooden house is a dire necessity. This is true not only for a log house, but also for a timber house.
The process of installing the pigtail is quite simple. Having the necessary tools and materials at hand, you can install the pigtail yourself.
It is assumed that the window opening has already been cut. Now you need to use a chainsaw to select a spike (ridge) on the sides of the opening. This is done so that the pigtail does not move perpendicular to the axis of the walls.
Then the pigtail is made according to the obtained dimensions. Accordingly, in its side racks you need to select grooves for the ridge.
All elements of the pigtail are attached using dowels. Installation of the frame starts from the bottom beam. A layer of linen or jute is first laid under it.
Then vertical bars are installed, into the grooves of which flax or jute is also placed. And lastly, the upper beam of the frame is installed. The shrinkage gap, which must be left above the jamb, is covered with linen fabric.
It is important!
The window frame is a monolithic structure and is absolutely independent of any movements of the frame. Framed with frames, windows and doors will please the eye and will last you indefinitely.
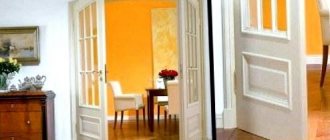
Rough and finishing casing: concept, difference
There are basic (rough) and finishing pigtails. They differ in materials and purpose. Various casing boxes are used in the construction of houses.
Rough casing is used in buildings that will undergo external and internal finishing. For example, the outside will be finished with siding, and the inside with plasterboard.
An edged board is suitable as a material. In the future, the slopes can be improved.
The basic pigtail is used in houses made of logs and timber. The casing elements are not polished. The profile shape can be T- or U-shaped.
Plastic windows are mounted on top of the installation profile. The window sill is also made of plastic. The opening can be finished with platbands.
A finishing trim is installed when the building does not require additional finishing, most often in houses made of rounded logs or timber frames. The material for the casing is planed board, which will also become a decoration.
Casing into the deck
This option for installing casing in a wooden house is sometimes called a U-shaped frame. A spike is installed in the opening or correctly, the end is profiled and a device that looks like a roof is placed on this structure. Beams from the frame (lower and upper) are mounted into the spacer. Their production is carried out exclusively in accordance with the parameters and requirements of a specific structural element and house. These could be balcony openings, a door or a beam.
Upon completion of this type of installation, no further finishing of the used area is carried out. This method has its pros and cons:
- An excellent stiffness coefficient applies to all possible directions of the log;
- If it is necessary to install doors or PVC, the previously carried out manipulations will not interfere in any way.
Minuses:
- A rather expensive procedure, due to the high cost of the materials used - parameters for the width of the bar for the manufacture of racks (vertical);
- This process covers a large volume of work - the frame takes a long time to produce, since it contains shaped elements).
When building houses made of wood, the method of glued casing of this type is very often used, which is much cheaper.
Installation of a pigtail in a wooden house
The general step-by-step instructions for installing the casing are as follows:
- The opening is cut 80-90 cm from the floor, taking into account the height of the residents of the house.
- It is important to leave a shrinkage gap of 35-60 mm between the opening and the door and window structure.
- Depending on the type of pigtail, a chainsaw is used to cut a ridge or groove in the opening.
- The wooden elements of the casing are treated with an antiseptic. Insulation is placed in the remaining gaps. It is prohibited to use polyurethane foam to fill voids.
- The sidewalls, top, and window sill are being installed.
The width of the casing elements can reach 26 cm. The use of large parts entails the risk of cracks forming throughout the entire structure.
The recommended moisture content of the lumber used is 10-12%. It is also not worth taking wood with lower humidity, since it may have cracks inside.
Particular attention is paid to the choice of raw materials when creating frames for metal doors.
Let us examine in more detail the manufacture of casing depending on the material of the house.
From a log (log house)
For standard wooden windows, grooves are cut into the logs near the openings so that one part of the casing fits perfectly.
A slightly different type is used for plastic windows in log houses. The trick is that you need to cut a ridge at the ends of the logs, onto which a carriage with a groove is then placed. As shrinkage occurs, the comb will gradually squeeze into the groove of the carriage. At the same time, the geometry and integrity of the window is preserved.
Installation on embedded timber
A beam with a cross-section of 50x50 mm is called cranial. During construction I use it to install floors and roofs. It is placed in window and door openings at the ends of logs or beams to prevent them from moving. The side bars are called roiki. The casing boards are attached to them with self-tapping screws.
The connection holds loads well, but is not always durable, because the connection is not solid. Metal screws shorten the service life of the saw and the entire frame. If moisture penetrates under the casing, the screws can rust. The beams in a timber house are immediately placed on the insulation, and a finishing frame can be attached to them. The deformation of the beam is insignificant.
Installing a quarter window
Let's assume that the window frame is already installed in the opening. The size of the plastic window is made such that it is slightly larger than the “clearance” of the casing, or more precisely: 10 mm more in width and the same amount in height.
Such a window will not fit into the frame from the inside, but it will easily fit into the reverse quarter from the street side. In this case, the edges of the frame will “hide” behind a quarter of 5 mm on each side (this is no longer possible - the sash hinges will interfere), and an installation gap will remain around the frame, which will later be filled with foam.
The frame is attached to the frame with self-tapping screws, as already described above. To ensure a beautiful tight connection between the frame and the casing on the room side, you can use a D-shaped door seal. It is glued before installing the frame with the adhesive side on the edge of the quarter. Accordingly, the dimensions of the quarter must be adjusted for the seal.
But as practice shows, with high-quality production of the pigtail, the need for such an addition disappears. The window is placed directly into the quarter and the meringue of the gaps is pressed tightly against the frame.
When attaching the frame, we press it tightly against the quarter, squeezing the seal, and screw in the screws, fixing the window in this position. The installed window is foamed from the street. Then, after the foam has dried, its excess is cut off, the seam is sealed with waterproofing tape or sealed with “STIZ-A” sealant, and the trim is installed.
Of course, since we refuse to decorate the casing with any additional elements, we must refine it, i.e. give it a look that matches the interior design of the room.
First of all, you need to give the bottom crossbar the shape of a window sill so that its inner edge protrudes slightly from the wall and is slightly wider than the opening.
Secondly, we “dawn” the internal surfaces of the racks and the top, i.e. we abandon the primitive rectangular (in cross-section) shape of these elements and create a large chamfer, simulating a reversal of the slopes.
Next, we process the inner surface of the casing elements. There are many options here: texture, color - the choice is yours. You can simply sand the surface and coat it with varnish. You can cover the wood with stain of the desired color so that the surface of the casing is in harmony with the color of the window and/or the color of the walls.
There is also, in my opinion, an interesting, but more expensive option - brushing the surface, i.e. antiqued treatment.
Artificial aging of antique wood is now very popular in various design styles. The essence of brushing technology is to remove soft fibers from the surface of wood using a metal brush (along the fibers), while the surface turns from smooth to embossed. After giving the relief texture, the wood is cleaned of lint and fibers, then the final gloss is given.
You can immediately coat the wood with varnish, but “aged” wood will look much more impressive after treating it with stain of the color you want. However, there is an even more effective way of painting - patting - creating a contrast between dark wood pores and a lighter surface.
This is achieved using paint of the desired color: the entire front surface of the casing is covered with it, and then the top layer is removed with a cloth before the paint has had time to dry. The final stage of artificial aging is varnishing. It is applied in two or three layers. You can then rub the surface with a soft cloth to add shine.
Self-production
Do-it-yourself casing has many advantages. In the first place is significant savings in money, since in this case you will only need to spend money on purchasing materials. Secondly, there is always an opportunity to spend time wisely and at the same time refresh your knowledge about the construction business.
To make a window frame with your own hands, you will need to know the size of the window opening. It is worth keeping in mind that the window opening should be 13 cm larger than the frame.
To make a pigtail yourself, you need to cut a tenon in the timber. Subsequently, grooves are cut into the bars with a cross-section of 10x15 cm - these will be the side posts. The carriage should be 5 cm larger than the window, while the dimensions of the tenon should also be 5 cm in width and depth.
An edged board with a cross-section of 4x15 cm is needed to make the top. A groove is also cut into it.
Useful tips
Plastic windows can reduce heating costs, since the sealed design prevents the formation of drafts. It is impossible not to note the aesthetic appeal of such products and the cost savings on maintenance. But plastic windows will meet the requirements only if the installation was carried out correctly.
Self-installation of PVC structures in a wooden house has some difficulties, which is why it should be done in accordance with the instructions of specialists. The time of year does not affect the installation process in any way. The availability of modern technologies allows work to be carried out with equal success in summer and winter, when polyurethane frost-resistant sealant is used.
Many users are unhappy with the accumulation of condensation and say that moisture constantly accumulates on the inside. This can be avoided by simply ventilating the room or installing exhaust devices and a high-quality ventilation system. In cold weather, you can immediately determine the presence of poor sealing; the condensation that appears will indicate places where it is necessary to foam more strongly.
It should be noted that in severe frosts, slopes can freeze, even if they are well foamed. This happens because cold air flows along a concrete wall or brick, and as a result negatively affects the slopes. This can be avoided by using polystyrene foam, the thickness of which should be two centimeters. The material is attached tightly to the frame along the entire perimeter of the window structure. Its width is 10 centimeters. Only after this the slopes are installed. The foam can be secured with polyurethane foam.
If the region is characterized by a cold climate, then it is worth choosing a three-layer double-glazed window and, conversely, residents of the southern region should not spend money on a three-layer option. It is also recommended to proceed with the choice of profile, which can be one-, two-, three- and four-chamber. When installing a window sill, it is necessary to foam the holes at the end so that cold air does not penetrate inside, especially in brick houses, where it passes through poor masonry. Modern frames are better insulated and more durable.
High-quality, south-facing windows can provide a net benefit by passively collecting solar heat absorbed during the day. Proper home design, orientation and window placement can easily reduce heating needs by 25 percent.
You should know such important points about polyurethane foam as:
- It is recommended to apply the product with latex gloves, since this material is sticky; if it gets on the skin, you will have to scrub for a long time;
- Before foaming, you should make sure that this area is clean;
- After application, the material continues to foam and expand, so there is no need to lay the foam in a thick layer. You can always add a little more later;
- after pressing the trigger, the foam will come out, and this process cannot be stopped. The can can be reused, but it usually takes about 15 minutes for the compound to begin to harden in the tube. It is necessary to mentally mark the foaming area and move along it until the container is empty.
There are two ways to replace an old window. You can remove the interior and exterior trim to install a completely new window unit and seal any gaps before finishing. The second option is that you can install the structure inside an existing opening with a frame. This option will help you save a lot, but this installation does not allow you to foam the air gaps around the window openings.
For more information about installing plastic windows in a wooden house, see the following video.
Design
It is a beautiful building with many windows located at different levels. Each window has its place! This location is determined by agreement between the architect and the client.
Our company develops glazing systems for any house made of laminated veneer lumber. Individual solutions are prepared for clients, taking into account their wishes.
First we determine the number of windows in the house; then we calculate their location and size. We calculate both the total number of windows and the height at which they will be located. We do all this at the project preparation stage.
During negotiations, it happens that the number (and location) of windows for a house made of laminated veneer lumber can change significantly. After all, there is always a chance to improve the project and come to a more harmonious solution.
When drawing up a glazing plan, the architectural features of the house are taken into account - the complexity of the structure, the presence of different levels, balconies and other nuances.
The “drawing” stage includes determining the dimensions, opening plane, and design (shape) of the window.
Also, as a result of negotiations with clients, we determine the material from which the windows will be made - wooden or plastic.
Dimensions
The dimensions of the casing are not strictly regulated according to GOST or SNiP standards, but this does not mean that there are no requirements for dimensions. They have already been briefly touched upon before, but for a more complete understanding we need to delve a little deeper into this issue.
First of all, there are two factors that influence the size of the frame: the width of the walls and the size of the window or doorway. Depending on this, the length and width of the bars used for casing are determined.
As for the cross-section, the most commonly used timber is 15x15 cm or 36x15 cm with a log of 100 mm. The top is made in proportions of 5x15 cm. The reinforced casing is made of 100 x 200 mm timber to level out possible increased loads.