Among the materials used for interior decoration, wood is becoming increasingly popular. More precisely, it is regaining its once lost popularity. At one time, thanks to the development of the chemical industry, plastic polymers practically replaced wood as a finishing material. However, the demand for wooden interior elements has arisen again. And this is understandable, since there is little that compares to wood in terms of naturalness and aesthetic appeal. Wood is increasingly being used as a material for making window sills. How to install a wooden window sill with your own hands and what rules must be followed will be discussed below.
Why choose
From tightly fitted boards
In order to finally be convinced that installing a wooden window sill in an apartment or private house is a good enough idea, it is enough to familiarize yourself with some of the unique properties of this material.
- A wooden window sill will have excellent performance characteristics. Here, first of all, we mean that the material is completely natural, and therefore such a window sill can be installed even in a child’s room.
- The material is durable and resistant to various types of impacts. This refers to both changes in temperature and humidity, as well as chemicals used, for example, during room cleaning.
- It should also be mentioned that wood leaves plastic counterparts far behind in terms of aesthetics. In hardware stores you can find a variety of options for these decorative elements. In this sense, even the most demanding taste can be satisfied. You can choose a window sill to suit any interior design.
What wood is best to make a window sill from?
You can make a window sill from any type of wood, the main thing is to decide for what purpose and where this interior detail will be installed. Hard wood, such as oak, is resistant to moisture and temperature changes and has a long service life, but the cost of such a product will cost a pretty penny. This material is suitable for window sills that will be used as a work area or a stand for heavy flower pots.
A budget option would be pine or spruce. Window sills made from these species are easy to install and do not require antiseptic treatment due to their increased resin content. You can install a larch board. It is not as expensive as oak, but has the properties of coniferous trees. The shade of a larch window sill turns out to be more noble, which determines its demand among buyers. There are several criteria for choosing wood for installing a wooden window sill with your own hands:
- integrity of the board. There should be no defects (chips, cracks, knots, etc.) at its ends, as well as inside the wood structure itself;
- The type of wood must be strong. It is better to choose oak, beech, hornbeam. Less strong are larch, pine, chestnut, cedar, but they have a beautiful pattern;
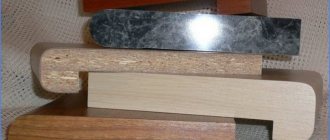
- texture and color of the board. There are so many species, so many shades and patterns of wood you can find. The choice depends on individual preferences and interior design.
Wooden oak window sill
In addition to solid wood, laminated wood, chipboard and MDF are used. Unlike solid wood, laminated boards do not deform from moisture, are much cheaper, but look no worse. If you want to save even more, it is better to give preference to MDF or laminated chipboard. The raw material is pressed wood chips covered with a laminate on top. The material is also good because it has many options for textures and shades. With its help, you can give the window sill the look of marble, stone, with a matte or glossy surface.
If you approach the choice of material for the window sill with all responsibility, then in addition to the functional element, you can get a real decoration for the room. There are ready-made products on sale, or you can try and make them, and then install wooden window sills yourself.
How to choose
Before moving on to the description of the technological process of installing a wooden window sill, it is necessary to clarify a little the rules in accordance with which the choice should be made.
The window sill may differ in texture and color
- First of all, you should pay attention to the integrity of this element. You need to look at the end of the product. There should be no cracks or chips either on the surface or in the structure of the wood itself.
- When choosing wood products, the type of wood used for manufacturing is also of considerable importance. In the case of a window sill, you should pay attention to hard rocks. Among them, the undisputed leader is oak. You can also take a closer look at beech, chestnut or pine.
- And, of course, it would be wrong to ignore the aesthetic side of the issue of choice. You can find many shades of wood, textures too, not to mention the wood pattern. And if we add to this just a huge number of different varnishes, stains and impregnations, then we can say that such a window sill will not only cope well with its tasks, but will also act as a true decoration of the entire interior.
Manufacturing procedure and classification
Manufacturers of wooden window sills offer products from several species. A variety of colors and shapes allows you to choose from a large assortment. Finished products are easy to install. You can even do this yourself.
Oak window sills are considered the most durable
Wooden window sills are made taking into account the required dimensions, the purpose of the room and the customer’s wishes regarding color and texture. The most popular and well-established wood species are oak and larch . Oak window sills are very durable. With proper care and use, they can last a very long time. Window sills made of larch are no less durable, and compared to pine they have higher moisture resistance.
Depending on the room in which the installation will be carried out, you should decide to make it from a whole piece of wood or its parts processed by milling, tongue-and-groove and assembled or glued together. For example, for a kitchen where there is a high level of humidity, a wooden window sill board should be made from a whole piece of wood, and special attention should be paid to impregnation materials and varnish coating.
It is recommended to varnish window sills for wet rooms
Wooden window sills can be classified according to various characteristics:
- in shape (classic straight and arched);
- by size (narrow - no more than 10 cm; wide, consisting of the width of the opening and an addition of 6 cm; large, serving as a working surface)
- by type of wood, and therefore by color and texture;
- by manufacturing method (from solid wood or from glued wooden planks);
- according to the method of surface treatment.
Products of any shape and size can be made from wood.
The manufacture of window sills itself is carried out only after taking all the necessary dimensions. They are made by private companies, presenting a wide selection of products.
Preparation
First of all, surface preparation must be carried out. The point is that whether it’s a new house or a major renovation, after installing the window blocks there will probably be construction debris left that needs to be removed.
Wedges
Also at this stage it is necessary to level the surface intended for installing the window sill as much as possible. If even slight distortions are observed, they must be removed using wooden wedges. The only distortion that is allowed is a slight tilt of the window sill plane towards the room, but here we are talking about a few millimeters.
How to seal foam under a windowsill
Foam not only degrades the aesthetic qualities of the window system, but also requires additional protection. The material shows excellent thermal insulation properties, but is destroyed by moisture. You can seal the foam using two methods:
- The trimmed foam is covered with tile adhesive. Before painting the walls, the area treated with glue must be sealed with putty. If there is wallpaper on the walls, then it is better to treat the surface with an acrylic-type primer.
- The second method involves the use of vapor-permeable tape. The product must be cut according to the required dimensions and secured in free space. A decorative cover made of wood, aluminum or PVC is mounted on top of the system.
Each technology has a number of undoubted advantages, but their combination will give the maximum result. The cost of consumables is insignificant, so you can easily use two methods at the same time.
Installing a window sill is a complex process that requires a set of tools, supplies and special skills. Many home craftsmen fix the window sill correctly on their own, and the quality of the result is excellent.
Installation
When the base is ready, you can begin the installation of the wooden window sill. Typically, this process is carried out using a cement mixture. That is, it is necessary to prepare a certain amount of cement-sand mixture. Here we can say that there should be enough solution so that it hides the upper planes of the wooden wedges used to level the plane by 3–5 mm. After this, the wooden window sill is laid on top and pressed down. Excess solution is simply removed with a spatula.
Advantages and disadvantages
Many people abandon wood when making window sills in favor of other materials, although wooden ones have more advantages:
- high strength;
- absence of harmful components in the composition of the material;
- ease of processing of wood, which makes independent production and installation possible;
- excellent decorative characteristics that complement any interior;
- good thermal insulation properties.
Minuses:
- higher price, for example, relative to plastic (read about replacing and installing a plastic block);
- the tree does not tolerate temperature changes and humidity;
- poorly resistant to sunlight and fire;
- If not processed correctly, it can serve as a habitat for insects and microorganisms.
Advice
Treating wood with antiseptics, varnishes, and paints that protect against moisture, ultraviolet radiation, and pests can increase its service life.
Sealing and securing
Sealing
After the above steps, in principle, you can do without additional measures, but to achieve the best effect, additional fixation of the window sill will not be superfluous. In the case when not only the window sills are made of wood, but also the frames of the window blocks, you can proceed as follows.
On the back side of the window, directly through the frame, you need to screw a couple of self-tapping screws into the window sill. The length of additional fasteners should be chosen so that the screws enter the window sill by at least 5 cm. Such measures will not be superfluous and will allow you not to worry about the strength of the window sill. This is especially important if this element of window decoration will be used to place bowls with flowers or other decorative elements on it.
Polished
You should also not forget that all the cracks remaining after work must be sealed with polyurethane foam or silicone sealants. In this case, you won’t have to worry about blowing from under the windowsill.
Miracles made of paper
Paper, white or colored, is found in every home. By using any bright paper - old postcards, glossy magazines, purchased colored leaves, decorated white paper or wallpaper with a small cheerful print, you can make a lot of interesting things to decorate the windowsill.
Decor for a window sill made of paper includes all kinds of origami balls, boxes, trees, and flowers.
With the help of glue, it is easy to build a three-dimensional figure or an entire staged scene from flat figures, copying theatrical scenery in miniature.
If you add correctly installed lighting, the scenery from the street will have a mesmerizing effect.
Few people can pass by without stopping and admiring the original idea for decorating a window sill.
Installation Features
Prefabricated wooden window sill
To the above, it would not be superfluous to add that in order to correctly install the window sill, it is necessary to keep in mind certain features that this process has.
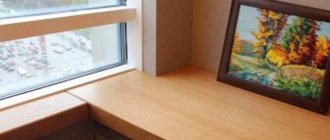
- The width of the window sill is considered optimal if it protrudes from the wall at a distance of approximately 7–8 cm. This is quite sufficient in most cases. But, if you plan to use the window sill for arranging, for example, a large number of flowers, or you plan to equip an additional seating area on the window sill (and this happens much more often than it might seem at first glance), then the width of the window sill may not be enough, and therefore you will have to install a wider element . In order for its fastening to be strong enough to support the weight of a person, additional supports must be installed under the window sill. They can be used as metal reinforcement rods. For this purpose, holes must first be made.
- Polyurethane foam can be used as the material on which the window sill is installed. It is necessary, like a solution, to be applied in sufficient quantity to the base, and then the window sill is installed. Thus, it is possible to reduce the total work time and achieve maximum window tightness.
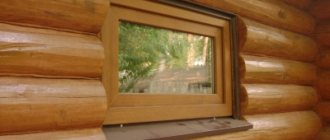
- Installation of a wooden window sill is possible not only if the window blocks are also made of this material, but also in combination with plastic. With the right approach to choosing a color palette, a wooden window sill is quite capable of harmonizing with a plastic window; moreover, this design element can add some zest to the faceless stamping of plastic, thereby adding individuality to the appearance of the room.
Installation of wooden window sills
Rice. 14. installation of a window sill
When installing, grooves should be made in the adjacent wall. This will serve as the basis for securing the structure and make it more reliable. Before installation, the corresponding recesses must be cleaned of dust and moistened with water.
If the window sill is installed in a brick or panel house, it will be more convenient to install it on concrete supports on both sides of the battery. Otherwise, the structure will hang in the air, which means it will be less reliable.
The height of concrete or metal supports must be established using a level or any other device. The main aspect here is the same height of both supports on which the tabletop is “put on”. The concrete pad below the surface should be hardened and level.
The product is inserted into the grooves, after which it must be secured in this state. This is done using self-tapping screws. With their help, the plywood or array is also attached from the outside. The self-tapping screws must pierce the window profile and enter the board with a depth of at least 4 cm. In the case of wide structures, longer self-tapping screws can be used. The remaining niches in the wall and near the window must be sealed using polyurethane foam. Next, the excess foam is cut off, and plaster and putty are applied to the wall.
Photo
The template is outlined in pencil
Assembling the rack template
Dimensions must be taken with maximum accuracy
The edges of the window sill go into the wall
On the other side
Check the level
What to use for the topcoat?
To make a wooden window sill look beautiful and last a long time, its surface is coated with varnish or paint. Most often, varnish is used for the finishing coating:
- Before processing, get rid of all unevenness and roughness of the surface, since under a layer of varnish or paint all these defects will be clearly visible.
- Use a sanding sponge to smooth out any irregularities.
- The surface is varnished in two layers. The second layer is applied after the first has dried.
- If paint is used, then it is better to make a three-layer coating, and after applying the second layer of paint, the surface must be treated with a sander with fine-grained sandpaper, and then sanded with a sanding sponge.
Manufacturing process
To make a window sill out of wood with your own hands, you need to purchase the original lumber. During work, it is not recommended to use boards with a moisture content of more than 15-20 percent, otherwise the change in linear dimensions after drying will be too significant.
Board after surface treatment.
First, the wood piece should be properly processed. The front side in this case is leveled by planing, grinding and polishing, depending on the requirements for the surface. The bottom is treated with a protective compound against rotting.
Next, the decorative element must be given the desired shape. On the lower side, wedges are installed, which are small gutters, the width of which does not exceed 10 mm. A distance of 10-20 mm must be maintained from the front part of the structure.
This is approximately how wooden window sills are made. After all the steps have been completed, the top side should be treated with any paint or varnish composition or oil.
Expert advice
The work should be performed in the exact sequence of technological operations. When fastening the product using corners, consoles or brackets, self-tapping screws are used. After installing the window sill, it is kept under load for a day.
Although DIY installation is not considered difficult, the process still requires attention to detail. Lack of skill can lead to serious mistakes. A leaky installation will result in heat leakage, moisture formation, product deformation, and reduced service life.
It is best not to take risks if you do not have enough experience in installing wooden structures.