The article was prepared with the information support of the KrepezhMaster online store.
Any work requires a certain algorithm of actions. And installing plastic windows in a frame house is no exception. In order to enjoy the final result, you should familiarize yourself with the basic rules for installing window systems.
Installation of a plastic window in a frame house
Tools and consumables
To perform window installation work, you need to equip yourself with the following tools:
- hammer with a silicone striker;
- a blunt chisel, which will be needed during the glazing process;
- drill and two drills (the first is 6, the second is 12 millimeters);
- screwdriver with bat;
- a gun for polyurethane foam and the foam itself;
- building level;
- straightening plates;
- steam and waterproofing films;
- screws and plates for working with concrete.
- special plastic support pads used on both sides of the profile and under the stand.
A square and a laser level may also come in handy.
Material of manufacture
Window blocks made of wood are of sufficient quality and more or less inexpensive. The higher the equipment, the more expensive it is.
The minimum configuration of wooden windows does not include double-glazed windows. They are purchased separately and mounted in the grooves, then driven in with glazing beads. Often, such window units are sold without not only double-glazed windows, but also other important materials (painting, seals). You can choose a single or double frame. Of course, you can purchase a window completely ready for installation, but its cost will be much higher. The material from which wooden window openings are made is oak, less often larch.
There are dozens of different types of plastic window blocks on the construction market.
Their price category varies depending on the properties and design and mechanism of the double-glazed window, to the size of the air layer and the quality of the heat insulators.
Assembly seam
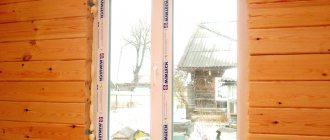
The first important point in installation is the mounting seam, or rather its design. It is located between the frame racks and the window profile.
In most cases, the installation seam consists of three layers:
- central, providing heat and noise insulation. It is performed using polyurethane foam;
- outer, protecting the central layer from moisture, as well as the mounting foam from the negative effects of sunlight. The outer layer must be combined with the external waterproofing contour;
- internal, protecting the central layer from internal evaporation.
You can see the general diagram of the installation seam in the picture below.
Assembly seam execution diagram
1 - central layer; 2 - outer layer; 3 - inner layer; 4 - additional sealing layer; 5 - low tide; 6 - window sill.
Upon completion of installation, it is necessary to fill the central layer with foam. This maneuver will add additional thermal insulation properties to the structure.
End-to-end methodology
When installing wooden windows, the through installation method is often used, which involves the use of dowels. The method is characterized by low cost and relative simplicity, allowing you to install the window yourself . Upon completion of the installation work, the fixed box will be completely motionless inside the window opening and will be reliably protected from the influence of environmental factors.
Through installation of wooden window blocks is simple and inexpensive
The occurrence of accidental distortions, various types of displacements and deformations of the structure during installation work is excluded. The use of dowels provides strength of fixation, which cannot be achieved with anchor bolts. Since the dowels are presented in the form of a hollow sleeve, it is impossible for the screws to penetrate deep into the wall. Perhaps these are the main advantages of the end-to-end installation system, which make it very popular among installers and customers.
It is worth mentioning the minor advantages. Firstly, installing windows using the end-to-end method will please you with minimal financial costs. Secondly, it will not require special tools, allowing you to get by with a set of existing ones. During the work, you only need to make holes using a drill, secure the dowels and finally attach decorative plastic plugs over the screws.
Holes for dowels are made using a drill
Using the through method, when installing windows, you need to pay attention to the correct choice of the place where the holes for the dowels will be located. The four-stage cross-section of window profiles allows you to drill holes at an exclusively uniform level. It should be borne in mind that experts strongly do not recommend making holes in different places.
Bottom of the opening
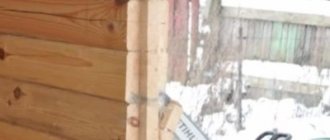
Separately, we should talk about such a structural element as the bottom of the opening. In the case when the window is mounted on plates, they are fixed to the frame through a stand profile using a self-tapping screw with a press washer and using a drill whose length does not exceed 5 centimeters.
It can be added that to obtain a better result, you need to install an elastic EPDM tape, which is folded under the waterproofing film on the vertical of the opening. The depth of the bend is approximately 15 cm.
Possible difficulties and errors
Let's list common mistakes:
- The use of non-special vapor-permeable film (external, external). Using polyethylene and the like instead is a gross mistake.
- Failure to comply with the rules for installing insulation (the tapes are glued carelessly, are not smoothed, and the ends are not overlapped).
- Non-foaming of the support profile inside, if one is used.
- Poor quality foaming. This procedure must be done slowly, carefully, so that there are no voids or cavities.
- PSUL tape is applied long before installing the window and pressing it to the quarter. This material expands over time, so it must be fixed immediately before inserting the glass unit into the opening.
- Incorrect depth selection and fastener spacing.
- Checking the level of evenness of the position of the window block is ignored. This must be done often several times at each stage of work.
Attention! If wedges are used, then a good solution would be to take even ones so that they can be placed not across, but along the opening - this way the foam seam will be unbreakable, as required by GOST.
The bottom of the opening is insulated especially carefully:
Fasteners
In order to secure a window system in a frame house, two types of fastening elements can be used: a self-tapping screw or an anchor plate.
The first option will give a better and more reliable final result. However, it takes more time and is much more dangerous, especially when the installation is done in-house. In the process, the glass unit can be damaged or distorted due to incorrectly placed straightening plates.
Installing the Mounting Plate
The method of installing windows using plates is more technologically advanced and faster. The disadvantage of the plates is that they cannot securely secure a large structure.
A wide range of fasteners https://krepegmaster.ru/catalog/krepezh/ can be found in the KrepezhMaster online store. On the website page you can familiarize yourself with the characteristics and compare prices of products. And if you are in doubt about your choice, then contact a store specialist for a free consultation.
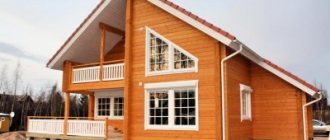
Choosing windows for a frame house
In order not to make a mistake in choosing windows for a frame, you should study the advantages and disadvantages of each type
Wooden windows
Wooden windows have the following features:
- high environmental friendliness and safety, absence of harmful substances in the composition;
- excellent heat and sound insulation;
- attractive appearance;
- formation of an optimal indoor microclimate;
- long service life, subject to proper maintenance using special sunscreen and water-repellent agents;
- easy and quick repairs due to the simplicity of wood processing.
All this makes structures made from wooden profiles an ideal solution for frame framing, however, they are not without certain disadvantages:
- high risk of fire;
- difficulty of self-installation;
- the high cost of the window itself and care products;
- significant moisture absorption, causing loss of functional qualities of the window.
Plastic windows
PVC windows have firmly entered our everyday life as the most convenient and reliable.
They have undeniable advantages:
- long service life without complicated maintenance;
- resistance to weather conditions;
- high noise insulation;
- simple and quick installation;
- maintaining the rigidity of the frame frame for a long time.
The disadvantages of plastic structures for frames include:
- poor ventilation;
- tendency to develop condensation, causing mold formation;
- impossibility of carrying out partial repairs - if individual parts are damaged, a complete replacement of the window is required.
Aluminum windows
On sale are not only wooden and plastic products, but also aluminum windows, which are distinguished by their strength, durability, corrosion resistance, and spectacular appearance.
They respond excellently to various adverse weather conditions.
Their service life is about 80 years, which is much longer than the service life of wooden and plastic windows. Plus, they are incredibly easy to care for.
Aluminum is a completely safe material for people and does not emit harmful substances into the atmosphere, which cannot be said about plastic.
This is the best solution for creating structures of non-standard shapes and dimensions.
The main disadvantage of such windows is their high thermal conductivity, which is why a frame house may need additional heating. These designs are considered the “coldest”.
If you plan to install them yourself, be careful not to let the aluminum touch other metals (this can cause electrolysis).
The cost of such windows is much more expensive than their analogues, so installation of aluminum structures in a frame house is carried out infrequently.
Panoramic windows
Spectacular panoramic windows occupying the entire space from floor to ceiling will help fill a frame house with natural light. Depending on your preferences, they can be sliding or folding.
Made from high-quality reinforced glass, such structures are characterized by maximum reliability and are suitable for glazing rooms intended for recreation.
Note! The maximum window area is 6 square meters. m. A larger structure cannot cope with wind loads and other adverse weather conditions.
It is better to install windows made of wood in a frame house. The frame itself is a structure with poor ventilation, and PVC windows will make the room more stuffy.
If you constantly use micro-ventilation mode, as some “experts” recommend, the room will quickly fill with frosty air. Installing aluminum frames is impractical due to high cost and low thermal properties.
Window unglazing
In any case, the window installation process will require unglazing of the profile. And if there are no problems with structures that have opening sashes, then you will have to tinker with fixed windows.
Before starting, you must carefully place the window horizontally on the floor so as not to damage it. Next, using a blunt chisel and mallet, carefully snap the glazing beads from the glass unit. Fortunately, in production, the glazing beads are not snapped all the way in advance, knowing about the likely problems of the installers. The glass unit is positioned in the frame using several sets of straightening plates. Double-glazed windows have very sharp edges and can cut your hands unnoticed. So it is imperative to work with gloves.
Window unglazing
DIY installation instructions
A felt pad is placed between the frame and the frame box to compensate for thermal expansion.
Do-it-yourself installation of plastic windows in a panel house is carried out in 2 stages. First they install the window frame, then the sashes. Double-glazed windows are delivered disassembled.
- Waterproofing is glued to the outside of the frame, and a vapor barrier film is glued to the inside.
- The frame can be inserted inside or pulled out to create slopes.
- The window block is installed, and the anchor plates or strips are bent at the points of contact with the wall. The amount of fasteners depends on the type of window. To fix the blind module, 2 elements are enough; the opening one is fixed at 3 points.
- Windows on the facade should be located at the same level. This is monitored during installation by assessing the positions of the openings using a laser level or construction cord.
- Inside the building, the frame is checked for verticality and horizontality after installation. However, the anchors should not be firmly secured yet. The conditionally correct position is maintained by placing wooden spacer wedges.
- The sashes are mounted on hinges in the frame. Immediately after installation, check how easily they move and deflect. The horizontal and vertical positions of the structure under load are carefully assessed. If opening is difficult or the measurement indicates irregularities, the position of the frame is changed using wooden wedges. This is done until they achieve easy opening.
- Secure the frame by tightening the fasteners.
It is better to adjust glass units after thermal insulation, since one of its tasks is to achieve the required level of tightness.
Support pads
Support pads are used to support the window sill of the support profile. They can be made from either plastic or wood impregnated with an antiseptic.
When installing a three-leaf window, you must make sure that there are one more support points than the number of sashes. Two of them should be located under the vertical imposts, and the remaining two at the edges of the frame. For a window with two sashes there should be, respectively, three support points.
The installation of the wedges should be carried out in such a way that they do not interrupt the foam contour and stand along the window. If there is a protruding part, it can be trimmed after installation. In any case, the wedges should not extend beyond the foam contour, that is, several hours after foaming they should not be visible. Otherwise, a so-called cold bridge will appear in this place.
Remember that the lower wedges must remain in the structure, but the side wedges can be removed at the end of the work and the resulting holes can be filled with polyurethane foam.
Features of the design of window openings
Before making a window opening in a frame country house with your own hands, it is recommended to study the requirements for this design.
For frame-type buildings, there are 2 design options for openings for window blocks:
- Hider;
- Crossbars.
There is no significant difference in reliability between these two types.
A header is a transverse beam (lintel) of a window structure that rests on a double frame mullion. The hider window opening looks quite impressive in appearance. Such structures are used in Canadian house-building technology.
Window openings with a crossbar provide for the arrangement of a load-bearing support, which is a board installed in the lower or upper part of the wall on an edge. The frame parts are then attached to this support beam. The crossbar is mounted along the length of the building wall. All wooden posts forming the window opening are single.
Hider design
The design of the opening and the dimensions of the window block are interconnected. The larger the window of a frame house, the greater the load created on the lintel (header) of the structure. This load is transferred to the window frame and can cause its deformation.
According to the Canadian technology of private house building, the hider structure consists of 2-3 boards, which are installed on an edge and connected to each other with nails. Short racks are additionally installed on the header, which evenly distribute the load transmitted by the load-bearing beams.
Crossbar design
The crossbar design of window openings is used in Finnish technology for the construction of frame residential buildings. The crossbar is installed along the entire length of the building wall. It is the basis of the frame, which consists of single racks.
The main advantage of this design is the reduction of cold bridges. This is due to the use of a minimum number of racks, which directly act as cold bridges.
Also, this option for arranging window openings for frame buildings allows you to save on building materials. They can install windows of any design, incl. double-glazed windows with PVC lintels.
Quarter
In a stone house, a quarter is present initially. Its main function is to protect the installation seam. In addition, the quarter acts as a base when installing external slopes and applying putty.
There is no quarter in a frame house and you will have to make it yourself. Frame cladding is suitable for this. You can also make a quarter from polystyrene foam, wooden beams or boards. In terms of size, the width of the quarter should not be less than 4 centimeters, because only 2.5 cm will be used to close the seam. And you also need a few centimeters to rest the window against it.
In general, it is not necessary to install a quarter, although many experts advise not to ignore this stage of work. The main thing to remember is that any part of the structure that is susceptible to moisture must be able to dry quickly.
Features of installing windows in stone, frame and wooden houses
Every reader of forumhouse.ru knows that no matter what material the windows are made of, they help keep the house warm and emphasize the individuality of any home. Therefore, the process of installing windows should be treated with special attention. After all, even the most expensive and energy-efficient window design loses all its advantages if it is installed incorrectly. In this article, our experts tell you how to properly install windows in a wooden house, frame or stone.
Wooden, stone and frame houses and country houses have a number of design features. Since they affect window installation technology, any developer should be aware of them.
From our article you will learn:
- Where does the preparation for installing a window structure begin?
- What stages of work precede the installation process;
- What features should you be aware of in order to install windows in wooden, frame and stone houses;
- How to install a wooden window with your own hands - how its installation differs from the installation of a plastic window;
- How are installation joints protected?
- How to control the installation process.
Preliminary preparation
Despite its apparent simplicity, installing windows at home is a process that requires a serious and responsible approach. After all, the quality of installation directly affects the level of comfort in the home. Here's where the process begins:
Anton KaryavkinHead of the technical center of REHAU, Moscow.
First of all, you need to carefully prepare: read the instructions and existing installation standards, and acquire the appropriate tools.
A professional installer's kit includes about a hundred different “tools”. It is not necessary to have them all, but without the basic kit it will not be possible to install a translucent structure. It includes: a hammer drill, a screwdriver, a foam gun, a chisel, a hammer and screwdrivers.
When choosing tools, you should also take into account that window installation involves a wide range of additional work.
These include:
- Plastering slopes in stone buildings;
- Construction of seams and thermal insulation;
- Installation of window sill and additional components.
The main thing to remember is that the installation technology directly depends on the material of the building walls.
Anatoly GavryshHead of design bureau
The type of house significantly influences the window installation procedure. In houses where there is significant shrinkage (most often in wooden houses), a casing floating box with compensation gaps is used. In other types of houses, window installation has the same patterns.
Installing wooden windows in a frame house with your own hands.
We install wooden windows with our own hands
Developers believe that there is a big difference between installing PVC and wooden windows, but experts disagree.
Anatoly Gavrysh:
There is practically no difference between installing a plastic and wooden window. The slight difference lies only in different fastening elements.
Do-it-yourself installation of a wooden window should be done more carefully. And in each case an individual approach is required.
Alexander KorpachevHead of installation department
Even windows in the same house can have their own characteristics. Therefore, in your work it is necessary to adhere to the recommendations of GOSTs, namely:
- Window mounting seams - with vapor-permeable self-expanding tapes;
- Technical specifications, GOST R 52749-2007;
- Assembly seams of units and junctions of window blocks to wall openings;
- General technical conditions, GOST 30971-2002;
- Window blocks are made of polyvinyl chloride (PVC) profiles. GOST 30674-99.
In general terms, the installation consists of the following steps:
- Preparation of the opening;
- Window preparation;
- Installation;
- Finishing work;
- Finishing.
Anatoly Gavrysh
I would like to dispel illusions about the ease of installation of both plastic and wooden windows. To carry it out yourself, you definitely need certain skills and special equipment, since correct installation is of decisive importance in how high quality and how long the new window structures will last.
In detail, the installation of both plastic and wooden windows is done as follows:
1. Window openings are cleaned of dust and dirt.
2. The windows are installed in the opening and wedged with small plastic or wooden corners strictly according to the level.
Corners are necessary to form a gap (margin) between the frame and the opening. Along the perimeter - between the window and the opening, it is recommended to lay a technological gap for foaming 20 mm wide. At the bottom of the window - under the window sill, it is recommended to leave a margin of 35 mm.
3. The structure is fixed.
Fixation is carried out using dowels or special mounting toothed plates. If the window is fastened through with self-tapping screws, then before doing this, holes for the anchors are marked and drilled in the opening. The number of attachment points depends on the size of the window and on average ranges from 40 to 70 cm. From the corners of the frame it is necessary to make a distance of 12 -15 cm.
4. The seams between the window structure and the opening are foamed.
To save foam, if the gap exceeds 40 mm, it can be filled with insulation - polystyrene foam, etc.
5. The foam is covered with steam and waterproofing tapes.
The vapor barrier is glued along the entire perimeter of the window structure on the inside (from the room side), and the waterproofing film is glued on the outside, from the street side. After foaming, the protective strip is removed from the tape and the foamed seam is closed.
6. Additional elements - flashings and platbands - are installed in their place on the outside (if the installation takes place in wooden houses).
7. The fittings are adjusted.
Features of installing windows in a wooden, frame and stone house
Anton Karyavkin
Installing windows in buildings made of rounded timber is the most difficult. This is due to changes in the design of wooden houses from manufacturer to manufacturer.
If developers use different types of wood when installing windows in a wooden house, it is almost impossible to predict the behavior of the material - each time you have to study everything from scratch. The deformation of logs in such buildings can be quite large: from 8 to 15 cm. The house shrinks, so not a single window in such conditions can remain operational for a long time.
Correct windows in a wooden house.
Here's what we can do to protect the structure from possible deformations caused by shrinkage of the walls, using the old carpentry method:
Anton Karyavkin
The most responsible developers begin cutting an opening in timber walls only a year or even two after the construction of the house. During this time, it is possible to track all deformations, taking into account the characteristics of the material and the climatic characteristics of the region.
After the opening is cut, a rough frame, also known as a “frame” or “casing”, is inserted into it, into which the window structure can then be laid.
Alexander Korpachev
In all wooden houses, when installing windows, it is necessary to use a casing or frame - a wooden box that levels the load on the frame.
Between the upper part of the window opening and the frame, a technological margin of 30 to 70 mm is usually left. After installation, the stock is filled with insulation and covered with platbands on both sides.
Anton Karyavkin
The box is made from wooden blocks 50-80 mm thick.
Despite the fact that the box absorbs the deformations of the logs quite effectively, the installation joints in this type of building still remain movable. Here it is important to choose the right mounting foam - it should not collapse when the walls shrink. Such correct foam can be found on the market, but it is relatively expensive. Therefore, experts often replace it with other materials, mainly of plant origin (tow). Of course, the tape and coating materials necessary to protect the installation seams must also have a high class of deformation resistance.
Glued laminated timber shrinks significantly less than solid logs. As a result, laminated veneer lumber is deformed less than a regular log.
But it is still difficult to install windows in a wooden house with your own hands.
How to install a window in a frame house
Wooden windows can also be installed in a frame house, but plastic windows are most often used. Control of the installation of any windows at all stages should be checked using a level or plumb line, and the horizontal and vertical deviation should not exceed 1.5 mm per meter.
Anton Karyavkin
The process of installing windows in a frame house is much simpler than in a wooden one. You will still have to deal with deformations of the window opening, but they are no longer so significant.
It is better to use anchor plates as fasteners. Installation with construction screws is not recommended: they secure the frame, and deformation of the wood, in turn, can cause damage to the windows.
How to install a window in a frame house
It is important to remember that when installing a plastic window in a frame house, the vapor barrier from the room must be wrapped into the window opening. This is necessary in order to connect the window vapor barrier circuit with the room vapor barrier circuit.
Brick of various types, concrete, aerated concrete blocks are standard building materials. The method of installing windows in stone houses has been developed over the years. Fastening is carried out using dowels and construction screws; the use of anchor plates is also allowed.
Anton Karyavkin
In some cases, installation technology may be influenced by design decisions that require taking into account the linear dimensions of structures and wind load in the region.
Protection of installation joints and stages of control of installation work
Regardless of the wall material, it is necessary to protect the mounting foam from ultraviolet radiation and atmospheric moisture. Otherwise, it will become loose and lose its properties over time. To protect it, special insulating tapes and sealants are used. The latter are good because they allow you to cover any cracks and irregularities, unlike mounting tape, which requires a perfectly flat, dust-free surface.
Anatoly Gavrysh
Assembly joints are protected with mounting foam designed specifically for these purposes.
If we talk about the rules and stages, then the protection is carried out strictly in accordance with GOST “Installation seams and junction assemblies”.
For each type of opening, an adjoining unit is developed and agreed upon, consisting of 3 parts:
- Vapor barrier;
- Insulation (spray foam);
- Waterproofing.
There are three types of mounting tapes:
- PSUL tape for protection from the street;
PSUL is a pre-compressed self-expanding and self-adhesive sealing tape impregnated with a special compound. The tape is used to protect the foam from exposure to adverse weather conditions.
- Waterproofing tape installed under low tide and indoors;
- Vapor barrier tape.
Anatoly Gavrysh
In most cases, vapor barrier and waterproofing tapes are used to protect installation joints and seams from moisture and dirt.
Alexander Korpachev
Vapor barrier and waterproofing tapes provide protection for polyurethane foam from moisture.
But sometimes you can do without their use (this depends on the design features of the opening, as well as the list of finishing materials used). If a similar finishing material is used that matches the characteristics of a vapor barrier tape or waterproofing tape, the use of the latter is not necessary.
If the developer has to independently control the correctness of the installation process, he must:
- At each stage of work, check the geometry of the window in the opening;
- Make sure that the gap between the opening and the window is foamed, and also monitor the implementation of insulation, steam and waterproofing work;
- Check the installation of additional elements - window sills, ebbs.
In cases where it is impossible for some reason to be present during the work, the quality of installation is evident during the first two years of operation of the structure.
To summarize, there are many factors to consider when installing a window. And one of the most important is the design features of your home.
Read on FORUMHOUSE which PVC window profiles are the warmest, join the discussion on how to correctly insert PVC windows and doors into a frame house and the discussion on our website about single-chamber and double-glazed windows.
We offer you a story about homemade installation of a plastic window structure and reviews of wooden windows.
Watch our video about framing door and window openings and two more: one shows the process of installing a window in a frame house, and the other in a stone one.
Films
If the wall on which the windows are installed is covered with a membrane, then it must be bent inside the opening. Accordingly, only the corners will remain uncovered. To cover this part, you need to cut the membrane into pieces and secure it in the corners with staples and tape.
If there is no membrane on the wall, then you just need to secure strips of windproof film. It is important that they overlap each other and completely cover the corners. Simply put, the side should go to the bottom, and the top to the side.
The next layer of waterproofing film must be fixed with one side directly to the window profile, and the other side to the general contour of the waterproofing film of the house.
There are several ways to carry out these procedures.
- We purchase self-adhesive waterproofing film. Here you just need to stick it on the window profile and to the film, which is inserted into the opening on the wall.
- We purchase double-sided tape designed specifically for window installation. Next, we glue one side of it to the window profile, and to the second side we glue a self-cut piece of the most ordinary windproof film. All that remains is to secure this piece to the opening with the same tape.
Mounting blocks for window installation
Do-it-yourself installation of wooden windows involves the use of mounting blocks, which makes the process inexpensive and quick to complete. Mainly used pads whose thickness is 50 mm. They are a block of wood impregnated with an antiseptic, which is installed on a waterproofing layer. The arrangement is made exclusively horizontal, running parallel to the upper edge of the window structure. To ensure correct installation actions, you must first free the window frame from frames and other components.
To install windows on blocks, you need a perfectly level opening.
The structure is installed inside the mounting block using a laser or simple level, carefully checking the levels on each side. It is advisable to make the top and side gaps the same, leaving 10-20 mm each. The number of pads can be determined using a graphic showing possible placement options.
Low tide and window sill
If the window system is provided with a stand profile, then we mount the ebb on one side and install a window sill on the other.
Before installing the drip sill, you need to look under the frame from the street side. In this way, you can find several special holes for drainage. The flashing must be installed with extreme caution, as it can block the drainage, and the collected condensate will flow under the flashing, and not on it. In addition, the ebb should not be installed very tightly with the stand.
Installation of plastic window sill
You can install the window sill simply by inserting it into the stand profile, and then make spacers under it and foam the finished structure. Since the thickness of the window sill is on average 2 cm, a lack of space can form under the lower profile of the window. In this case, you will have to resort to the help of support blocks, which are set strictly according to the level. Then the space is foamed, but not the entire plane, but small strips, and then you need to press down the window sill with a heavy load. After the foam has completely dried, the joint between the window sill and the window should be treated with liquid plastic.
Process
A very convenient way to align a window evenly in an opening from one of the forum members: Somewhere there are photos of another stage of preparing the opening, I’ll have to explain it in words. We measure the width of the assembly seam on all 4 sides. We nail plastic wedges from the bottom and some side (for example, from the left). The ones with teeth. Then we place them there and nail the pairs for these wedges. It is convenient to set the required distance equal to the width of the installation gap using a level (one pair of wedges along the square, the rest by applying a level). Then, when the bottom and side are ready and have even vertical and horizontal planes, we insert the window and move it towards the installed wedges. Thus, we have two of the four sides ready. All that remains is to wedge the opposite side and top
Advantages of plastic window systems
Why are plastic window systems especially popular when building a frame house? The secret of this trend is that they have all the necessary qualities of excellent heat conservation, are able to provide a decent level of noise absorption in the room, do not require complex manipulations during the installation process, and are also an excellent option in the price-quality category.
In addition, the service life of plastic structures exceeds that of their wooden counterparts.
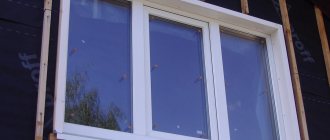
Window installation
Windows in a frame house are mounted in the area where the insulation is located. If external insulation is used in the construction of a frame house, then the window is installed almost flush with the cladding. If there is no external insulation, then the window is recessed into the insulation level.
On a note
Experts often say that the depth of insulation determines how well the window will cope with its functions of protecting the room from the cold.
If the windows in a frame house sweat, it means that during installation of the structure you made a mistake and installed a profile in the area of the ventilation gap. Such inattention can result in the rapid failure of a frame house.
Advantages and disadvantages of panoramic glazing
The advantages of panoramic structures are:
- Long service life, resistance to various atmospheric conditions.
- Manifold. This implies the possibility of installing multi- and single-chamber double-glazed windows. The profile can be warm or cold. The double-glazed windows themselves can have quite large dimensions, but at the same time be not reinforced.
- Possibility of manufacturing curved parts of the structure.
- The type of window opening can be any - fixed, hinged, sliding.
- Safety and good sound insulation of structures.
- Decorative variety - the profile can be painted in any color, as well as imitate wood or stone.
However, panoramic glazing has several disadvantages:
- Low thermal insulation performance due to the large glazing surface.
- High price. It is due to design features and labor intensity during installation.
- The need to provide additional heating to prevent the formation of condensation.
- Keep in mind that in a ready-made frame house such glazing cannot be performed without an approved project.
It is advisable to provide panoramic glazing at the stage of designing a house, and not during the construction process.
Advantages of panoramic glazing
- Abundance of transmitted light. This will help visually expand the room and make it much lighter.
- Reduced electricity costs due to increased solar light flow.
- The use of reflective, energy-efficient glass will help keep you warm in winter and cool in summer.
- Unlimited number of design options, finishes and structures.
- Style and presentability of the room.
Disadvantages of panoramic glazing
- High cost of quality materials, proper installation, maintenance and repair of panoramic windows.
- The need for proper planning, as well as the design of a room with panoramic glazing.
- Difficulty in washing and cleaning panoramic windows.
- Additional costs for the installation of thermal convectors for heating, as well as air conditioners for cooling.
Panoramic glazing methods
- Frame glazing is the most convenient and reliable. With this option, a double-glazed window is used, which is built into a frame made of plastic, fiberglass or aluminum, which allows for thermal and sound insulation.
- Frameless glazing involves a “cold” glazing method without the use of frames. With this option, tempered glass is attached to the lower and upper beams using roller bearings, which ensure good sliding of the glass along the wall. The optimal width of such a window is 650 mm, but the length can reach up to 3 m.
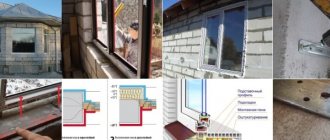
Preparing openings
Quite often there is a mistake when the OSB sheathing on the outside of the house is adjusted to the size of the openings. That is, in window areas small pieces of cladding material are used, on which, by the way, the strength and rigidity of the load-bearing frame depends.
To avoid such a mistake, the correct solution would be to prepare the openings after covering the outer side of the frame with OSB boards. When everything is ready, the openings in the right places are simply cut out into OSB. This results in some excess consumption of this material, but in return it is possible to avoid small pieces that do not help in any way to make the frame house as strong as possible.
Panoramic windows: what sizes?
Many structures in this case have a length of up to 2.5 meters. If the length is at this level, but does not exceed it, you can install a system with heated floors. Otherwise, it is recommended to use special convectors.
PVC structures are suitable for installation in openings up to three meters in size. If the dimensions are larger, it is recommended to give preference to aluminum products. This alloy is practically devoid of the ability to linearly expand.
You can calculate the cost of the structure in advance by calling a specialized company.
The larger the glazing area in this case, the more the room can heat up if it is not protected from sunlight in any way. In addition, such designs open up an overview of what is happening inside. Not all owners of a private home like this situation.
How to reduce heat loss?
The most common problem associated with panoramic glazing of a frame house is heat retention. The stumbling block here is the budget. If you are not ready to install warm windows, you will be forced to pay more for heating and vice versa.
Glazing can be done in two ways:
- Cold. It is suitable for installation in unheated rooms. These include gazebos, summer houses, verandas. Its thermal insulation values are extremely low. This glazing is made without frames or in an aluminum profile with 1 pane.
- Warm. It uses a profile made of plastic or wood and three-chamber double-glazed windows. Thermal insulation indicators are high, but this also determines their high cost.
Today, the difference between these types is increasingly blurred. For example, there are already energy-saving double-glazed windows, in which inert gas is pumped between the panes; profiles with sectional thermal breaks, etc. The thickness of such structures does not increase, and heat loss is reduced.
However, no double-glazed window guarantees the same reliable protection from the cold in winter as a wall. Therefore, it is strongly recommended to install an additional heating system - an electric convector or additional radiators next to the window.