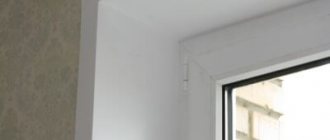
In order for modern double-glazed windows to serve the owner faithfully, they must be installed correctly. Among other things, this implies such related work as installing window sills and slopes on plastic windows. The issue of installation is of serious importance, since even the wrong sequence of actions can lead to an annoying result, and an energy-efficient window will symbolize wasted money. You can see how to properly install these elements on a wooden or frame house in the corresponding videos and photos. Below we will briefly present the most important points.
Functions performed by the window sill
A properly installed structure will solve many problems in the house. The main functions that the window sill performs include:
- Protection of the room from the penetration of cold air into the room through cracks in the window unit. To do this, the window sill board must be installed correctly in compliance with all dimensions.
- Shelf for small light items. You can place flowerpots with flowers or other decorative interior elements on it.
- Additional work space. In new houses, window sills are made much wider than before and used as countertops. Here you can install a computer, lay out books and other written objects.
- Completing the decor. The window will look thanks to the slopes and window sill.
Each of these functions will be fulfilled in a wooden house if the work is done efficiently.
Installation of slopes
For proper installation of slopes, they also need to be measured using a construction tape. The material for these window elements can be one of the following options:
- Plastering. These slopes are budget-friendly because they require regular maintenance and painting. Another disadvantage is the possible formation of cold bridges. However, many are attracted by the speed of work and the low price of all costs;
- Plasterboard. The installation of these slopes can also be classified as dusty work, since after them a thorough cleaning of the apartment will be required. Window elements are installed using an adhesive binder. In this case, the slope and the outer edge of the opening should be coated with a continuous layer;
- Plastic. They are the most popular because their operation is extremely simple. They are also warmer than the first option, as they ensure the tightness of the structure. All necessary elements are sold in one set with detailed instructions for self-installation.
Window slope in a vertical section: using the example of installation using one of the technologies
After determining the material, you should choose the type of slope - with or without a slope. In particular, in wooden buildings it is necessary to cut off the end part in order to install oblique slopes. Then the surface is sanded and covered with a layer of polyurethane foam. The latter is secured with liquid nails. Then the slope is decorated with sealant.
It is quite possible to install the window sill and slopes with your own hands if you know the sequence of all stages. Before installing these window elements in the opening of a wooden or frame structure, it is necessary to decide on the material and take all measurements. The window sill is installed first, and then the slopes.
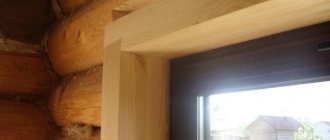
Which window sills are most often used in wooden houses
In modern houses, window sills are installed in different types and they differ from each other in the method of installation and shape. The most common window sills are:
- With a wide canvas. The structure can be up to half a meter in size. Such window sills are installed by combining them with the countertop. Wide canvas is used in houses with thick walls. Most often they are found in brick buildings. Since timber walls are of medium thickness, a window sill-tabletop is rarely installed in a wooden house.
- With a narrow canvas. This option is classic and is used in houses built from timber or solid logs. Most of all it suits attic windows.
- Formal window sill. In this case, the element is completely replaced with a slope, which is plastered along with the walls and painted in the same color as the window frame. The owner can make the formal version with his own hands. The downside is that it cannot be used for any purpose. Such elements are made in brick and panel houses, but this option is also appropriate in wooden ones.
- With launch on the wall. In this case, the window sill board is made wider than the window opening by several centimeters. This option was more often used in old wooden houses, but even now has not lost its relevance.
- Without launching into the wall. Such structures are installed in order to save on material. But they look attractive on the window.
- Straight and curly types of fabric. Straight boards have been used as window sills for a long time. Therefore, this option is recognized as a classic, and is still used today. Figured options are used as a decorative decoration for a window in a room.
The type of window sill depends on the material from which it will be made. Plastic and wood remain in demand. In addition to these materials, you can see the design from:
- MDF;
- natural stones;
- artificial stone;
- drywall;
- made of plaster;
- covered with ceramic tiles.
The consumer chooses the material for the window sill based on his budget. The cheapest are PVC and plastic. The advantages of PVC construction lie in the availability of the material at a low price. The product is easy and practical to install. But PVC window sills have a fragile structure, which is easily damaged by mechanical impact on the surface.
Plastic for window sills is coated with a layer of acrylic, which makes it resistant to high humidity in the room. The product is lightweight and easy to work with. Plastic has a low price, which increases its demand in the building materials market. Can be installed in both a brick and wooden house.
Wood is a popular material that has high strength and reliability in use. Its price is slightly higher than PVC and plastic. In addition, wood is an environmentally friendly material. Windows with wooden window sills look original and emphasize the cozy atmosphere in the room.
Important! Wooden window sills go well with walls built from beams or logs.
To protect the product from exposure to moisture or damage by pests, its surface must be treated with substances that preserve wood from moisture, and covered with varnish or paint. This way the window sill will last much longer.
Required Tools
To carry out installation work you must have:
- A tape measure of suitable length and sufficient accuracy for taking measurements;
- A hammer drill that will allow you to form a groove in the wall with the required geometric parameters;
- A jigsaw or a hacksaw for metal, since during the installation process it may be necessary to adjust the elements to size;
- a rubber hammer, which allows you to apply a certain force to the element without disturbing its integrity;
- spatula for applying the composition;
- spray foam gun;
- marker or construction pencil;
- a screwdriver or two screwdrivers: for “plus” and “minus”;
- construction knife with replaceable blade;
- building level of any type;
- rags.
What wood is best to make a window sill from?
To make a canvas for a window sill, you can use any type of wood, but take into account the intended purpose of the structure, as well as in which room it will be installed. Hardwood is suitable for rooms where frequent changes in temperature and humidity are acceptable. This product will last a long time. The only negative is the high price of the material. An oak board will be a reliable stand for pots of indoor flowers.
Important! Cheaper materials are coniferous wood. Their main advantage is that the products do not need to be treated with antiseptics.
Larch is a cheap material, but it has a number of advantages:
- the wood of this species has a pleasant shade corresponding to hard varieties;
- has all the properties obtained from coniferous trees and does not need to be treated with antiseptic substances.
Thanks to all these qualities, larch material is in high demand in the building materials market.
The board for a window sill in a wooden house is selected according to the following indicators:
- Material integrity. When examined from all sides of the board, there should be no chipping of wood, cracks or knots. In addition, there must be no signs of pest damage.
- Select tree species that have a strong wood structure. The best material would be a board made of oak, beech or hornbeam. The second place in hardness is deservedly occupied by larch, pine, chestnut, and cedar. Boards made from these types of wood have an original pattern.
- Wood texture and color. Each type of wood has an individual structure and color. Only the buyer decides which option to choose.
Window sill made of oak boards
The oak material for the window sill is made from a single board. Oak sawdust is used to make laminated wood, chipboard and MDF. Despite the fact that glued material is much cheaper than solid material, it has an important advantage, which is its resistance to deformation under the influence of moisture. Chipboard and MDF have the same qualities, but are even cheaper.
To produce budget versions of the product, the wood is crushed, pressed and covered with a laminate. By creating such material, the manufacturer increases the amount of texture and color range. Thanks to this, the window sill can be imitated like marble or stone. The surface will be both matte and glossy.
When choosing a material for a structure, you need to determine the purpose for which it will be used. In addition, the canvas must fit into the overall design of the room.
If there is a skew
The solution would be a little installation trick. Most often, this remains invisible to others, especially if the width of the product is more than 25 cm. To do this, we will need self-tapping screws or some other material with which we can make adjustable beacons. They are mounted in two lines. The first should be located almost flush against the window, and its level should exactly follow the slope of the window. The second is installed closer to the edge. It must be leveled exactly using a special tool. After installation, the far part of the window sill will fit snugly against the window frame, and the near part will be precisely level. This will deceive the eye and create the visual effect of correct placement.
Installation of a window sill can be combined with the installation of plastic covers on the corners near the window. Never rush the process, especially when marking. We are interested to know what nuances you noticed for yourself personally. Share your observations in the comments.
How to install a window sill on a plastic window in a wooden house
With a plastic window, not only a window sill made of a similar material is installed, but also a wooden board. You can choose any color and shade that will ideally suit the design of the room and will look good with the window itself. Wood makes the window package warm and complete.
Strengthening and sealing
In a brick or panel house, a wooden window sill is attached to the opening using mounting foam. In order to securely fix the window sill, self-tapping screws are used in the place where it comes into contact with the window. They are screwed in from the side of the window so that they completely pass through the frame and enter the board no less than 4 centimeters.
If you are installing a window sill that will serve as a tabletop, then you need to take care of additional fastening. Most often, metal corners are mounted in the slope and firmly secured with self-tapping screws.
For fastening, you can use pins, one end of which is mounted in the slope, and the other in the window sill board. In this case, polyurethane foam is used as a retainer.
It is recommended to seal the structure with acrylic. This substance has greater plasticity and resistance to aggressive environments.
Restoration
During operation, a plastic window sill may lose its original appearance. This will negatively affect the presentation of the entire window unit. Restoring the element helps correct the situation. You can do it as follows:
- By gluing decorative film. Manufacturers offer material with different patterns. It is not necessary to choose white film. You can glue material with a pattern that imitates wood. Before gluing the film, the base is cleaned and degreased. Then the protective material is glued, evenly distributed over the base;
- By gluing mosaics. This is a good opportunity for emphasizing and zoning space. First, all glued elements are cut to size and applied to the base. Then the adhesive composition is applied to the previously cleaned base. The mosaic is applied to the base and carefully distributed over the surface. If necessary, the surface is coated with a composition to increase gloss;
- Painting with acrylic paint. The selected composition is applied to the surface and carefully distributed over the base;
- Using spray paint. In this case, the risk of painting over mating surfaces increases significantly;
- Application of liquid plastic;
If the above methods do not help, you can restore the former brightness by installing a repair pad. To do this, the surface is carefully prepared and then carefully fixed to the base using glue.
Installation of a wooden window sill
Do-it-yourself installation of a wooden window sill is carried out by following step-by-step instructions and strictly adhering to the recommendations:
- First, all measurements are taken and adjusted to all the required sizes.
- The surface of the wall on which the window sill board will be installed is prepared properly.
- Before installation, the board is treated with antiseptic substances to extend its service life.
Before proceeding with installation, it is necessary to prepare the surface of the window opening. To do this, the remains of hardened cement mortar are completely removed, dust is swept away, and other construction debris remaining after the window installation work is removed.
It is necessary to make grooves in the wall on both sides of the window into which the board will be inserted. Thanks to them, the window sill will be securely fixed. The recesses must be at least 2 centimeters. They are made using a hammer and chisel.
Important! Between the window frame and the lower edge of the wall in the window opening, gaps of 2–3 centimeters are left. It is impossible to install a window sill without them.
The cleaned wall surface is first moistened with water, and then a primer solution is applied. While working on installing a window sill, you can find communication channels under the window opening. To avoid damaging them, metal supports are placed under the board, parallel to the wall.
Window sill leveling
In the classic version, 2 parts of 3 window sill boards are located on the surface of the wall. The remaining part is supported by weight. The board should not protrude more than 8 centimeters. If these conditions are not met, the circulation of warm air in the room will be disrupted and the glass on the windows will become covered with condensation.
Since during the construction of houses not all craftsmen lay the walls perfectly smooth, the surface of the window opening also has unevenness. For this reason, the window sill board is set below the level. Having discovered a distortion in the canvas, the master uses a wedge to eliminate it.
Important! The surface of the window sill may have a slight slope, which is equal to one or two millimeters. The wedged board must be re-checked with a level. The angle of inclination must have the same parameters over the entire surface.
The installed wedges must first be attached to the wall using cement mortar, only after this the window sill board is fixed.
How to fix a window sill
Before installation, the wooden board is treated with a product that will protect the material from moisture. This will preserve the structure and allow it to serve for many years. Cement mortar is placed on the surface of the wall where the board will lie, taking into account that its ball covers wedges up to 8 millimeters thick. Cement can be replaced with substances that, when dry, hold the structure tightly. Putty or gypsum have these properties.
The board is laid on fresh mortar and pressed tightly to the surface. Excess solution is removed using a spatula.
Important! If there is no means to protect the wooden surface from moisture, you can put a layer of polyethylene between the layer of mortar and the board.
A window sill in a wooden house should be installed together with the installation of the window itself.
Dismantling
Installing a window sill on wooden windows is not always done from scratch. Often, you first have to remove the old structure and only then do the installation work. Dismantling an old window sill can be a real challenge, especially for an inexperienced person. We could not lose sight of this point, so now we will describe the essence of dismantling.
Now let's look at the structure of the structure that we need to dismantle.
- An old window sill can be wooden or concrete.
- Cement is used for fastening, but nails or dowels may be used.
- From the sides the structure extends into the wall grooves.
- Cement was used to form the slopes, and wooden trims were used for the joining seams. There is glass wool under the platbands.
Such structures were built everywhere before, so most likely this will be the same picture in your case. Wooden window sills can be installed only after dismantling the old structure. Dismantling work is carried out according to the following scenario.
- We disassemble the seam around the perimeter and remove the glass wool, which will later be replaced with new insulation.
- Using a chisel and hammer, we remove the cracks along the window sill. First of all, we deal with the top and sides.
- The concrete that holds the structure needs to be loosened.
- The heavy weight of the window sill complicates the work and requires the involvement of assistants. The floor must also be protected from possible damage.
When the space is freed up, you can attach the window sill to the wooden windows. But first you need to process the seam. This is easy to do:
- We place a vapor barrier membrane along the outer edge of the seam.
- We finish the edges of the opening using waterproofing.
- Fill the seam 2/3 with foam and leave to dry.
- We place a vapor barrier tape on the outside.
And finally we got to the main section. Now we will tell you how to install a window sill to a wooden window.