A balcony is a slab that protrudes some distance from the wall of the building. For security purposes, it is fenced with railings along the entire perimeter. A balcony is a structure that includes a horizontal base plate, fastenings and fencing.
Today there are several types of balcony slabs, which differ in design:
- Cantilever plate. It is used in brick houses with reinforced concrete floors. They fasten it by pinching it into a wall with two opposite sides or one;
- PB (balcony slab). It is a multi-hollow reinforced concrete or metal floor platform. Used in old buildings, at a depth of more than 38 cm;
- The balcony slab in a monolithic house is a continuation of the floor slab. Features of installation of balcony slabs
Many people believe that all slabs are a continuation of the floor, but this is not entirely true. When building a balcony, a wide variety of fastening methods are used:
- Use of additional support. It is mounted on the ground floor, as it requires an external steel, reinforced concrete or wooden support fixed to the ground;
- Pinching in the structure of the wall of the house. A cantilever plate is used;
- Suspension to the load-bearing walls of the balcony platform;
- In frame buildings, the support rests on the consoles of the internal walls or columns. In this case, there is no load on the wall.
- In panel-type houses, for example, in Khrushchev, balcony slabs are used with floors and supported on reinforced concrete structures.
- Installation in a brick building is carried out by pinching it into the facade of the house. Overhead and underlay elements made of reinforced concrete are walled into it. They make up a niche for the stove. The edge that is adjacent to the wall is thickened. A fairly large entry into the wall of the building is required. It must be welded using steel anchors to reinforced concrete elements.
Features of balconies
Mounted
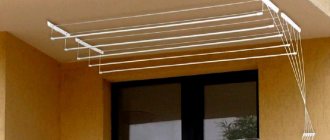
Hanging balconies differ from permanent balconies in that they can be installed on any floor, regardless of whether there are balconies below or not. They can be installed anywhere, since they are mounted on a special frame, which, in turn, is fixed to beams.
You can also hang clotheslines there, install a drying rack, a window sill, or put a flower pot there. The differences, in general, are exclusively in design terms. But there is one very important “but”: such buildings need additional strengthening.
Scheme of strengthening the slab of a small balcony using guy wires
Moreover, the brackets and the metal frame itself rust over time; the structure will have to be strengthened at least once every 5 years. This rule should not be neglected, because you need to understand that we are talking about the safety of human life.
Before talking about the features of permanent balconies, it is worth adding that most often plastic material such as PVC or siding is used for finishing hanging balconies. A window sill, clotheslines, a flower pot and a dryer can be installed there, we must repeat, the same way as on a permanent one.
Capital
As it is not at all difficult to guess, a capital balcony is a structure that extends from the load-bearing wall of an apartment building. In new buildings, all such structures are exclusively capital.
Basic methods of fastening balcony slabs
On the one hand, such a design can withstand a very heavy load. On the other hand, it is extremely difficult to repair it; it will require a lot of time and a lot of money.
To drain water, even in capital balconies, the slab is laid at a certain slope.
The main thing that needs to be done when strengthening such a structure is to strengthen the load-bearing balcony slab, fences, parapet and everything else - this is also important, but secondary.
You can also install clotheslines on the loggia, put a flower pot, install a window sill in front of the parapet, organize a dryer, do glazing by installing any window, whether plastic, wooden or aluminum.
Balcony slab
Rules No. 1: general provisions
Despite the fact that the dimensions of the balcony slab may be different, they often have the same problems, this is a weakening of the structural strength, since it extends beyond the facade and is subject to atmospheric influences.
Console plate PBK 24.12-5a
GOST for balcony slabs 2569783 divides them into:
- multi-hollow (only for loggias);
- solid flat;
- ribbed;
- the entire load in a monolithic or brick house is transferred to two or one side, pinched in the wall at two edges.
Balcony installation method
Fastening in a brick house and in a panel house is essentially the same and the same problems also arise, especially in old houses. For example:
- in the well-known “Khrushchev” buildings, the design permissible load per linear meter along the wall was 100 kg, but under the influence of moisture it decreases over time;
- It is noteworthy that in some houses of this type, over 40 or more years of operation, the cross-section of the reinforcement in the slab has decreased four (!) times, therefore, at the moment the permissible load is 50 kg;
- the situation in “Stalin” buildings is much worse, since they are older and reconstruction has long been needed there, because the service life of the slabs has already come to an end - they are more than 50-60 years old;
- therefore, it is not recommended to allow any additional loads - in some cities, slab collapses were observed and people were injured;
Balcony collapse in Ryazan: photo from 2013
- so those who are looking for how to properly fill a slab should take into account that this is not a restoration, but an extra weight. In addition, the pouring does not strengthen the reinforced concrete structure in any way, but simply lays an additional layer on top;
- Naturally, the question may arise here: at whose expense will the repair of the rotten slab be paid? But this already depends on the service agreement that you drew up when purchasing your apartment. Although any organization will resist such a replacement in every possible way (I know from my own experience);
- If you need to replace the slab, then it is better for you to contact a private company, since they will dismantle and install it using special equipment and specialists.
Rule No. 2: strengthen the slab
If the top layer collapses, remove it
But how can you make major repairs and calculate loads if you notice that the slab has begun to collapse? First of all, if the top layer is full of cracks and potholes, then you better remove it, getting to the mortgages and reinforcement.
But don’t rush to re-fill anything. If you have the skills of a welder, turner, mechanic, or have a technical education, then you can independently determine whether the reinforcement scheme will withstand further loads. However, if you do not understand this, then it is better to take the help of a specialist.
The arrows indicate the places of sticking to the embedded parts.
You can knock down the collapsing top layer later if you are sure that the mortgages are “living” - this is the same as the reinforcement of the vault - the entire structure is supported by the frame. Therefore, you will need to cut the fence flush with the slab.
And weld the 50th corner to the vacated mortgages around the perimeter - this will strengthen and replace the old edging. But I want to repeat once again that this is only possible if the reinforcement is in good condition, and this can be determined by the condition of the mortgages.
If you do not expand the balcony, then in place of the knocked down top layer, after the perimeter has been fastened and the fence has been installed, you can pour a light screed, no more than 2 cm thick.
This photo shows how to strengthen the slab on both sides
But what to do and how to restore mortgages if they are rotten? To do this, screw a steel strip 40 mm wide along the length of the slab to the wall with anchor dowels and weld the same strips to it across the slab (towards the offset) after 60-70 cm.
Loggia ceiling monolith
Floors Contents
Monolithic products
The design features of monolithic products require their mandatory reinforcement. Monolithic structures reinforced with a steel frame are called reinforced concrete structures.
Separate rods and wires, wire bundles and packages, welded meshes, flat and three-dimensional frames are used as reinforcement for reinforced concrete structures.
A special group of reinforcement products consists of embedded parts. If the reinforcement frame in the finished product is walled up in concrete, then the embedded parts come to the surface of the concrete and serve as a connecting link between the frame and the products, which, if necessary, will be attached to this reinforced concrete structure.
In general terms, you now have an idea of what monolithic reinforced concrete structures are. What a reinforcement frame is, specifically for covering a loggia, we will consider below.
Reinforcement works
The manufacture of the reinforcement frame and mesh must be carried out according to the drawings and have the exact location of the elements to be welded. Replacement of reinforcing steel provided by the project by class, grade and assortment is agreed upon with the design organization.
The technological process for manufacturing a reinforcement frame includes:
straightening and cutting of steel reinforcement, wire supplied in coils with a diameter of 3...14 mm and in rods with a diameter of 12...40 mm into rods of measured length; straightening (bending) and butt welding of rods to the required size; welding of meshes and frames; enlarged assembly (welding and wire knitting) of volumetric reinforcement blocks; transportation and installation of frames at a construction site.
The reinforcement frame of monolithic section No. 2 for covering the loggia is made according to the dimensions indicated in the diagram (see figure).
For the frame of the loggia floor, reinforcement is used according to the specified table 1.
Table 1: Specification of reinforcement for the frame of the monolithic section of the loggia floor
The mesh must be welded by spot welding. For the frame, reinforcement is used according to the specified table:
Cross intersections of reinforcement bars mounted individually, in the places of their intersection established in the project, should be fastened with tying wire. There should be no broken, crossed or broken wires in the reinforcement cage. The wires should fit tightly together.
Wire (or reinforcing wire in coils) affected by corrosion is not allowed for use. The wire is considered corroded if the rust cannot be removed by wiping.
Concrete works
Before carrying out concrete work, it is necessary to install scaffolding and formwork on it for the monolith.
Before concreting, reinforcement and formwork should be cleaned of debris, dirt and loose rust. The surface of the wooden formwork adjacent to the concrete must be moistened. Seal the gaps in the formwork flooring that were formed during installation of the frame.
Before installing the frame, pads (cement mortar crackers) must be secured to the formwork to provide the necessary gap between the reinforcement and the formwork to form a protective layer of the floor.
Attention! The installed reinforcement must be secured against displacement and protected from damage that may occur during concreting of the slab structure. It is prohibited to use linings made from scraps of reinforcement, wooden blocks and crushed stone.
The concrete mixture must be laid into the structure in horizontal layers of equal thickness without breaks, with a consistent direction of laying in one direction in all layers. When laying the concrete mixture, methods must be used to prevent its delamination.
The concrete mixture is compacted using a vibrator, which must not be rested on the reinforcement during operation. Vibration can be stopped only after laitance appears on the surface.
Note: Compaction of the concrete mixture with a surface vibrator is allowed if the thickness of the concrete mixture layer in structures with double reinforcement does not exceed 120 mm.
Floors monolithically connected to vertical structures (walls, columns) are concreted 1-2 hours after concreting these structures. Construction joints must be installed in the middle third of the slab spans.
Attention! When there are breaks in the laying of the concrete mixture, vertical shields should be temporarily installed in places where there is an expected break. In this case, concreting should be carried out up to these panels.
After a break, the concrete mixture is laid on the surface of the working joint, previously cleared of dirt (cement film) and washed with water, provided that the strength of the previously laid concrete is at least 15 kgf/cm2.
The top level of the mixture to be laid should be 50mm below the top of the formwork panels.
Concrete work is carried out only at positive ambient temperatures.
Attention! It is not allowed to restore the mobility of the concrete mixture to the required consistency by adding water at the place of its placement.
If cracks appear on the surface of concrete after laying it due to plastic shrinkage, repeated surface vibration is allowed no later than 1 hour after completion of concrete placement.
Curing and maintaining concrete
When curing laid concrete during the initial period of its hardening, it is necessary to: maintain a temperature and humidity regime that ensures an increase in the strength of concrete; protect hardening concrete from impacts, shocks and other mechanical influences; protect hardening concrete from exposure to wind, direct sunlight and systematically moisten it.
Note: During initial maintenance, direct contact of hardening concrete with water is not allowed (i.e., cover the concrete from moisture in case of rain).
Wetting should be carried out on hardening concrete by spraying at a frequency such that the surface of the concrete during the maintenance period would be in a wet state all the time.
Concrete surfaces that are not subsequently intended for monolithic connection with concrete or mortar should be covered with film-forming compounds or protective films instead of covering and watering.
The open surface of the structure should be covered with a solid sheet over the entire area, the edges of the sheet should fit tightly to the side surfaces of the concrete.
To eliminate the labor-intensive operation of moisture maintenance of concrete and accelerate its hardening, electrical heating of the concrete is performed.
Concrete maintenance is stopped in the evening. After the cessation of maintenance, the concrete surfaces must be kept under the coating for another 2-3 days without additional moisture.
Attention! The movement of people on concrete structures, as well as the installation of scaffolding and formwork on them, is allowed only after the concrete reaches a strength of at least 15 kgf/cm2.
Stripping of monolithic structures must be carried out within the time limits indicated below:
How to repair balconies
The main cause of damage to balcony slabs is moisture. Penetrating inside the slab, water can activate corrosion of the reinforcement. In old houses, the protection of concrete from moisture is reduced; water easily penetrates to the reinforcement. Corroded reinforcement loses its load-bearing capacity, expands and destroys concrete.
Restoring a balcony slab involves several working stages:
Remember that the thickness of the concrete screed must exceed the thickness of the reinforcing mesh by two or even more times.
If the reinforcement frame is severely corroded, the balcony slab will need to be strengthened - this is a more extensive job:
- Rolled steel beams are installed on the sides of the balcony slab and cantilevered to the wall.
- The reinforcing mesh is welded to the beams.
- Then the work of pouring concrete described above begins.
Scheme for strengthening the balcony slab
When the reconstruction of the balcony slab is completed, its surface needs to be waterproofed , which is mandatory if the balcony is open. Various roll-type or coating-type waterproofing materials are suitable for this. In particular, penetrating waterproofing Penetron has proven itself well. It is applied to a pre-wetted surface in two layers, after which the surface must remain moistened for three days, and mechanical stress and temperatures below 0 degrees are not allowed.
Instructions for installation and repair of balcony slabs
The balcony slab is the basis of your balcony. The operational properties of the structure depend on its strength characteristics and dimensions.
The diagram shows a slab with the correct slope
- Specifications
- Kinds
- Calculation and device
- Installation technology
- Extension of the balcony along the base
- Strengthening
- Repair and restoration
- Cost of balcony slabs
- Where can I buy
- Video
Specifications
Types of balcony slabs, their main parameters and dimensions are regulated by GOST 25697-83.
Balcony slabs are divided into the following types:
- PB – flat solid beams;
- PBK – flat solid cantilever;
- PBR – ribbed cantilever.
Balcony slabs are manufactured in lengths from 1200 mm to 7200 mm, widths from 1200 mm to 1800 mm. Standard dimensions: length – 3275 mm, width 800 mm.
The thickness of the slab in brick and panel houses or in Khrushchev varies from 150 mm to 220 mm, depending on the type, its size and weight.
The serial number of a product consists of several groups of numbers and letters; the series is deciphered as follows: the main group of letters and numbers is the type, length and width in decimeters. Additional groups of numbers and letters may contain the following information:
- if the slab is equipped with an emergency exit, then indicate which side it is located on, left or right;
- class of prestressed reinforcement, type of concrete, if it is light;
- for heavy concrete indicates the type of finishing of the upper front surface.
- Balcony slabs (PB) are reinforced concrete hollow-core floors. Dimensions of PB 1: product length 3440 mm, product width 1400, product thickness 160 mm.
- In the monolithic version, it can be integral with the floor slab.
- The cantilever PB is secured by pinching it into the wall on one side or two opposite sides. Suitable for buildings with heavy walls, such as brick with reinforced concrete floors.
Calculation and device
The balcony slab under the brick walls has a special ledge; to ensure the entry of the PB, there is a special niche in the wall formed by reinforced concrete underlays walled into the wall. Load-bearing brick walls, as a rule, are made of two or more bricks, so the penetration into the wall is 300 mm or more.
The slab support unit on a brick wall is a junction of horizontal and vertical planes. Moreover, it can only be implemented on a load-bearing wall. The unit is calculated to determine permissible loads in accordance with GOST 956-91.
Overturning stability is calculated by comparing the overturning moment with the restraining moment from the weight of the structure.
The photo shows the strengthening of the balcony on the top floor
Installation technology
The fastening technology depends on the material from which the building is constructed.
When building a brick house, it is attached to the masonry walls.
In a large-panel building, balcony slabs are sandwiched between the building blocks. In both versions, the structures are welded to reinforced concrete lintels and floors using anchors connected to the reinforcement frame.
Extension of the balcony along the base
Extending the balcony along the base of the slab beyond its limits will provide additional usable space. But before you begin work on increasing the balcony, calculate all the loads to prevent the collapse of the structure. As a rule, metal brackets made from angle steel are used to expand the balcony.
Sequencing
When carrying out work, the general sequence characteristic of monolithic construction is observed.
Arrangement of formwork
For construction, it is advisable to purchase a special formwork kit. It's cheaper than renting and more reliable than making it yourself. Subsequently, the kit can be sold for almost the same price.
Installation sequence:
- Telescopic stands are installed throughout the entire room in increments of 50-60 cm. The distance from the outermost stand to the wall should be 20.0 cm;
- The racks are mounted on tripods, which ensures safety. A “fork” is fixed in the upper part - on which the crossbars will be placed. Depending on the rotation of the fork, 1 or 2 crossbars can be placed on it;
- the main guides of the crossbar are laid out on the racks;
- retaining crossbars are laid on them, on which plywood (boards) will be placed, that is, cladding with horizontal formwork is implemented;
- for panels it is advisable to use plywood 18.0-20.0 mm;
- then the installation of plank vertical fences is carried out;
- the system should not contain cracks or gaps. The location of the structure is checked by level. If there are gaps between the lintels and the horizontal formwork, they can be closed with foam. Small cracks will become clogged with crushed stone when filling, so they can be ignored.
Reducing the cell size, although it will increase the strength characteristics, will lead to an undesirable increase in the weight of the structure
Laying reinforcement:
- class A3 fittings are used;
- depending on the thickness of the slab, one or two reinforcement belts are laid;
- The location of the mesh is adjusted using plastic clamps, that is, it is on them that the lower horizontal layer is laid. The chairs themselves are placed directly on the formwork, in increments of 50 cm;
- the distance from the horizontal formwork and the top layer of concrete should correspond to the thickness of the slab, usually 20-25 mm;
- knitting - it is advisable to lay the lower mesh with a cell size of 15x15 cm, with a rod cross-section of 12 mm. The upper belt can be connected to a cell 30x30 cm, with a cross-section of 8 mm;
- longitudinal and transverse rods are connected with wire with a diameter of 1.2-1.5 mm in a checkerboard pattern;
- the ends of the reinforcement frame should extend onto the load-bearing walls by 15 cm (crowns). If the walls are made of aerated concrete, the inlet should be increased to 25.0 cm. It is also possible to provide an outlet for balconies of the appropriate length.
Pouring concrete:
- It is recommended to use concrete no lower than M200. Again, it is more profitable to order the material at the factory in order to maintain the original strength;
- pouring is carried out in one step, for which the solution is evenly distributed over the entire area of the future slab using a concrete pump;
- during operation, the solution must be supplied without splashes, otherwise air bubbles will form in the thickness of the fill;
- the solution is compacted - equipment for tamping can be rented;
- the pouring area is covered with polyethylene film; the material should not form folds, as this will negatively affect the geometry of the surface;
- in the first 24-48 hours the surface is moistened, which has a beneficial effect on the strength of the structure and blocks the formation of cracks;
- When pouring, you can leave holes for hoods, communications, sewer pipes, fireplace chimneys and other technological openings, which are reinforced with bricks or metal boxes.
It is recommended to moisten the surface of the hardening concrete, and not simply water it with a hose
Options for fastening balcony slabs, their characteristics and possible restoration methods
To ensure the effectiveness of reconstruction work on balconies, it is necessary to study their characteristics and methods of attachment to the building. Often, a balcony and a loggia are the same concepts for the average person. But in fact, these are two structures of different design. Balcony with (Old German balko - beam) - a slab with a railing protruding beyond the facade of an architectural building. Loggia (from Italian loggia - covered gallery) is an unheated niche in a building, with an open side (sides) and supporting elements such as columns, arches, slabs, etc. Since the design of the platforms discussed above differs significantly from each other, in The article does not cover loggia repairs.
Options for attaching balcony slabs.
By design, balconies are divided into:
- Cantilever (a) - a reinforced concrete slab with a thickness of 90 - 120 mm, placed outside the facade of the building and attached between the load-bearing walls. The method of installing such a structure is called pinching.
Balconies of beam and cantilever type.
The plate is installed at an angle of 10 degrees to the ground. In the absence of protection from precipitation, improper care, or improper installation, the slab quickly collapses. Often cantilever platforms can be seen in houses built by Khrushchev. In the part “Strengthening the balcony slab in Khrushchev” the option of a major restoration of all elements of the balcony will be considered in detail.
- Beam (b) – beams made of different materials (reinforced concrete, metal, wood) are used as supports for the site.
During the construction of a house, supporting elements are laid in the load-bearing wall to a depth of at least 400 mm, or a niche is made in the installed wall, followed by the installation of beams. In older houses, the outer platforms are held in place by reinforced concrete modillions (decorative brackets). But since corrosive wear of the reinforcing layer occurs in the brackets, reducing its load-bearing capacity, balconies of this design quickly become unusable.
Photo of the restored beam-type balcony slab.
After reconstruction and protection of reinforced concrete supports from destruction, the slab was expanded and strengthened with channel No. 10, the entire balcony was additionally fixed with hangers from a profile pipe, combined with elements of the railing and roof supports.
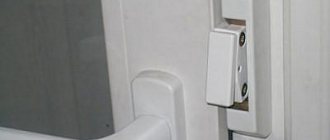
- Overhead (c) - a metal platform with a railing, connected to the facade of the building with anchor fasteners.
The load-bearing capacity of such elements is not large, therefore, it is advisable to install the floor from wood and fill the free space with light things. Since the entire structure is held in place by anchors, they must be periodically inspected for cracks, changes in design position, and corrosive wear. To extend the service life of the structure, balcony elements must be periodically protected with an anti-corrosion coating. In cases of damage to the fastening, it is necessary to install a new anchor nearby, at a distance of 80 - 100 mm. In case of minor frame defects, worn elements are restored with additional stiffeners.
When the wear of the metal structure exceeds 50%, the balcony is considered emergency. The area where pedestrians can move underneath is fenced off until a new structure is erected or an emergency one is dismantled.
- Suspended (d) - the balcony slab is held by overhead brackets, most often in the form of a right triangle, attached to the wall with anchor fasteners.
The support can be placed under the slab, in which case the hypotenuse will act as a support, or above the slab, with the hypotenuse acting as a suspension. In the first case, the structure will work in compression, in the second, in tension. More often, the strengthening of the balcony slab is carried out using hangers, since the neighbors of the lower floors do not allow supporting brackets to be installed in their space, which would disturb the interior of the balcony.
Maintenance and measures in case of wear are similar to those listed for overhead balconies.
- Attached (e) - the platform rests on columns and walls placed on the foundation.
Structural elements are made of wood, iron, etc. The main load falls on the vertical supports and foundation; these elements are designed to hold the design load capacity, taking into account the safety factor. It is not advisable to attach the slab to the facade of the building, since when the supports shrink, overturning forces may occur in the load-bearing slab. With proper care, the structure is reliable and durable.
In the process of major repairs, supports and railings are replaced, the foundation and platform are strengthened.
Let's look in detail at how to strengthen a cantilever-type balcony slab using an example.
Strengthening the balcony slab in Khrushchev
Depending on the type of building and the scale of the problem, there are several ways to strengthen a balcony slab:
- If the reinforcement of a partially destroyed balcony slab from below is damaged no more than 10%, then it can be treated with a special compound - concrete contact.
- For concrete walls, a suitable option is to strengthen the balcony slab, when an additional slab is attached end-to-end to the bottom one. Elements of steel reinforcement must be connected to each other by welding.
- The balcony can be strengthened with diagonal elements - jibs. This type of work can only be performed by a specialist.
- Strengthening the balcony and its slab can be done by replacing the parapet and railings with more durable structures.
Strengthening the balcony slab is carried out using the following technology
The service life of a balcony slab in Khrushchev during construction was set at 15-25 years, and now almost all balconies require reinforcement. Procedure:
Metal reinforcement
Metal reinforcement looks like this:
- If the technical condition of the parapet is acceptable (does not require radical measures), then it can be strengthened by welding metal corners to the areas of old reinforcement necessary for this.
- In case of severe wear and tear, the old metal parapet is carefully separated and then replaced with a new one.
How to strengthen a balcony slab
If the balcony is in disrepair and it becomes dangerous for even one person to be on it, you must contact the management company to carry out major repairs and strengthen the balcony slab. Thanks to such work, the maximum load on the balcony will increase, the risk of collapse will decrease and it can be used again.
Strengthening the balcony slab
Ways to strengthen a balcony slab:
- Additional reinforcement and piping around the perimeter with a steel angle and channel are suitable for quite strong slabs. This method will also help not only strengthen the worn-out structure, but also give it additional load-bearing capacity. Sometimes this method is used to increase the area of a living room.
- Supports are used to strengthen external structures on the first floors. To prevent them from subsiding over time, a high, strong layer of foundation is poured at their base.
- The lower slopes are attached to the slab and to the wall of the house from below. Such a structure can be strengthened by reinforcement, using a channel, and thereby expanded.
- For fastening with the help of upper slopes, a groove is made around the perimeter of the slab; the slopes themselves are welded to the reinforcement in the slab and to the wall. To ensure reliable fastening, the holes should be filled with frost-resistant concrete.
Before undertaking DIY balcony repairs, there are many factors to consider. To protect yourself, your family and neighbors, it is better to contact specialists who will accurately calculate the permissible load on the balcony.
We insulate the structure
The standard insulation of a loggia (balcony) parapet is complete thermal insulation, where the interior of the structure is insulated together with the walls, floor and ceiling.
- foil polyethylene foam;
- construction foam;
- penoplex;
- mineral wool.
If insulation is combined with balcony heating, then the most practical material is roll insulation. It has excellent heat-reflecting qualities, resistance to moisture and at the same time is extremely convenient to install.
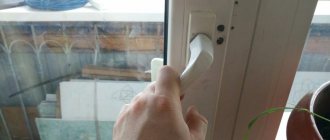
If you take foil polyethylene foam (penofol), then you can, even without professional skills, carefully and efficiently install the first thermal insulation layer, eliminating all possible cracks in the working surface. Repeating the operation provides additional heat protection. The material is not only very easily attached to the surface (both a stapler and special glue are suitable for this), but also does not require careful leveling.
In the case of using tile insulation (foam plastic, penoplex, etc.), lathing, thermal insulation and vapor barrier film are used for high-quality installation. The final stage is the decorative finishing of the parapet, after which the loggia or balcony will acquire the long-awaited appearance.
Types of balconies and features of installation of slabs
A balcony is usually called an open area that is adjacent to the wall on only one side, and is closed on the other sides by a fence.
According to SNiP, the height of the balcony railing must be at least a meter.
What types of balconies are there?
Example of an installed balcony slab
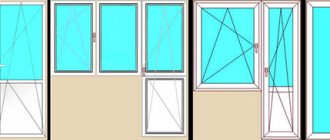
Depending on the design features, the following types are distinguished:
- The balcony is open.
- Balcony equipped with a wind screen.
- Built-in loggia.
- External loggia.
Balcony design
The balcony consists of the following elements:
- Horizontal reinforced concrete slab,
- Fencing.
- Waterproofing.
- Floor.
In some cases, the design includes fastening elements: racks, pendants, cantilever beams, etc.
For the construction of external structures (loggias, balconies), special parts are used - balcony slabs - GOST regulates the quality of the materials used. For the manufacture of slabs, concrete is used that meets the requirement of class B10 for compressive strength.
Requirements for concrete frost resistance may vary depending on the climate in the construction area, but not less than class F5. The section of the part must be solid, and the thickness of the balcony slab must be at least 100 mm.
Installation stages
Balcony slab installation diagram
As a rule, the installation of balcony slabs is carried out after the construction of the walls of the house has been completed and the ceiling has been laid above the floor below. Installation of slabs must be preceded by careful marking of their location .
The installation process takes place in several stages:
- First, the so-called lighthouse slabs are installed, placing them along the edges of the building.
- Between the lighthouse slabs along their upper edge, the mooring tension is carried out.
- The prepared balcony slab is lifted by crane to the installation site.
- The mortar bed for laying the slab is leveled using a trowel.
- The slab is laid in place by two installers, constantly monitoring the correctness of its lowering, focusing on the mooring cord.
- The slab is laid strictly horizontally or with a slight (1 - 1.5%) slope to the outside.
- The horizontality of the slab is checked by two levels laid perpendicular to each other.
- If a slope is detected in the longitudinal direction, you have to raise the slab and lower it again, replacing the mortar bed first. If a slope to the inside is detected, the situation can be corrected by installing temporary rods.
- As a rule, concrete slabs are strengthened by welding steel rods of floor slabs and balconies.
- The slings with which the balcony slab was lifted may be removed only after its position has been finally verified and the embedded parts have been welded to the anchors.
Technical requirements for the installation of balcony slabs
Example of a slab in need of repair
Control of installation work is carried out in accordance with SNiP series 3.03.01-87, namely:
- The difference between the floor level in the room and the plane of the balcony slab should not exceed 80-100 mm.
- The slope of the slab relative to the outer wall should not exceed two percent.
For the construction of balconies it is allowed to use the following materials:
- Reinforced concrete slabs complying with GOST 25697-83*.
- Reinforced concrete lintels (used in the construction of balconies in brick houses), corresponding to GOST 948-84.
It is allowed to use jumpers that have a technological slope along the side and end faces, the dimensions of the permissible slopes are:
- Up to 8 mm. in width.
- Up to 20 mm. by lenght.
Step-by-step installation process
The general procedure for installing balcony ceilings is to prepare consumables and tools, work clothes, methods of protection (goggles, hat, respirator), marking the surface, cleaning and checking its location and plan, according to the project. The preparation for all types of slabs is the same, and even the installation nuances are largely similar, differing only in the type of hangers and fasteners.
Builders follow these steps:
Lighthouse slabs are installed on the sides of the wall structure, to which elements for the future ceiling are welded and attached.
- A mooring is stretched along the outside length of the house.
- Then, using a crane, the slab is transported to the future mounting location. To do this, they must sling it.
- The slabs are carefully lowered (2 people) along risks and a cord called a mooring. Before this, a cement mortar bed is prepared on which the slab is laid.
- Check the level and geometric compliance of the laid floor.
- Identified slopes are eliminated and leveled; if necessary, the mortar bed is changed if the slab has to be raised again.
- Install temporary stands and rods until the bed solution completely hardens.
- Weld the protruding steel rods of the slab to the rods in the wall, screw in the anchors securely, and check the reliability of the fastenings.
If the slab is laid on a finished metal structure, it is welded and screwed with anchors and screws. A wooden slab of wood is fastened to the main part. During installation, it is important to do everything sequentially, take your time, and follow safety precautions .
The fastening element for wooden balconies is special hot-dip galvanized construction nails, size 3.5/100. Large screws are also used, with attachment points appropriate to the project.
Beams that are attached to support balcony ceilings are mounted above the outer wall, as well as at the end of their beam marking.
How to strengthen a balcony without replacing the balcony slab
Repair and strengthening of the balcony structure in Khrushchev is carried out in several ways:
- To reinforce a slab that is partially destroyed from below in order to extend its service life, the product is treated with concrete contact along the lower plane. However, the width cannot be changed. This restoration method is suitable only when no more than 10% of the main size of the reinforcement is affected by corrosion. This kind of work can be done with your own hands, not forgetting the safety rules.
- Strengthening balconies by installing an additional plate end-to-end to the bottom one, followed by welding the steel reinforcement elements together. This option is only possible for concrete walls.
- Do-it-yourself installation of additional side slopes. In this way, you can repair a balcony if the load on it is expected to increase, for example, as a result of glazing. The attachment point for balcony slabs in this case is the diameter of the jibs, the size of the anchors, and the method of installing them in the wall must be agreed upon with specialists. For buildings that are communally owned, an expert opinion will be required.
- Strengthening the balcony by replacing the parapet and/or railings. This method is often used when installing a glazing frame, especially if it is made of metal. This also needs to be done in case of obvious loss of parapet stability, and the process is quite accessible to do it yourself.
Advice! It is safer to do any restoration of the slab with your own hands from below, being in the cradle of the lift, and not on a safety rope attached to the balcony itself.
Reinforcing the parapet with foam blocks
Foam block, thanks to its undeniable advantages, is in great demand in the building materials market. It does a good job of strengthening the balcony parapet, while the material has increased strength and sound insulation, and the composition of the building foam block allows high-quality heat retention in the room. It is often used not only for strengthening, but also for additional thermal insulation of loggias in multi-story buildings. Another distinctive feature of the material is reasonable prices.
- Long service life.
- Low thermal conductivity.
- Increased resistance to high temperature.
- Installation using the material can be successfully performed by non-professionals.
- Safe for health.
Construction foam blocks also have disadvantages, for example, poor resistance to high humidity and natural precipitation (therefore, when installing the material, steam and waterproofing material are used).
Important! In this case, the foam block is laid first, then the waterproofing layer is applied, after which the finishing is done with galvanized metal.
The nature of work with foam blocks is as follows: