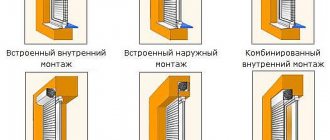
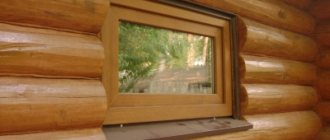
When replacing windows, a new window sill is usually installed. There are many options for the material from which it can be made, but in most cases preference is given to plastic products. Its installation does not involve any difficulties, but some points still need to be known and taken into account.
The most important thing is to correctly adjust the dimensions of the window sill, since it is sold as a single plate. The first step is to take measurements of the width and length of the concrete base, which should have a slight overlap.
The width of the PVC product should protrude slightly beyond the seat. This size is usually chosen taking into account the practical considerations of the owner and is 80-100 mm. Otherwise, the overhang of the window sill will prevent the circulation of warm air that comes from the heating radiator.
To facilitate the operation and eliminate the possibility of incorrect cutting, you can make a special template. Thick cardboard or other similar material is suitable for this. After preparation, it is laid in place of the future window sill. If the dimensions correspond to the seat, then the plastic product can be cut out using the template.
How to cut a plastic window sill?
Plastic is cut quite easily with standard saw tools and equipment:
- angle grinder;
- circular;
- electric jigsaw;
- hacksaw for wood or metal.
It is most advisable to use a jigsaw for cutting PVC window sills. The grinder also copes well with this task. A circular saw is less preferable - due to the high speeds and large teeth of the saw blade, there is a high probability of destruction of the plastic product.
If an electric tool is not available, you can use a hand tool. A blade for metal is best suited, since a hacksaw for wood has large teeth, so the ends will have to be additionally processed with a file. After which you can attach a decorative overlay to them.
Installation Features
A plastic window sill is inserted under the window frame. But before this, you need to prepare wooden blocks of the required thickness in order to wedge the product between the window frame and the concrete base of the opening, and there should be no gap between them. Wedges are placed in the middle and along the edges.
When installing, it is necessary to control the position of the window sill using a building level - it should be located with a slight slope into the room, 2-4 mm will be enough. To maintain the slope, you can also install bars of appropriate thickness on the near side of the base.
After this, the product should be fixed using:
- polyurethane foam - blown into the gaps between the base and the window sill;
- brackets (L-shaped plates) - they are fixed to the wall, and a PVC product is screwed from below with self-tapping screws.
As you can see, there is nothing complicated in installing a window sill, so you can install it yourself without resorting to outside help.
You can cut with different saws. Let's see how each of them works.
A file with large teeth and set (when the teeth point slightly in different directions). When cutting, the jigsaw jerks and chips will be visible on the plastic. With proper experience, the quality of work can be acceptable, but still such a file is not suitable for plastic.
With medium teeth and without setting. The cut goes smoothly, the jigsaw jerks less. There are few notches.
A metal file with fine teeth and a slight setting. It takes a long time to cut. The cut is shaggy, with small jagged edges. They can be adjusted, but it will take time.
The conclusion is this: take a blade with medium teeth and without setting. This is the best option.
How to cut a plastic window sill
So a man calls the phone and asks: “ How to install a plastic window sill ?” If you have had similar cases, then you can probably imagine how difficult it is to explain to a person about installing a plastic window sill over a plastic phone.
The secret of installing window sills has been strictly kept for centuries and passed on only from teacher to student. However, I did not take an oath not to disclose the method of installing the window sill correctly and simply, because I will tell you a lot that I learned from my experience about installing this structural element of the window, giving it a finished look, right now and here.
The reality around us is so replete with plastic that one could set out to write a tutorial about installing a plastic window sill using only plastic tools. However, why make life difficult for yourself? Let's use the tools that are available, regardless of the material from which they are made. What do we need from this earlier?
- Hacksaw, jigsaw or grinder
- Rack or laser level (preferably both)
- Polyurethane foam
- Dowel nails 8x40 and 8x60
- Square, tape measure, pencil
- Hammer
- Human hands
I will outline the process of installing a plastic window sill using the example of a window with a balcony door. You need to install two window sills . One under the window, the other under the balcony door.
The old PVC window sill was dismantled. But somehow, we had to dismantle the left window slope, since it was attached to the surface of the window sill. I’ll write about how to actually make slopes on the windows later.
The surface for installation must be carefully cleaned of old foam, construction debris and dust, and then primed. Next we proceed to marking. It is necessary to cut both PVC window sills to the size that suits us. Whoever is free to decide to what extent the window sill will protrude relative to the wall, I think that this is not important. The main thing is that it does not block the heating radiator. In ordinary cases, I leave approximately 5 cm.
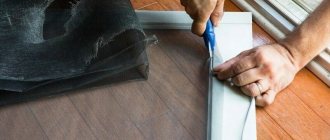
Marking
Let's draw a line along which we will cut. Be careful, if the film comes off the plastic, it is better to remove it completely. And glue masking tape to the window sill, along which it is convenient to draw a line.
The original factory film is slippery. It's hard to draw a line on it.
A pencil is not at all suitable for this purpose. The line from him is barely visible. The gel pen leaves clear markings, but the moment you use them, they are erased. A ballpoint pen is better - it does not erase, but such markings will not be visible to older people.
Removing the plate
If all of the above methods for restoring window sills are not suitable or the plastic is very swollen, and you no longer know how to seal the plastic window sill, you can try to radically get rid of the problem by completely replacing the part.
Dismantling the element requires some effort:
- Cut off the mounting foam and carefully pull the element towards you, holding the slopes.
- We remove the vacated space from garbage.
- We place the new plate according to the dimensions of the old window sill.
- We supply support rails.
- Lubricate the side of the connection between the plate and the window with silicone sealant.
- We install the new window sill into the slot, checking it with a level.
- We fill the voids with polyurethane foam, and place a weight on top of the part.
- Remove the protective film after the foam has dried.
Important! Before giving preference to PVC windows, you should pay attention to the fact that some companies provide a guarantee for replacing the window sill if it is damaged. .
Jigsaw
You can cut with different saws. Let's see how each of them works.
A file with large teeth and set (when the teeth point slightly in different directions). When cutting, the jigsaw jerks and chips will be visible on the plastic. With proper experience, the quality of work can be acceptable, but still such a file is not suitable for plastic.
With medium teeth and without setting. The cut goes smoothly, the jigsaw jerks less. There are few notches.
A metal file with fine teeth and a slight setting. It takes a long time to cut. The cut is shaggy, with small jagged edges. They can be adjusted, but it will take time.
The conclusion is this: take a blade with medium teeth and without setting. This is the best option.
How to cut a plastic window sill without dismantling it
If you have a wide window sill in the kitchen that constantly prevents the freezer from opening, you can try sawing it off lengthwise. This is difficult to do, since you will need to cut off the part that goes under the window. To saw off the inside, the product is pulled out. After trimming, they are mounted back. You can cut a curve on one side of the product or saw off the spout.
- Open the refrigerator door and make a mark. At this place we draw a rounding. Use a large bowl or cup as a template.
- We cut off the excess plastic with a jigsaw.
- Then we make the end trim. To bend it and form a non-standard shape, the product is heated in boiling water for no more than 2 minutes. The result should be an angle of 90°.
- The hot pad is installed on the end of the window sill panel.
Round window sill boards are finished in the same way.
I will describe the process of installing a plastic window sill using the example of a window with a balcony door. It is necessary to install two window sills at once . One under the window, the other under the balcony door.
The old PVC window sill was dismantled. But first, we had to dismantle the left window slope, since it was attached to the surface of the window sill. I will write about how to make slopes on windows later.
The surface for installation must be thoroughly cleaned of old foam, construction debris and dust, and then primed. Next we proceed to marking. We need to cut both PVC window sills to the size we need. Everyone is free to decide how many centimeters the window sill will protrude relative to the wall; I think this is not important. The main thing is that it does not block the heating radiator. In normal cases, I leave about five centimeters.
Since, in the example I am describing, the right side of the window sill does not go under the slope of the window, but remains open, it would be completely useful to check that it has a right angle. This can be done simply using a square. If there is no right angle, then you need to create one. Draw a line with a pencil and cut it off.
Fit to size
An important and critical stage that significantly affects the productivity and quality of work performed. Initially, the width of the opening is measured and 10 cm is added to the resulting value. In this case, the window opening will have a finished appearance and will look more attractive.
When determining the transverse dimensions, add 8 cm to the distance from the edge of the wall to the frame. In this case, the window sill will go inside the room and under the frame. It is not recommended to exceed the specified value, since a wide window sill prevents the circulation of warm air.
Add 4 cm to the width of the opening: 2 cm on each side. In this case, the board can easily fit into the grooves. The length of the cut element is correlated with the thickness of the walls at the installation site and the spatial position of the frame.
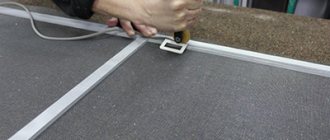
After marking is applied, the window sill is cut to size. To get a high-quality result, it is better to use a jigsaw. If you don't have one, you can use a hacksaw or circular saw.
Ways to solve the problem
Let's break down the options for restoring PVC window sills into categories depending on the use of the material used.
Important! Before you repair a plastic window sill with your own hands, the surface must be cleaned of dirt, degreased with alcohol and dried.
Chemical cleaners
It is known that the plastic surfaces of windows and window sills are covered with an invisible or decorative film that performs a protective function. If handled carelessly, it will become scuffed and yellowed. To eliminate such minor defects, you can completely restore the part using laminate wax or a special solvent-based Cosmofen cleaner.
Small stains and abrasions can be removed with a special cleaner Cosmofen
If the window sill is completely yellowed, it is better to apply the composition to its entire surface. It will dissolve the top yellowed layer and the plastic will become as good as new. This will complete the restoration of the window sill.
Special putty
The use of a specialized mixture such as Fenoplast or Reparaturset to seal small defects is a very popular method today. In stores it is sold in powder form complete with a spatula and measuring cup. Preparing the putty according to the instructions is not difficult. After use, this mixture acquires properties close to PVC and easily covers gaps, be it a crack or a scratch. To dilute the two-component mixture, experienced specialists use not water, but a primer for deeper penetration, which helps to obtain a fairly durable coating.
You can use putty to repair small scratches and cracks.
Immediately after preparing the composition you should:
- Apply putty to the surface.
- Carefully repair the scratch and smooth it out.
- Wait 10-15 minutes. until completely dry.
- Sand with sandpaper.
- Polish with Fenosol S5 “UVA”.
To understand what it will look like to repair a plastic window sill with your own hands using putty, you need to start with more inconspicuous places.
Liquid plastic
If you don't know how to remove scratches from a plastic window sill, use liquid plastic. This material is absolutely indispensable for repairing deep scratches and large dents. It allows you to restore even the most advanced deformation.
To correct deep defects in the window sill, liquid plastic is used
With a ready-made composition such as Cosmofen Plus, all the recesses on the plastic window sill are sealed until a smooth surface is obtained. After this, you need to see how the cracks being repaired and the patch will differ from the overall texture of the plate. Therefore, it can additionally be covered with self-adhesive decorative film.
Care
In order for a window sill to last long enough, it must be properly cared for. The procedure depends on the material used in the manufacture of the structure.
PVC elements are practical and easy to maintain. However, during operation, the matte rough surface easily becomes clogged with dust, gradually acquiring a characteristic gray-beige tint. Glossy models are easily scratched. To prevent this, matte ones should be wiped once a week, and shiny ones should be protected from possible mechanical impact.
When exposed to high temperatures, plastic melts. Do not allow ash to accidentally fall on the surface or place hot utensils. For these purposes, you need to use special stands.
If contamination does appear on the surface, you should immediately stop using the abrasive. Mechanical inclusions will quickly scratch the base and, instead of the expected lightening, it will turn yellow. For cleaning plastic, a soap solution or other neutral products designed specifically for cleaning glass and plastic work well. The effectiveness of such compositions is not as great as that of cleaners with the addition of abrasive.
If stone was used to make the window sill, there will be no problems with maintenance. It can be natural or artificial. The order of impact directly depends on the expected result. A liquid detergent can be used to clean marble surfaces. It will help get rid of contaminants, but will not disturb the structure of the stone. Wax is ideal for polishing.
To clean granite, use ordinary water. To combat stubborn stains, you will need special alkaline-based products. Existing defects are sealed with putty based on acrylic resins or polyesters. But you should avoid using powder or gel with an abrasive. If these rules are not followed, it will fade very quickly.
If the window sill is made of wood, it is worth periodically treating the window sill. Special compositions will extend the service life of the surface. For cleaning, use a soft, slightly dampened soft cloth. You should avoid using a sponge with a hard surface, as it will easily scratch the base.
Whatever window sill is preferred, each element has its own advantages and disadvantages during use. By following the installation rules, you can install a high-quality window sill yourself. The following maintenance tips will help extend the life of the structure.
Required tools and materials
To replace the window sill, you need to prepare the following tools:
- a crowbar or hammer drill (you can also use a hammer and chisel if you need to knock down a certain part of the concrete base);
- knife;
- a hacksaw for metal, wood or plastic (depending on the material of the element);
- mallet;
- chisel (for wooden window sills);
- screwdriver or Phillips screwdriver;
- grinder (it is equipped with a circle for cutting concrete);
- putty knife;
- building level and tape measure;
- pencil for marking the base and the decorative element itself.
In addition to the window sill, you will need polyurethane foam, self-tapping screws, and a metal strip with perforations. If the slopes are plastered, you need a mixture to finish them. Often, a weight is placed on the product to ensure tight installation.
Window sills are made from different materials:
- Tree. Such elements never go out of style. They give a feeling of comfort, are natural, and are suitable for most interior solutions. Wood has a beautiful texture, is an environmentally friendly material, and is easy to repair. It is better to use it when installing wooden window frames. Thanks to production processing, the material does not warp, does not rot, and is not susceptible to damage by insects, so it lasts for a long time. In addition, its appearance is easy to change.
- Plastic. This material is lightweight, easily attached to the base using glue or foam, and has an attractive appearance. This window sill is resistant to mechanical stress, moisture and direct sunlight, and is environmentally friendly. The product has a wide range of colors and configurations. However, you should not load it too much, so as not to break it.
- Acrylic. Such window sills are not cheap, but they are durable and can withstand even human weight. They are not susceptible to mechanical damage and can be easily cleaned of any contaminants.
You can make a window sill from natural or artificial stone. It will add elegance and luxury to the room. However, such elements are heavy. When choosing, special attention is paid to the environmental safety of the material.
Dismantling works
When removing a window sill with your own hands, you need to take into account that the methods of dismantling will depend on the type of window sill: wooden, concrete, plastic.
Wooden boards
A solid wood window sill can be fixed in several ways:
- on metal support brackets;
- with pinching under the window frame;
- with mechanical fastening through a window profile on self-tapping screws;
- on glue supported on wooden dies;
- on foamed polystyrene glue.
Fastening with glue.
The easiest way to remove the window sill is from the metal brackets. To do this, simply unscrew the screws on which the board is secured and pull it out of the previously cleaned grooves.
With other installation options, the window sill board is torn off from the supporting plane using a pry bar or hammer. This should be done carefully so as not to damage the frame or split the board along the wood grain.
First you need to lift the overhanging edge of the window sill by 2-3 cm and, slightly loosening it, pull it towards you.
If there is no fastening with self-tapping screws, the board will be removed immediately, otherwise you need to find and unscrew all the screw fasteners: they can be installed under the ebb on the outside of the window or under the rubber seal inside the room.
Monolithic concrete slab
Since dismantling a concrete window sill is accompanied by a large amount of dust and construction debris, before starting work it is necessary to cover the furniture and floors with plastic film or other material to protect against possible damage and contamination.
Useful tips
When installing a PVC window sill, it is worth considering some points:
- When working with an angle grinder or hammer drill, wear safety glasses, a respirator and gloves.
- The installed window sill should not protrude beyond the slopes by more than 5-6 cm (read about installing slopes and window sills here). Otherwise, the air circulation in the room will be disrupted, and this will lead to fogging of the windows and condensation accumulation.
- When working with polyurethane foam, the surface to be treated should be moistened with water, this will increase the adhesion of the materials.
- When installing a new PVC base, you need to know its exact dimensions so that you don’t have to knock out excess part of the wall.
- The gap that forms between the window sill and the surface is filled with construction foam.
In conclusion, it is worth noting that replacing a PVC window sill yourself is quite easy , even if you do not have specific skills in the construction industry. The main thing is to adhere to the advice and recommendations of specialists, correctly calculate the dimensions of the product, stock up on free time, and carry out all work carefully and slowly.
On the balcony
On the balcony, installation work is carried out in the following sequence:
- The base to which the window sill will be attached is being prepared. The insulation is trimmed if necessary, the old plaster is knocked off;
- The window sill is attached to the base. If the width is greater than necessary, a protective film is glued to the surface of the mounted element;
- Using a jigsaw, excess material is cut off;
- The panel is applied to the installation site to check that the installation work has been carried out correctly;
- Part of the protective film is removed from the element being installed, which will go under the frame;
- The element is installed in place. Its position is controlled in both planes;
- The base foams. If necessary, foam is poured into those areas that were poorly foamed;
- If the length of the board being mounted is not enough, cut off the missing part and connect it to the previously installed element using a connecting profile;
- To securely fix the window sill in the correct spatial position, use a protective film, which is glued directly to the element and the wall located below.
Watch the following video to better understand the intricacies of the process:
Result
Overall I'm pleased with the result. I think it was necessary to remove another half brick of the wall to make the refrigerator larger (there would have been a wall of one and a half bricks remaining - in five-story Khrushchev buildings there are generally only half a brick). But it was not clear how to install the window sill. In fact, you just needed to make corners for it, like for a shelf in the refrigerator, only more powerful. Well, the gap between the frame and one slope is a jamb. Later I read online that in addition to foam (I didn’t consider the starting profile as an option, I don’t like it), you can install hard pads around the perimeter of the frame that will press the slope to the frame. For example, from the remains of extruded polystyrene foam insulation.
Installation Process - Step by Step Guide
The correct sequence of work and compliance with technical nuances are a guarantee of the quality of the window sill. The process of attaching to a plastic window is not complicated and does not take much time.
Sequence of work - how to avoid mistakes
At what stage of the renovation is it most appropriate to install a plastic window sill? The correct answer is immediately after installing the windows, before finishing the internal slopes.
If you install it later, the slopes will have to be partially or completely redone. After all, for installation you will need to select grooves in the slopes. It is not recommended to remove the protective film from the plastic board until all repair work is completed.
Advice! When installing a window sill, the protective coating must not be completely removed. But only in those places where the panel fits into the grooves (near the frame and on the sides). If this is not done immediately, the film will be difficult to remove completely.
Preparatory stage - creating a strong support
How to properly install a window sill on plastic windows:
- If you are installing the window yourself, form a foam mounting seam under the frame. A seam larger than 8 cm should be foamed in several passes with an interval of 7 minutes. And after hardening (after 20 minutes), install a vapor barrier tape on top. If the window installation is carried out by craftsmen, this stage must be completed by them.
- How to install a window sill if the window is already standing? Select grooves on the sides of the window opening (from 10 to 60 mm depending on the size of the “ears”). If you need a grinder for this, it is better to cover the double-glazed windows with cardboard sheets during the work. Since flying sparks can damage windows (melt plastic).
- Screw 51 mm support screws into the support profile under the frame. They should be located at a distance of 17-19 mm from its lower edge. This technique will increase the maximum pressure that the structure can withstand.
- If the window sill distance exceeds 40 mm, it should be increased with plaster. After all, at this size the foam will not completely polymerize. Which will lead to a decrease in its supporting and thermal insulation characteristics.
- Next, you need to thoroughly clean the window sill using a construction vacuum cleaner or brush. And also - prime the rough surface. The point here is in the features of the polyurethane foam. For adhesion to the surface, the latter must be wet. The primer also further increases adhesion.
- Measure the surface and, if necessary, adjust the plastic board to size. The end should not be placed close to the wall. You need to leave 1 cm for thermal expansion.
- Lay out support points in increments of 50–60 cm. To do this, fold the plastic wedges into a “jack” and rewind with electrical tape or masking tape. For reliability, you can grab the support points with self-tapping screws, since during installation you need to be careful not to move them out of place.
Advice! If some of the liquid gets on the glass during priming, you need to wipe it off immediately. Since when it hardens, the composition forms a film that is difficult to remove.
We fix the window sill - the secrets of proper installation ↑
How to install a window sill to a plastic window:
- Check the window sill for voids in the foam. If gaps are found in the wall, foam them to prevent the windows from freezing.
- Install the window sill into the profile with force. Align it centrally so that it has a 2-3 mm slope from the level into the room for every 20 cm of depth. This is necessary for moisture to drain out.
- Foam the space under the window. Place a load on top (for example, 5-liter bottles) around the entire perimeter. The foam tends to expand, squeezing out the board. To prevent this from happening, a load is needed.
- Install end caps.
- Apply a layer of sealant to all cracks.
- After the foam has completely hardened (about 12 hours), remove the load.
Disadvantages of a refrigerator under the window
The most significant drawback of a winter refrigerator under a window is the low thermal insulation properties of the door material - a wooden frame with a sheet of chipboard or fiberboard. With the onset of cold weather, the niche becomes suitable for storing perishable foods, but at the same time the problem of constant drafts arises due to the refrigerator door not fitting tightly or freezing. The kitchen becomes cold and uncomfortable.
Another significant drawback is the through hole connecting the internal volume of the refrigerator with the external environment. Some refrigerators were equipped with a louvered grille, which made it possible to regulate the flow of outside air into the refrigerator, but most simply had a hole that was not covered by any damper. When the air temperature outside dropped to sub-zero temperatures, food in the refrigerator froze, cans of preserves burst, and the door closing the refrigerator became covered with a layer of frost.
These shortcomings forced the owners of Khrushchev’s “mansions” to fight the cold with any available means:
- the opening to the street was plugged with rags or walled up tightly;
- the inside walls of the niche were lined with cardboard or batting;
- the doors were insulated with old blankets;
- the cracks in the doors were covered with felt or rubber seals.
But these measures did not exclude freezing of the interior space of the refrigerator under the window in severe frosts and drafts on the floor in cases where a frontal wind was blowing.
This led to the fact that, having purchased an electric refrigerator, people stopped using the refrigerator under the window for its intended purpose and used it as a box for unnecessary rubbish, or simply covered it with brickwork or stuffed it with foam plastic.
DIY ideas for remaking, repairing and operating the “Khrushchev refrigerator”
Content
- Remove the Khrushchev refrigerator
- Improvement of the Khrushchev refrigerator
- Making a practical cabinet out of a Khrushchev refrigerator
- Glazing to replace the Khrushchev refrigerator
- Video: example of work on arranging a niche under a window in a Khrushchev building
Many will agree that today such sophistications are not needed at all, or, at a minimum, they insist on some modification so that they fit into today's interiors. Although they are called “Khrushchev’s”, they were also found in the so-called Stalinists.