The window sill is usually installed during the installation of the window and slopes, but sometimes a complete replacement of the slab is required after finishing work.
Let's consider when it may be necessary to dismantle and replace the window sill of a plastic window, what will be needed to carry out the work, as well as the algorithm for performing the process itself.
We will analyze safety precautions during dismantling, difficulties or errors, and average prices for replacing the canvas by specialists.
When to replace an old window sill
The old window sill broke.
Nothing lasts forever, we all know that, so from time to time any thing needs either repair or replacement. There are many reasons for this. What are the reasons for replacing the window sill? Here are a few of them:
- Damage has formed on the surface of the coating, reducing the overall attractiveness of the window sill. The aesthetic appearance is lost in the presence of small scratches, cracks, chips and various kinds of deformations when the window sills are made of wood.
- Violations of the integrity of the product appear - deep chips, large cracks, due to which the window sill can collapse at any moment. Often the window sill serves us as an additional shelf, where we usually put our flowerpots, seedlings or other things. Therefore, when such deep damage occurs, its replacement is mandatory.
- Crumbling of the wall adjacent to the window sill or complete destruction of the coating itself. This often leads to the fact that the window sill may fall at the most inopportune moment. Moreover, the quality of sealing in this case deteriorates significantly, which allows cold air from outside to freely penetrate into the room. This is especially unpleasant in winter.
- The last reason is to reorganize the entire space and change the overall design of your room, into which the old window sill may not fit. It may also be that you just need a larger window sill - for various purposes.
Too narrow
Whatever the reason, the window sill needs to be changed, even if you are simply tired of it. Is it possible, if desired, to carry out all the work on dismantling and installing the window sill yourself? You will find out the answer further by reading the window sill installation technology. But before installing it, you should decide what material the future window sill will be made of. Let's look at some of them.
Advantages of the covering-overlay
Plastic covers for window sills have a whole list of advantages that make their installation profitable:
- Versatility. Installation of the lining is possible on any window sill: old or new; wooden, plastic, stone, brick, concrete.
- Variety of assortment. You can easily choose a sample that matches the color of your home decor. It can be plain or imitate wood, stone, or other materials.
- Quick and easy installation. There is no need to remove the old window sill - just glue the trim to it. You can do this yourself.
- Interchangeability. An overlay that has lost its presentation or has become boring can easily be replaced with another one if desired.
- Aesthetics. The decorative trim is made from the same material as the window frame, so together they look cohesive.
- Price. The material is inexpensive, the next purchase cannot undermine the family budget.
Installing covers on the window sills returns its attractive gloss, radically changing for the better the overall appearance of the window as part of the interior.
What will he be like?
We live in times of technological progress. Nowadays, there are so many materials for construction, and they are all so diverse and versatile that our ancestors would envy us. And this applies not only to durability and quality. It also has a beautiful, aesthetic appearance, which is important.
If we talk about window sills, modern models on the market are presented in various versions. The range of products is so wide that you can choose a model that would fit perfectly into the interior design, fully perform its functions, have various design features, cope with various types of loads and have a very reasonable price.
Plastic window sill
Plastic products . They are one of the most sought after materials on the market as they are affordable for most. Despite the low price, a plastic window sill can be called practical and reliable, resistant to light and heat, and can serve you for a long time, since it does not rot. However, under strong mechanical stress it can break. Considering the fact that the material is of synthetic origin, such a window sill has good environmental friendliness, which is very important, especially for those families who have small children. And of course, one of the important advantages of plastic products is a wide range of colors and product configurations, as well as their low weight. This fact will allow you to choose exactly the window sill that will harmonize with the overall interior of your home. It should also be noted that such a window sill can be replaced using a simplified scheme.
Features of aluminum bends
Various materials are used to make window sills, one of the most popular of which is moisture-resistant and durable aluminum. Metal strips are painted in various colors to make them decorative. Aluminum window sills are galvanized in order to impart high protective characteristics and prevent corrosion processes. For painting, moisture-resistant powder paints are used, the characteristics of which guarantee the preservation of the original color until the end of the period of operation. Applying two layers of varnish followed by firing eliminates the possibility of cracks or chips during use, darkening or fading of the coating.
Sequence of work
Measures for replacing a window sill
To install a new window sill, you will have to carry out a full range of measures. As we know, planning leads to success. Therefore, it is important to prepare everything in advance, familiarize yourself with the work ahead and have an idea of what will need to be done. Let's look at the work that will need to be completed in several stages:
- preparation of tools for work;
- dismantling an unusable window sill;
- installation of a new window sill.
Main advantages
Using such an overlay has many advantages. Many people decide to refresh an old wooden window sill in this way rather than install a new one.
- Speed and ease of installation;
- No construction waste after work;
- Cost-effective;
- Possibility to change the decor to your liking.
Many people subsequently purchase additional overlays so that they can change the color depending on the interior design. There is an imitation of stone, wood or marble; the appearance of the overlays is very diverse.
Preparing tools
Preparing the tools
If you want to install a new window sill quickly, efficiently and without hiccups, prepare the following tools in advance:
- roulette;
- level;
- hammer;
- chisel;
- hacksaw;
- scrap;
- drill or hammer drill;
- polyurethane foam;
- jigsaw;
- silicone sealant;
- sandpaper;
- cement mortar;
- putty knife;
- respirator;
- mounting knife;
- boards with a small cross-section;
- paint for slopes.
If you don’t have something from this list, don’t rush to the store. When you are not sure that you will need these tools in the future, you can borrow them from good friends or acquaintances, or even better, from relatives. Having collected all the necessary equipment, you can begin dismantling the window sill.
One pentagon is good, but two are better
Beveled shapes will contrast with other countertops. But a set of such forms looks harmonious. Triangles, pentagons, trapezoids, if they are rationally placed, will free up a lot of space and decorate the interior. It's easy to turn an old kitchen table into a kind of fashionable set. To do this, you need to combine the facades near the floor with a single tabletop.
There is no need to throw away the old cabinet table with a wide tabletop that is convenient for rolling out dough. It is cheaper to increase the working surface in the area with the sink, and add a sash below the sink.
Removing the old window sill
Removing a window sill
In fact, removing an old window sill is not as difficult as it might seem at first glance. The main thing is to strictly follow the instructions. It is also important that when working you should be attentive, careful and careful so as not to damage anything unnecessary. You don't want cracks or chips near the window. Let's look at how you can remove various types of window sills.
To protect your hands from injury, use gloves.
If the window sill is wooden, a hacksaw and a crowbar will come to the rescue. First you need to check how the window sill is attached. When it is attached to the wall, hit the window sill from below with a hammer several times to loosen the fastening. Try to lift it with a crowbar. Then just try to get it out. Was your attempt unsuccessful? Use a chisel and hammer. Otherwise, use a hacksaw. Make cuts in different places and remove pieces using a crowbar. It happens that there is glass wool under a wooden window sill, which can damage your respiratory tract. To avoid injury, wear a respirator when starting work.
With a concrete window sill, things are more complicated, since more effort will have to be made. Such work cannot be done without dust and debris, so it is important to protect your respiratory organs and eyesight. To remove it you will need a hammer drill or grinder. If there are none, you can use a hammer and chisel, but this will significantly reduce the speed.
Removing the plastic window sill
Removing the plastic window sill is quite easy, since it is attached mainly thanks to the mounting foam. There are two methods to dismantle a plastic window sill. The first is simple, but with great destruction. The essence of the work is to carefully remove the slopes and beat off the plaster. Then it remains to cut off the polyurethane foam with a sharp knife. After this, the plastic window sill can be easily removed with a sharp upward movement and towards you. The second option is more gentle, thanks to which you can preserve the plaster and slopes. First of all, cut down the mounting foam that secures the window sill with a hacksaw. Similarly, you need to remove the liquid plastic remaining at the joints of the window sill slopes. When you cut this layer, carefully pull the product towards you. If all else fails, cut through the polyurethane foam again under the window sill and repeat all over again.
After the window sill is removed, the surface must be prepared for installing a new one. Remove all debris, dust, remaining solution and foam. The surface is now ready for the new coating to be installed.
Difficulties and errors
When dismantling and replacing a window sill, the following difficulties and errors may occur:
- If you do not lubricate the surface of the slab and the opening with water, then when it hardens, the foam will begin to expand unevenly, which is why the window sill can swell, deform, bend or break.
- During operation, you can damage the mounting seam under the window frame or the window itself. To avoid this, it is recommended to carefully familiarize yourself with all the nuances of the installation or leave the work to specialists.
- If you incorrectly determine the type of fastening, then during dismantling you can break not only the window sill, but also the opening with the window frame.
- During the dismantling process, a large amount of dust and dirt will be generated, which is why it is necessary to protect yourself with goggles and a respirator, as well as cover (clean) furniture or electrical appliances.
- The layer of plaster around the slab will act as an additional fastener, so it must be carefully removed before removing the slab.
Window sill installation
It is important to get a good fit.
You should not assume that to replace a window sill you just need to remove the old window sill and insert a new one in its place. There are some rules for preparing this niche and the product itself. These rules are mandatory, so compliance with them is very important.
Installation diagram for a plastic window sill
So, to install a new window sill, you need to follow this sequence:
- To ensure that the fit of the window sill into the window opening is as accurate as possible, you need to cut out the excess parts in the place where the window sill will be installed, taking into account its dimensions. Also check the groove itself where the blade will be installed. Measure all dimensions to prepare a new canvas. Not only the overall appearance, but also the strength of the structure, as well as the functionality of the window sill, depend on how well the measurements are taken. If the old window sill remains intact, it can be used as a template to make a new canvas, if the dimensions of the previous window sill suited you. You can cut the new blade with a jigsaw or saw. It is important that when cutting, defects and cracks do not form, so you should not push too hard into the window sill.
- When installing a window sill made of wood, all cut edges at the ends must be treated with an antiseptic to protect the material from mold and reduce moisture permeability.
- Prepare the opening itself on which the window sill will be installed. If the height of the purchased window sill is less than that of the old one, it is necessary to make a cement screed on the horizontal base. If the window sill is thicker, the niche needs to be deepened.
- If during the work gaps and cracks appear in the walls adjacent to the installation site, they must be repaired. To do this, use regular putty or cement mortar.
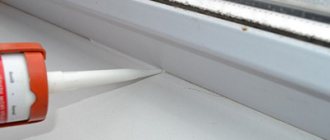
Applying sealant
In the place where the window sill will adjoin the frame, silicone sealant must be applied across the entire width of the window opening. This way, you can achieve tightness and eliminate the formation of voids that allow cold to penetrate inside your house or apartment.- You need to place prepared boards in the opening. They will serve as a support for the new window sill and take on the main load.
- Using a level, check the horizontalness of the entire structure. The defects need to be corrected, making everything perfectly smooth.
- Now install the window sill slab on the prepared boards.
Checking with a Level
Use a level again to ensure proper installation.- Place some weight on the windowsill. This could be books, a heavy box, water bottles, or whatever is on hand.
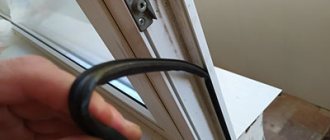
- Take polyurethane foam and use it to blow out all the side and rear grooves. If a plastic structure is installed, some manufacturers add special profiles to the kit, thanks to which the process of installing a new window sill will become even easier.
Foaming
The edge under the window sill that protrudes must be sealed with cement mortar or foam to fix it.- Now take a technical break of a day so that the foam or solution completely hardens.
- If the gaps were treated with cement mortar, the surface must be sanded with a float or fine sandpaper.
- Now all that remains is to protect the ends of the window sill with a plug and remove the protective coating from the canvas.
- To give the window a natural and aesthetic appearance, the slope must be plastered or painted.
Why choose a tree
Wood, as a material for the manufacture of interior products and furniture, has been valued for a long time. Modern processing technologies only enhance the performance qualities of wooden products and the visual effect.
In terms of strength, solid wood of some types of wood can only compete with stone. We are talking about oak, ash, teak and other highly durable trees. Of course, wood must be subject to high-quality carpentry; then products made from it acquire significant advantages over artificial materials:
- optimally retain heat;
- create comfort and a good microclimate;
- durable;
- respectable appearance;
- extraordinary interior.
It won't be long before you need to replace a wooden window sill that was professionally manufactured and installed correctly. The products have a long service life, subject to proper installation and further careful care of the beautiful piece of furniture.
Also keep in mind that a wooden surface can always be restored if scratches and abrasions appear over time. Chips, swelling, drying out, and deformation of products do not occur if installation and manufacturing are carried out by master carpenters.
Let's sum it up
You could see that it is possible to replace a window sill with your own hands. This procedure is simple and does not require professional skills; you can do everything in 2 days, taking into account a drying break. By replacing one window sill, you can easily do the same with other windows. Moreover, thanks to self-installation, you can save money on hiring workers.
Care
To increase the service life of the new canvas, during installation you need to:
- choose the right width and length of the future window sill;
- correctly measure and cut the canvas;
- use high-quality consumables;
- follow all installation rules;
- be careful and careful when performing work;
- After installation, regularly maintain the surface.
We hope that our tips will help you competently and quickly replace your old window sill. If you succeeded, write to us in the comments, it will inspire not only us, but also those who will read this article!
Average prices
The cost of installing and dismantling window sills depends on the region, as well as the workers themselves. Average prices are:
for installation they amount to 450-500 r/lm (linear meter);- work with dismantling and reinstallation of the old window sill - 1200-1300 r/l.m;
- if a colored slab up to 600 mm wide is used, then there may be a markup on work of up to 30%;
- dismantling without preserving slabs up to 40 cm deep - 100 r/l.m., more than 40 cm - 150 r/l.m.
How to do it yourself?
Wood is easy to process, so it’s possible to make it yourself. To do this, you need to select the material and familiarize yourself with the details of the process.
Materials and designs
The location of the window sill implies regular exposure to sunlight, moisture, and high temperatures from the battery during the heating season. Therefore, you need to choose more durable materials: glued, tongue-and-groove or milled wood. Designs can be of the following type:
- Solid - one wooden board is used, which is processed to obtain the required shape.
- Milled - consists of solid elements with grooves on one side and ridges on the other. There are several grooves on the underside of the board to prevent the material from deforming in the future.
- Tongue-and-groove - has tongue-and-groove joints. There are holes in the bottom for air circulation.
- Glued lamella - different-sized pieces of wood are glued together under high pressure.
The highest quality materials for manufacturing are oak, beech, and pine.
The most economical option is to use blocks made of sanded chipboard and MDF. These are pressed wood materials that are covered with a polymer film.
From a cut tree
For manufacturing, you need to choose well-dried boards that are free of knots or other defects. Manufacturing stages:
- The board must be planed on all sides, then sanded and polished so that the original material is even and smooth.
- Then it must be coated with an antiseptic to prevent the appearance of fungus, bacteria, and pests.
- Small grooves up to 10 mm wide are cut out at the bottom of the board, and you need to step back from the front part by 10-20 mm.
- The board must be given a shape and a suitable length.
If not a solid tree is used, but component parts, then they are glued together, connected with dowels or dowels.
Attention The length of the wooden window sill must be 10–15 cm greater than the width of the window opening, and the length of the part protruding into the room must be at least 6–7 cm.
Installing window sill boards level
The base and slopes are prepared, which means you can proceed to fitting. To do this you will need a building level. Before correctly installing a plastic window sill, pads should be placed on the base. For small windows, two supports will be enough, but for a balcony, at least three should be used. This operation is easy to perform yourself.
The plastic panel is installed on pads
The pads should lie strictly at the level of the window, which will allow you to properly align the plastic window sill before changing it. When everything is ready, you should try on the part in a new place. To do this, we insert a plastic board into the grooves of the slopes. Next, move it all the way. Nothing should interfere with this process.
Next, the installation of the window sill continues to set the optimal slope. This is necessary to remove condensation naturally. It should not accumulate at the base of plastic windows. To do this, you need to lower the edge of the slab, looking inside the room, a couple of degrees. The building level will show how much the slope has changed. To ensure that the opening remains level, you need to check the position at the edges and in the middle.
Reasons for popularity
The demand for windows in the market is associated with a number of advantages that make them attractive. These advantages include:
- soundproofing characteristics;
- thermal insulation properties;
- high moisture resistance;
- fire safety;
- health safety while observing environmental and technological manufacturing standards;
- ease of care;
- ease of installation, dismantling, replacement of damaged parts;
- compatibility with almost any interior;
- long service life (40-50 years) with proper operation;
- price affordable for the average consumer.
Elements
Flaws
There are no ideal things; metal-plastic also has negative characteristics.
Due to the tightness, condensation accumulates in the windows when there is a difference in temperature between indoors and outdoors, so they are opened and ventilated more often than wooden ones.
The weak side of plastic windows is the vulnerable structural element - the window sill. Due to its horizontal location and purpose, it is at greater risk of negative impacts.
Plastic does not withstand significant loads, especially impacts. Therefore, it is not recommended to place heavy objects on the windowsill.
Plastic should not be exposed to high temperatures (melts, changes shape). It’s hard to imagine the housewife putting a hot kettle or iron on the surface, but it gets damaged in the most unexpected way. A glass jar with an onion acts as a lens that focuses the rays. The surface heats up and becomes deformed.
Final points
The window sill is leveled, then a stop is made from it to the top of the window opening. The polyurethane foam will expand after hardening, and this stop will not allow it to move the level alignment.
Then a spacer weight is installed on the window sill, after which the canvas is foamed from below. Remember that polyurethane foam is extremely difficult to remove.
If it does get on the surface, you should not clean it off with a knife or other sharp objects - it is better to use chemicals.
After hardening (usually at least 24 hours), the excess polyurethane foam is cut off, and the joints are sealed using silicone sealant.
Replacing the window sill is an important element when renovating a house or replacing windows
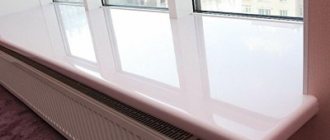
When installing the element, it is important to ensure that everything is done hermetically: this will ensure warmth in the room and eliminate fogging of windows and the formation of condensation. In addition, the window sill is an excellent stand for various objects, and if there is a heating radiator under it, the warm air from it will be distributed evenly
Recommendations from experts
When replacing a plastic product, use the following practical guidelines:
- Before installation, you need to thoroughly moisten the back side of the canvas and the base of the cement screed of the window opening with water using a sprayer. This will speed up the polymerization process of the polyurethane foam.
- You should not fill the voids with a large amount of foam. It is better to foam the space with stripes, leaving gaps between them. This way you can save mounting foam and avoid undermining the entire installation when the foam swells over time.
- It is better to treat the surface under the new canvas with an antiseptic - this will take a little time, but in the future it will protect the structure from moisture.
You can get specialist recommendations not only for replacing a plastic window sill. Our experts will also talk in great detail about how to install a structure made of concrete, wood or PVC, whether it can simply be updated, what a warm window sill block is and what should be taken into account when installing a window sill on a balcony.
Replacing a plastic window sill is easy. You need to put in a little effort by studying the theoretical foundations outlined in the article. The whole work will take you no more than two days, and with practical experience, you can replace the remaining windows in the apartment.