A window sill is a part of a window opening that performs a practical and decorative function. Before attaching the window sill to the plane of the plastic window, it is necessary to perform a number of preparatory measures. This work is performed by specialists when installing a window, but if you have the appropriate knowledge and skills, the task can be completed independently. To do this, you need to consider several important aspects and features.
The role of the window sill in the window
The original structure of the window sill.
Previously, the window sill board performed the following functions:
- prevented cold air from entering the room through the gap between the window and the opening;
- eliminated the difference between the bottom of the opening and the spacer-mounted frame;
- covered part of the wall;
- collected moisture when the double-glazed windows fogged up.
Over time, the design became:
- decorate the interior of the room;
- serve as a stand for flowers or other interior elements;
- used as a desk in a bedroom or children's room.
- used as a support when hanging curtains or cleaning windows.
In accordance with the functions that the window sill board will perform, the material for its manufacture is chosen.
Preparing the base
This step may take most of the time, but it is actually the most important in the entire process.
Let's see how the window is installed. It is important to assess whether there are any deviations from the horizontal plane. To do this, apply a level or run a projection from a laser level along the lower edge of the frame. In the future, the window sill will be aligned precisely along it, which can also lead to misalignment. If there are small deviations, then this is not a big deal; further on it will be described how they can be compensated.
Material selection
Window sills are made from:
- artificial or natural stone;
- composite materials;
- wood;
- polymer materials.
Acrylic-based plastic
Structures made from this material have the following advantages:
- Insensitive to dirt. Acrylic plastic is characterized by a monolithic structure without cracks or pores. Contaminants cannot penetrate into the thickness of the material.
- Resistance to aggressive substances. Use any means for washing.
- Safety. Window sills are often installed above heating appliances. Even when heated, acrylic plastic does not release toxic substances.
- Resistant to sunlight.
The structures come in all sizes and shapes. There are no joints or connections on such products.
The window sill is made of acrylic-based plastic and is resistant to sunlight.
PVC
A plastic window sill is a hollow slab consisting of thin sheets united by stiffening ribs.
The more jumpers, the stronger the product.
Installation of this design helps:
- save money (the cost of PVC is lower than that of wood or stone);
- equalize the service life of the window unit with that of the window sill;
- get a window element that harmonizes with any interior;
- prevent cold air from entering the room;
- perform the installation yourself.
The disadvantages of PVC products are:
- sensitivity to high temperatures;
- low strength.
When used correctly, such shortcomings do not appear.
A PVC window sill is one of the budget options.
Stone board
The advantages of this material include:
- presentable appearance that lasts throughout the entire service life;
- a variety of colors and patterns that help you choose an element that matches any interior;
- high strength (in this indicator, marble and granite are second only to diamond);
- insensitivity to temperature changes, ultraviolet radiation, humidity;
- unlimited service life;
- insensitive to dirt.
Natural stone has disadvantages, which include:
- sensitivity to sharp objects (granite is considered more resistant to damage);
- accumulation of radioactive radiation (it is better not to install stone slabs in radiation hazardous areas);
- high thermal conductivity;
- complexity of transportation and installation;
- large mass;
- high price.
High-strength window sill made of stone boards.
MDF or chipboard
The materials are used as a replacement for natural wood. However, in terms of performance, products made from MDF and chipboard are inferior to all others.
The main disadvantage is destruction under the influence of moisture. The waterproof film does little to protect the chipboard.
It gets damaged quickly. Laminated MDF is considered a more reliable material.
A product made from MDF is not durable.
Tree
Natural material is now less often used for the manufacture of elements of window structures.
However, wood has the following advantages:
- safety for humans;
- long service life with proper use;
- good thermal insulation properties;
- originality of texture, the ability to use any decoration methods;
- increased strength.
The disadvantages are:
- sensitivity to moisture (when in contact with water, wood is deformed, so the window sill requires varnishing or painting);
- the need for constant care;
- deformation under the influence of high temperatures (due to this property, it is recommended to install the panels at a sufficient distance from heating radiators).
Oak window sill.
Installation methods
Installing a window sill using wooden pads requires a lot of time, but this method is the most reliable
There are several methods for installing PVC products. Let's look at each of them.
- The first method, the oldest, involves fixing the element using a special composition. Nowadays, this method is used extremely rarely, as more convenient and reliable ones have appeared.
- The fastest installation of a window sill is carried out using self-tapping screws. First, holes are drilled in the window frame into which hardware is screwed. The connection point is treated with acrylic sealant, after which the edge of the window sill is placed under the glass unit and fixed with self-tapping screws. To give maximum rigidity to the slab, special pads are placed under it and the resulting space is filled with polyurethane foam.
- The next method involves installing PVC window sills using spring brackets. These fasteners are screwed to the substitution profile of the product with self-tapping screws. After this, the plate is mounted in the groove formed between the window frame and the bracket, and the product is installed.
- In the last option for installing plastic window sills, no fastening elements (screws and staples) are used. This is the most time-consuming method, but also the most reliable. Its meaning is that the wedges are driven under the slab until its edge is pressed against the frame as tightly as possible.
Each method has its pros and cons. For example, it is not advisable to install a window sill using self-tapping screws near the opening sash. The installation options for PVC window sills differ only in the method of fixing the product under the frame. The remaining stages of work here are absolutely identical.
Required Tools
To work you will need:
- roulette;
- hammer drill for forming a groove in the wall;
- jigsaw, metal hacksaw or angle grinder;
- rubber hammer;
- putty knife;
- foam gun;
- marker or special pencil;
- screwdriver or screwdriver;
- construction knife with replaceable blade;
- rags;
- level.
A level is one of the necessary tools.
Dimensions
To make high-quality repairs, you need to select the right materials for it. When replacing windows and window sills, it is worth choosing the correct dimensions of the latter. The standard width for it will be the following dimensions:
- 50-60 cm, if installation will be carried out in a brick house;
- 20-25 cm for panel houses.
The widest window sill that can be found on the market is 80 cm, and the narrowest is 20 cm. If we talk about length indicators, it can be from 1.5 meters to 6.
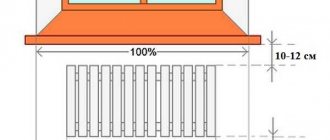
If we talk about atypical windows, for example, small structures in a bathroom or other room, then in this case there is no need to use a large window sill; the best solution would be a width of 10 cm. Almost all standard products have a thickness of 2 cm, which is enough for moderate loads and full use of the window element. There are also thinner products, where the thickness is 1.8 cm, which implies lighter loads on the surface.
If the window sill is planned to be used as a table, then its width must be sufficient for this, so products are produced in widths from 60 cm to one meter. This option can be used in almost any room where you need to minimize the amount of furniture and increase functionality.
Preparatory activities
At the first stage, perform the following actions:
- measure the width of the window opening, determine the parameters of the window sill board;
- choose the material for making the window sill;
- form recesses in the wall;
- clean the opening from construction debris and dust;
- cut out the plastic plate according to the markings.
We take the necessary measurements.
Dismantling the old structure
If it is necessary to replace the window sill, the existing board must be removed. At the first stage, the slopes are dismantled.
Further actions are carried out taking into account the installation method of the old window sill block:
- When dismantling a PVC board, the side plugs are first removed. After this, the decorative strip is opened and the joint filled with sealant is opened. Remove foam from the support rails, clean the places where the edges are fixed. After this, you can remove the window sill block.
- When a structure is secured with foam, it cannot be dismantled in a simple way. The board is cut with a jigsaw or angle grinder. After this, the pieces are removed from the fixation sites.
- If a special profile was used during installation, remove the street ebb and unscrew the screws from the mounting bracket.
Removing the old window sill.
Understanding anchor points
If enough attention is not paid to this issue now, then the structure will not be as rigid and durable as we would like. Therefore, we will consider how to insert a window sill into a plastic window a little later. There should be several reference points. When economical installation is carried out to order, workers sin and reduce their number. Upon completion of the work, this nuance will not be noticeable, but with further use it will certainly appear. The reference points should be located in three rows parallel to the profile:
- the first row is located near the window;
- the second row with support points is located along the edge of the inner wall;
- the middle part is occupied by the third row; it is necessary when working with wide window sills (more than 40 cm).
That's not all. Each row must contain a certain number of anchor points. This indicator is determined by the number of sashes in the window and its width. If there is one leaf, it will be enough to create two support points. Two sashes will require three supports. Three sashes require four, or preferably five, points.
The support is often made of wood. Old wooden windows, a window frame or a window sill are great for these purposes. The main thing is that the tree is dry and healthy. Initially, the first support row (which is near the window) is set. The height of the support should ensure a tight connection between the window sill and the frame.
Wooden pads are easily replaced with brackets, which allow you to securely press the window sill to the window frame. This option is a little more expensive, but installation will take less time. The required number of staples corresponds to the number of supports. The staples are not as good as we would like them to be. They are not characterized by strength; even under the weight of a person, the bracket can easily deform. To avoid this situation, after filling the voids with foam, it is necessary to wait for it to dry completely. This may take several hours.
After completing work with the first support row, you can work on the second, which occupies the extreme position. In this situation, you can also use a cut from an old window sill. At each support point you need to check the level.
Step-by-step instructions for doing the work yourself
During installation, you must follow the sequence of actions.
Cut the required size and make markings
Plastic panels are cut at home. All other types of slabs are supplied ready-made. Errors in calculations cannot be corrected. If the deviation is greater, install brackets and widen the grooves.
Measurements are performed as follows:
- Determine the distance from the edge of the wall to the frame. 8 cm is added to the resulting value for the panel to exit into the room and be placed under the window frame. It is undesirable to make a protrusion that is too large; this prevents the circulation of warm air. The window sill should cover the radiator by half.
- Measure the distance between the walls near the window and the base of the opening. Add 2 cm to the values on each side. This allows the board to fit into the grooves. 3-5 cm are allocated under the eyes.
Taking into account the data obtained, the plastic panel is marked and excess material is cut off.
We make markings.
Surface preparation
Polyurethane foam is applied directly to the masonry. Therefore, the opening is cleared of debris and excess material used when installing the window. Under the bottom of the frame, the foam is cut to a depth of 2-3 cm so that the board fits under the structure.
If the distance between the window sill panel and the wall is too small, a channel 7 cm wide and 2-3 cm deep is made in the masonry or concrete. This is necessary to form a foam layer on which the panel will be installed.
We clear the surface of debris.
Support pads, linings and straightening plates: adding rigidity to the structure
To give the block stability, wooden beams or wedges are used.
When making them, take into account that:
- the beam width is at least 5 cm;
- the length of the wedge should be 5-10 cm less than the width of the window sill (the lining should not extend beyond the wall);
- the bars must be installed in increments of 40-50 cm (this rule does not apply to houses with narrow walls; at least 3 elements are placed in each opening);
- Before installing the wedges, the surface is covered with plaster;
- The supports are leveled using a level.
Wedges and spacers for installing the window sill.
Level installation
After preparing the opening, they begin fitting. To do this, the window sill panel is inserted into the grooves of the wall until it stops. There should be no interference at this stage.
After installation, make the necessary slope to facilitate the natural drainage of condensate. To do this, the edge of the slab is slightly shifted towards the floor.
The slope is measured using a building level. Correct installation is checked in the middle and extreme parts of the panel. If deviations are detected, chips are placed under the board. After installation in the desired position, the edges of the window sill are fixed.
Level check.
Foaming boards
At the next stage, the structure must be fixed with mounting foam, uniformly filling the gap. Before spraying, the container is slightly heated. This makes the foam more effective and penetrates into voids better.
A common heating method is to immerse the balloon in warm water.
You can use a heating system if installation is carried out in the cold season. Shake the container thoroughly and begin to fill the space under the panel with foam. There should be no empty seats.
Foaming the space under the window sill.
Loading the structure
Polyurethane foam quickly increases in volume. Due to the expansion of the material, the window sill may move. Strengthening the structure with a load helps to avoid this. To do this, use bricks or jars of water, which are placed on the surface.
Load on the structure.
Installation of plugs
The foam requires at least 48 hours to dry. After this time, cut off the excess material with a construction knife. The ends of the panel are closed with plugs, fixing them with PVA glue.
Dent repair
If during operation a noticeable dent appears on the window sills, you can easily correct the situation.
Use:
- solvent
- hand electric drill
- jigsaw
- hammer
- glue
- sandpaper (sandpaper)
- wooden cork
- paint
- technology
Process:
1. Using a solvent, clean the damaged area of paint. 2. Drill a hole with smooth edges at the location of the dent. 3. Using a jigsaw, make a cork of the same format by cutting it out of a piece of wood that has a suitable structure. 4. Coat the cork with glue and hammer it into the prepared hole. 5. Level the surface with sandpaper. 6. Paint the window sill.
Nuances of installation work on the balcony
The installation of a window sill on a loggia is most often carried out at the glazing stage. However, if this does not happen, you will have to install the stove yourself.
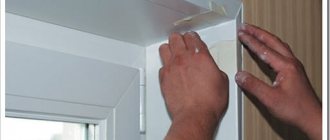
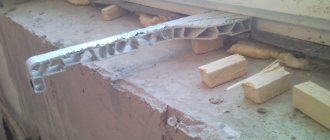
Before starting work, purchase corner brackets, which are secured to the parapet with anchors. Metal elements help strengthen the structure and make it more resistant to stress.
The fasteners are installed at a distance of 1 m. Before fastening them, a rope is pulled to help level the structure.
After securing the brackets, proceed to installing the panel. It is secured with self-tapping screws screwed into the bottom of the element. The window sill is treated with a sealant that eliminates gaps. There is no need to reinforce the balcony structure with foam. The plastic panel immediately takes the desired position.
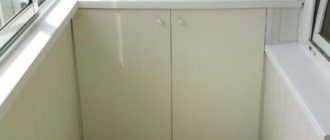
Window sill on the balcony.
Tips from the professionals
Now we will reveal valuable secrets that every master keeps and tries not to disclose. So you're in luck. Still, it’s not enough to know how to install a window sill in a Euro window; you still need to observe the subtleties of this process and remember the tricks.
- If the edge of the slab protrudes from the side of the room by more than 10 cm, it is necessary to strengthen the structure. Metal corners are suitable for this purpose. Still, in the future it is better not to put a load on the edge of the window sill.
- When performing work on the balcony, the temperature should remain at 16-20 degrees for the first day. Such conditions are necessary for good adhesion of surfaces.
- There should be more construction foam in the area of the ends and in the middle part of the slab.
- In order to strengthen the structure, it is permissible to apply silicone sealants and glue.
We told you how to install plastic window sills. We hope you don’t have any questions that could prevent you from doing the job well and achieving the desired result. We can only wish you patience and courage.
Features of replacement in a wooden house
The installation instructions in this case are similar to those for working in an apartment.
Installation is done as follows:
- The existing wooden window sill is removed and the opening is prepared. The side slopes are trimmed so that the panel takes the desired position.
- Grooves are formed for fastening the plate. To do this, use a hammer and chisel. Sometimes grooves are already present in the walls.
- Install support attachments. They are fixed so that they do not move during installation of the window sill.
- Align the plastic panel. Fix the element and fill the gap between it and the wall with foam. Load the structure, leaving it for 2-3 days. Install plugs.
Fastening a window sill in a wooden house.
Window board installation technology
When installing any window sill, certain rules must be followed, which do not depend on the material from which the product is made:
- The window sill plate must cut into the wall, so grooves should be made in the slopes.
- The place where the window sill will be installed should be cleaned of dirt and dust.
- Calculate the area of the window sill.
- If the window sill slab has plugs, they should be secured before placing the slab under the window.
- The window sill plate should be located at a slight slope towards the room (4-5 mm) so that condensation or water does not leak under the frame, but flows onto the floor.