Building codes do not regulate clear parameters according to GOST, which dimensions correspond to the standard. When installing it, it is better to focus on the requirements of SNiP, which stipulate: dimensions for different rooms, distance from surfaces and heating devices.
When using artificial stone, you don’t have to follow the regulations and install it at your own discretion. When installing plastic or wooden material during manufacturing, it is better to adhere to the recommended instructions.
To install correctly, you need to consider:
- battery dimensions - standard length 0.5 m, width 0.4-0.9 meters, depth 0.15 m;
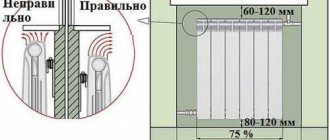
- the distance to the heating radiator is at least 80 mm to ensure normal thermal air circulation;
- The recommended gap from the coating is 100 mm, which makes it possible to safely operate it at maximum power.
Builders of multi-apartment buildings adhere to the parameters of 0.75 m, but the standard height of the window sill from the floor is 0.68-0.8 m.
When the radiator is located under the structure, this ensures an optimal microclimate, normal humidity and durability of the board.
Correct installation of window sills
Installing window sills during a major renovation of an apartment is an inevitable operation. Even if your new apartment has window sills from the developer, then with a high degree of probability these window sills will still have to be replaced: careless installation, the window sill itself is of poor quality, damage during the renting out of the apartment.
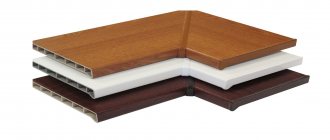
In most cases, the customer gives preference to inexpensive PVC (plastic) window sills in white matte color, which are unpretentious in operation. This option is acceptable for budget renovations if your windows do not face the sunny side or you plan to have blind curtains. Otherwise, under the influence of sunlight, a budget window sill will quickly lose its presentation: temperature deformations, fading of plastic (yellowing, etc.). Such installation of a window sill is not always financially justified.
When making high-quality apartment renovations for yourself in the long term, it is better to give your preference to higher-quality window sills (Moeller, Danke, Werzalit). This is no longer just plastic colored in the mass, but window sills made on the basis of wood-polymer mass from environmentally friendly materials with various acrylic coatings, imitating the textures of wood or marble of various colors, allowing to please the refined tastes of any client for the implementation of his design project. In addition to decorative qualities, such a window sill has great torsional rigidity, durability and wear resistance, and high-quality geometry. When installing a window sill, you must be guided by certain technologies.
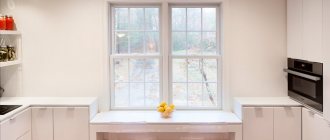
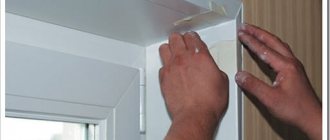
When purchasing a window sill, you need to take the dimensions in advance and understand how it will be positioned. Since the store will cut you the required length for ease of transportation, and the width of the window sills are produced in multiples of 5 cm (20,25,30 cm, etc.). When installing the window sills correctly, it is necessary to agree with the customer on the overhang of the window sill relative to the wall. The “flush” option (flush with the wall) is shown in Fig. 1; this option for installing a window sill is preferred by those who plan to hang curtains and tulle to the floor so that the protruding window sill does not interfere. Those who plan to use the window sill functionally (storing decorative items, flower pots or making a window sill-tabletop) prefer a large window sill overhang (Fig. 2).
It is necessary to take into account that the large protrusion of the window sill in further operation will interfere with the convection of hot air from the heating radiator upward in order to create a barrier to cold air that penetrates into the apartment through the double-glazed windows. To improve convection in the protruding part of the window sill, it is necessary to make ventilation holes or install a ventilation grill (Fig. 3), which will not interfere with the rise of hot air.
To install the window sill correctly, it is necessary to make a groove in the slope (if it is already made) into which the ends of the window sill will be placed to create additional rigidity of the structure in the coupling. On the side edges of the part that will fit into the groove of the slope, cut off the window sill (Fig. 4). At the end of installation, special end caps will be installed on the remaining part of the end (sold separately from the window sill).
The window sill can be installed on mounting or plaster mortar. For better adhesion with the adhesive, small length (25mm) self-tapping screws (25mm) should be screwed into the smooth back side of the window sill (not the front) in a checkerboard pattern (Figure 5.6), which after the solution (or foam) has hardened, will ensure reliable fastening
When installing, blowing out the polyurethane foam on the window sill should be done with good foam, giving preference to proven brands. In this case, you can be sure that the foam will not inflate and make your newly installed window sill “humpbacked.” Using a professional foam gun will allow you to use 2-3 cylinders to install window sills in the entire apartment.
MDF and Versalit - what is the fundamental difference?
MDF is almost no different from chipboard; it is still the same shavings and sawdust, but bonded with lignin or paraffin, which is less harmful than formaldehyde resins. True, there is still a difference - the strength increases by 2 times. The abbreviation is not deciphered in Russian, but is obtained by transliteration from English MDF, where it means medium-density fiberboard. Production occurs in a similar way. MDF and chipboard can have a variety of colors and patterns, they are often laminated with various materials, they are not afraid of cleaning even with the use of household chemicals, the only thing that cannot be rubbed with them is abrasive cleaning agents.
The window sill, of course, is characterized by all the listed properties of chipboard and MDF, but the coating, which comes in several types, also adds specificity. For example, when veneer is applied on top, the product is almost indistinguishable from natural wood. But if damaged, such cladding cannot be repaired, and the window sill begins to absorb moisture and dirt, loses its attractiveness and becomes unsuitable for further use. You will find the same problem in the case of a cork covering, or if you purchase a laminated chipboard window sill.
Verzalite products are produced using a similar technology. They contain more binding agent. According to the technology, 8% formaldehyde resins are added to chipboard, in the case of verzalit - 24%, and the paste is based on less harmful synthetic substances. On such window sills there are a couple more layers of film that are fused into the surface. Therefore, verzalite is more wear-resistant, has greater hardness and density compared to chipboard, but it chips easily if you hit the edge, and this place cannot be repaired. This is perhaps its disadvantage, which can be forgiven in favor of other indicators. For example, such a product can be used at high humidity and temperature.
APPLICATION AREA
1 AREA OF USE
Installation of the window sill
and ebb
is the final stage of installation of plastic windows.
Fig.1a. Plastic window design
A variety of standard sizes allows you to select and install a window sill for any window opening. The window sill is easy to install and dismantle, practical and easy to use.
Methods of fastening plastic window sills
Into cement masonry
Installing PVC window sills does not require any special skills or special tools. Cutting a plastic window sill can be done with a wood saw. It is necessary to be careful and cut without much pressure to avoid scratches on the surface and chips at the place where the PVC window sill was cut.
After sawing, the ends of the plastic window sill are closed with decorative plugs, which can be purchased when placing an order. Plugs for PVC window sills are selected in length depending on the installation location and method of fastening. The lower surface of the plastic window sill has special grooves of the “dovetail” type (as it is called in Russia, there is also the name “gabelin sheet trident”) to facilitate installation and improve the fastening of the PVC window sill in the window opening.
Plastic window sills can be laid on cement mortar, glued with “liquid nails” type glue to the horizontal surface of the window opening, and also mechanically attached to nails or screws using a metal profile, which allows them to be installed in premises of any purpose and with any type of external walls.
It is recommended to leave at least 10 cm between the PVC window sill and the top edge of the radiator.
End caps for plastic window sills are made in universal length with two side edges or along the width of the PVC window sill. If you change the installation location, you can easily reduce the length of the plug yourself by cutting off the protruding end with ordinary scissors.
Window sill level: set the window sill horizontally and tilt it slightly towards the floor
Ideally, the window sill should have a clear horizontal level. But, the horizon of the window sill will be similar to the horizon of the window
. Because the window sill is docked with the lower profile of the window, which already has a certain level set during installation. Here we check the horizontal level for information only.
Now regarding the slope of the window sill
. When installing, the window sill should be inclined to the floor by approximately 3 degrees. This is done, firstly, so that spilled water on the windowsill does not stagnate, but runs down to the floor. Or at least it didn’t flow down to the junction of the window and the sill.
ORGANIZATION AND TECHNOLOGY OF WORK EXECUTION
Modern window sills are usually made of rigid PVC. They are durable and wear-resistant, match the design of plastic windows and fit perfectly into any interior. And they make them in different shapes and colors.
The window sill is placed under the frame to a depth of about 1 cm. If the gap between the window sill and the bottom of the opening is too large, it is partially filled with cement mortar, leaving a gap of 5-10 mm. The edges of the window sill must extend into the wall by approximately 1.5-3.0 cm.
Fig.1. To fit the window sill to the location, take the necessary measurements
Fig.2. Self-tapping screws are screwed into the lower part of the stand profile to support the back side of the window sill
Fig.3. Place the window sill in place and level it using different thicknesses of pads
Product protrusion functions
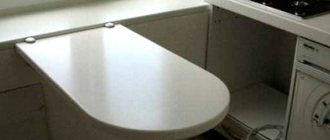
The protrusion of the window sill may vary. There are practically invisible structures that do not stand out beyond the window opening; there are also wide, powerful window sills on which you can sit. The structure is needed to retain heat in the house; it can serve as additional support, for example, for installing flower pots.
You should choose a window sill carefully; it must match the design of the window, otherwise it may fail. Replacing a part without removing the glass unit is extremely problematic.
REQUIREMENTS FOR WORK QUALITY
The composition of controlled indicators, scope and methods of control must comply with the requirements of SNiP 3.01.01-85* “Organization of construction production”, GOST 23166-99 “Window blocks. General technical conditions”, GOST 30971-2002 “Seams of assembly units connecting window blocks to wall openings. General technical conditions" and technical recommendations TR 152-05 "Technical recommendations for ensuring the quality of installation of window and balcony blocks."
Quality control of construction and installation works should be carried out by specialists or special services that are part of construction organizations or hired from outside and equipped with technical means that ensure the necessary reliability and completeness of control.
The window sill is placed under the frame to a depth of about 1 cm. If the gap between the window sill and the bottom of the opening is too large, it is partially filled with cement mortar, leaving a gap of 5-10 mm. The edges of the window sill must extend into the wall by approximately 1.5-3.0 cm.
Some simple solutions to close the battery
Minor imperfections can ruin even the best quality repairs. There are things that are very difficult to integrate into the chosen design. These primarily include heating radiators: even modern ones, less primitive than Soviet cast-iron ones, look quite poor and disrupt the entire elegant composition. Nothing better has been thought of except how to close the battery itself. And one of the most successful options, which can perfectly fit an unattractive element into the design, will be a plasterboard structure installed around the radiator.
Frame for housing
Anyone who is planning to make a battery box with their own hands should first of all pay attention to the window sill above it. It can cover the entire structure from above, or even protrude slightly beyond its edges. This is required not only by the aesthetic side of the matter, but also by the practical one: the box sticking out from under the window sill will constantly be touched by household items, and therefore the service life of the structure will be reduced. To implement the idea we will need:
- plasterboard 12 mm thick;
- profiles of two dimensions: 60x27 and 27x28;
- serpyanka;
- perforated corners;
- fasteners: screws for metal and drywall, dowels 6x40;
- putty.
Selecting a design sketch
Before developing a sketch, think about how exactly you are going to cover the battery with plasterboard: build a “cabinet” just for it or cover the entire wall along the window sill, making a kind of shelf. The second method is somewhat more wasteful in terms of materials, but it helps solve the problem of a window sill that is too narrow: it is simply built into the upper surface. At the same time, the question of how to close the heating pipes in the room is removed - they are hidden behind the casing. True, this is only permissible for metal-plastic pipes with compression fittings: the rest have too high a risk of breakthrough.
Algorithm of actions when installing the box
- Measurements are being taken. When calculating a box for a plasterboard battery, you need to make an allowance on the front and sides of about 2 cm so that its walls do not come into contact with the radiator.
- Load-bearing frame elements made of 27x28 profile are installed. Before fastening the level, their verticality/horizontalness is checked, after which it is fixed with dowels to all adjacent ones (window sill, floor, wall). A shock-absorbing tape is laid between the profile and the surfaces.
- After installing the frame skeleton, jumpers from the 60x27 profile are mounted.
When finished, the sheathing should be strong and not susceptible to loosening. If this is observed, you need to add transverse stop bars.
Covering the battery with plasterboard
There are practically no differences from facing works in other areas.
- GCR is cut to exact dimensions. To do this, use a stationery knife.
- The elements are screwed onto the profiles with self-tapping screws with a frequency of 3-4 pieces per linear meter. The caps need to be recessed by 1 millimeter so that they become flush with the sheet, but do not tear the cardboard covering.
There is only one difference between the lining of a box and, say, a niche: in order to cover the battery with plasterboard, but not lose the overwhelming amount of heat it generates, ventilation holes must be drilled in the sheets. They can be done with a drill with a crown attachment. The recommended hole diameter is 5 cm, but such “holes” may not look very attractive. Alternatively, you can choose one of two directions:
- Drill a large number of smaller holes. A diameter of less than a centimeter is unprofitable: heat will pass through with difficulty, and the holes themselves will quickly become clogged with dust and will need to be cleaned.
- Make some kind of windows in the box and insert plastic ventilation grilles into them, such as are used in the bathroom and kitchen.
Alternative ideas for solving the problem
There are other ways to close radiators in a room. Among them we can mention:
- Radiator grilles – metal and plastic. They somewhat hide the radiators and make them less noticeable against the general background. Among the advantages: less heat is taken away; are removable, allowing access to the radiators at any time. Among the disadvantages: a rather standard, trivial design and a small selection of colors.
- Lattice wall made of wooden slats. It is good because it harmonizes with almost any interior and does not interfere with repair work. However, it takes up quite a lot of space and performs a purely decorative function.
- Built-in plasterboard niche for battery. The radiator recessed into it can be covered with any screen, and the supply pipes can be hidden under the casing. Heat loss with this solution is minimal, the radiator is not noticeable and remains easily accessible in the event of an accident. This idea is especially successful as a way to close the radiator in the kitchen, where it is undesirable to take up extra space, the window sill is too narrow for the box equipment, and there is no desire or opportunity to change it.
Installation of a plastic window sill
Hello, friends!
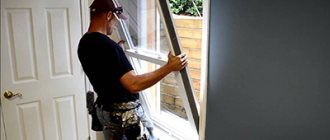
If you decide to install a plastic window sill yourself, then I can safely assure you that there is nothing complicated about it. Using the example of this article, I will try to clearly describe the process of installing a PVC window sill.
First of all, we need to prepare the foundation. If the window slopes have already been made, you need to make grooves in them, so-called pockets, for the entry of the window sill.
In this case, the base is too low from the bottom profile of the window. Therefore, you will have to pour a cement-sand screed (“pillow”) to raise the level of the base. We mark the wall. On the wall we mark the lower level of the future window sill and attach the guide board below this level by 2mm. Clean the surface from dust. If the brick on the base is hollow, we lay a painting mesh to prevent the mortar from getting inside the brick. Prepare a cement-sand mortar, wet the surface and pour the screed. To fill the screed evenly and not install an additional beacon, you can use a simple device made from timber. By the way, this is my know-how :).
After filling the screed with a grinder or jigsaw, we cut out the window sill to fit the seat. The window sill should protrude beyond the wall surface by approximately 40mm, but not more than 70mm. This is necessary so that the flow of warm air from the heating radiator rises freely. It can also be installed flush with the wall; this is sometimes necessary due to the specifics of the project.
After the window sill is cut, you need to install the end caps. The plugs are sawn off with a margin so that when installing the window sill they extend slightly into the wall.
The gap between the base and the window sill is 2mm. With such a small gap, we can install the window sill both on polyurethane foam and on liquid nails. After the screed has dried, the window sill is inserted into the window support profile with a special groove and should fit snugly against the bottom edge of the window. To achieve a tighter press, you can use thin pieces of our window sill or wooden wedges, which need to be placed under the window sill closer to the junction with the window. Also, closer to the junction with the window, polyurethane foam is applied. It thereby bridges the gap between the base and the window sill resulting from the linings and prevents the occurrence of drafts. Apply polyurethane foam or liquid nails in strips to the base and insert the window sill.
Sometimes it is very difficult to insert the window sill into the profile groove. The lower blade of the profile does not allow inserting a window sill. This usually happens when the window sill is cut to width. As a result, part of the window sill with a special chamfer (rounding) is sawed off. In this case, you need to cut the linings under the window sill longer so that they fit half into the profile groove and half look out of it. Then, when installing the window sill, the linings will press the lower petal, and you can easily insert the window sill into the profile.
Now you need to check the horizontalness of the installed window sill. We place a bubble level on the surface, and if there are deviations, we adjust the horizon with pads. With a well-made screed, this will not be necessary.
We fix the window sill with wedges and foam in the grooves under the slopes. We place a load or place spacers between the upper slope and the window sill. We wait about a day, cut off the foam and plaster the grooves on the slopes. This completes the installation of the plastic window sill.
There is a lot of debate about whether to slope the window sill towards the room. In principle, it is not necessary, but it is better to be on the safe side. It often happens that moisture condenses on the windows, and in large quantities. All this water from the windows flows onto the windowsill. This moisture is not harmful to windows and window sills, but it can damage painted slopes quite significantly. So the choice is yours :).
home_and_garden
Stylish and comfortable home
Are your window sills long-eared?
Recently, Dmitry Sivak had a blog post about window sill ears.
In short:
Cleats date back to the days when every window had an internal casing around it, so it's normal for traditional styles. But if you are a design rebel or an art revolutionary, then feel free to make the window sill not only without side projections, but generally flush with the window opening.
There is one point that confuses me about all this. With roller blinds and Roman blinds, everything is clear if they are located on the window itself or along the width of the window opening:
But if they are dark, then light will shine through the cracks from under them.
What to do if the curtains are hanging on the wall?
If you make the window sill narrower, they will hang around the edges:
The topic of huge ears is also not covered:
What do you think? Have you ever thought about window sill ears? How are you?
Information about this community
- Placement price 50 tokens
- Social capital5 311
- Number of readers
- Duration 10 hours
- Minimum bet 50 tokens
- View all Promo offers
- —
- leave a comment
- 1
- 2
And in all apartments in the Russian Federation and the Netherlands there are lop-eared people everywhere :))))
By the way, I didn’t think that such a photo would ever be useful, so I didn’t take it. When we replaced the windows and window sills in our Stalinist building, there was almost a rail for the window sill in the walls right up to the frame, well, it’s the same as a groove in the slopes along which it was literally inserted there (in the original we had granite window sills).
But in Israel, most apartments have no window sills at all. This is one of the items on the list of things that plunged me into culture shock upon arrival.
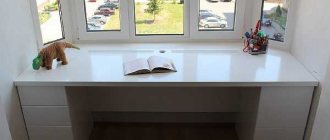
I have such “ears” that they merge into one large marble window sill (15 cm from the wall, 40 cm from the window). Literally from one side wall to the other. Under it there are radiators under the sheathing, and where they are not there are small cabinets. I love large window sills, for flowers - it turned out to be such a large shelf.
Rather not “why”, but “why”. Plastering a window opening with a “eared” window sill is 100 times easier, because there is no need to maintain the thickness of the plaster to the nearest micron.
The argument with curtains doesn’t work at all, because... they change more often than window sills, even for the most careless housewives