Restoring wooden structures is a measure resorted to by owners of private houses with a long service life.
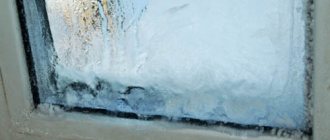
The decision to repair a window is made based on a number of factors that directly indicate that it is necessary. This may be the unsightly appearance of the opening, the appearance of deformation, the formation of cold bridges or condensation at the corners of the frame.
A careful visual inspection of the internal and external surfaces of the window, checking the functional ability of the sashes (opening, closing), assessing the condition of the frame elements, joints, slopes, ebbs, and fittings allows us to develop an effective restoration plan.
You can carry out repair work yourself or invite a specialized specialist. How to do this correctly, and what is needed for this, read more in the presented article.
The feasibility of repairing wooden windows
Restoring wooden windows with your own hands allows you to save money and improve the dilapidated window structure.
Before starting repairs, it is necessary to take into account the “lifetime” of the material from which the frames are made. Larch and pine can last no more than 35 years, oak and beech - more than half a century. Restoring wooden windows is unlikely to lead to the desired result if:
- The structure of the wood is so loose that when pressed, strong dents form;
- There is complete loosening of the window frames in the openings;
- Large dark spots are visible under the paint, which usually indicate rot and decay;
- Frames are bent or severely deformed;
- Wooden windows are very seriously damaged (for example, frames are split).
After reconstruction, the old window looks like new
Main defects and ways to eliminate them
During the operation of wooden window structures, their owners often have to deal with the following problems:
- The gap between the frame and the window frame.
- Problems with surface coating.
- Warping of window frames.
- Rotting of part of the binding or frame.
- The doors close tightly.
Defect 1. The problem of insufficient tightness is one of the most pressing. Such gaps are formed due to the fact that wood is a material that is easily deformed. The need to restore old wooden windows in this case is explained by constant drafts.
But fixing this problem is quite simple. You just need to install an additional seal.
Defect 2. Repair of old wooden windows will also be required in case of worn stain or cracked paint. After a few years, the paint on such structures loses its original properties, regardless of its quality and price. To restore the window, it will be enough to simply update the painting.
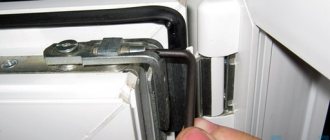
Defect 3. A pressing problem, especially when it comes to frames made of solid boards. The main reason for the distortion is the properties of wood to deform under the influence of moisture or direct sunlight. Such distortions can be eliminated by adjusting the fittings. If this is not possible due to the technical features of the selected parts, you will have to change the hinges.
Defect 4. This is the most difficult wood defect that cannot be eliminated. In case of rotting, you will need to completely change the window structure.
Defect 5. A fairly common problem during the operation of old wooden windows. To return them to the ability to close normally again, you should first check whether the structure as a whole has sagged. If so, simply adjust the height of the sashes.
We draw up a correct defect report - sample
Accounting Expand the list of categories Subscribe to a special free weekly newsletter to keep abreast of all changes in accounting: Join us on social media. networks: VAT, insurance premiums, simplified tax system 6%, simplified tax system 15%, UTII, personal income tax, penalties We send letters with the main discussions of the week > > > January 29, 2022 Defective act - a sample of its completion in cases of write-off (repair) of fixed assets (equipment) is presented in our article.
Here you will find information about the purpose of the defective act and the rules for drawing it up. Documents and forms will help you: During an inventory inspection or quality check of the operating system (equipment), an expert commission may identify defects. The commission records its conclusions regarding the impossibility of eliminating these defects or the scope of necessary repairs in a special document generated based on the results of the inspection (verification) - a defect report.
A missing or incorrectly drawn up defective act often becomes the reason for the tax inspectorate not to recognize the costs of repairing (writing off) OS (equipment) in tax accounting, which leads to additional taxes and penalties.
A defective act for writing off OS (equipment) is generated and confirmed by a commission approved by order of the organization.
The commission must include: the chairman of the commission appointed by order, the chief accountant, the employee responsible for the safety of the OS (equipment), and a specialist who understands the technical characteristics of the OS (equipment) being inspected. In the absence of the latter on the organization’s staff, third-party companies that carry out a technical assessment of the operating system (equipment) are invited to draw up a defect report. The defective act for write-off of OS (equipment) specifies the following mandatory information:
- The name of the organization drawing up the act.
- Title of the act.
- Technical parameters of detected defects and their units of measurement.
- Positions, surnames, initials and signatures of the commission members.
- Description of defects that are considered irreparable from the point of view of physical wear and tear or obsolescence.
- Date of formation and approval of the act.
- Name and accession number of the object.
A sample defect report for write-off of fixed assets (equipment) is available for download on our website.
IMPORTANT! A defect report refers to documents containing only a qualitative assessment of the technical condition of the OS (equipment) subject to write-off (repair), and cost indicators are not included in it. Read about what primary accounting documents will be used to document the write-off of fixed assets (equipment).
The unified form of a defect report for the repair of OS (equipment) was approved by Resolution of the State Statistics Committee of Russia dated January 21, 2003 No. 7 and is called “Act on Identified Equipment Defects” (). In terms of its content, the presented document is not universal and is unacceptable for a number of defect recording situations.
Causes of these defects and their elimination
Let's look at the TOP 13 common problems that arise during the installation of windows and their operation. Let's find out the main causes and ways to get rid of problems.
Condensation and mold
Such problems often arise as a result of unprofessional installation and operation, lack of obstruction of gas and liquid exchange between media and the absence or improper ventilation in the building.
What you need to do to get rid of the problem:
- install equipment that will help ventilate the room;
- replace a double-glazed window with certain heat transfer parameters;
- insulate the installation seam;
- fix plastic slopes, which will also conduct heat;
- adhere to GOST rules.
Defects on slopes
Usually they buy slopes that are created from several pieces of material. If the work is done efficiently, the seams can be firmly protected from exposure to water and excess moisture. The main technology uses the installation of monolithic slopes without cuts, breaks or cracks. If you do not follow this rule, mold and dirt will appear.
Blowing or leaking from a window
Air from a PVC window can penetrate into the room due to poor quality work or a poorly closed window. If the master adjusts the plastic windows, installs new fittings, adds some fittings, and replaces the insulation, then this can save the situation.
In addition, the main causes of leakage may be:
- Ventilation problems. In winter there will be increased humidity.
- Poor room heating.
- The glass unit is not “warm” enough.
Defective mosquito nets
Typically this problem occurs due to rapid wear or installation of low-quality fasteners. Re-upholstering the fabric and installing fasteners will help bring the mesh back to normal condition.
Clogged drain holes
The problem happens because people do not follow care advice. In this situation, a specialist should clean the window drainage holes.
Creaks, various kinds of noise during smooth opening or closing
The most common problem is the appearance of various kinds of squeaks during use of the sashes. Often there is not enough lubrication on the mechanisms for the sash to work continuously and without sound, which is why it is important to lubricate the elements with simple machine oil.
Defects in wooden window blocks during operation - Let's make it together
Windows, doors, gates and lanterns must have a certain heat, moisture and sound insulation, and windows and lanterns must also provide sufficient illumination of the premises and their ventilation.
The main defects of windows are: rotting of the material of window frames, window sill boards and frames; disorder of mating parts of window frames; distortions and looseness of the shutters; malfunction of window fittings; wear of door seals; destruction of the color of window frames and lag behind the putty; poorly executed window sill drain; absence or contamination of holes for draining condensate from the interframe space; broken glass or joined glazing; penetration of atmospheric moisture through the filling of window openings onto the walls and into the interior of the room, increased air permeability (Fig. 28.1).
Lanterns are mainly used for better illumination of work areas and aeration of industrial premises. Over time, the glass of the lanterns becomes covered with industrial dust and soot - the illumination through them sharply decreases. Glass may fall out of the lanterns, which requires the development of special devices and measures for repair. Due to leaks in the vestibule and destruction of the glass filling of the lanterns, moisture may leak into the production premises.
Rice. 28.1. Defects in window fillings:
1 - the drain for removing condensation moisture is clogged; 2 - the ebb tide is installed incorrectly, water gets on the window frame; 3 - the steel drain is not inserted into the groove of the box; 4 - violation of the connection between the box and the wall; 5 - the side part of the steel ebb is not inserted into the wall groove
The main defects of doors are their insufficient fastening to the frames, as well as walls and partitions, as a result of which the frames become loose, warp and even fall out. Balcony doors are characterized by exactly the same defects as windows. A loose ledge in external doors leads to the formation of ice in winter, swelling of the frame and door panels, and, consequently, to premature wear of structural elements.
The reasons for rotting of the filling of windows and doors are the use of damp products (humidity more than 18%), poorly executed waterproofing from the walls, getting wet in the absence or improper installation of drains (insufficient drain extension, lack of a drip tray, lack of drain bends in masonry slopes), penetration of atmospheric moisture into leaks between the wall and the frame, as well as condensation and untimely removal of moisture in the interfloor space.
The use of lumber with high humidity for blocks of windows and doors leads to their further shrinkage (shrinkage cracks), warping and the formation of leaks in the vestibules. Swelling of the frames and panels of balcony doors from atmospheric moisture and their decay is also facilitated by untimely renewal of the color of the frames and coating of the glass. For metal bindings, corrosion protection is of great importance.
Defects identified during the inspection of windows, doors and skylights are eliminated in the process of preparing buildings for the winter period of operation or during the next scheduled maintenance.
In general, a wooden window is a good thing, especially when it’s new and made with high quality. Unfortunately, wooden windows produced in the 60-90s of the twentieth century do not fit these definitions; it is better to completely replace them with new wooden or plastic ones. Fussing with old windows is beyond the roof, but the result is approximately the same. But Stalin-era windows are a completely different matter. They were made quite well and their repair gives a good result.
The window looks disgusting, and it’s still blowing out of it!
This is the most common complaint and the main source of income for plastic window manufacturers. If you are not a supporter of surgical methods (you are not going to change windows yet), I can suggest the following therapeutic methods if:
Stages of restoration of old wooden windows
House owners do not replace old window frames with new ones if they lack funds, or when they want to maintain the exclusivity of the appearance of the house. In any case, restoring the integrity and external beauty of the glass frame is of paramount importance.
The degree of wear of window frames can be determined by the following indicators:
- Violation of the tightness between window elements;
- Difficulty closing window sashes;
- Cracking of layers of paint;
- Formation of gaps between the frame and the additional upper window sash (transom);
- Presence of rotten areas of window frames and window frames;
- Distortion of window elements.
Repairing wooden window frames is recommended on warm, fine days. The dismantling of window elements and processing of wood is carried out in dry conditions.
Dismantling and cleaning
Step-by-step work on restoring a wooden window with your own hands includes the following activities:
- Dismantling window fragments: removing sashes from awnings, removing glass;
- Removing old paint from the surface of a window using one of the existing methods: mechanical or chemical.
Using a hair dryer, the paint is removed from the entire surface. Use the device to heat the paint until swelling appears and quickly remove the heated paint with a spatula. This is a mechanical option for cleaning windows from old layers of paint.
The chemical cleaning method involves treating the frame with kerosene. To do this, after dismantling, the frame is disassembled into its components, wrapped in a rag soaked in kerosene, and placed in a plastic bag for several days.
After this period, each element is cleaned with a spatula to remove old paint. It is removed from the surface of each element, and you need to work quickly, not allowing the kerosene to evaporate, since the paint, after the kerosene evaporates, takes on its previous appearance.
All procedures are performed using means that protect the respiratory tract and skin of the hands from the effects of kerosene - the performer of the work must be provided with rubber gloves and a mask.
The work is completed by cleaning the structural elements using sandpaper and a grinding machine.
Restoration of old wooden windows, bent as a result of deformation processes, consists of straightening the frame elements. To do this, perform the following steps:
- The window sashes are dismantled, the glazing beads are removed and the glass is removed;
- Remove fittings and wooden ebbs, steel angles and nails;
- The window frame and sashes are placed on the prepared shield, and then leveled until a rectangular shape appears. Then the window sashes are aligned. This window element requires a more careful approach due to its small size. A 1 mm discrepancy between the diagonal sizes will result in the presence of gaps.
Cracks that appear during the process of leveling the window contour can be corrected by filling them with PVA glue. After the glue has completely dried, the area of the repaired surface must be cleaned. The repaired frame is puttied and painted.
Replacing rotten window elements
Restoring old wooden windows that have fallen into disrepair should begin with dismantling them.
- Areas of the frame that require restoration must be cleaned of traces of old paint and the rotted, loose layer of wood must be removed;
- The prepared area is treated with putty;
- After complete drying, the frame is sanded, leveling the surface;
- A section of the frame that has become unusable is removed with a chisel, forming a recess in the form of a rectangle;
- An insert is made according to the shape and size of the recess with a small allowance;
- Using glue, the insert is fixed in the area of the frame prepared for repair;
- In this place, several through holes are made with a drill and pins with glue are inserted;
- The procedure for restoring the rotted area is completed by leveling the surface by grinding.
Installation and final finishing of wooden windows
In order for repaired windows to have a long service life, a number of other procedures must be performed:
- After eliminating all identified defects in wooden windows, the repaired areas are treated with an antiseptic and lubricated with wood glue and connected;
- Using a right triangle, check the correctness of the frame and window sashes;
- Closed parts can be secured in a tripod for greater strength;
- To increase the strength of the connection of window components, axles mounted on glue are used;
- Minor defects, in the form of small cracks, are removed by leveling the restored surface with sandpaper, followed by impregnation with primer and putty;
- Elimination of cracks in the end part of the window is carried out by filling them with a mixture of sawdust and wood glue;
- The dried areas are sanded using a sanding device;
- To increase the strength and durability of wood, it is treated with drying oil, which is applied in several layers. It is considered that the drying oil has been completely absorbed if there is no feeling of stickiness when touching the treated surface;
- If the appearance of the frame after restoration is good, then it is possible to leave the window frame in a natural color. This can be done using stain. Applying several layers will enhance the tone. Varnishing will preserve the external natural beauty of the wood for several years;
- Glass installation plays an important role. This window element must be installed with high precision, since the tightness of the window structure depends on it. The strong fastening of the glass to the window frame is facilitated by its placement on silicone adhesive. Along the entire perimeter, the glass is additionally secured with beading;
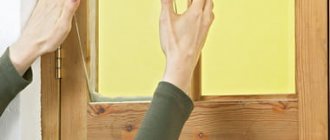
- To insulate wooden windows and increase tightness, foam and rubber gaskets are used.
This completes the DIY window repair. Ancient and modern technologies, techniques and materials were used in this procedure. The windows acquired a refined appearance for many years.
Replacing paintwork: recommendations
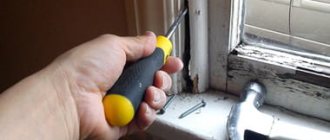
In order to carry out restoration work most effectively, it is first necessary to remove the old paintwork from the frames. The work begins by removing the frames from their hinges and removing all metal parts and glass from them. If these works are carried out in full, the restoration work itself is significantly reduced.
To remove old paint from frames, there are several methods, most of which will require the involvement of a team of professionals with special chemical compounds. But if all the work is done independently, then mechanical cleaning methods are used: scrapers, spatulas or abrasive materials are used.
When the surface is cleared of paint, dust is removed from it and washed with an alkaline solution, which is purchased at hardware stores. After this, the remaining paint comes off and is easily removed with a spatula.
If you have the skills to cut glass, you can do all the work yourself. Otherwise, it is better to use the services of specialists, who will simply need to take measurements.
When the glass of the required dimensions is cut, a layer of putty or sealant is applied to the frame folds, which will ensure a tight fit of the glass to the frame. When the glass is installed, all cracks are also coated with sealant.
How to restore an attractive appearance
Old wooden windows, as a rule, are covered with more than one layer of paint, which has begun to peel off and has smudges. Of course, you don’t have to waste a lot of time, clean up what is falling off and apply another layer, but in order for the window to look like new, the old coating must be completely removed.
Removing paint
Before starting work, it is necessary to remove the frames from the box, remove the glass and remove all metal elements of the mechanisms.
There are three methods for removing old paint:
- Mechanical;
- Thermal;
- Chemical.
The first is the most complex and time-consuming, but does not require special tools and materials. The paint can be removed manually with a spatula, sandpaper or scraper. The method is not always effective; it is appropriate if there is a thick layer of paint on the frames, which is easily removed. The work will go faster with a grinder.
For thermal cleaning, a hair dryer is required. It needs to be directed to a section of the frame, heated for several minutes and immediately removed the paint with a spatula. The warm coating is easily removed, with virtually no residue. Areas where the paint sticks tightly can be cleaned with sandpaper.
When chemical cleaning, a special liquid is used to remove paint; you can also use what is at hand, for example, kerosene.
For this method, the frames need to be wrapped in rags, moistened generously with solvent and packed in a plastic bag. Leave for a couple of days, after which you can clean the surface with a spatula to remove the softened paint. The wood after such treatment will not be perfectly clean; you will need to remove the remaining coating with a grinding machine or sandpaper.
Preparation
The next stage is puttying. This type of processing is necessary to level out minor defects: cracks and irregularities. Before this procedure, it is recommended to remove burrs, trim off protruding parts and clean the surface of dust. The composition must be applied in as thin a layer as possible. Then dry well and sand.
Before painting, the wood must be protected from damage. Such a coating can be drying oil or an antiseptic. Frames should be impregnated with them in several layers.
The “old-fashioned” way of dipping wood into hot drying oil is dangerous to life and health.
You can begin applying paint after the protective coating has dried. You can check the readiness of the drying oil by touching the frame; if your hand does not stick, then the surface can be painted.
Coloring
Applying fresh paint is the most important step. Here a lot depends on the choice of material. Oil paint is best for windows. The samples presented on store shelves are made of synthetic components and have a short service life.
To keep windows looking good for 10 years, you need natural paint. It can be prepared from thickly ground paint based on mineral pigment, mixed with linseed or nut oil.
It is more convenient to apply the coating with a thin brush. It is better to remove the glass so as not to accidentally stain it. You can put the frames in place when the second coat of paint has dried. It can also be used to cover drainage, window sills and internal slopes.
How to restore wooden window frames, including installation of seals, removal of old coating, puttying and painting, is clearly presented in the video:
Restore or change
Unfortunately, repairs are not always possible. If the window has completely become unusable, then replacing it is the only solution to the problem.
In what cases will the window have to be dismantled and thrown away:
- The frame is literally falling apart. Most often this happens at the bottom of the window, where condensation accumulates;
- The geometry of the window is severely distorted. If it cannot be fixed without dismantling the box, then it is better to replace the frames;
- The window is too fragile. Thin frames between glasses may not withstand mechanical stress. Considering that you will need to remove layers of paint from the frame, which means using force, you should not waste time on restoration, but immediately dispose of the window.
You can replace the window not only with a popular plastic one, but also with a wooden one. Such products cost a little more and functionally are practically no different from PVC windows, as they are equipped with modern fittings and double-glazed windows.
What can be repaired:
- Appearance of frames;
- Broken glass;
- Crevices;
- Minor distortions;
- Local rotten areas;
- Sagging sashes.
To carry out the repair, you will need a set of tools and materials: chisels, plane, spatula, drill, level, sealant, sealant, drying oil, putty and paint coating.
It is better to carry out restoration in the summer when the weather is warm and dry. You need to start with inspection and identification of defects. In order not to miss anything, the frames can be removed from the box, check the integrity and reliability of the connections, as well as the level of the sides of the box.
How to repair rotten sections of a frame
A rotten section of frame can be replaced or restored. For restoration, epoxy wood putty is required. The damaged area must be freed from paint and dust removed. Then apply putty, carefully filling all the recesses and cracks. Form the missing part. It should be slightly larger than the required size, since the excess will be removed during subsequent grinding.
If the rotten area cannot be replaced, the defect is eliminated using putty
Leave the frame to dry for at least a day. Sand the repaired area with sandpaper or a grinder.
It is worth understanding that such repairs of old wooden windows help restore the appearance, but do not provide the necessary reliability, especially in areas of active use. But on a blind or rarely used window, this method will allow you to restore the structure without a radical replacement.
Putty and primer for small defects
Before carrying out this operation, it is necessary to identify cracks, chips and other defects in wooden windows, mark them with a marker and treat them with sandpaper. Then cover the marked areas with latex or oil putty. The work is carried out with a rubber spatula, immediately removing excess material. If necessary, after the first layer has dried, apply a second one. Finally, the wooden surface is treated with fine-grained sandpaper. The primer is applied in 2 layers.
Impregnation of wooden windows
In order for repaired antique and Soviet windows to last as long as possible, they need to be covered with drying oil. It will block the development of new rot germs and, if possible, restore the structure of old wood.
Coating with drying oil will extend the life of the window frame and prevent the formation of rot.
The drying oil is applied with a brush in 3-4 layers: the next one - after the previous one has been completely absorbed and dried. This treatment will last for 2-3 years (until the next repair). Impregnation for many decades is carried out in a piece of iron pipe 10-12 cm thick, sealed at one end. All actions must be performed only on the street, away from residential buildings.
Place the pipe at an angle of 300, fill it ¾ full with drying oil and heat it from below with hot air from a hairdryer or electric stove. As the temperature rises, the drying oil will begin to swell - this will release moisture and air. If the smell suddenly increases, you need to move the heater away and wait a little. Impregnation begins after the bubbles disappear:
- Prepare an iron hook with a sharp end 5-6 mm thick;
- Place the part in the pipe and press down with a hook for 4-5 minutes;
- Hook the bar with the point of the hook, remove it and lay it to dry;
- It is forbidden to touch the parts with your hands (even with gloves), since the temperature of the hot drying oil exceeds 130 degrees.
Such treatment allows you to extend the service life of wooden window frames by more than 100 years, and if they are coated with an oil composition, repainting will be required no earlier than after 15 years.
Assembling the sashes
The prepared sashes are placed on the shield and carefully aligned to a rectangular shape. The details of the window require special attention: a 1 mm difference in diagonals will provide a 0.7 mm gap.
The leveled area is secured with glue or nails, carefully driving them into the shield near the sash. They look through the old dowels (“chopiki”).
When assembling the sashes, it is necessary to strictly observe the rectangularity
Drill them in the middle of the corner using a larger diameter drill. If one of the dowels is shifted to one side, then you need to:
- Secure it along the border with a few drops of “Super Glue”;
- Drill the correct location;
- Pass the saw blade through the gap between the fixing lugs and saw through the old dowel.
After assembling all the corners, you should get a fairly rigid structure. Now you can take the frame and install the sashes into it. They will fit more tightly if plywood strips of the appropriate width and thickness are glued to the frame.
Place all parts on a leveled surface and press down with a weight (approximately 100 kg). Leave to dry and level for 2-3 days.
What to do if a misalignment occurs
This problem is one of the most serious and requires major restoration. As a result of distortions, the functions of the window are disrupted, cracks are formed and the appearance deteriorates.
The distortion may be noticeable visually. If it is not visible from the outside, you can use a level. Even a small difference can affect the quality of the window - a gap of 2-3 mm will become a source of cold air and cause ice to freeze.
The solution to the problem must be radical - the frames must be dismantled and returned to the correct geometry. A simple and reliable way is to attach metal reinforcements to the corners. To do this, it is necessary to make landing grooves in the frame so that the corner does not protrude beyond the frame after installation. The same corners can be mounted on sashes and vents. To achieve the correct geometry, the frame without glass must be laid on a flat panel and the diagonals aligned.
If the dowels or “chops” (wooden nails at the junction of parts of the frame) become loose, they can be filled with glue; before this, you also need to adjust the diagonals to equal values.
Sometimes the dowels dry out and are freely removed from the groove; in this situation, it is better to make new ones of a larger diameter, and lubricate them with liquid nails before installation. To make “chops” you will need a core drill and a piece of solid wood.
The dowels must be cut strictly across the grain. And hammer it into the holes with a mallet. After installation, drive wedges into the “chops” on both sides.
Correcting the geometry of the frame is not enough; it is possible that the box is also lopsided. You can change its position without dismantling, but only if the difference does not exceed 2 cm. To do this, you need to determine the lowest point in the bottom plane of the box and the highest in the top. Focusing on them, cut down the “extra” in terms of level. The same should be done with the sides of the box. To control the shape of the opening, you need to measure the diagonals, as well as the height and width at several points.
Inevitably the frame will become smaller than the opening. To adjust the dimensions, you need to install wooden slats of appropriate thickness around the perimeter.
Insulation of wooden windows
High-quality repair of wooden double-glazed windows includes their insulation, which can significantly reduce heat loss in the house. There are several ways to insulate windows yourself:
- Silicone sealants;
- Special paper;
- Fabric strips;
- Tubular profiles;
- Heat-saving film;
- Sealant in frame sashes.
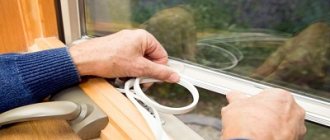
The last two methods are considered the most effective. First, the junctions of the sashes and glass are covered with silicone sealant. Then they take a cutter and cut a 5 mm recess along the perimeter of the sash at an angle of 450. Clear it of shavings. Consistently press the PVC seal into the resulting groove, but do not stretch it.
When restoring a structure, an obligatory step is insulating the window frame
Dismantling and disassembling the window structure
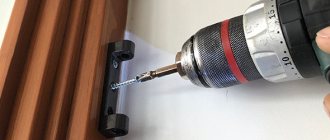
The decision about the need to repair or restore a window is made after a specialist carefully examines the window frame, sashes and window sill. The glazing bead is removed or the layer of putty holding the glass in the wooden sashes is removed with a chisel. Then the handles, ebbs, and metal corners are dismantled. And also all fasteners.
After this, the removed frames are placed on a flat surface and measurements are taken. By the difference in diagonals, repairmen find possible distortions. For further work, the frame is secured to a work table or board made of boards. Dismantle the dowels. If the fastener is exactly perpendicular to the surface of the structure, then it can be knocked out with a hammer. If the frame is bent, the dowel is drilled out. Having previously fixed it with superglue.
Repair of wooden windows using Swedish technology
Modern wooden windows
Modern wooden window structures, with proper installation and subsequent timely repairs, will serve you for many years. Why is there a need to repair them?
Any paint coating exposed to the sun and moisture over time ceases to protect the window from destruction. Therefore, timely painting will prevent the destruction of wood, the occurrence of fungus, rot and drying out. Cracks and chips may also appear on the window frame; repair and restoration of the window will solve this problem.
New wooden windows have a lot of weight due to the double-glazed windows installed in them. Therefore, fittings and mechanisms are constantly overloaded. All mechanisms and fittings need timely adjustment and lubrication. Otherwise, they do not perform their functions, the sashes sag and begin to cling to the frame, the mechanisms open and close the window with difficulty, cracks appear due to poor fit of the seal, and over time they completely fail.
The seals on modern windows are made of rubber and have their own service life. During operation, the rubber seal loses its elasticity, as a result of which it does not fit tightly, and cracks are formed that worsen the heat and noise insulation. The seal must be replaced with a better one (Swedish silicone sealant EvroStrip).
Old wooden windows
The Teplo-Oknodel company's craftsmen service and repair old wooden windows and doors in Moscow and the Moscow region. In Moscow houses and apartments built from the 70s to the 90s, windows of the so-called “Finnish type” were installed. These are windows with paired sash on tie bolts; when open, when washed inside, they resemble a book. In houses of older construction, “Stalin-type” windows were installed. These are windows with separate sash and frame, closed with bolts, and most often have a transom.
The company's specialists carry out repair work using Swedish technology with this type of windows. Swedish technology is the elimination of any defect in wood (chip, crack, dent), building up rotten parts. Restoring the geometry, adjusting the sashes until they open and close freely. Removing all layers of old enamel, coating with an antiseptic, painting with new enamel. Repair, adjustment, replacement of any window fittings. Sealing the seam between the frame and the slopes with acrylic sealant. It is also possible to carry out insulation work on any wooden window using the Swedish EvroStrip technology.
Average prices
For construction services, official Russian companies provide price lists on official websites. They do not depend on seasonality or urgency factors, but prices may vary depending on regions. Moscow and St. Petersburg, as well as the northern regions (Novosibirsk, Yamal-Nenets Autonomous Okrug, etc.) are considered the most expensive.
The average prices for repair services for wooden windows with consumables and company tools in rubles were:
complex deep restoration – 8-18,000;- double-leaf window – partial repair – up to 8,000, major – up to 15,000;
- three-leaf window - up to 10,000, full - up to 16,500;
- cleaning, priming, painting windows – from 2,000;
- replacement of fittings – 300-1000;
- repair of slopes and window sills – from 1,500;
- glass replacement – 2,000.
Prices may fluctuate and vary depending on market conditions. Many companies immediately negotiate and coordinate their services with the customer, providing discounts. Private individuals charge half the listed prices for work, but do not provide an official guarantee for the services provided.
Any repairs are best carried out on a dry, sunny day.