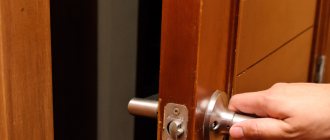
Latch handle design
Models of this plan consist of two main elements: the product itself and the working mechanism. Both handle parts are cut into the door leaf separately.
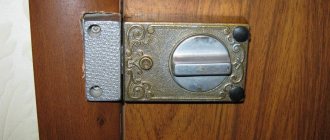
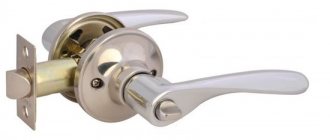
Latch models are available with or without a latch. The lock is an additional turning mechanism. If it is not there, the door cannot be locked from the inside with a thumbscrew or a key (there is a keyhole on one side and a locking tab on the other, as in the photo).
Door handles vary in type of construction, but this does not affect the installation process in any way.
Types of door handles
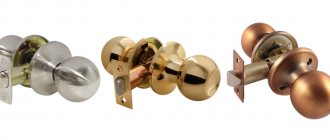
All handles are not very similar to each other and differ in material, shape, color, mechanism and installation method. Based on the last feature, pens can be divided into two types:
- Mortise;
- Invoices.
Mortise handles for interior doors are not difficult to install and will not cause any trouble at all. If we compare them with other products, they are quite simple to install and all you need to do to install them is drill a hole in the sheet of the required diameter.
Mortise handles are also divided into two types:
Rotary. In order to open the door, you do not need to press on them, and opening occurs by turning the holder. Often this type of mechanism is additionally equipped with a latch, with the help of which the lock tongue is locked. This option allows you to lock yourself in a room. In addition, the rounded shape of the handle is very convenient to use.
Push. Here, too, everything is very simple and the mechanism starts after pressing the lever.
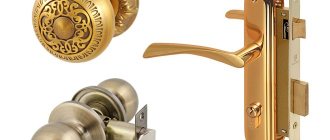
When purchasing a product, it is important to pay attention to what material the handle is made of, because it can be not only metal, but also glass, plastic or natural stone.
The selection of the product is made based on the color and model of the installed canvas, as well as the style of the interior.
Height and distance from the edge of the door
The internal element (latch) is uniform, so it is installed the same for different handles with a latching mechanism. The height from the bottom of the door and the distance from the edge are standard.
For latch handles, there are two options for inserting into the canvas: 60 or 70 millimeters from the edge. The rotary latching mechanism can “move” to the right or left by about 1 cm, and this also needs to be taken into account.
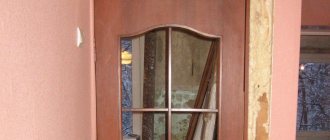
- If the handle has a spherical shape, and the distance from the edge of the door to the decorative element of the door (for example, glazing) exceeds 140 mm, it is better to fix the mechanism 70 mm from the edge. If you install the handle at a distance of 60 mm, when closing the interior door from the inside, you can hit your hand on the door frame.
- When installing a pressure product, the indentation must definitely be 60 mm.
The standard handle installation height (distance from the floor to the center of the latch) is 900–1100 mm. If the door is usually used by one person, the optimal height will be located at the level of his waist.
Installation of the product on an interior door is carried out on the right or left side. For round handle models, you only need to reverse the latch design. The tongue should point towards the closing of the interior door. If the device is asymmetrical, the elements simply need to be swapped, focusing on the opening side.
USEFUL INFORMATION: Installation of interior doors: GOST and SNiP
What does it consist of?
To make it easier to cope with the installation of door hardware, we will find out what parts and elements are included in the handle.
- Handle . This is the main decorative part of the product.
- Each handle has a special ring that is attached to the door.
- The rod and rosette are also two integral parts of a door handle.
- Travel limiter . This element prevents the sash from hitting the wall when opening.
- Stoppers.
You can read about how to repair the handles of plastic windows in this article.
In addition to the above, the “composition” of a door handle also sometimes includes the following elements:
- locking mechanism;
- tongue;
- metal box cover; (therefore, it is necessary to know the dimensions of the door frame of the interior door)
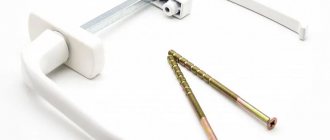
- screw for tightening the structure. This part is necessary when the handle is installed on a hollow interior door.
It happens that the “composition” of the handle also includes a latch. In order to install such a model, you will need to insert an additional rotary screw. Keep this in mind.
It may also be useful and interesting for you to learn more about what handles for glass sliding doors look like.
Marking
The procedure begins with marking the door leaf.
- Use a pencil to mark the location for drilling. Diagrams are usually included with the product.
- If there are no explanations, you can apply the dimensions yourself. To do this, mark with a pencil a distance of 60 mm from the door edge, the height of the location is from 90 to 1100 mm.
- We mark the central point for drilling on the side edge of the door leaf. Dimensions are drawn along the center line.
Required Tools
To install the handle, arm yourself with tools, without which it will not be easy to do this:
- a simple pencil;
- square;
- roulette;
- chisel;
- screwdriver;
- drill;
- drill;
- crown.
The crown and screwdriver can be replaced with other available tools, but the quality of the work will suffer and it will take a lot of time.
Before starting installation, read the instructions for the product. It indicates all the dimensions, which will help you choose the right drill bit and crown according to the radius.
Hole preparation
At this stage we do the following:
- Using a chisel, we hollow out a 3 mm recess under the face plate of the latch, corresponding to its width. It is better to mark the center in advance with an awl so that you do not have to apply the markings again.
- Using a half-centimeter crown, we drill a through hole. It is better to do this on both sides of the door leaf so as not to damage the door coating at the exit of the crown.
- Now let's move on to the side edge. Take a wood drill (about 24 mm in diameter). They need to make a hole in the marked center for the latch. You shouldn’t go too deep, otherwise you can make a hole in the canvas all the way to the panel.
Latch installation instructions
So, having examined the existing types and a brief overview of the functions of each of the latches, having decided on the necessary option for installation, let’s move on to the detailed installation instructions.
First, it’s worth collecting the necessary set of tools that we will need for this work:
- Drill or screwdriver.
- Set with feather drills.
- Wood crown, diameter 25-50 mm.
- Chisel.
- Hammer or mallet.
- Pencil.
- Square.
- Roulette.
As you can see, the list of required tools is quite simple and everyday. All these tools can be found in every owner and in every home.
Step #1 - marking the space for the latch
First you need to decide on the height of the handle on the door. Of course, there are generally accepted standards, which range from 800 mm to 950 mm relative to the floor line, but changes are possible for greater convenience for a particular owner.
It is better to carry out the marking itself on a fixed door leaf. To do this, you can remove the door from its hinges and do it on the floor or securely fix it .
We recommend that you read the detailed instructions for installing an interior door.
Using a simple pencil and a square, we make markings at the selected height on one of the sides of the door and on the end of the door leaf, where we additionally mark the middle for further drilling for the latch mechanism itself.
On the horizontal line that we drew on one side of the door leaf, we measure the required distance, relying on and taking into account the length of the latch. We measure this distance by placing the mechanism on the side of the door, as shown in the figure.
A standard construction square, with which you can quickly and accurately draw a horizontal line to mark drilling points when installing the handle
Apply the latch and mark the middle of the square hole with a pencil. This will be the center point for drilling with the wood core bit.
This point in the square of the interior mechanism will be the central point for drilling a hole on the side of the door leaf to install the latch handle
Step #2 - Drilling Holes
After marking, we proceed directly to drilling the holes. It's better to start from the side.
To correctly and efficiently drill a hole on the side of the blade, you will need to place a wood crown on a drill. The intersection point of the marked lines will be the drilling center.
But it is worth considering one important point - you do not need to drill to the very end on one side, but as soon as the crown reaches the opposite side, you need to change the drilling side. This is done so that at the exit the teeth of the crown do not chip the coating of the surface of the door leaf.
For some models of latch locks, there is another option for drilling from the side of the blade. In this method, we make holes not with a wood crown, but with feathers or a crown of a smaller diameter, which is enough for a square rod. Its size is 8 by 8 mm. And we also make two holes, each of which will be intended for tightening bolts. These two holes can be identified after applying the base of the handle adjacent to the side of the door to the door leaf.
The first hole is there, now we proceed to drilling a hole for the latch mechanism at the end of the door. To do this, we change the crown to a feather-type drill, the size of which depends on the diameter of the mechanism. The standard latch diameter is 22 mm.
We start drilling at the point where the lines intersect. We also do not forget about the correct drilling technique, in which it is imperative to hold the drill strictly horizontally, and in no case bend it, in order to avoid poor-quality work of the lock in the future, or, at best, breakage of the drill.
At the end of drilling, it is necessary to thoroughly blow out all the holes so that chips or dust remaining after the drilling procedure do not get on the lock mechanisms. Which can further lead to its malfunction or even jam the mechanism.
After the hole for the latch is ready, we insert the mechanism itself to the limit so that its outer part (vertical plate) rests tightly against the end of the door. You need to set it exactly vertically in relation to the sides and carefully outline it with a pencil - you will get an inverted rectangle. The purpose of this operation is to make a recess in the end for the outer part of the latch. To do this you will need a chisel and a small hammer. The depth of the slot depends on the thickness of the latch plate. The finished holes will look like the pictures below.
Side hole for the handle-latch mechanism, made using a wood crown. The diameter of the hole should be less than the diameter of the decorative trim of the handle itself
A hole in the end of the door leaf for the interior mechanism, made using a feather-type drill or a small-diameter wood crown
Step #3 - installing the latch
Let's start installing the latch lock itself.
Installation of the latch itself
The first thing to do is install the mechanism (latch) at the end of the door leaf.
We advise you not to tighten the screws right away, but first, use a pencil to mark points through the holes on the plate and use a small diameter wood drill, preferably 1 mm, to immediately drill holes for the screws themselves. This is done to make it easier for them to enter the tree. It’s just that the self-tapping screws that come with the kit are made of soft metal and have a coating that matches the color of the lock and are easily licked off when screwed in hard.
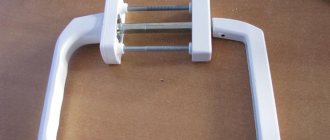
Installing handles on both sides of the door
When the mechanism is installed, we proceed to the handle itself. First, you need to disassemble it; in most cases, this is done using a special key included in the kit. But if for some reason it is not there, then this can be done with something narrow and straight.
The key hole is located below the handle. By pressing into the hole, we remove the handles themselves, and then the decorative plates, under which there are holes for tightening bolts and screws. But here, too, there are options with different manufacturers, some do not install decorative plates, they have self-tapping screws located on the outside, which simplifies the process itself.
According to statistics, fastening with tightening bolts, so-called ties, will be more durable and reliable. By themselves they pull together two opposite handles and are hidden
Now you can start installation. To begin, we insert the square into the hole of the latch, then put on the handle on one side and the other and, using tightening bolts, tighten the two sides to the door leaf. After this, we put on the decorative plates and snap the handles. If there are no plates, then use self-tapping screws to screw the handles to the door.
Making a recess for the latch tongue
The main part of the installation work has been completed. All that remains is to make a recess for the latch tongue on the door jamb. To do this, you will need to close the door all the way and mark the place where the tongue touches the door jamb.
Where we made the mark, we apply a metal plate and outline the inner rectangle. Now you need to gouge out a hole with a chisel or with the same pen. Usually the package includes a so-called plastic pocket, which is inserted into this recess for the purpose of improvement, because the hole for the tongue will be visible when the door is open.
Then we drill again for the screws and tighten them. The plate itself can be applied directly to the door frame without making a recess to recess it.
It is worth noting that all procedures associated with cuts or recesses using a chisel do not always turn out perfect for everyone, and as a result, small gaps or cuts remain. Here we recommend buying silicone that is as close in color to the door as possible, and going through these places to hide the defects.
Installing a plate on a door jamb with premature drilling of a hole for the mechanism tongue. The plate itself can not be heated, but placed directly on the tree
Now your latch handle is installed and ready to use. The installation process is quite simple and does not require any great knowledge. Now your latch will work properly and for a long time.
Careful and gentle handling of the lock will lead to its long-term and stable operation. And if it accidentally slams, you shouldn’t immediately resort to radical measures - you can open the door without a key using safe methods.
Product Installation
At this stage we have two holes ready. Then we proceed in the following order:
- We install a snap mechanism into the side hole and fasten it with self-tapping screws.
- Remove the upper part of the handle. There must be a side hole for this.
- Using the key included in the kit (you can take any other thin flat object), press the tongue inside the hole and lift up the handle itself.
- We remove the decorative trim and find the mounting holes underneath it.
- We install the outer part of the product, and then the inner half.
- We tighten both parts with screws that are included in the kit.
- We put on the decorative trim and the body of the handle-latch. In this case, it is necessary to press on the inner tongue with a key or other suitable object.
- Now the door needs to be closed in order to trace the place where the latch tongue touches the door frame. Using this marking, we hollow out a recess for the entrance of the lock.
- We install a decorative plastic pocket covering the wooden groove.
- We screw a metal plate over the hole under the latch tongue. At this stage, the installation of the handle is completed.
If you don't have a drill, all the holes can be cut with a chisel. However, the process of installing a door handle will require some experience and skill and will take more time.
Caring for door hardware
In order for a thing to last for many years, it needs to be looked after. It's the same with fittings. Over the years, it ages and wears out, which negatively affects the product as a whole. To slow down this process, do not forget to take care of the fittings.
To care for your hands you need:
- Wipe them from dust with water and special cleaning products. Avoid products that contain acids, alkalis or abrasive particles. They can damage the outer coating of the product, leading to rust. After washing, the product should be wiped with a dry cloth.
- Tighten the loose handle. If this is not done, the mechanism will break.
- Protect the product from rough mechanical influences.
In addition to the handle, the door lock also needs your attention. Basic care in this case means regular lubrication of the mechanism with special means. Sometimes sunflower or other vegetable oil is used as a replacement.
Considering that many parts of the mechanism are not easy to reach, a special nozzle in the form of a thin tube is used for lubrication. Often, for these purposes, the cover is removed or the handle is dismantled.
To lubricate hard-to-reach areas of the handle, use a tube nozzle.
Thus, having studied the basic intricacies of installing the handle, you are able to master this task without outside help. The main thing is to believe in yourself, and then the reward in the form of a well-installed pen will not be long in coming.
Selecting the height of the handle
The mechanism of operation of door handles is obvious: we turn the handle - the “tongue” hides in the door. Therefore, the first step in how to install a door handle is to drill holes for the handles and prepare a groove for the tongue. To do this, you need to decide on the installation height of the handles. Experts recommend installation at waist level, taking into account that the arm is bent at an angle of 90 degrees. Usually this is about 90–100 cm from the floor level.
Attention! In accordance with GOST 6629-88, the installation height of door handles is exactly 1 meter from the floor surface. However, in private households you have the right to choose the location of the handle that is convenient for you.
Installation height of door handles and hinges
It should be noted that if handles are installed within rooms located in close proximity, for example, adjacent bedrooms, then think about maintaining a uniform height for installing handles.
However, it is worth noting that sometimes the texture of the door suggests the presence of fittings in certain places. In such cases, deviations from the intended installation location can have a negative effect. Also, if there are small children in the house, then on the doors to the toilet and children's room, it may be worth lowering the installation height of the door handles a little.
Return to content
Simple option
Using this method, making a handle for a bathhouse is easy even for a novice craftsman. To work, you will need a board with approximate dimensions of 26 × 10 × 5 cm. First, you need to sketch a sketch on a sheet of paper.
Sawed blank for a bath
Note! Choose a simple handle shape so that it is easy to cut. A checkered piece of paper is suitable for the drawing.
Transfer the contours of the workpiece onto wood and cut it out with a jigsaw. Sand the product well, round it a little, so it will turn out neat. If you wish, you can make a carving, burn an image, an inscription. This handle is attached directly to the canvas, without a base. Self-tapping screws are used for this.
Artistic carving
How to remove the handle?
Having decided on the preferred option for fittings for an interior door, you can begin dismantling and then installing a new device.
When dismantling a handle with a mechanical lock, the first thing you need to do is remove the screws , for which you use a screwdriver.
After this, it is necessary to pull out the system of linings, which will allow you to remove the product itself along with the rod holding the mechanism inside the canvas.
You need to take a wrench, unscrew the rod, and then pull the spring-wrapped turning mechanism out of the handle. To identify the cause of the mechanism malfunction and determine your further actions, you should carefully inspect the handle. Although several methods are known for dismantling a round-shaped handle with a lock, we will still focus on one of the simplest and most effective.
- It is necessary to take a flat-head screwdriver and remove the tab on the part of the door on which the device with the lock is located. You can simplify the dismantling task if you press down on the opened stopper and at the same time begin to pull the handle towards you.
- Using a screwdriver you need to unscrew two screws, but why remove parts of the latch handle from the surface of the door.
- Having completed this operation, you should already pull out the mechanism itself with the lock. To do this, you need to unscrew the screws that will help release the locking latch.
Useful tips
- It is first necessary to carry out careful calculations and then carry out any actions.
- When creating a through hole, you should be extremely careful and do not drill the door on only one side. This can cause chips on the back side of the door leaf. As soon as the drill begins to appear, passing through, you need to continue working on the other side.
After completing the installation, it is necessary to double-check the tightening force of the bolts or screws used so that poorly fixed parts do not soon damage the handle.
Mounting a handle with a magnetic lock
In fact, the design with a magnetic latch is installed in a similar way to installing a handle with a lock. It may be a little difficult to install the strike plate so that the lock closes smoothly.
You need to do the following:
- With the door closed, mark the top and bottom of the magnetic latch;
- outline the contour of the recess for the magnet;
- make indentations in the center with a feather drill or router;
- Using self-tapping screws, screw the bar and check the operation of the lock.
When installing a magnetic lock, you should not deepen the strike plate to the same level. There is a high probability that over time the magnet will no longer fit smoothly into the hole, so it will need to be displaced.
Making wooden handles
On the main part of modern doors you can see metal fittings. Wooden handles are a thing of the past. However, such an element of the door leaf can be made on your own.
To do this, you need to stock up on a pencil, which is used to mark on a piece of wood. Typically, such elements have an arched, slightly rounded configuration, with flat plates at the ends. They are designed for a mounting base attached to the canvas. Decorative elements can be placed on them. To do this, you can successfully use a special wood putty consisting of sawdust and PVA glue. Its cost is low.
To begin with, a wooden blank is prepared, onto which the silhouette of the future pen is drawn with a pencil.
The product is cut along the contour. After this, the base is sanded with emery cloth and then polished. Often, to give an object a beautiful shade, it is treated with varnish, the color of which matches the tone of the door. The dried handle is secured to the door with small screws.
Handle assembly: features
Installing a handle on a square base.
How to make a handle? Many consumers want an element, once installed, to last for a long time and not cause inconvenience or breakdowns. If such a nuisance does occur, the structure should be disassembled and carefully examined. There will be a housing, a device for turning, a locking ring, a tightening spring, and a key washer. All broken parts must be replaced.
Undamaged elements should be replaced and tightened thoroughly with a screwdriver. Next, the finished handle is installed in the door body.
Installation of handles for sliding doors
To work, you will need a minimum set of tools - a router with a cylinder cutter and a drill with feather and simple drills.
Stages of working with an oblong handle
- you need to disassemble the handle, remove the plastic insert and decorative trim from it;
- determine the location of the handle;
- outline;
- Using a 25 mm feather drill, make several holes through the contour to a depth of 12-13 mm;
- Remove the rest with a chisel; you can entrust the work to a router;
- A plastic liner is placed in the recess and secured with screws;
- a decorative overlay is put in place and should click.
Some installation tricks
In order to accurately maintain the immersion depth of the drill when drilling a groove for the lock, it is necessary to secure an insulating tape to the drill. It will become an indicator that will let you know when to stop.
To accurately mark the position of the tongue on the door frame, the door must be closed. Then forcefully lift the handle lever several times so that the latch leaves a mark on the loot. This way you can find the middle of the hole. You can also use an awl. When the door is closed and the tongue rests against the frame, use an awl to mark the top and bottom edges.
Materials for work
Materials for work:
- – roulette;
- – electric drills;
- – screwdriver;
- – self-tapping screws;
- – chisels;
- – square;
- – hammer;
- – a set of wood drills;
- – pencil;
- – conductor.
The conductor allows you to simplify the process of marking on the door leaf and spend a minimum of time on it. It needs to be attached to the end of the door so that at the end of the work its holes coincide with the lining of the tongue of the screwed handle.