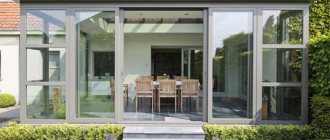
The veranda is most often used for outdoor recreation, but it can also serve as additional living space for temporary, seasonal residence, and sometimes even for permanent residence, if it is insulated and heated.
The possibilities of using the veranda largely depend on whether it is glazed, as well as on what technology and with what materials the glazing was made.
Glazing affects the appearance of the veranda, has a decorative function and at the same time is of considerable practical importance, providing protection from wind, precipitation, temperature changes, dust and debris.
Various materials can be used to glaze a veranda; polycarbonate is a fairly popular option.
Features of polycarbonate as a glazing material
Polycarbonate is a sheet material made from polymers with various additives.
In construction, it is widely used as a translucent glazing material, which has a number of advantages:
- high strength, impact strength, resistance to wind loads - polycarbonate is quite difficult to break, and when broken it does not shatter into fragments with sharp edges;
- the light weight of this material allows you to reduce installation and foundation costs;
- polycarbonate is a fireproof material;
- environmentally friendly, hypoallergenic, safe for human health material that does not emit toxic compounds;
- perfectly withstands frost, heat, and temperature changes;
- in terms of thermal insulation characteristics, a single sheet of polycarbonate is comparable to a double-glazed window, and also provides good sound insulation;
- has high transparency, and can be tinted to reduce light transmission or painted in different colors, which makes it possible to implement a variety of design solutions;
- It is characterized by high plasticity, can bend without heating, which allows you to create curved glazing;
- resistant to chemicals;
- provides optimal transmission of useful rays of the spectrum, a high degree of protection from ultraviolet radiation, and partial delay of infrared radiation;
- polycarbonate, intended for outdoor use, retains all its properties when exposed to sunlight, since it has a coating for ultraviolet protection.
Compared to another translucent material - glass - polycarbonate has such important advantages as light weight combined with high load resistance and strength, and ductility. A polycarbonate veranda attached to a house will be cheaper than using the cheapest glass of the same thickness.
It is not surprising that when choosing a material for glazing a veranda, many choose polycarbonate.
Glazing a veranda with polycarbonate is an opportunity to give your veranda an extremely impressive look at low cost, provide reliable protection from harsh UV radiation, and retain maximum heat in the room.
By the way, aluminum can serve as an alternative to polycarbonate. Read about glazing the veranda with aluminum profiles. Information about frameless glazing of the veranda, glazing with PVC double-glazed windows, and sliding structures will also be useful. All this is in our article.
Photo
Recommended Posts
Do-it-yourself gazebos with barbecues: bad weather is not a hindrance
Do-it-yourself finishing of the veranda inside + photo
Enclosed veranda in a private house + photo
Verandas attached to the house + photo
The best way to paint the floor on the veranda
Glass verandas for the house + photo
Choice: cellular or monolithic
There are many brands of polycarbonate available, each with its own characteristics.
Each manufacturer's product range includes materials of different thicknesses, colors, and translucency.
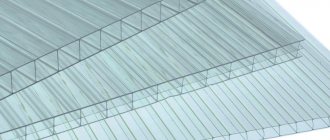
But the most significant difference is between the two types of polycarbonate, monolithic and cellular.
Monolithic polycarbonate:
- has a continuous homogeneous structure without cells;
- in appearance it is practically indistinguishable from glass;
- anti-vandal material, superior to cellular in strength characteristics;
- injury-proof, upon impact, a dent is formed in it, but the fragments do not fly apart;
- requires careful handling during transportation and installation due to susceptibility to scratches (more expensive varieties of monolithic polycarbonate are available with additional protection against scratches);
- costs more than a cell phone.
Areas of application
Both types of polycarbonate panels are used for:
- finishing of doors inside buildings;
- installation of translucent partitions;
- greenhouse and greenhouse structures;
- glazing of balconies and loggias;
- glazing of office, industrial and private buildings;
- production of protective screens near machines;
- glazing of telephone booths, transport stops and other objects in the transport sector;
- production of security service shields, bank counters, ATM visors;
- anti-vandal glazing.
One of the new areas of use of polycarbonate is facade glazing. With its help, you can completely transform any building in the shortest possible time. Thanks to the unique properties of the material and various color solutions, polycarbonate has very actively begun to be used for decorative design of business centers of many large companies.
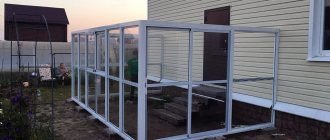
Technique for glazing a veranda with polycarbonate
If you plan to cover the veranda with polycarbonate during the construction stage, you need to install a frame of metal channels, pipes or wooden beams at the base of the foundation, before the solution hardens. If the foundation was poured a long time ago, attaching the frame to it will be more difficult.
- A sheathing of beams with a cross-section of 5-10 mm in increments of 60-80 cm is mounted on the frame.
- Polycarbonate sheets are attached to the sheathing using special transverse panels with self-tapping screws; with self-tapping screws, it is necessary to use thermal washers with rubber gaskets. Check the vertical position of the sheets with a level.
- The gaps are filled with sealant.
- You can make a veranda roof from polycarbonate, pitched, inclined at an angle of 30-40⁰, and for a small veranda - arched, bending the sheets (the maximum permissible bending radius is 6⁰).
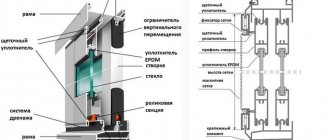
Installation of a sliding structure
In the process of installing a window profile and its glazing, you will need the following materials, tools and working equipment:
- polycarbonate sheets;
- protective perforated tape and end profiles;
- connecting detachable profiles;
- self-tapping screws with thermal washers, roofing screws, screws and anchors;
- insulation, polyurethane foam;
- construction tape, level, marker;
- a circular saw, electric jigsaw or fine-toothed wood saw for cutting material;
- drill with drills of various diameters, hammer drill;
- screwdriver, screwdrivers, pliers;
- saw, mounting knife, sandpaper;
- silicone glue and a gun for applying it.
To install a parallel sliding window system, it is recommended to make a drawing. Having a detailed diagram will help you avoid common mistakes in construction. The drawing is made based on the measurements taken and taking into account the design features of the sliding system.
Don’t forget about the material that will be needed when installing windows.
Now let’s move on to the algorithm for installing polycarbonate sliding windows:
- Clean the work surface from dust and debris. Cut the polymer fabric, taking into account the material’s tendency to thermal expansion.
- Then clean the embedded structure to install the window frame. Treat the surface with special protective agents.
- Using anchors, attach the profile to the frame and install the window frame on it. Using a level, level the structure in horizontal and vertical planes.
- Install the window sill, which is fixed under the bottom of the frame. Attach the window sill with metal anchors.
- Adjust individual elements. Recheck the horizontal and vertical lines. Fill the gaps between the frame of the gazebo and the window frame with foam.
- Treat the ends of the polymer plastic with perforated tape and end profiles.
- Install the split profile base. Install the polycarbonate, secure the sheet with self-tapping screws and thermal washers.
- Close the profile with a protective cover.
Polycarbonate glazing of the gazebo requires minimal maintenance. Timely cleaning of panels from dust, debris and various types of contaminants will significantly extend the service life of the window. The warranty period for polycarbonate glazing of garden gazebo windows is 10–15 years.
Recommendations for glazing the veranda
- If the veranda is made of cellular polycarbonate, then the air channels must be located vertically; the material must also be bent in the direction of the channels, and not across.
- Open sections of cellular polycarbonate must be covered with profiles or special aluminum-based tape, but not with tape.
- At the bottom of the sheets, closer to the frame, you need to make small holes for drainage.
- Polycarbonate has quite significant thermal expansion, so the sheets should not be fastened rigidly; thermal washers with rubber gaskets compensate for the expansion of the material when heated.
- You can use a jigsaw or a circular saw to cut the sheets.
- The protective film is removed from the polycarbonate after all installation work has been completed.
Preparatory stage
If the main factor is weight, price and thermal insulation, the obvious option would be to use cellular (cellular) polycarbonate for glazing the veranda, which is 13 times lighter than ordinary glass of the same thickness. If strength and transparency are important to you, the choice lies with the monolithic option. The monolithic version is more expensive and heavier than its cellular counterpart, but still several times lighter than regular glass.
Preparation of the glazing of the veranda begins with measurements of future windows and the acquisition of the required number of polymer sheets. Next, in accordance with the selected type of window, related parts are purchased: aluminum tape, runners, hinges, self-tapping screws, thermal washers. Then you can start marking and cutting. Polycarbonate at home, depending on the thickness, is cut with a stationery knife, jigsaw or grinder. Do not forget that the cellular polymer is sensitive to orientation in space and should be positioned so that the cells are located along the window opening with the protective anti-ultraviolet coating facing outward.
When installing such windows there are some nuances
Don’t forget that you need to drill 10–15 mm more holes for the thermal washer to compensate for the thermal expansion of polycarbonate panels.
Advantages of polycarbonate
Polycarbonate immediately became a popular material among owners of suburban areas. It is used to make awnings for summer cottages, figured roofing, filling of fences, glazing of gazebos, greenhouses, partitions and much more. Unlike glass, polycarbonate has many unique properties:
- highly decorative: polycarbonate is available in different colors and varying degrees of transparency;
- ease of installation: installation of polycarbonate does not require the use of expensive equipment - a home builder will only need a jigsaw and a screwdriver;
- flexibility: regardless of the thickness of the sheet, the material can be bent, giving it various shapes;
- strength of the material: due to its springy properties, it is not afraid of small mechanical impacts;
- high degree of protection against UV radiation;
- fire resistance: the material does not burn, but melts;
- environmental Safety;
- ease of care;
- durability.
Company offer
The Plastilux-Group company offers polycarbonate for glazing at a competitive price. We produce and sell polymer plastic sheets and additional elements for the construction of various structures.
You can order polycarbonate of any thickness and color. For detailed information about the product, call the number listed on the website, and our managers will answer all your questions. Delivery of materials is carried out throughout the city and region.
Source of the article: https://cheboksary.polikarbonates.com/osteklenie-verandy-polikarbonatom/
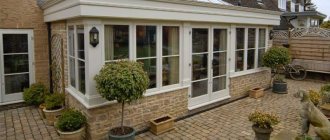
Types of verandas
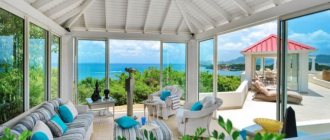
Thanks to the flexibility of the material, verandas and terraces of any shape can be glazed with polycarbonate. If it is planned to create a roof for the veranda from the same material, then it must be pitched at an angle of 30-40 degrees so that snow does not linger on it. You can build a domed or rounded roof. A semicircular glazed veranda will give the house a luxurious, presentable look.
If the veranda will be used only in the summer, it makes sense to install one sash that can be moved horizontally. This will allow the room to be ventilated. Unfortunately, it will be difficult to seal such a structure for the winter. For ventilation, you can install polycarbonate windows on the roof. Modern materials and technologies make it possible to make not only the windows sliding, but also the roof.
Varieties
There is a huge selection of materials on the market, so everyone can choose a specific type for themselves:
- plastic with single glass - simple design and easy installation. Single sliding frames are used. Durable and protects against many external factors;
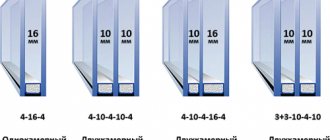
- plastic construction with double-glazed windows;
- sliding windows – create comfort and a pleasant warm atmosphere;
- aluminum structures - installed in a room without heating;
- soft curtains are an excellent design option for getting rid of weather conditions and insects;
- polycarbonate is an inexpensive replacement for glass;
- wooden windows - allow fresh air to pass through and play an important role in thermal insulation;
- Products without frames can only be manufactured and installed by professionals. But the result will definitely amaze you.
All options have their advantages and disadvantages. When choosing, you need to rely only on personal preferences.
How to choose polycarbonate for veranda glazing
First you need to decide what you want to make from polycarbonate. Glazing of terraces can be done with materials varying in color, thickness and structure. If you glaze the veranda with polycarbonate under the finished roof, you will need one type of plastic. If you plan to make a roof for the veranda out of polycarbonate, you will need a different one. The ideal solution would be to use polycarbonate for the roof and polycarbonate glazing with a thickness of 8 mm, however, if the residents of the house are bothered by noise from a nearby highway, you can use a 10 mm sheet for vertical glazing, which has high noise-proofing properties. If you only need protection from wind and rain during the warm period, then a 4 mm thick sheet for walls will be sufficient.
It is also necessary to take into account one more property of polycarbonate. Despite the fact that any type of polycarbonate - both cellular and monolithic - has good light transmittance, it is difficult to distinguish the facial features of a suitable person through glazing with cellular plastic, while monolithic has transparency at the level of ordinary glass. However, cellular is easier to install, forgives some installation mistakes and costs less. While a monolithic one will have to be installed more carefully due to its rigidity, and its price is much more expensive.
Work plan
In both cases, polycarbonate sliding windows for the gazebo are installed in the following sequence:
- The intended location of the window is pre-planned and the number of sashes is determined.
- To install the structure, you will need a frame (or a frame, like a door). It is made from ready-made sets of aluminum profiles made in the factory, or wood, plastic, metal-plastic and various combinations of these materials are used.
- Having the dimensions of the box, we begin to work with the sashes. A polycarbonate sheet of the required dimensions is placed in an aluminum, wooden, plastic or metal-plastic frame. Instead, edging fragments can also be made only at the top and bottom.
- Special fittings for sliding windows made of polycarbonate are selected - roller, locking, locking, pressing elements.
- They assemble and install the window structure. If necessary, install a window sill and ebb.
Assembly of frames and sashes
When wondering how to make sliding frames from polycarbonate, a related question often arises about where to get the components for making frames for the sashes. produces a wide range of components designed specifically for polycarbonate sheets of any type.
These include connecting (HP, HCP, GCP) and end profiles, hardware, sealing and perforated tape for cellular polycarbonate, metal and heat-resistant washers made of polycarbonate. Components are selected for specific brands of sheets based on thickness, type, and color. Full size compatibility guaranteed.
Frame installation procedure
Do-it-yourself sliding polycarbonate windows are installed according to the following scheme. The frame is inserted into the prepared opening and leveled relative to the horizon vertically and horizontally using a plumb line or spirit level. For long structures, it is convenient to use wedges, through which the frame is wedged and firmly fixed in a given position until finally secured.
If windows on a polycarbonate terrace are used for partial glazing, the frame is attached to the fence and ceiling using self-tapping screws or anchor plates. When the opening is completely filled, the structure is more bulky, monolithic and fixed to the floor and ceiling. Fasteners are selected depending on the type of base. For concrete ones, anchors and anchor plates are used, for wooden ones, rather large self-tapping screws are used.
Installation and adjustment of sashes
The cracks and gaps between the base of the opening and the outside of the box are filled with polyurethane foam. Sashes are inserted into sliding windows for polycarbonate verandas. Their horizontal movement is ensured by guides and rollers. The first ones are fixed on the frame, the second ones are installed on the sash frame.
The window can be locked using a special locking mechanism. Finally, for normal rebate and opening, the position of the valves is adjusted using bolts on the roller mechanisms. Cheaper glazing options do not involve any mechanisms at all. The sashes are simply inserted into the grooves of the guides and, due to their low weight, easily slide along them.
Video on installing a polycarbonate window:
Glazing with monolithic polycarbonate
Withstands heavy weight loads - excellent for glazing roofs and canopies, since in our region snow accumulates on roofs during the cold season. In especially snowy winters, the weight of a snowdrift on the roof can reach 800 kg!
Completely transparent sheets perfectly transmit sunlight (even with color tinting) and look aesthetically pleasing.
Foundation
Before glazing, it is necessary to pour a strip foundation or use concrete blocks for this purpose. If you plan to glaze the veranda yourself during construction, and the house is being built on stilts, it makes sense to immediately install several stilts under the glazing.
To create a strip foundation, a trench 40-50 cm deep and 25-30 cm wide is dug around the perimeter of the veranda. A sand and gravel layer is poured into the bottom of the trench to compensate for the forces of frost heaving. The formwork is placed in the trench, the reinforcement cage is laid and everything is filled with concrete.
A columnar foundation is made even simpler when the supports for the frame are poured in the form of several concrete columns. When pouring the foundation, do not forget to install the anchor bolts correctly to attach the bottom trim.
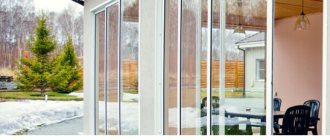
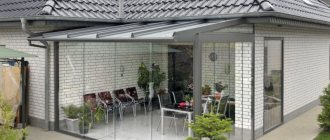
Glazing of the veranda with polycarbonate
Polycarbonate glazing of the veranda can be of any shape due to the flexibility of the material. The light weight of cellular polycarbonate allows you to glaze even a fragile wooden veranda in an old house.
If you plan to keep flowers on the veranda, we recommend choosing transparent monolithic polycarbonate - it transmits sunlight best.
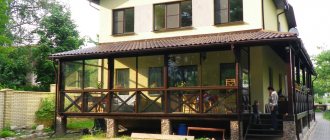
Pay attention to photo number 3 - this particular roof angle (approximately 22-25°) is optimal: in winter, snow will slide down the slope rather than accumulate. This will reduce the load on the material and the glazing will last longer. If the slope of the roof is made greater, then the snow will accumulate and a snowdrift will form - this can lead to the destruction of the roof, especially if it is made of cellular polycarbonate.
For roof glazing, our experts strongly recommend choosing monolithic polycarbonate because of its high strength - you should not skimp on the roof. If you don’t want to spend a lot, then choose cellular polycarbonate for the walls, and monolithic only for the roof.
Metal-plastic windows
Metal-plastic products are suitable for heated verandas. They are distinguished by excellent sound insulation properties, durability, and attractive appearance. Such windows are recommended for cold regions with harsh winters. Among the disadvantages is the significant weight of the structure; metal-plastic should not be used for light wooden buildings.
It is better to entrust the installation of metal-plastic windows to specialists. If this is not possible, you need to carefully measure the window openings, order profiles of the appropriate size, and then install them yourself.
Sliding structures go well with panoramic glazing. If desired, you can mount a combined tilt-and-slide system from metal-plastic profiles. Such windows not only slide to the side, but also tilt towards themselves. This function is used for micro-ventilation; the movement of the door can be controlled using the handle.
Frame making
Before erecting the frame, it is imperative to lay a layer of waterproofing on the foundation. The lower frame is laid on it and secured with anchors to the concrete foundation or to an installed support. The frame can be made from metal corners or profiled pipes, wooden beams, etc.
A wooden frame is one of the easiest to install. All wooden frame elements must be treated with an antiseptic or water-based primer before installation. The lower frame is made of timber 10x10 cm or 12x12 cm. Vertical beams are attached to it in the corners of the terrace. The top trim is mounted on top of the racks and, if necessary, rafters are laid. The frame parts are connected by corners.